How to prevent motion sickness when playing Valheim on Xbox Series X and S

When playing Valheim on your Xbox Series X or Xbox Series S, you may start to feel a little nauseous. To see how you can prevent yourself from getting motion sickness when playing this open-world survival game, you can check out this article from Seeking Tech.

1. To start off, you need to head over to the Settings menu in Valheim, which you can do from either the title screen or pause screen.

2. After getting to Settings, use the LB and RB buttons on the controllers to navigate over to the Graphics tab.

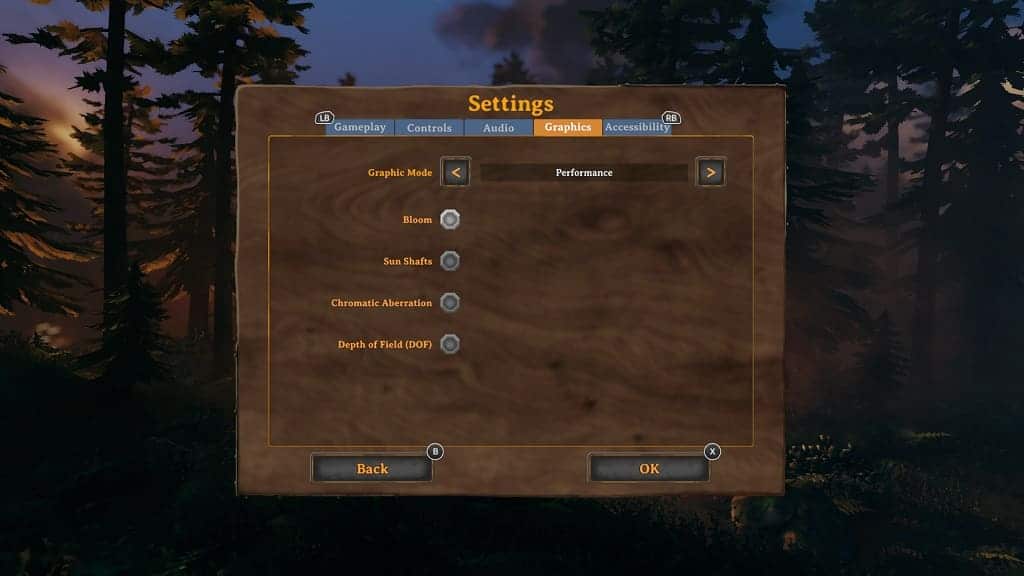
3. In the Graphics tabs, we recommend that you change Graphics Mode to Performance if you haven’t done so already.

By doing so, the game will target a 60 frames per second frame rate, which should make the action appear smoother.

4. From the same Graphics tab of the Settings menu, we recommend that you disable the Bloom and Sun Shafts settings.

These additional lighting features make it harder to see during the daytime in Valheim, which may end up triggering your motion sickness.

5. Furthermore, we suggest that you turn off the Chromatic and Depth of Field settings from the same Graphics menu. These will add blur to objects, which will make the game look blurrier than it already is.
6. Once you are done making changes in the Graphics tab, you should then navigate over to the Accessibility tab.

7. Once you get there, we suggest that you disable Motion Blur and Camera Shake.

As we mentioned above, the blur will make it harder to see in Valheim. To learn more about how you can make this game appear sharper, you can check out these steps.

The Camera Shake feature may also trigger your nausea due to the constant movement.
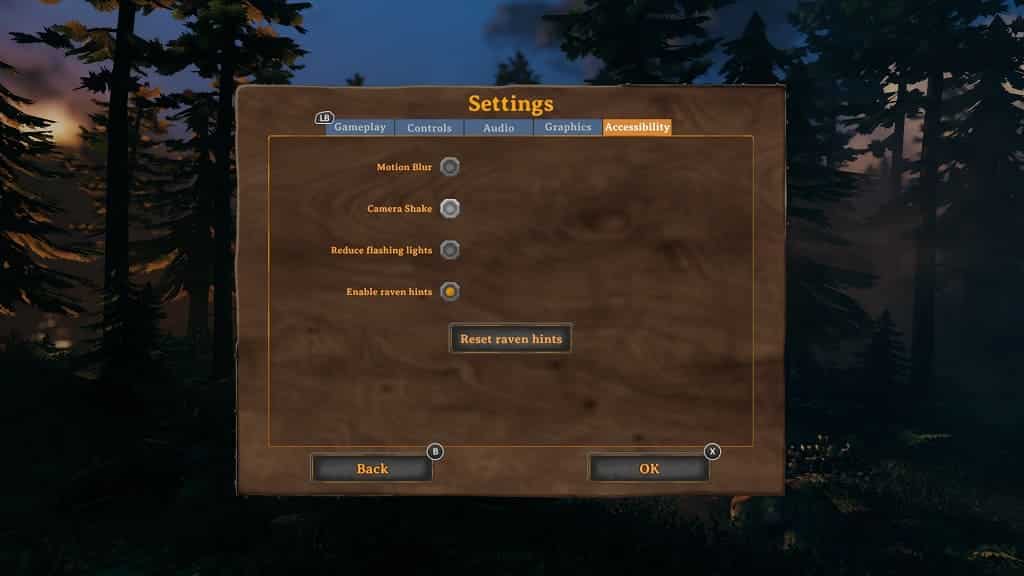
8. From the same Accessibility tab, you may also want to enable the Reduce Flashing Lights setting if you find that the flashing light effects are making you feel uncomfortable.

9. Once you are done making the aforementioned changes, press the X button on your Xbox controller to save your customized settings and then return to the game.

How to disable the damage indicator in Resident Evil 4 Remake

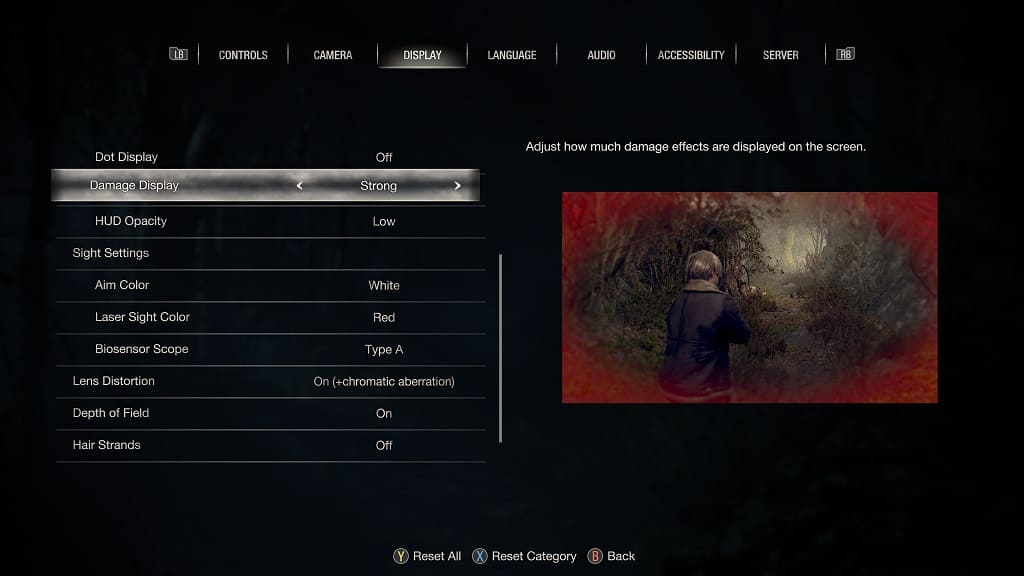
When you get hit, or your character is low on health, then the borders of the screen will flash red in the Resident Evil 4 Remake. This damage indicator can be very distracting, especially if you are in the middle of an intense encounter.

To see how you can disable this effect, you can take a look at this guide from Seeking Tech.

1. While playing Resident Evil 4 Remake, you need to open the Options menu, which you can do on either the main menu or pause screen.

2. From the Options menu, you need to navigate over to the Display tab.

You can change tabs by pressing the L1 and R1 buttons on the DualShock 4 or DualSense if you are using those game pads. If you are using an Xbox controller instead, then you need to use the LB and RB buttons.

3. Once you are in the Display tab on the Options menu, scroll down and then move the cursor over to Damage Display. This setting should have the following description:

  • “Adjust how much damage effects are displayed on the screen.”

4. You can use the left directional pad button, right directional pad button, move the left analog stick to the left direction or move the left analog stick to the right direction in order to change the Damage Display setting to “Off” to fully disable the effect.

If you want to keep the damage indicator enabled but make it less distracting, then you can change the Damage Display setting to “Weak” instead.

5. Once you are done changing the damage indicator setting, you can save and apply it by simply backing out of the Options menu.

You can do so by pressing the circle button on the PlayStation controller or B button on the Xbox controller. The game will then save any changes you make automatically.

How to disable and enable Ray Tracing in Resident Evil 4 Remake on PS5 and Xbox Series X

The PlayStation 5 and Xbox Series X versions of the Resident Evil 4 Remake feature ray tracing as you will see more realistic reflections. With that said, the frame rate won’t be as stable due to the increased performance cost.

To see how you can enable or disable this feature, you can take a look at this tutorial from Seeking Tech.

1. It is important to note that Ray Tracing can’t be enabled or disabled from the Options menu if you open it from the pause screen. Instead, you need to exit your current game and then go back to the main menu.

So, if you are currently playing RE4 Remake at this moment, then you need to bring up the pause screen, which you can do by pressing the Options menu on the DualSense or the Menu button on the Xbox controller.

From the Options menu select Quit Game and then Yes when a notification pops up asking if you want to continue as you will lose any unsaved progress.

2. Once you get to the main menu, you need to select Options.

3. From the Options menu, you need to change tabs until you get to Display.

To change tabs on the DualSesne, you need to use the L1 and R1 buttons. To do the same on the Xbox controller, you need to use the LB and RB buttons.

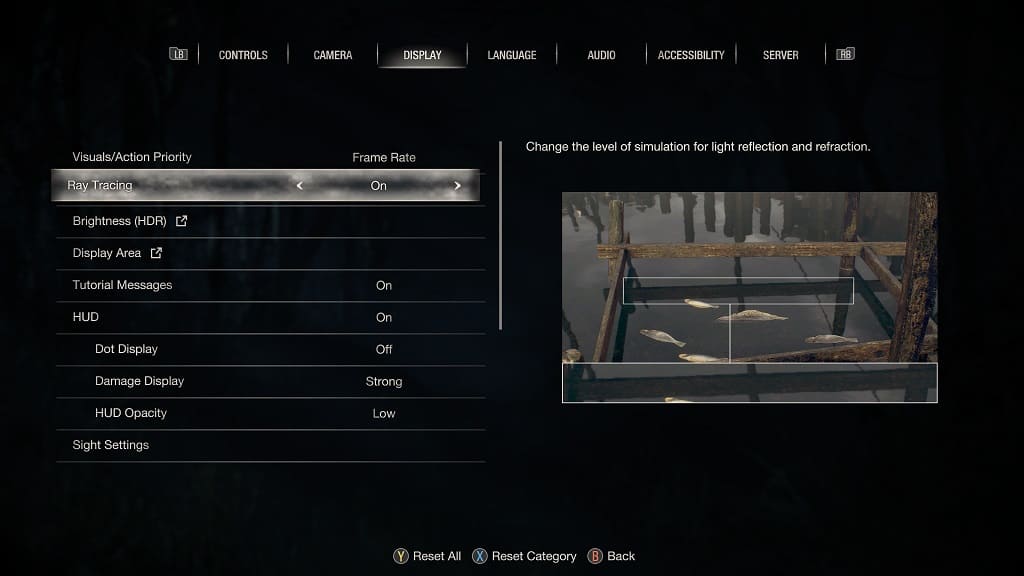
4. In the Display tab, move the cursor to Ray Tracing.

If you set the Visuals/Action Priority setting to “Resolution,” then Ray Tracing is set to “On” by default. If you set the Visuals/Action Priority setting to “Frame Rate,” then Ray Tracing is set to “Off” by default.

5. To change the Ray Tracing setting, you can use the left directional pad button, right directional pad button, tilt the left analog stick to the left side or tilt the left analog stick to the right side.

6. Once you are done enabling or disabling Ray Tracing, you need to press the circle button on the DualSense or B button on Xbox in order to back out of the Options menu.

Any changes you make before backing out will be saved and applied in RE4.

7. Once you get back to the main menu, load back into your save file and you should see the effects of turning on or off the Ray Tracing feature.

How to disable auto reload in Resident Evil 4 Remake

Auto reload is enabled by default in the Resident Evil 4 Remake. As a result, the character will automatically reload when you fire a shot with an empty clip as long as you still have more ammo in your inventory.

If you find that the auto reload is causing you to make mistakes and/or breaking your immersion, then you can disable it from the in-game menu. To find out how you can do so, you can follow the steps laid out in this Seeking Tech tutorial.

1. To start off, you need to head into the Options menu in the game.

In order to get there, you need to select “Options” from either the title screen or pause screen. To open the pause screen you can press the Options button if you are using a PlayStation controller or the Menu button if you are using an Xbox controller.

2. Inside the Options menu, you should already be in the Controls tab.

If you are in another tab at this moment, then you can press the L1/R1 or LB/RB buttons to change tabs.

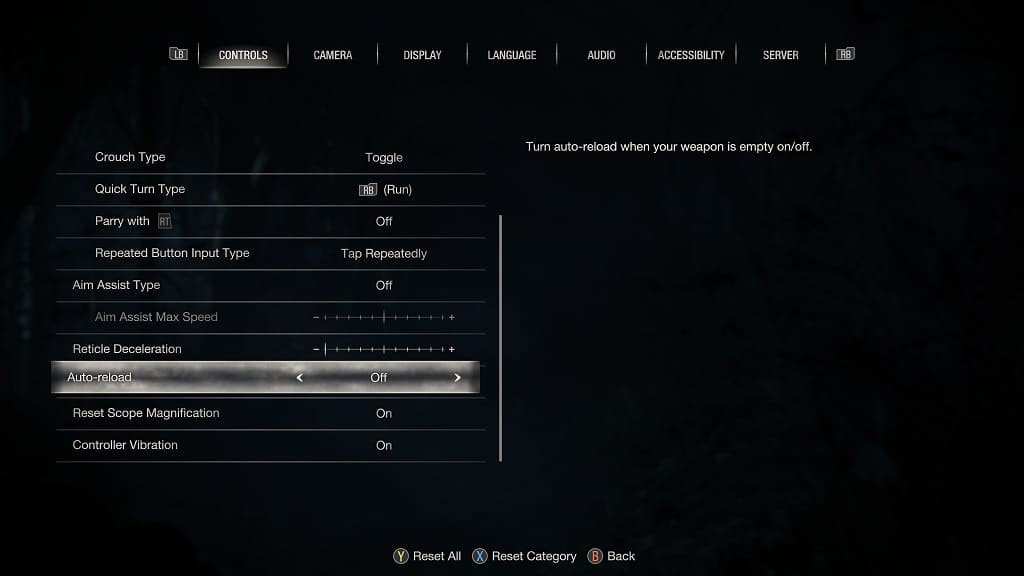
3. On the Controls tab, scroll down and then move the cursor to Auto-Reload, which should have the following description:

  • “Turn auto-reload when your weapon is empty on/off.”

4. By default, the Auto Reload setting is set to “On.”

With the cursor on the setting, you can use the directional pad or left analog stick to set it to “Off.”

5. Once you are done, press the circle button if you are using a PlayStation gamepad or the B button if you are using an Xbox gamepad.

The new setting should automatically be saved and applied.

The next time you try to shoot a weapon on an empty clip, the character won’t reload. Instead, you have to manually press the reload button, which is square if you are using a PlayStation controller or B if you are using an Xbox controller.

How to invert camera and aiming controls in Resident Evil 4 Remake

The Resident evil 4 Remake uses normal directional controls when it comes to using the right analog stick to look around as well as when you are aiming a weapon. As a result, if you move the right analog stick upwards, then the camera will also pan upwards.

If you would like to invert the camera and aiming controls in this game, then you can check out this guide at Seeking Tech to see how you can properly do so.

1. To start this process off, you need to head over to the Options menu from either the main menu or pause menu.

2. From the Options menu, you need to head over to the Camera tab.

You can change tabs by using the L1 and R1 buttons if you are playing the RE4 Remake on your PlayStation 4, PlayStation 4 Pro, PlayStation 5 or PlayStation 5 Digital Editon console.

If you are playing the game on your Xbox Series X or Xbox Series S, then you need to use the LB or RB buttons instead to change tabs.

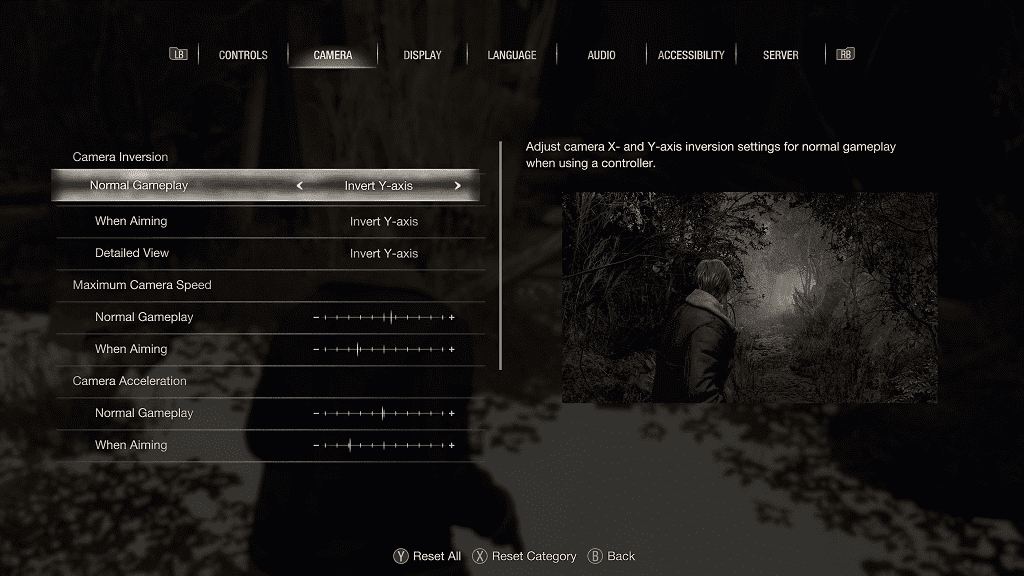
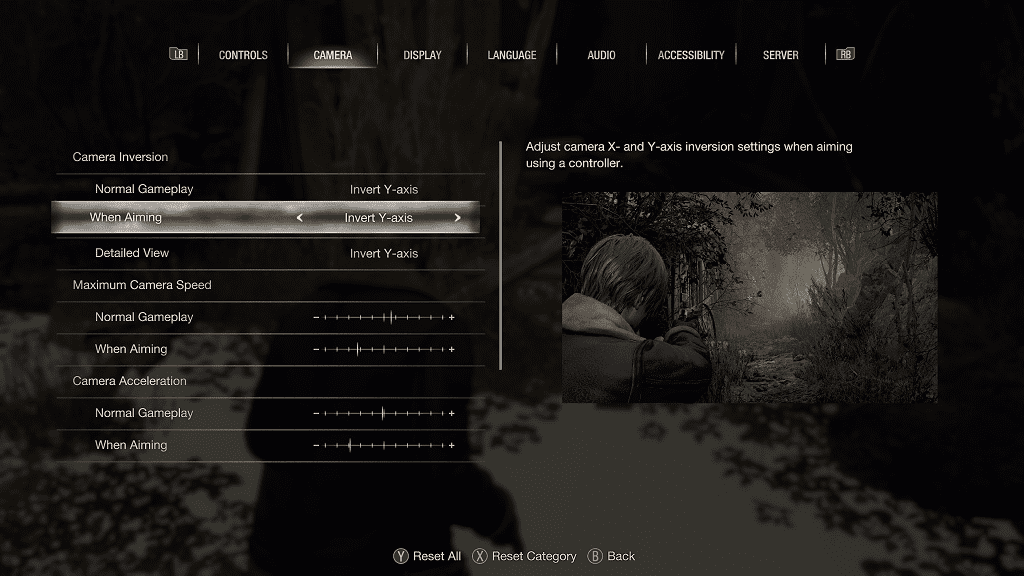
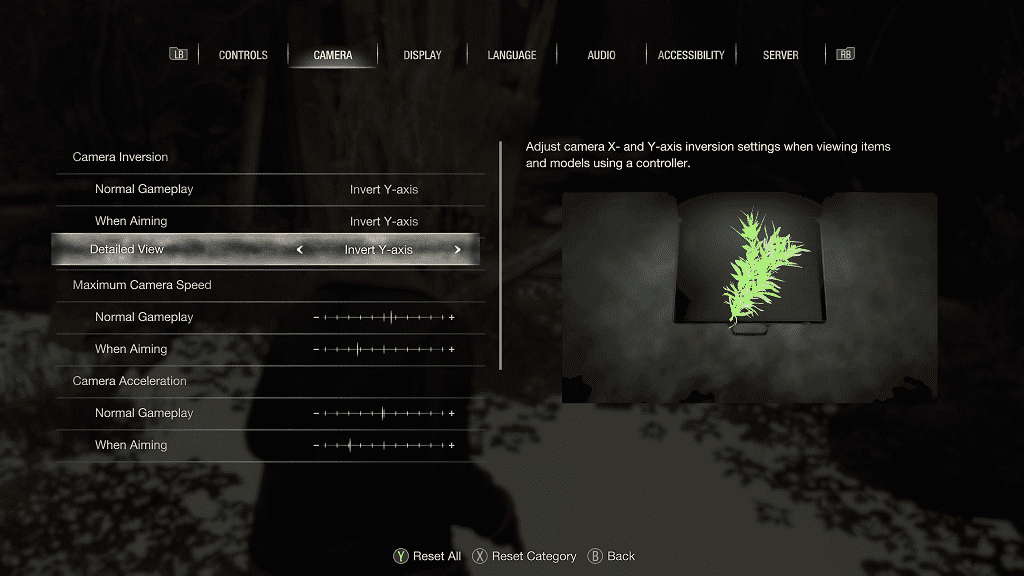
3. From the Camera tab, you should see the Camera Inversion section located at the top. You can find the different settings that you can change, as well as the descriptions, below:

Normal Gameplay: “Adjust camera X- and Y-axis inversion settings for normal gameplay when using a controller.”

When Aiming: “Adjust camera X- and Y-axis inversion settings when aiming using a controller.”

Detailed View: “Adjust camera X- and Y-axis inversion settings when viewing items and models using a controller.”

You can change these three settings to None, Invert Y-Axis, Invert X-Axis, Invert X- and Y-Axis.

None is the default option as it features no inversion whatsoever.

The Invert Y-Axis will let you invert the controls so that pushing the right analog stick upwards will move the camera downwards and vice versa.

The Inver X-Axis option will make it so that moving the right analog stick to the left side will move the camera to the right side and vice versa.

You can change these settings by using the left or right directional pad buttons as well as the left analog stick.

4. Once you are done making changes to the camera inversion for the Normal Gameplay, When Aiming and/or Detailed View settings, you need to back out of the Options menu to save and apply the edits.

5. When you go back to playing the Resident Evil 4 Remake, the camera and/or aiming controls should now be inverted.

How to change quick turn button in Resident Evil 4 Remake

The Resident Evil 4 Remake features a quick turn action so that you can quickly rotate the camera 180 degrees. This is helpful if you need to quickly run in the opposite direction and/or notice that an enemy is coming up from behind.

If you would like to change the corresponding quick turn button, then you can take a look at this tutorial to see how you can properly do so.

1. To start off, you need to go to the Options menu.

In order to do so, you can select “Options” from the title screen or pause menu.

2. After opening the Options menu, you should immediately be put in the Controls tab.

If you are on another tab, then you can switch tabs by tapping the L1 and R1 buttons if you are using a DualShock 4 or DualSense. If you are using an Xbox controller to control the game, then you need to tap the LB or RB button.

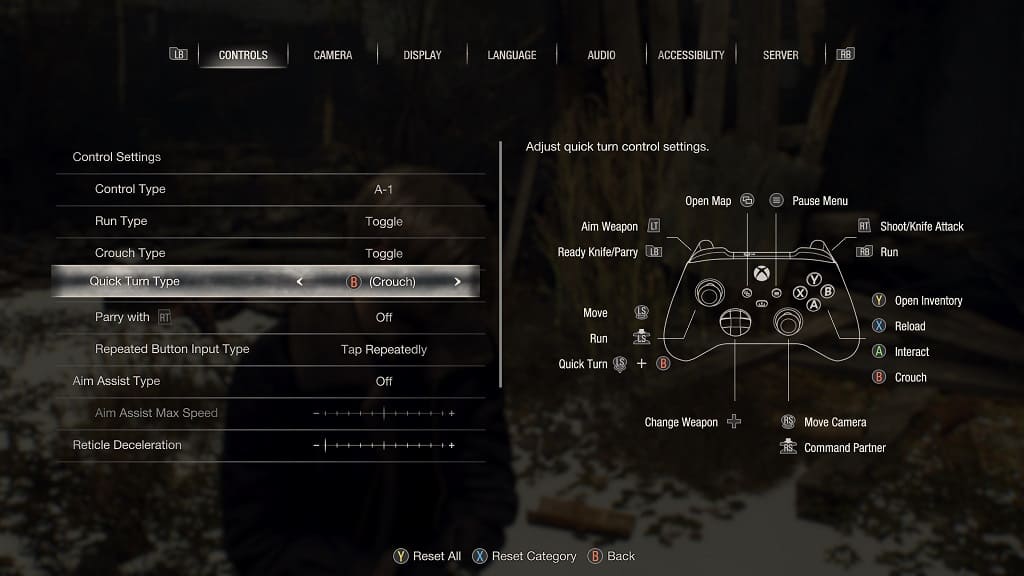
3. From the Controls tab, scroll down to Quick Turn Type.

4. By default, the Quick Turn Type is set to the R1 on PlayStation or the RB button on Xbox.

By moving the left analog stick downwards and then pressing the R1 or RB button at the same time, then you are able to do a quick 180 degree turn in the opposite direction.

5. If you want to change the corresponding button being used to perform a quick turn, then you can change the Quick Turn Type setting by using the left directional pad button, right directional pad button, moving the left analog stick to the left side or moving the left analog stick to the right side.

In addition to R1/RB, you can change the corresponding quick turn button to Circle/B or L3/pressing down on the Xbox’s left analog stick.

We suggest that you avoid using the L3/pressing down on the Xbox’s left analog stick option as it is not as reliable as using a face or shoulder option.

If you would like, you can also disable the quick turn feature altogether.

6. Once you are finished with making the change to the Quick Turn Type setting, you can save and apply your edit by backing out of the Options menu. You can do so by pressing the Circle or B button.

How to use photo mode in Resident Evil 4 Remake

The Resident Evil 4 Remake added a photo mode. To see how you can use this new feature, you can take a look at this tutorial from Seeking Tech.

1. For the first step, you need to pause the game anytime you want to take a picture of what is being shown on the screen.

To pause the game, you need to press the Options button on your DualShock 4 or DualSense controller if you are playing on a PlayStation 4, PlayStation 4 Pro, PlayStation 5 or PlayStation 5 Digital Edition console. For the Xbox controller, you need to press the Menu button.

2. In the pause screen, you then need to press the square button on your PlayStation controller or X button on your Xbox gamepad.

3. You should now be in the photo mode of Resident Evil 4 Remake.

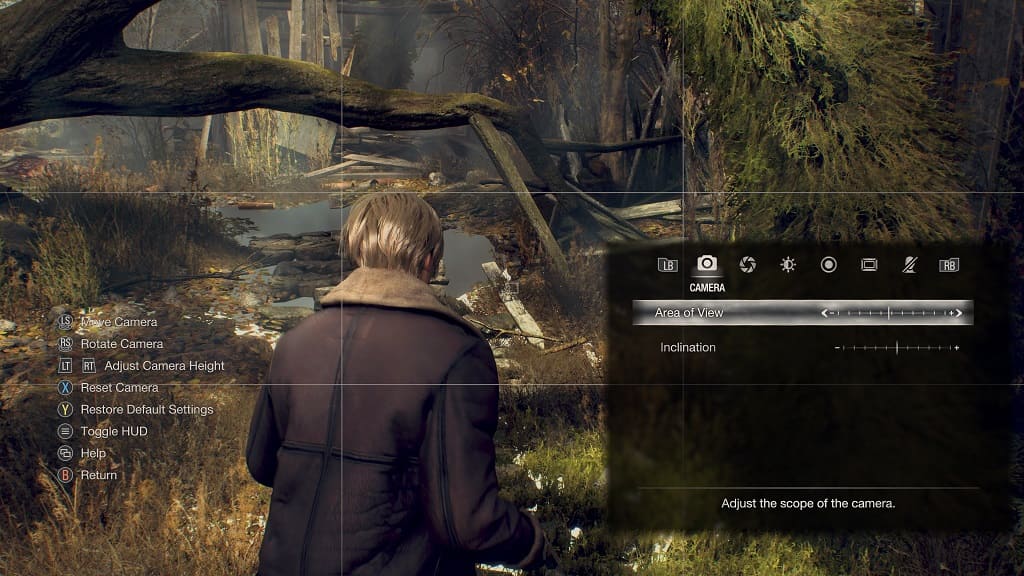
Here, you can use the left analog stick to move the camera and the right analog stick to rotate the camera. You can adjust the camera’s height by using the L2/R2 triggers on PlayStation or LT/RT triggers on Xbox.

4. On the bottom right side of the screen, you should find the customization options menu, which you can navigate by using the directional pad as well as the L1/R1 or LB/RB buttons.

You will be able to adjust the following:

Camera Section:

  • Area of View slider
  • Inclination slider

Focus Section:

  • Blur (On or Off)
  • Focusing Distance slider
  • Depth of Field slider
  • Blur (Short Range) slider
  • Blur (Long Range) slider
  • Blur (Overall) slider

Effects #1 Section:

  • Brightness slider
  • Contrast slider
  • Vignette (On or Off)
  • Vignette Coverage Slider
  • Bloom (On or Off)
  • Bloom Strength Slider

Effects #2 Section:

  • Filters (Orange, Blue Yellow, Vintage, Sepia, Black & White, Pastel, Dark or None)
  • Lens Distortion (On or Off)
  • Lens Distortion Strength slider
  • Chromatic Aberration (On or Off)
  • Chromatic Aberration slider

Frames & Logo Section:

  • Frame Type (Square, Rectangle, 4:3, Letterbox or None)
  • Game Logo (Top Left, Top Middle, Top Right, Middle Left, Middle Right, Bottom Left, Bottom Center, Bottom Right or None)
  • Copyright (Bottom Left, Bottom Center, Bottom Right or None)

Other Section:

  • Subtitle Display (On or Off)
  • Main Character Display (On or Off)
  • Enemy Display (On or Off)
  • NPC Display (On or Off)
  • Fauna Display (On or Off)
  • Grid (On or Off)

5. Once you are ready to take the picture, press the Options button on the PlayStation controller or the Menu button on the Xbox controller to make the heads-up display invisible.

6. To take the screenshot, you need to press the Share button on the DualShock 4, Create button on DualSense or Share button on Xbox. The screen will be saved on your console’s local storage.

7. Once you are done taking the screenshot, you can exit the photo mode by pressing the circle button on PlayStation or B button on Xbox to go back to the pause screen.

How to change the parry button in Resident Evil 4 Remake

By default, you need to press the L1 button if you are using a DualSense or DualShock 4 in order to perform a parry in the Resident Evil 4 Remake. If you are using an Xbox controller, then you need to press the LB button.

If you would rather change the parry action to another button on the gamepad, then you can take a look at this guide at Seeking Tech to see how you can do so.

1. Make sure you open RE4 Remake if you haven’t done so already on your PC, PS4, PS5, PS5 Digital Edition, Xbox Series S or Xbox Series S system.

2. Afterwards, you need to open the Options menu from within RE4. In order to do so, you can either select “Options” from the main menu before you load into the game or from the pause screen if you are currently playing it.

3. When you open the Options menu, you should be in the Controls tab.

If you are on another tab currently, then you can use the L1 and R1 buttons on the PlayStation controller or the LB and RB buttons on the Xbox controller to change tabs.

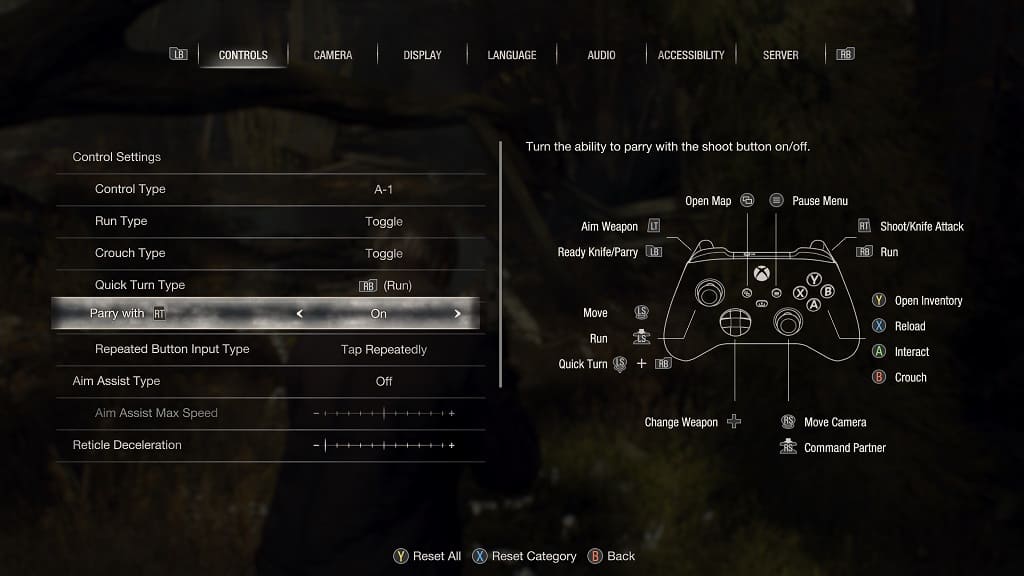
4. Once you get to the Controls tab, you need to scroll down to Parry with R2 if you are playing on PlayStation or Parry with RT if you are playing on Xbox.

5. You can then change the Parry with R2 or Parry with RT setting to “On” by using the left directional pad, right directional pad, moving the left analog stick to the left or moving the left analog stick to the right.

6. Once you change the parry button, you need to back out of the Options menu to save and apply the change.

7. In order to parry in Resident Evil 4 Remake, you now need to use the R2 button if you are using the DualSense or DualShock 4 controller. If you are using an Xbox controller, then you need to use the RT button.

How to disable button smashing in Resident Evil 4 Remake

In some instances, such as being grabbed by an enemy, you may be forced to do a quick time event where you need to quickly press a button in the Resident Evil 4 Remake. If you find that completing this QTE is too hard and/or annoying, then you can check out this guide at Seeking Tech to see how you can disable the button smashing sequence.

1. If you haven’t done so already, make sure you launch Resident Evil 4 Remake on your PC, PlayStation 4, PlayStation 5, PlayStation 5 Digital Edition, Xbox Series S or Xbox Series X.

2. With this game opened, your next step is to navigate over to the Options menu.

In order to do so, you can select Options from either the main menu before you load into the game or straight from the pause screen.

For the uninformed, you can pause the new versions of RE4 by pressing the Options button if you are using a DualShock 4 or DualSense. For the Xbox controller, you need to press the Menu button.

3. From the Options screen, make sure you are in the Controls section.

If you aren’t then you can use the R1 and L1 or RB or LB buttons to switch sections until you get there.

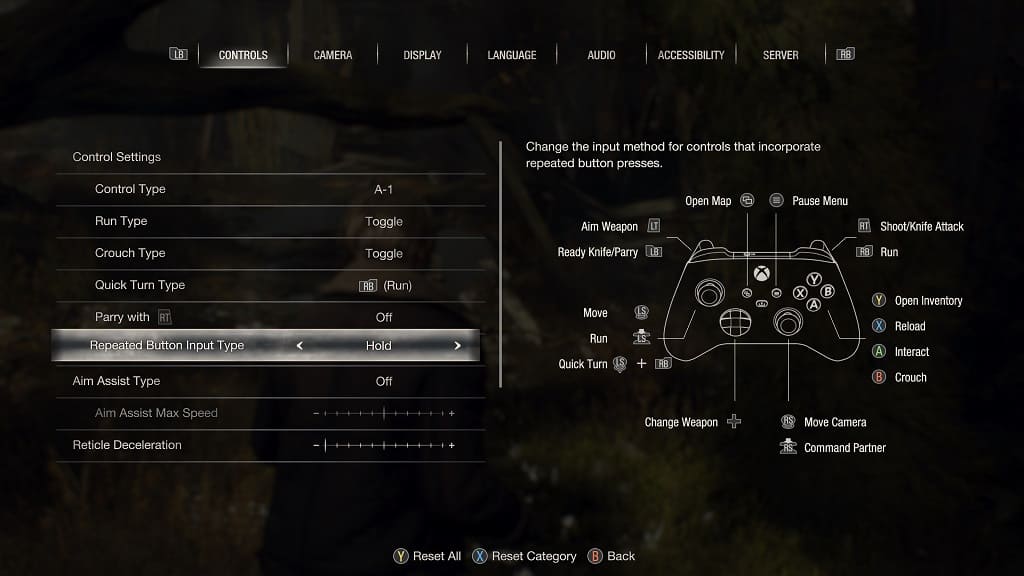
4. From the Controls section in the Options menu, move the cursor down to Repeated Button Input Type, which should have the following description:

  • “Change the input method for controls that incorporate repeated button presses.”

5. With the Repeated Button Input Type setting highlighted, you can use the directional pad or left analog to change it from Tap Repeatedly to Hold.

6. To save and apply the change you just made, you need to back out of the Options menu, which you can do by pressing the circle or B button on the controller.

7. The next time you run into a sequence that previously required you to quickly smash a button repeatedly, you now only need to press and hold the same button in order to complete the QTE.

How to change run and crouch to hold instead of toggle in Resident Evil 4 Remake

By default, the run and crouch buttons in the Resident Evil 4 Remake are set to toggle. So, if you press the run button and continue moving the left analog stick, then the character will continue to run. If you press the crouch button, then the character will remain in the crouch position unless you press the same button again.

If you are using the default A-1 control type, then you can use L3 or R1 to run as well as using the circle button to crouch if you are using a PlayStation controller. On the Xbox controller, you can either press down on the left analog stick or RB button to run as well as using the B button to crouch.

To see how you can change these buttons to hold instead of toggle to accomplish the same actions, you can take a look at this tutorial from Seeking Tech.

1. To begin, you need to head to the Options menu in the Resident Evil 4 Remake, which you can do from the main or pause menus.

2. One you opened the Options menu, make sure you are in the Controls tab.

Keep in mind that you can change tabs by using the L1 and R1 buttons on PlayStation or LB and RB buttons on Xbox.

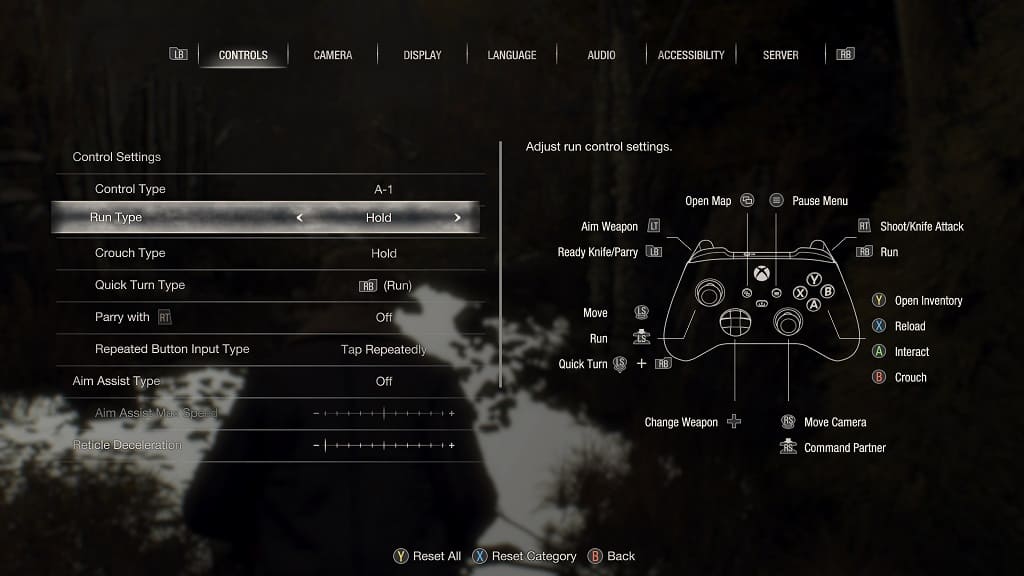
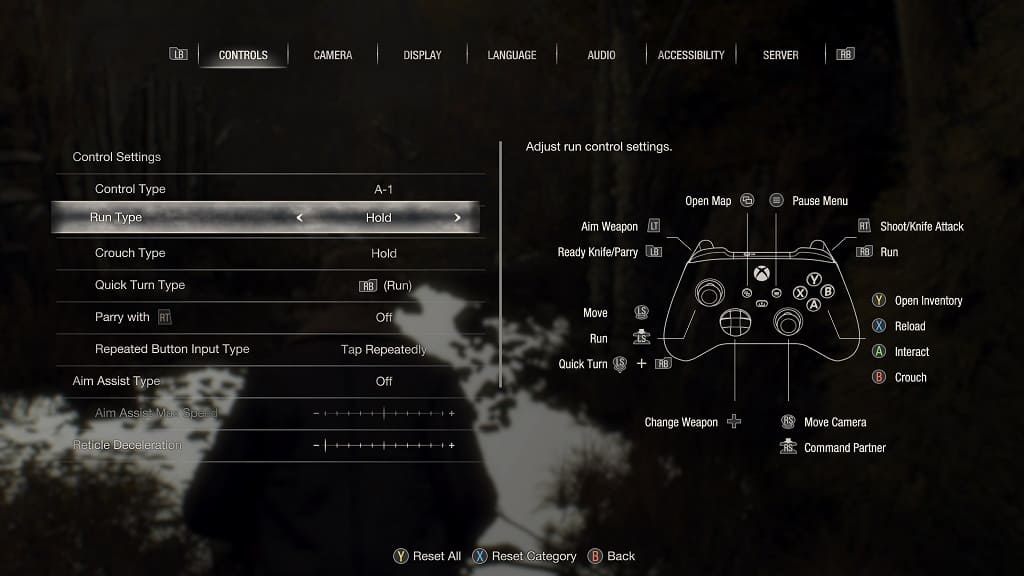
3. From the Controls tab, you should see Run Type under the Control Settings section. It should have the following description:

  • “Adjust run control settings.”

You can use the left directional pad button, right directional pad button, tilt the left analog stick to the left or tilt the right analog stick to the right in order to change the Run Type settings from Toggle to Hold.

4. In the Control Settings section, you should also find Crouch Type with the following description:

  • “Adjust crouch control settings.”

You can use the left directional pad button, right directional pad button, move the left analog stick to the left or move the right analog stick to the right in order to change the Crouch Type settings from Toggle to Hold.

5. To save and apply the changes you made to the run and/or crouch button, you need to back out of the Options menu.

6. If you change Run Type to Hold, then you now need to press down on the run button in order to keep running. To stop running, you need to let go of the same button.

If you change the Crouch Type to hold, then you now need to press down on the crouch button to keep crouching. If you want to stop crouching, then you need to let go of the same button.