How to turn off the controller speaker in God of War Ragnarök 

When playing God of War Ragnarök on your PlayStation 4, PlayStation 4 Pro, PlayStation 5 or PlayStation 5 Digital Edition console, you may hear sound coming out of the controller’s speakers. You may find this to be too distracting and/or causing the battery life of your DualShock 4 or DualSense to drain faster than normal. 

If you want to turn off the controller sound in God of War Ragnarök, then you can check out this tutorial at Seeking Tech to see how you can properly do so. 

1. For the first step, turn on your game console and then boot up the game if you haven’t done so already. 

2. Next, you need to head over to the Settings menu. In order to do so from the start screen, you can simply select Settings from the list of available options. 

If you are currently inside of the actual game, then you need to press the Options button in order to pause the action and then bring up the Options menu. From there, you should be able to select Settings. 

3. From the Settings menu, you need to head over to Audio & Subtitles. 

4. After getting to the Audio & Subtitles screen, you should find the Controller Speaker Volume slider located in the Volume section at the top. 
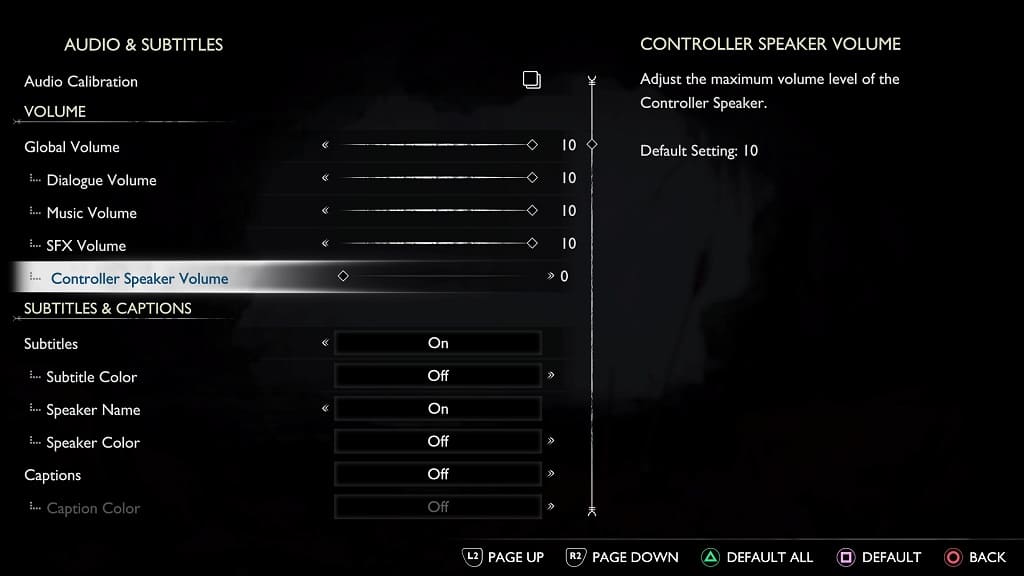
5. By default, the Controller Speaker Volume slider is set to a value of 10, which is the loudest for the built-in speaker of the DualShock 4 or DualSense.

In order to decrease the volume, you need to move the slider to the left. 

If you want to mute the controller sound altogether, you need to move this slider all the way to the left until you hit 0.

How to change audio language in God of War Ragnarök on PS5

God of War Ragnarök support multiple languages when it comes to spoken dialogue. Changing the audio language can be somewhat confusing, however. To find out how to do so on the PlayStation 5 and PlayStation 5 Digital Edition consoles, you can follow the steps laid out in this tutorial at Seeking Tech. 

Before we start, it should be noted that this guide is based on the digital version of the game that was bought from the U.S. PlayStation Store. 

1. If you are play God of War Ragnarök currently, then you need to close it.  

In order to do so, press and hold the PS button on the DualSense controller to open the home menu. From there, you need to move the cursor to the God of War Ragnarök icon and then press the Options button on the controller. 

In the pop-up window, you then need to select the Close Game option. 

2. Once the game has closed, move the cursor over to the God of War Ragnarök icon and then press the Options button on your DualSense again.  

3. In the pop-up menu, you then need to select Manage Game Content. 

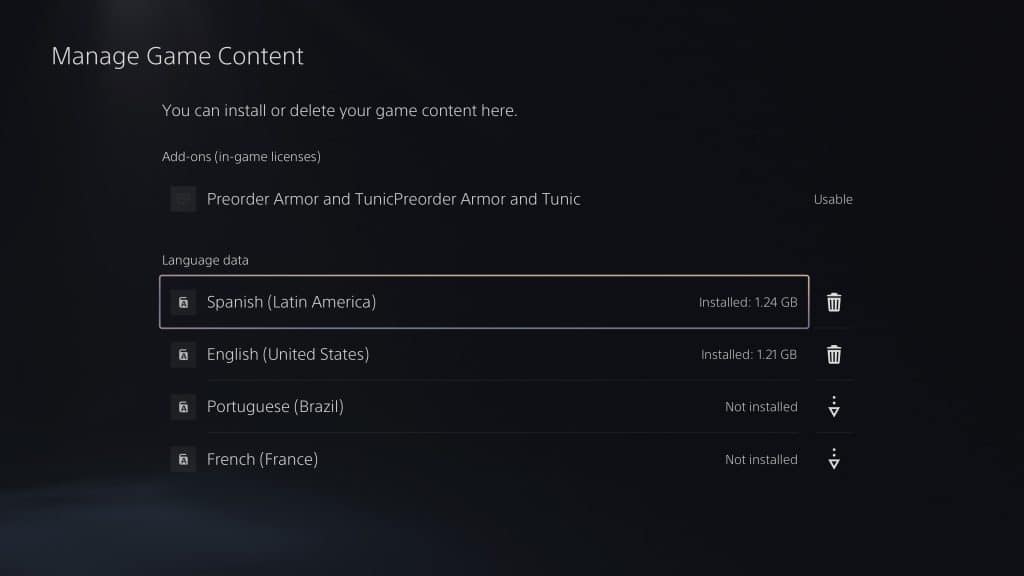
4. From the Manage Game Content for God of War Ragnarök, you should see the Language Data section. Here, you can select the language pack to download.  

In the U.S., the following languages are available to download: 

  • English (United States) 
  • Spanish (Latin America) 
  • Portuguese (Brazil) 
  • French (France) 

Keep in mind that the download and installation of these language packs can’t be completed unless the game is closed.  

5. Once you downloaded the audio language, boot God of War Ragnarök back up. 

6. In the start screen menu, you need to select Settings. 

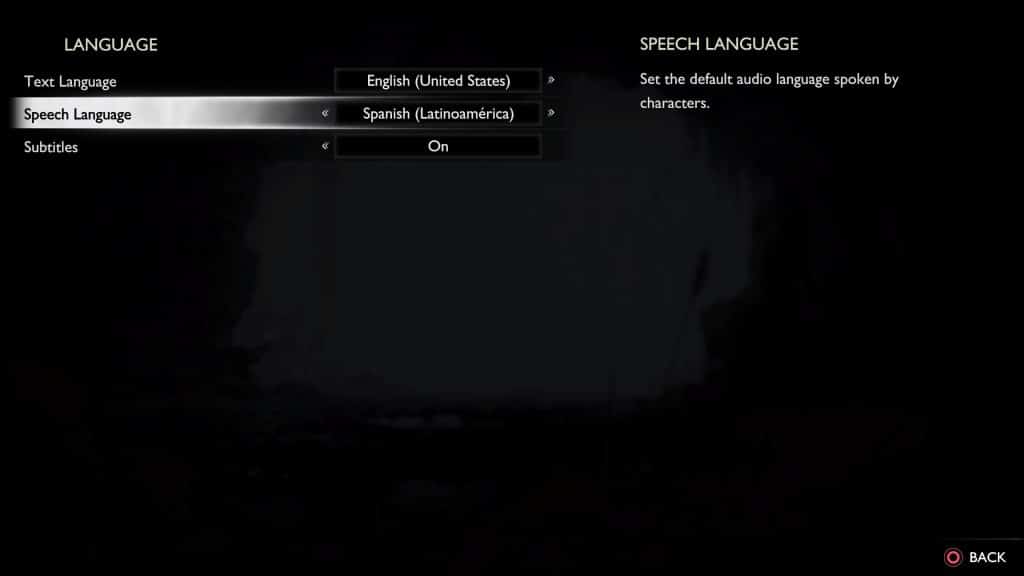
7. From the Settings menu, select Language. 

8. After getting to the Language menu, move the cursor over to Speech Language.  

9. You should be able to change the audio language with this setting.  

If the language you are trying to enable is greyed out, then you need to close the game and then make sure that you have the language pack downloaded and installed. 

10. In the same Language menu, you will also be able to change the text language, which does not require any additional downloads. You will be able to choose between the following: 

  • English (United States) 
  • Spanish (Latin America) 
  • Spanish (Spain) 
  • Portuguese (Brazil) 
  • Portuguese (Portugal)  
  • French (France) 
  • Italian  
  • Dutch 
  • Hungarian 
  • Polish 
  • Russian  
  • Turkish 
  • Thai 
  • Arabic 
  • Czech 
  • Croatian 
  • Traditional Chinese 
  • Simplified Chinese 
  • Korean 
  • Japanese 
  • German

How to enable and customize gyro aiming in God of War Ragnarök  

God of War Ragnarök supports gyro aiming as it uses the built-in accelerometer and gyroscope of the DualSense and DualShock 4. If you enable this feature, you will be able to use the motion of your controller to fine tune the aim with your weapon, giving you more accuracy.  

To see how you can turn on, as well as customize, gyro aiming in this PlayStation 4 and PlayStation 5 game, you can take a look at this tutorial from Seeking Tech.  

1. To start off, you need to head over to the Settings menu in God of War Ragnarök. 

In the start screen, all you have to do is select Settings. 

If you are actively playing the game, then you need to press the Options button during gameplay in order to open the Options menu. From there, you should be able to select Settings. 

2. Inside of the Settings menu, head over to Graphics & Camera. 

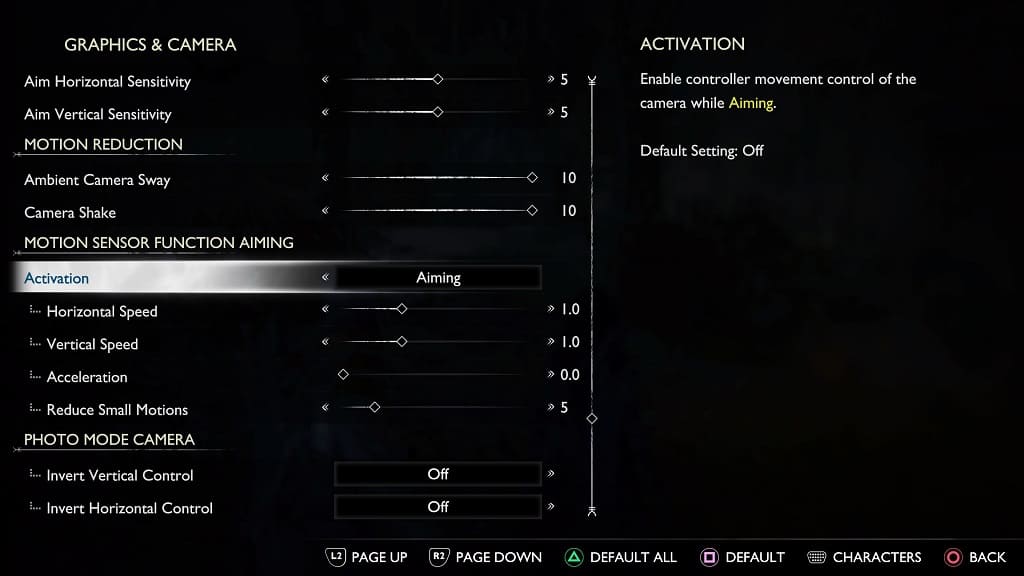
3. From the Graphics & Camera menu, scroll down until you reach the Motion Sensor Function Aiming section. 

4. Here, you need to set Activation to Aiming in order to use gyro aiming. 

5. Once you activated motion controls, you will be able to customize the following aspects: 

The Horizontal Speed slider will let you change the speed at which the aiming cursor will move on the horizontal axis. The default value is 1.0. You will be able to change it, in increments of 0.1, from a range of 0.1 to 3.0. 

The Vertical Speed slider will let you adjust the speed of the aim cursor on the vertical axis. This also has a default value of 1.0 as you will be able to adjust it, in increments of 0.1, from 0.1 at the minimum to 3.0 at the maximum. 

The Acceleration slider will let you determine the speed of the aiming cursor in relations to how fast you are moving your controller. So, if you move the controller at a slower rate, then the cursor will travel a shorter distance. If you move the controller at a faster rate, then the cursor will travel at longer distances. By default, this setting is disabled as it has a value of 0. You will be able to change it, in increments of 5, from 0 to 10. 

The Reduce Small Motions slider will let you adjust the amount of camera movement when you are using gyro aiming. This is used to prevent any accidental camera movement while aiming. The default value for this setting is 5 while you are able to adjust it, in increments of 1, from a minimum of 0 to a maximum of 30.

How to customize film grain and motion blur in PS5 version of God of War Ragnarök

The PlayStation 5 version of God of War Ragnarök features both film grain and motion blur. If you find that these visual effects to be too intense, then you are able to dial both down. You can even turn the two settings off completely if you like how they make the game look. 

To find out how to customize film grain and motion blur in this PS5 game, you can follow the steps laid out in this tutorial from Seeking Tech. 

1. To begin, you need to head over to the Settings menu of God of War Ragnarök. 

At the start screen, you can simply Settings from the list of available options to get there. 

If you are currently playing God of War Ragnarök, then you need to press the Options button (which is the small button with the three horizontal lines icon located at the top) on the DualSense controller in order to bring up the Options menu. From there, you need to select Settings from the left column. 

2. Once you arrived in the Settings menu, you need to select Graphics & Camera.  

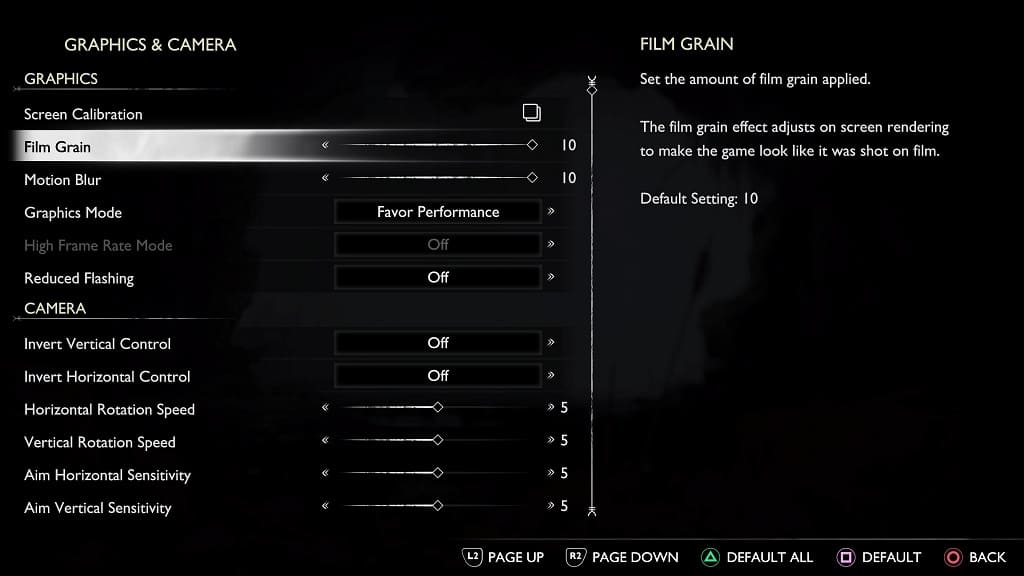
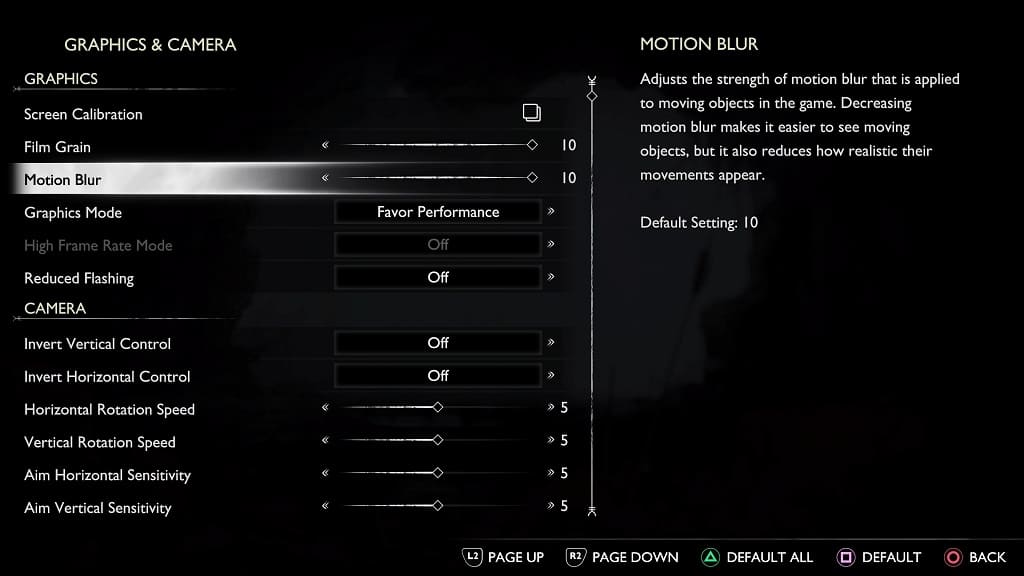
3. From the Graphics & Camera menu, make sure you are in the Graphics section, which should be at the top of the screen. 

4. From there, you will be able to adjust the slide for Motion Blur and Film Grain to any of the following values: 

  • 9  
  • 10 

By default, both Motion Blur and Film Grain are set to 10. So, you need to lower the value in order to lessen these effects. We recommend lowering these settings and then test them out while playing God of War Ragnarök so that you can find a good balance between visibility and visual enhancements. 

If you don’t like the Motion Blur and/or Film Grain visual effects at all in this game, however, then you can simply set both values to 0 from this menu. 

For the uninformed, Film Grain makes the image quality noisier as the game tries to mimic the look of a movie. This could lead to less-than-sharp image.  

Motion Blur will add blur effects to moving objects, which can may some scenes hard to see. It is really noticeable when your spin the camera around the character.

How to turn off adaptive triggers and haptic feedback in One Piece Odyssey on PS5

The PlayStation 5 version of One Piece Odyssey supports adaptive triggers and haptic feedback. Adaptive triggers will tighten the resistance depending on certain actions while haptic feedback will provide contact sensitive vibrations.  

If you would rather disable these two features of the DualSense while you are playing this turn-based Japanese role-playing game, then you can take a look at this guide from Seeking Tech. 

Method #1

If you want to turn off adaptive triggers and/or haptic feedback for just One Piece Odyssey, then you need to take the following steps: 

1. To start off, you need to head over to the Settings menu in the game.  

You can do so by pressing the R1 button until you get to Settings in the main menu.  

While you are playing game, you can also press the Options button to bring up the pause screen and then use the R1 button to switch tabs until your get to Settings.  

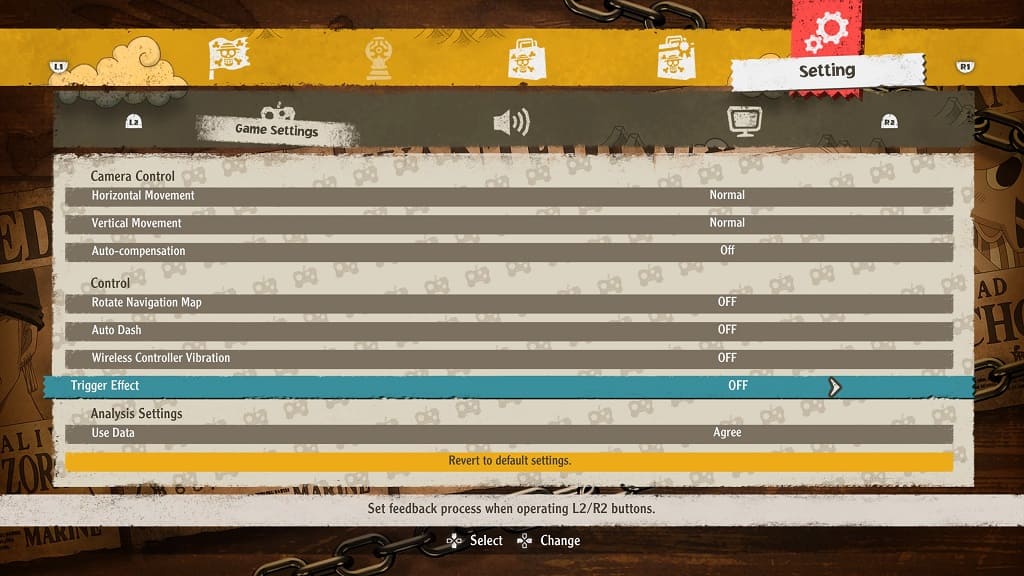
2. In the Settings menu, make sure you are in the Game Settings tab. You can use the L2 and R2 buttons to switch tabs.  

3. After getting to the Game Settings tab, scroll down to the Control section. 

4. From there, you should see the Wireless Controller Vibration and Trigger Effect settings. Make sure you set these to Off if you want to disable them. 

Method #2

For the second method, you will be able to customize the intensity levels of adaptive triggers and haptic effects or turn both off complete on a system level by doing the following: 

1. To start off, head over to the home menu of your PlayStation 5 or PlayStation 5 Digital Edition. If you are currently playing One Piece Odyssey, then you can bring up the home screen by long pressing the PS button for 1 second. 

2. In home, you need go to the upper right corner and then select Settings. 

3. Inside of the Settings menu of your PS5, go down and then select Accessories. 

4. From the Accessories menu, select the Controller (General) option on the left column. 

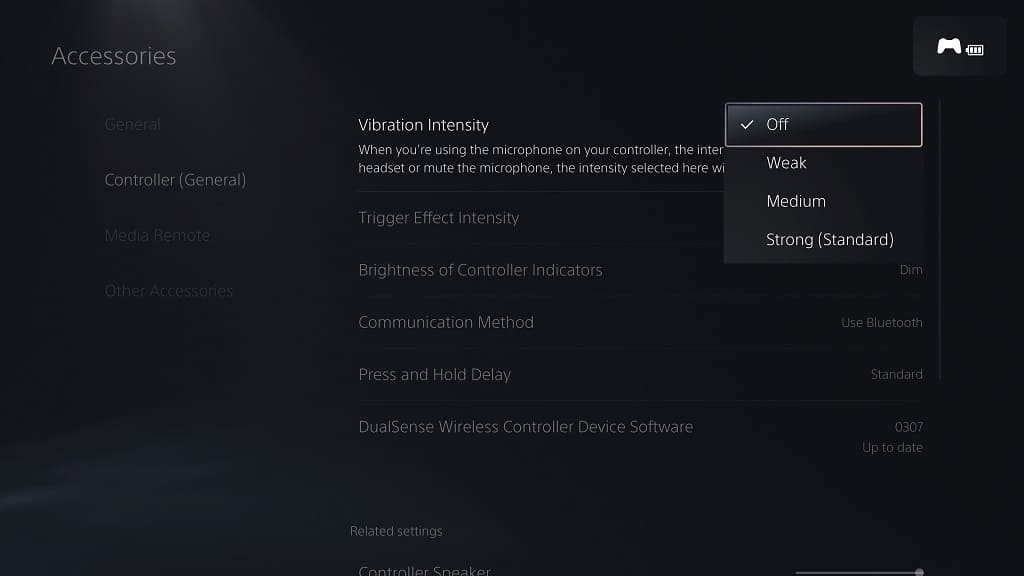
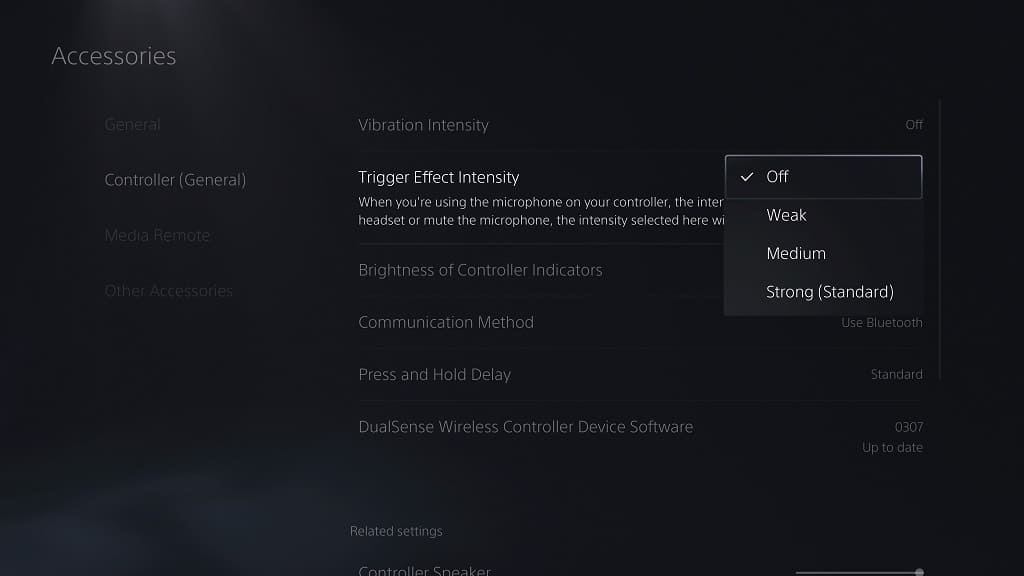
5. On the right side of the same screen, you should see Vibration Intensity and Trigger Effect Intensity. You can change both of these settings to Strong, Medium, Weak or Off. 

6. Keep in mind that these system-level changes will be applied to not only One Piece Odyssey, but also all the other PS5 games as well.

How to disable adaptive triggers and vibrations in God of War Ragnarök

The PlayStation 5 version of God of War Ragnarök takes advantage of the adaptive triggers and haptic feedback features of the DualSense. If you would rather have these two functions disabled when playing this action-adventure title, then you can check out this tutorial at Seeking Tech to see how you can properly do so. 

How to turn off rumble in God of War Ragnarök 

There are two ways that you can turn off vibrations in this game.  

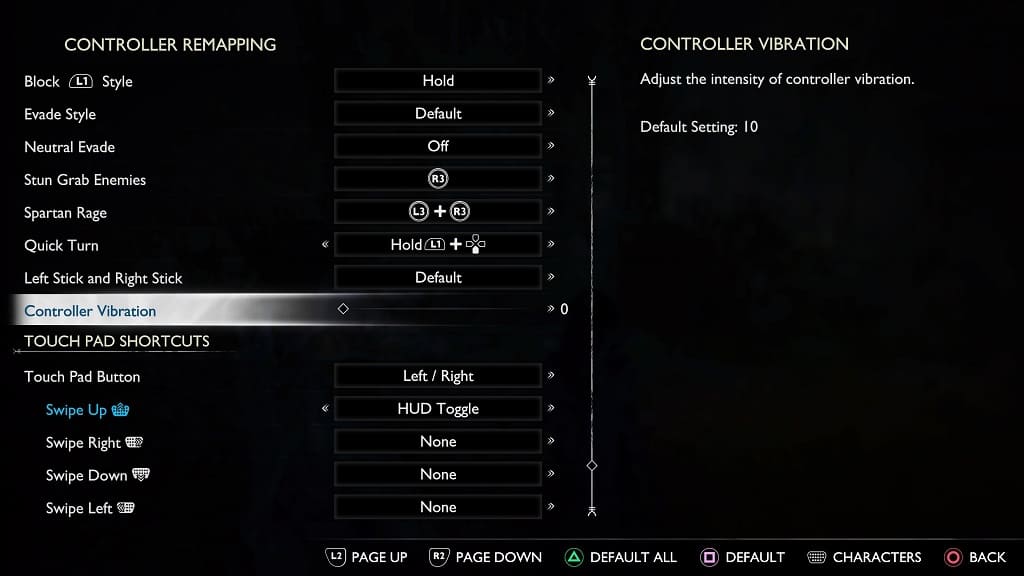
For the first method, you need to head over to the Settings menu in God of War Ragnarök. You can do so by selecting Settings from the main menu or pause menu. Afterwards, select Controller Remapping and then move the cursor down to Controller Vibration. You can use this slider to customize the rumble intensity of the DualSense. To turn it completely off, set this slider to 0. 

You can also turn off the DualSense haptic feedback on the system level. In order to do so, press and hold the PS button on the controller for around a second to open the home menu, where you need to select Settings on the top right side. In Settings, select Accessories > Controller (General) > Vibration Intensity. In the pop-up menu, you can customize the rumble intensity or simply set it to Off. 

By disabling haptic feedback on the system level, you will also disable rumble on other games being played on your PlayStation 5. So, make sure you enable the Vibration Intensity setting for games that you want to have rumble turned on. 

How to turn off adaptive triggers in God of War Ragnarök 

There is currently no way to disable adaptive triggers directly in-game when playing God of War Ragnarök. Instead, you have to turn off this feature at the system level. 

To do so, you need to take the following steps: 

  • If you are currently playing God of War Ragnarök, then you need to press and hold the PS button to open the home menu. 
  • Select Settings at the top right corner of the home menu. 
  • Inside Settings, scroll down and then select Accessories. 
  • You then need to select Controller (General) on the left column of the Accessories menu. 
  • On the right side of the same screen, select Trigger Effect Intensity. 
  • In the pop-up window, you can change the intensity level or simply set it to Off. 

Changing the Trigger Effect on the system level effects will apply to all the PlayStation 5 games being played on your console. Therefore, you need to enable this setting anytime you want to use adaptive triggers when playing games other than God of War Ragnarök.

How to fix One Piece Odyssey HDR issues on PS5, Xbox Series X and S 

When playing One Piece Odyssey on the PlayStation 5, PlayStation 5 Digital Edition, Xbox Series X or Xbox Series S, you may notice that some scenes may look too dark while others may be very bright. The colors may look a little off as well.  

To see how you can potentially fix this display issue, you can take a look at this troubleshooting article from Seeking Tech. 

1. To start off, it is important to note that One Piece Odyssey does not officially output a HDR picture. So, if you have dynamic tone mapping or a similar mode that will convert SDR to HDR, then then colors in this anime turn-based role-playing game may end up looking not quite right.  

To get the most accurate colors when it comes to the developer’s intent, we recommend playing One Piece Odyssey in SDR without any automatic HDR conversion.  

In order to do so, you need to disable dynamic tone mapping on your television set or monitor if possible.  

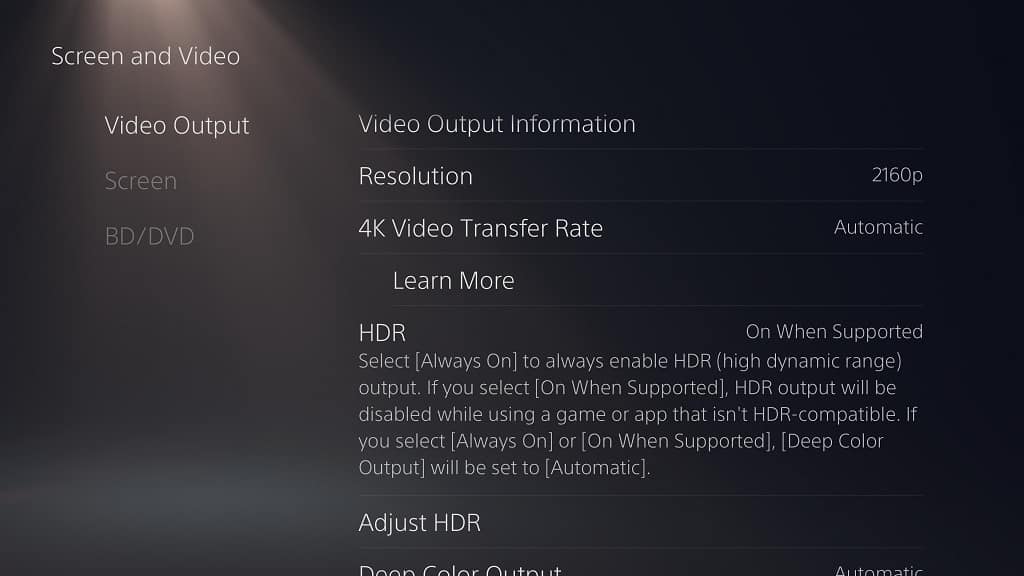
You should also do the same on your console. On your PS5, you need to go over to its Settings menu and then select Video and Screen > Video Output > HDR. Afterwards, make sure HDR is set to On When Supported. 

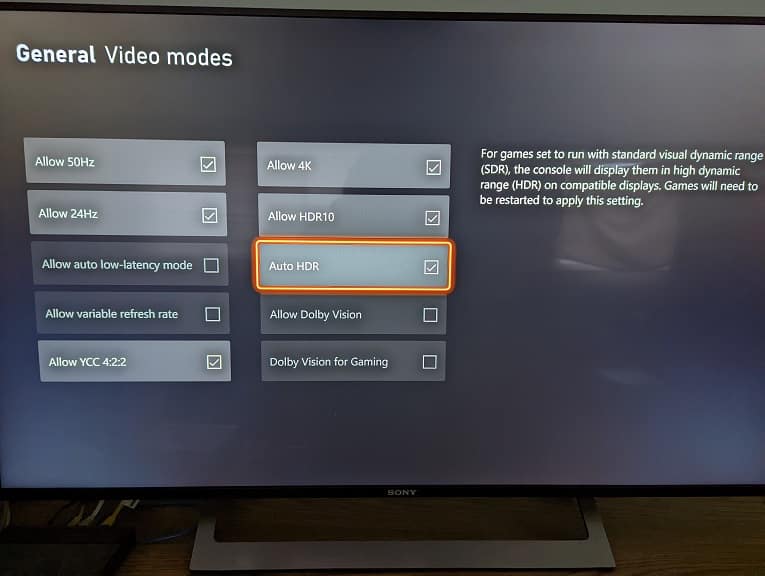
On the Xbox Series X or Xbox Series S, you also need to go to the Settings menu of your console and then select General > TV & display options > Video modes. Next, make sure that the Auto HDR setting is disabled. 

2. If some scenes appear to be too dark or too bright, then you can try adjusting the contrast level by using the in-game menu by taking the following steps: 

  • To start off, you need to go to the Settings menu from the Start Up menu. If you are playing the game, then you can pause the screen and then go to Settings from the Pause menu. 
  • To go to Settings from the Start Up and Pause menus, you need to press the R1 or RB button to switch tabs until you get to the gear cogs icon. 
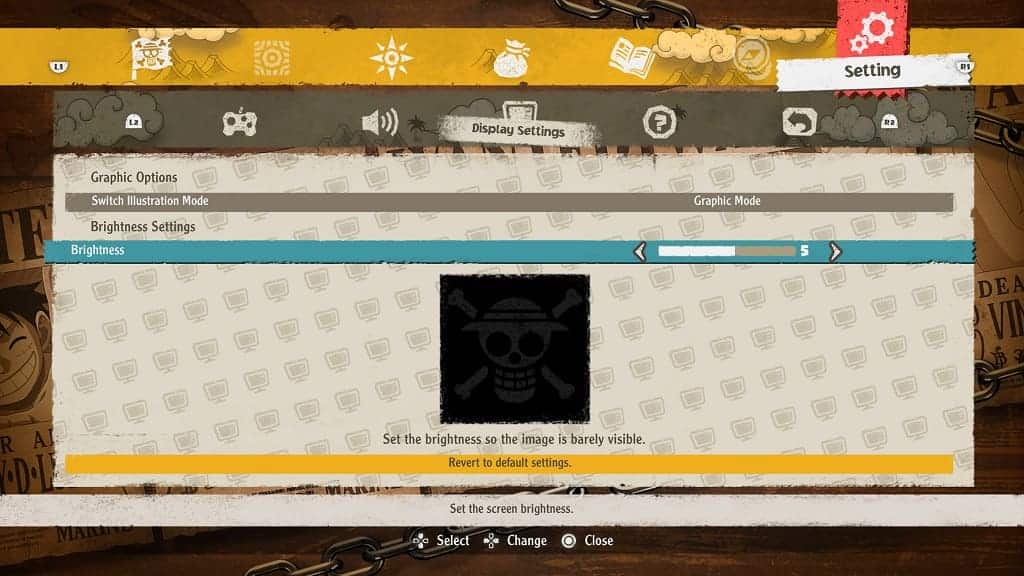
  • Once you get to the Settings tab, press the R2 or RT button to head over to the Display Settings, which is represented with the TV icon. 
  • You should find the slider in the Brightness Settings section. Here, you can try increasing or decreasing the Brightness to see if you can see better in the game. 

3. If you are still can’t get One Piece Odyssey to display a proper picture, then we recommend that you try updating the game. A new patch may fix your issue and/or even add proper HDR support.

How to find PlayStation Move and PS VR Aim Controller games on the PlayStation Store of PS5

By using a special adaptor that you can get for free, you are able to use the original PlayStation VR headset, along with the PlayStation Move and PlayStation VR Aim controllers, on the PlayStation 5 gaming system.  

To see how you can find which virtual reality games that are compatible with these motion controllers on the PlayStation Store of your PS5, you can take a look at this tutorial from Seeking Tech. 

1. If you know the name of the PSVR 1 game that you want to check the controller compatibility status for, then you can use the search functionality from the home screen or main menu of the PlayStation Store on your PlayStation 5 or PlayStation 5 Digital Edition console.  

In order to search, you need to select the magnifying glass icon on the top right side. You can press the triangle button to quickly move the cursor to that spot.  

After finding your game from the search results page, you need to select it in order to open its product page. 

If you don’t know the name of the game and/or would like to see a full list of PSVR 1 titles that are available on the PlayStation Store of the PS5, then you can follow the steps laid out in this article to see how you can properly do so. 

2. On the product page of the PlayStation VR 1 game, you can select the box located at the right side at the top of the screen or the middle box located in the Game and Legal Info section at the bottom of the page. 

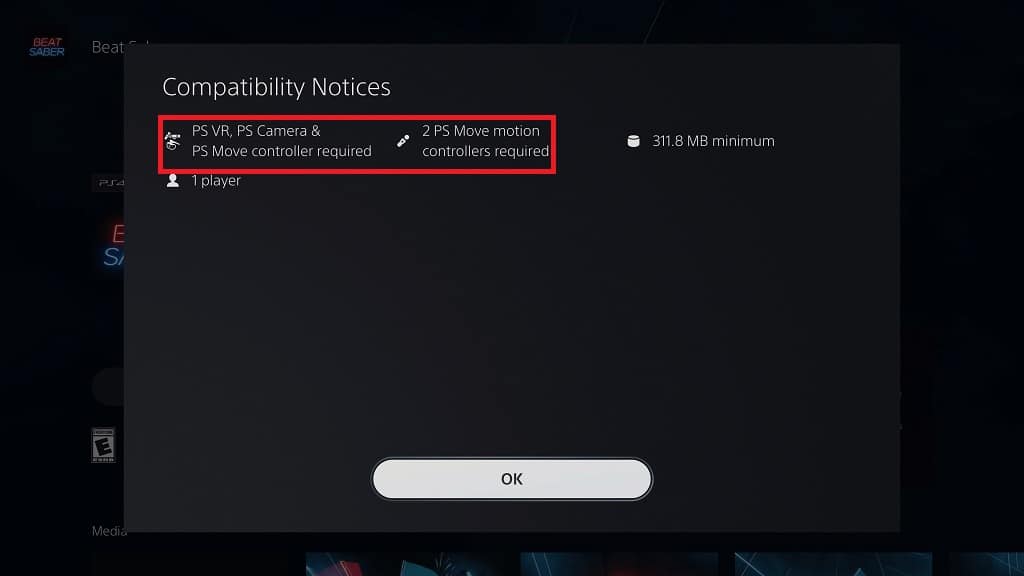
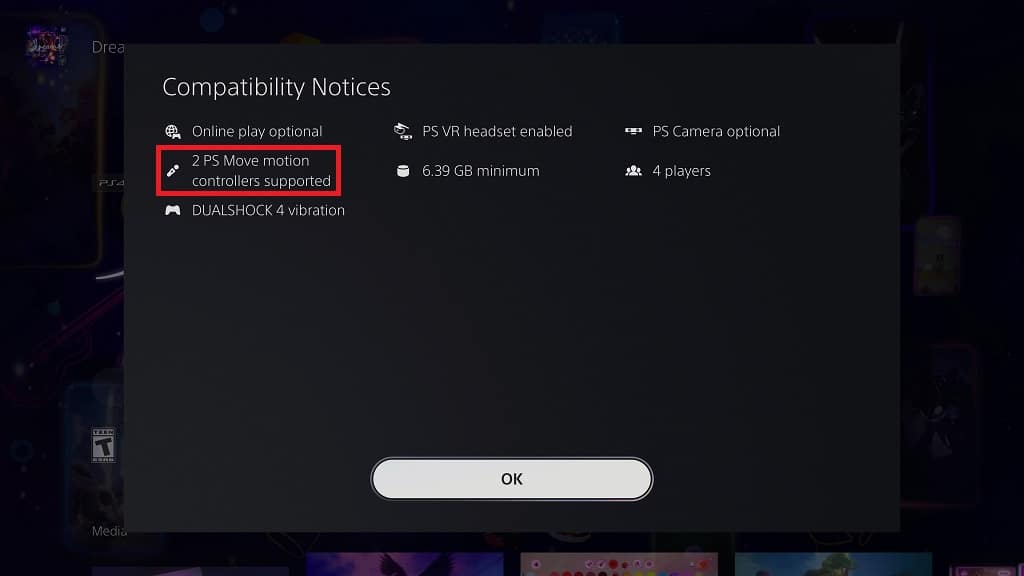
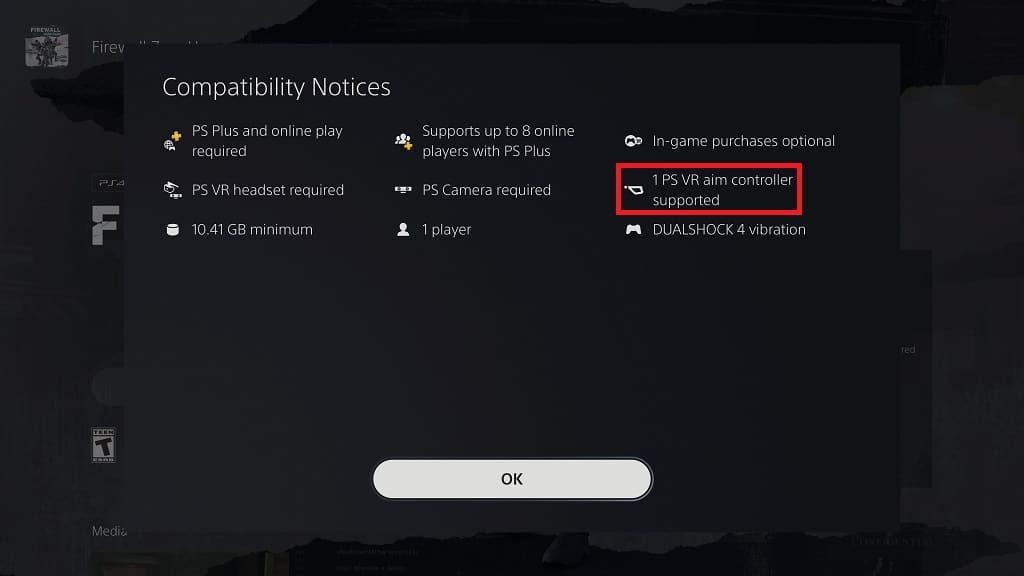
3. If done correctly, you should see the Compatibility Notices menu for that specific game.  

If a game requires one or two PlayStation Move motion controllers, then you should see the following listed: 

  • “PS VR, PS Camera & PS Move controller required.” 
  • “2 PS Move motion controllers required.”  

If PlayStation Move controllers are optional for a PSVR1 game, then you should see the following: 

  • “2 PS Move motion controllers supported.” 

For PSVR 1 games that are compatible the PlayStation VR Aim controller, you should see the following listed: 

  • “1 PS VR aim controller supported.” 

As we stated above, you will need an adaptor in order to use the PlayStation VR 1 headset, PlayStation Move and PlayStation VR Aim Controller on your PlayStation 5 or PlayStation 5 Digital Edition console. In order to request one for free from Sony, you need to visit the official PlayStation Global Support website with this link. 

How to fix Disney Plus PS5 App ‘something went wrong’ error 

When trying to watch Disney Plus streams on your PlayStation 5 or PlayStation 5 Digital Edition console, you may encounter the following error message: 

  • “Sorry, something went wrong. Please try again later.” 

To see how you can potentially fix this issue, you can take a look at this troubleshooting article from Seeking Tech. 

1. For the first step, you can try restarting your PS5. By doing so, you will accomplish the following: 

  • Closed the Disney Plus App. 
  • Refresh the internet connection of the console. 
  • Clear out any temporary glitches. 

Once your system has boot back up again, try to use the video streaming application. 

2. If you are still seeing the “Something went wrong” error, then you can try checking to see if there is a new update available for the application.  

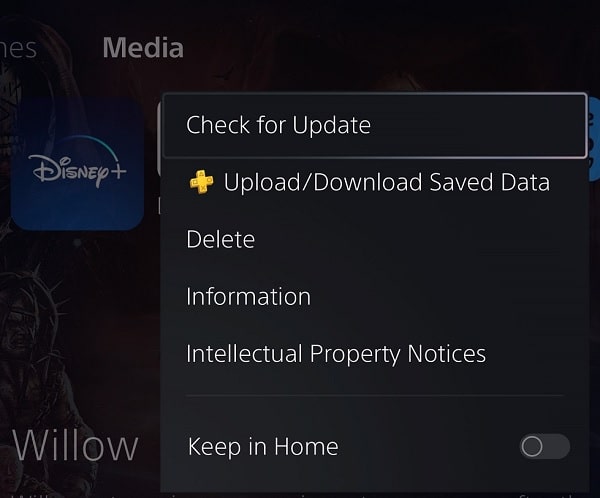
In order to do so, move the cursor over to the Disney+ icon in the home screen menu of your PlayStation 5. Afterwards, press the Options button and then select the Check for Update option. 

3. Of course, you should also keep the system software of your PS5 up-to-date as well if you haven’t done so already.  

4. A fresh install of the streaming application may also help. 

In order to do so, press the Options button with the cursor over the Disney+ icon in the PS5’s home menu. Afterwards, select Delete. Once the app is removed, download it again from the PlayStation Store.  

After the Disney Plus App has been re-installed, test it out. 

5. You can also try power cycling your home network, which you can do by taking the following steps: 

  • Turn off your PlayStation 5. 
  • Turn off your modem and routers. 
  • Wait for at least two minutes. 
  • Turn your modem and routers back on. 
  • Wait for your home network to go back online again. 
  • Turn on your PS5. 

Open the Disney Plus App to see if you are able to use it without any issues. 

7. If possible, you can also try using another internet connection method on your PlayStation 5. You can do so by opening the Settings menu on the console and then selecting Network > Settings > Set Up Internet Connection.  

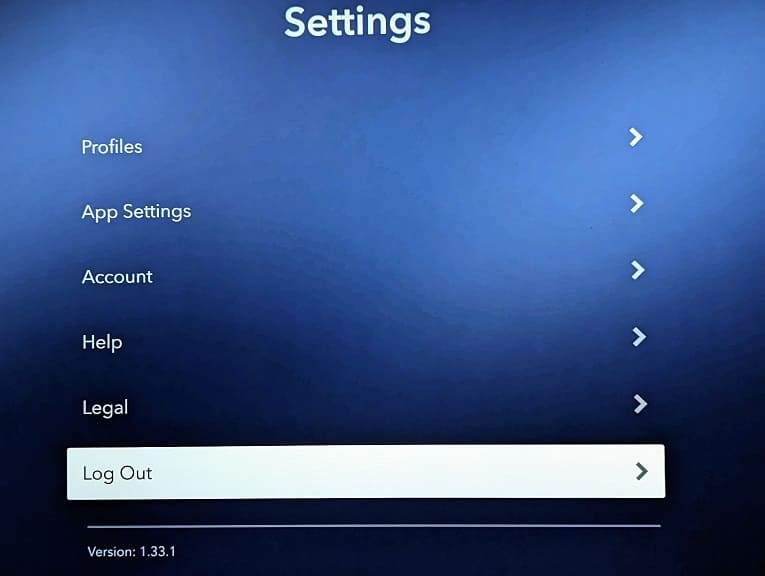
7. If possible, log out of your account on the Disney+ PS5 App, which you can do by following the steps in this prior article.

If the “something went wrong” error is preventing you from signing out, then you need to use a different device. 

If you have a desktop computer, for example, then you can do the following: 

  • Visit https://www.disneyplus.com on a web browser. 
  • Log into your Disney Plus account if you haven’t done so already. 
  • After signing in, move the mouse cursor over to your profile image on the top right side. 
  • In the drop-down menu, select Account.  
  • Finally, click the “Log out of all devices” link. 

By doing so, you will log out of Disney+ on all of the devices that you are currently signed in on. This should include your PlayStation 5.  

After signing out, sign back into the Disney Plus PS5 App to see if you are able to fix the “something went wrong” problem. 

How to find PSVR1 games on the PlayStation Store of PS5

Finding games that require or support the original PlayStation VR headset can be a bit cumbersome on the PlayStation Store of the PlayStation 5 or PlayStation 5 Digital Edition console. If you need help locating these titles, then you can take a look at this tutorial from Seeking Tech. 

1. To start off, you need to go to the PlayStation Store on your PS5. You can get there from the home screen, which is the place where you can select which game to boot up. 

2. Once you arrived at the digital shop, make sure you are in the Latest, Collections or Deals tab.  

In order to switch tabs, you can press the L1 and R1 buttons. 

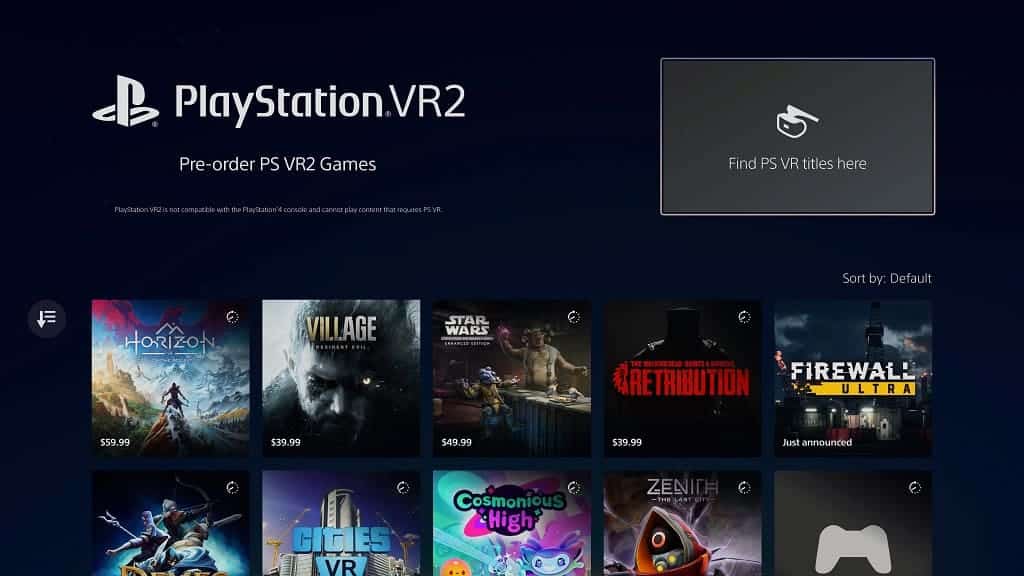
3. Next, scroll all the way down to the See More section and then select PS VR2.  

4. You should now be in the PlayStation VR 2 menu of the PlayStation Store. Here, you should see the “Find PS VR titles here” option located on the upper right corner. You need to select it. 

5. You should finally arrive at the PlayStation VR menu of the PlayStation Store on the PS5.  

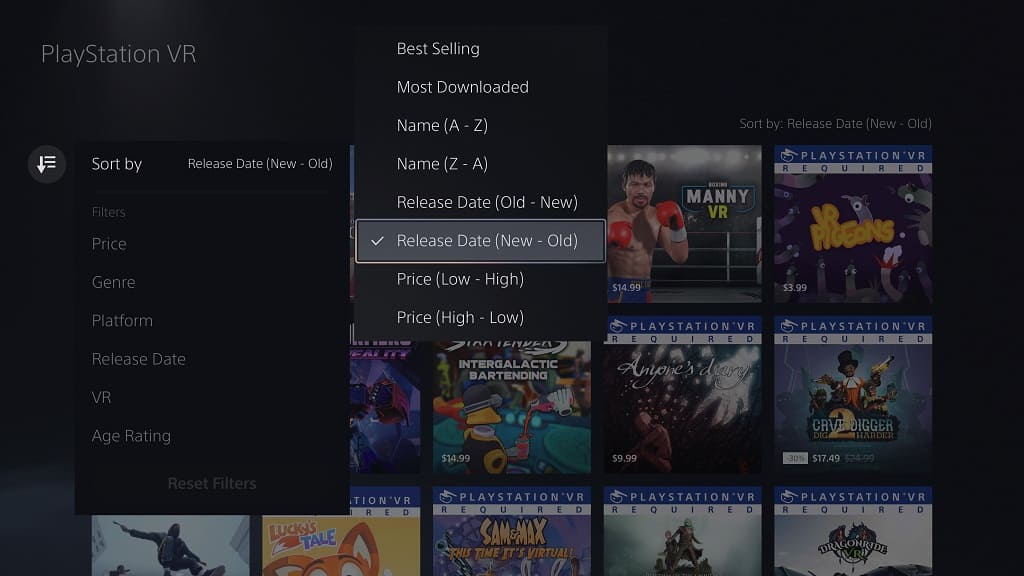
6. If you want to sort the listing, then select the Sort and Filter option, which you can find to the left (its icon is a down-pointing arrow that is overlapping three horizontal lines). Afterwards, you need to select the Sort By option to change the order of the listing based on the following options: 

  • Best Selling  
  • Most Downloaded  
  • Name (A to Z)  
  • Name (Z to A)  
  • Release Date (Old to New)  
  • Release Date (New to Old)  
  • Price (Low to High)  
  • Price (High to Low)

6. In the same Sort and Filter menu, you can also filter out your results based on the following: 

Genre: 

  • Action 
  • Adventure 
  • Shooter 
  • Puzzle 
  • Arcade 
  • Simulation 
  • Causal 
  • Horror 
  • Unique 
  • Family 
  • Sport 
  • Music/Rhythm 
  • Driving/Racing 
  • Role Playing Games 
  • Strategy 
  • Party 
  • Educational 
  • Fighting 
  • Fitness 
  • Simulator 
  • Brain Training  
  • Quiz 

Release Date: 

  • Just Released 
  • Coming Soon 

Age Rating: 

  • Early Childhood 
  • Everyone 
  • Everyone 10+ 
  • Teen 
  • Mature 

While you can also filter out the PSVR1 listing based on Platform, changing it to display PS5 titles only will result in no games showing up. The same is also true if you decide to filter the listing to show only PSVR 2 games. 

For the uninformed, PlayStation VR 1 games are backwards compatible with the PlayStation 5 and PlayStation 5 Digital Edition consoles. However, you will need to use the PSVR 1 headset in order to play these titles. Furthermore, a special adapter is needed, which you can get for free from Sony.