How to enable BenQ MOBIUZ EX2710U and EX3210U VRR support for PS5

Both the 27” and 32” BenQ MOBIUZ 4K Gaming Monitors are compatible with the Variable Refresh Rate feature of the PlayStation 5 and PlayStation 5 Digital Edition home consoles. You can take a look at this tutorial to see how you can activate PS5 VRR for these computer screens.

This guide will be covering the following monitors:

  • 27-inch BenQ MOBIUZ 4K True HDMI 2.1 (48Gbps) Gaming Monitor (Model Number: EX2710U)
  • 32-inch BenQ MOBIUZ 4K True HDMI 2.1 (48Gbps) Gaming Monitor (Model Number: EX3210U)

1. To start off, make sure you have the latest firmware downloaded and installed for your EX2710U or EX3210U.

You can find the download pages for the newest software versions of these screens on the official BenQ website with the following links:

2. Since Variable Refresh Rate support was added through a firmware update for the PlayStation 5 and PlayStation 5 Digital Edition, you should also download and install a new software version of your home console if you haven’t done so already.

3. Now that both devices have been updated, make sure you connect your PS5 to the HDMI port of your EX2710U or EX3210U.

You should be using a HDMI 2.1 cable to connect the two. The PlayStation 5 and PlayStation 5 Digital Edition comes with this cable included in the box.

4. Turn on the gaming monitor as well as your PS5.

5. If your EX2710U or EX3210U isn’t displaying the output video from your PlayStation 5, then you need to switch over to the correct input source.

6. Press the 5-way controller found at the bottom of your gaming monitor to bring up the Quick Menu.

7. You then need to select Menu.

8. Afterwards, select Input.

9. Next, select the HDMI input that is connect to your PS5.

10. Finally, make sure that the aforementioned HDMI input is set to Game.

Your BenQ MOBIUZ EX2710U or EX3210U should now to ready to accept the Variable Refresh Rate signal from your PlayStation 5 or PlayStation 5 Digital Edition game console.

11. On your PlayStation 5, you should head over to the home screen. This is the main menu of the gaming system where you can pick which game or app to open.

12. Using the DualSense controller, select the gear icon located on the top right side on the home screen.

13. If done correctly, you should now be in the Settings menu of your PS5. From there, head to Screen and Video.

14. After arriving at the Screen and Video menu, the first thing you need to do is to select Video Output on the left side.

15. On the right side of the same screen, you should be able to find the VRR setting. If not, then you can check out this guide to see how you can make it appear.
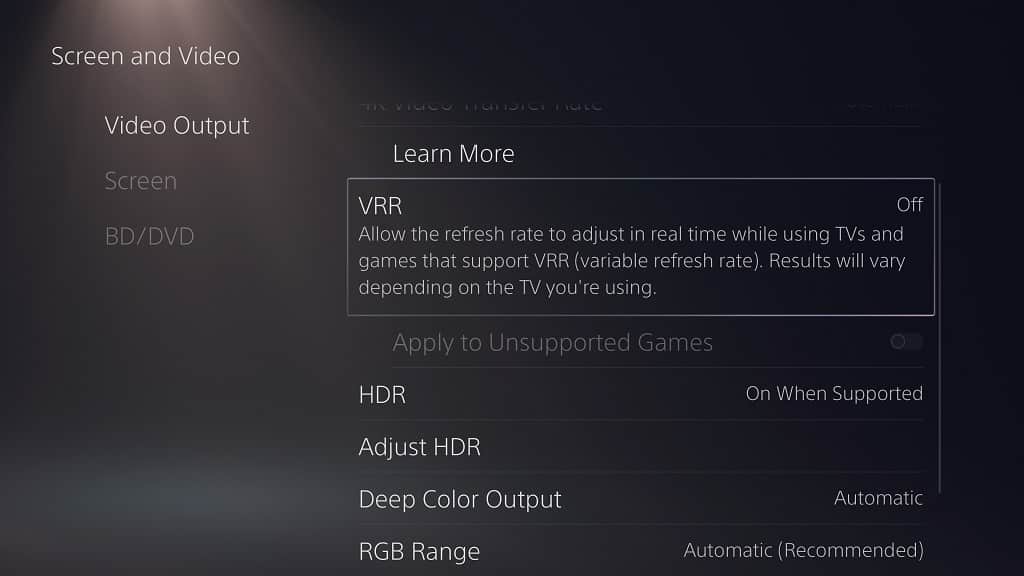
16. Set VRR to Automatic in order to turn on Variable Refresh Rate for supported games on your PlayStation 5 or PlayStation 5 Digital Edition.

17. Optionally, you can also enable the “Apply to Unsupported Games” setting in order to activate VRR for games that don’t currently support this feature.

How to enable AORUS FI32U, FV43U and FO48U VRR support for PS5

With the PlayStation 5 and PlayStation 5 Digital Edition now supporting Variable Refresh Rate, you should be able to use this feature on your FI32U, FV43U or FO48U.

To find out how your enable VRR support for your PS5 with these computer monitors, you can check out this tutorial at Seeking Tech.

This article is based on the following HDMI 2.1 gaming monitors:

  • GIGABYTE AORUS FI32U 32” 4K IPS Gaming Monitor
  • GIGABYTE AORUS FV43U 43″ 4K VA Gaming Monitor
  • GIGABYTE AORUS FO48U 48″ 4K OLED Gaming Monitor

1. The first step we recommend taking it to update your monitor to its latest firmware release if you haven’t done so already. A new update may improve your screen’s performance and/or fix bugs.

You can find the firmware files for these gaming monitors on the official GIGABYTE website with the following links:

2. Of course, you should also keep the firmware of your PlayStation 5 or PlayStation 5 Digital Edition. A new software version of your console may help improve the VRR performance, fix glitches and/or add new adaptive sync features.

In order to manually update your game console, you can try taking the following steps:

  • From the home screen menu, which is where you can select which game to launch and play, select the gear icon on the top right side.
  • You should now be in Settings, where you need to select System.
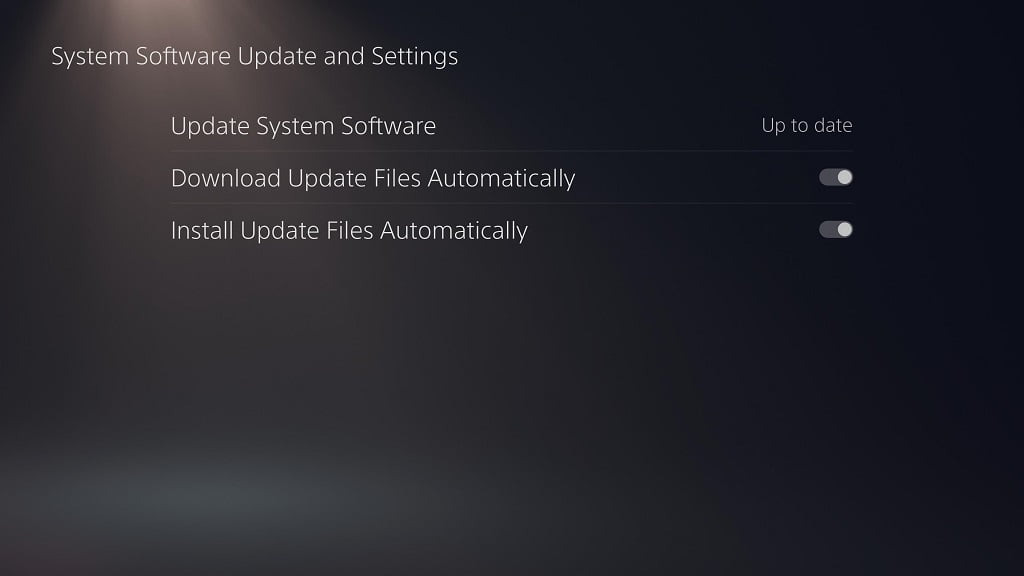
  • In the System menu, select System Software on the left side and then System Software Update and Settings on the right side.
  • After getting to the System Software Update and Settings menu, select Update System Software.
  • Finally, select Update Using the Internet.

3. With your console and monitor updated, connect your PlayStation 5 to the HDMI 2.1 port of your AORUS monitor.

Make sure you are using the HDMI 2.1 cable, which comes with your PS5, to make the connection.

4. Power on both your console and monitor.

5. Make sure that your monitor is displaying content coming from the PlayStation 5. If not, you need to switch over to the correct input source.

6. Using the control button located on your monitor, go to Settings.

7. Inside the Settings menu of your FI32U, FV43U or FO48U monitor, select Gaming.

8. Next, you need to select Adaptive Sync.

9. Make sure that Adaptive Sync is set to Enable.

10. On your PlayStation 5, head into the console’s Setting menu.

11. From the Settings menu of your PS5, you need to head over to Screen and Video.

12. After getting the Screen and Video menu, you need to first select Video Output on the left side.

13. On the right side of the same Screen and Video menu, you then need to set the VRR setting to Automatic.

If you don’t see the VRR setting, you can take a look at this troubleshooting guide to see how you can make it appear.

14. You may also want to turn on the “Apply to Unsupported Games” setting underneath VRR. By doing so, you will force unsupported PS5 videogames to use the Variable Refresh Rate feature.

How to enable GIGABYTE M28U and M32U VRR support for PS5

Variable Refresh Rate support was recently added to the PlayStation 5 and PlayStation 5 Digital Edition. As a result, you will be able to play most games on your Sony gaming console without having to worry about any stuttering or screen tearing due to unstable frame rates.

Both the GIGABYTE M28U Gaming Monitor and GIGABYTE M32U Gaming Monitors have been confirmed to be compatible with the VRR feature of the PS5.

To see how you can enable Variable Refresh Rate, when playing games on your console, for the M28U and M32U, you can take a look at this tutorial at Seeking Tech.

1. Before doing anything else, we recommend that you update your M28U or M32U to the latest firmware. New updates may improve the Variable Refresh Rate support of your gaming monitor.

2. You should also keep your PS5 or PS5 Digital Edition updated to the newest firmware as well.

VRR support for the game console was added in a recent firmware update. Not to mention that subsequent updates may have improved the compatibility and/or performance of this feature on the PlayStation 5 as well.

3. If you haven’t one so already, use a HDMI 2.1 cable to connect your game console to the M28U or M32U monitor.

You can use the HDMI cable that came with your PlayStation 5 or PlayStation 5 Digital Edition box as it should be 2.1.

If you lost your HDMI 2.1 cable, then you can check out this article to see alternatives will work with your console.

4. After properly connecting your PS5 to the computer monitor, turn on both devices.

5. Make sure that the monitor is displaying the input that is connected to your game console.

6. On your PlayStation 5, make sure that you are in the home screen. This is the main system menu where you can open games and media apps.

7. Next, you need to get to the Settings menu from the home screen. You can do so by selecting the gear cog icon, which you can find on the top right side of the screen.

8. Once you are inside the Settings menu, you need to head into Screen and Video.

9. After getting into the Screen and Video sub-menu, the first step you need to take is to select Video Output on the left column.

10. On the right side inside the same Screen and Video sub-menu, you then need to select VRR.

11. In the pop-up menu, make sure that VRR is set to Automatic. This will enable Variable Refresh Rate for games that natively support this feature.

12. Underneath the VRR setting in the Screen and Video sub-menu, you can also turn on the “Apply to Unsupported Games” setting to use Variable Refresh Rate for games that don’t support this feature.

13. To use Variable Refresh Rate for games that have a frame rate that is beyond 60 frames per second (such as Marvel’s Spider-Man: Miles Morales, Marvel’s Spider-Man: Miles Morales and Ratchet and Clank: A Rift Apart), make sure that you have 120 Hz enabled on your PlayStation 5 or PlayStation 5 Digital Edition.

To find out how to do so, you can check out this article.

How to enable 4K and 120 Hz gaming for PS5 and Xbox Series X on AORUS and GIGABYTE monitors

You are able to play select PS5 and Xbox Series X videogames at the 4K resolution with a frame rate of up to 120 FPS on specific AORUS and GIGABYTE monitors. To find out how to do so, you can follow this guide at Seeking Tech.

Before we begin, it is important to note that this guide is based on the following HDMI 2.1 computer monitors:

  • AORUS FI32U Gaming Monitor
  • AORUS FV43U Gaming Monitor
  • AORUS FO48U Gaming Monitor
  • GIGABYTE M28U Gaming Monitor
  • GIGABYTE M32U Gaming Monitor

1. To start off, make sure you update your HDMI 2.1 gaming monitor to the latest firmware version as a new release may help improve the performance or compatibility with your game console.

2. Or course, you should also make sure you have the latest firmware update for your PS5 and/or Xbox Series X. The new release may help with the performance or compatibility for your console when it comes to being able to output 4K at 120 Hz on your monitor.

3. Once you have updated all your devices, connect your PS5 or Xbox Series X to the HDMI 2.1 port of your gaming monitor if you haven’t done so already.

Make sure you are using a HDMI 2.1 cable for the connection; otherwise, you won’t be able to output your console games at 120 frames per second and 4K resolution.

A HDMI 2.1 cable is already included with your PlayStation 5 or Xbox Series X box.

If you can’t find it, then you can purchase a new HDMI 2.1 cable. If you are looking for specific recommendations, then you can take a look at this article.

4. Once you made sure that everything is connected correctly, turn on your game console and monitor.

If the monitor isn’t displaying the input of your game console, then you need to switch over to it.

5. Next, you need to enable 120 Hz display on your game console.

If you have a PlayStation 5, then you need to take the following steps:

  • From the home screen, which is where you select which game to play, select the gear icon on the top right corner of the menu in order to get to Settings.
  • In the Settings menu, you then need to select Screen and Video.
  • After getting to the Screen and Video menu, select Video Output on the left column.
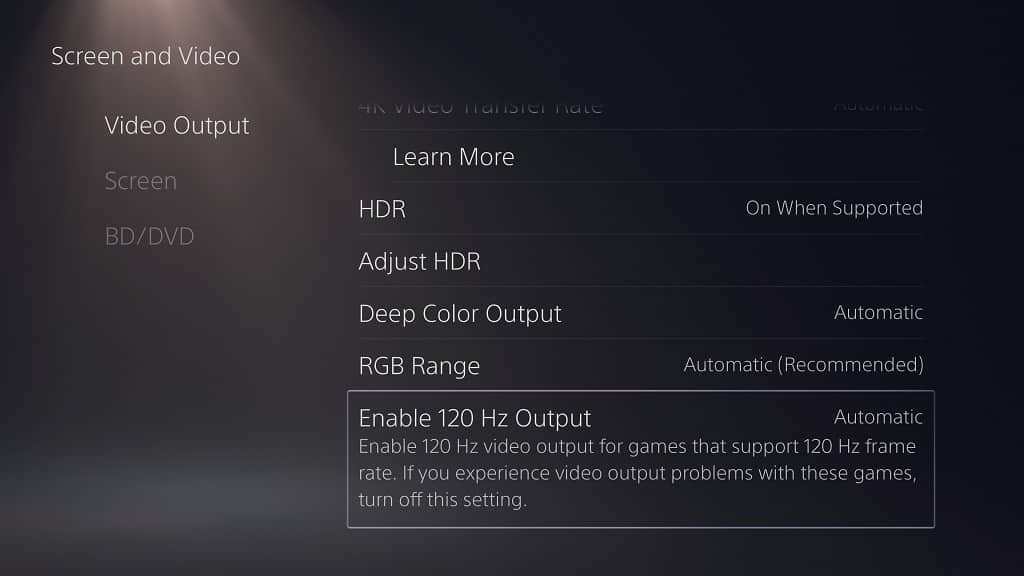
  • From the right side of the same Screen and Video menu, you then need to make sure that the “Enable 120Hz Output” setting is turned on.

If you have an Xbox Series X, then you need to do the following:

  • Head to the Settings menu.
  • Inside of Settings, you first need to select General on the left column.
  • On the right side of the same screen, you then need to select TV & display options.
  • In the Display section of the next screen, you need to change Resolution to 4K UHD.
  • In the same Display section, you then need to change the refresh rate to 120Hz.

Once you enable 120 Hz support for the game console, you should now be able to play select games at 120 frames per second in 4K.

How to fix ‘Your TV Doesn’t Support VRR’ issue with PS5

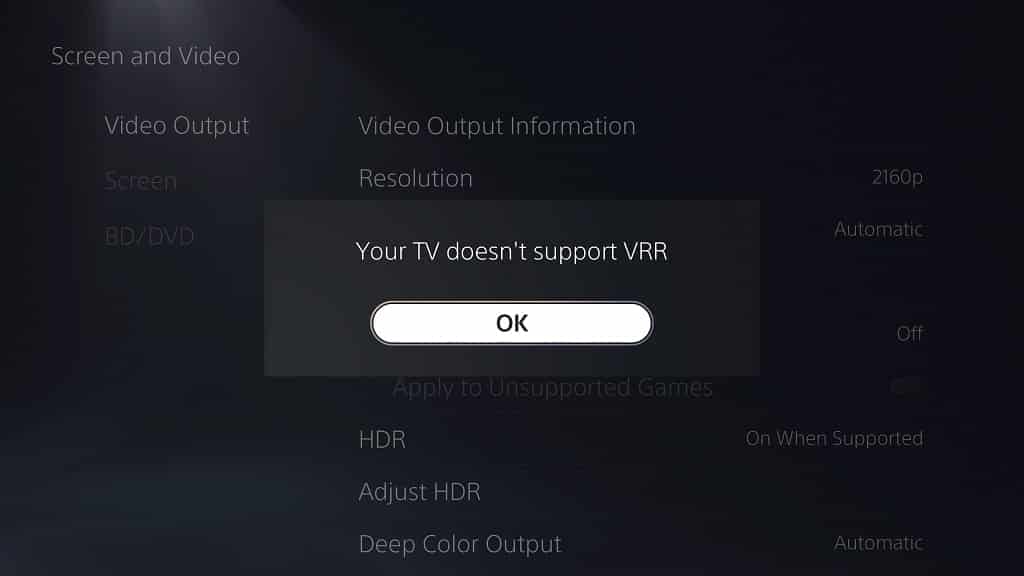
When trying to enable Variable Refresh Rate support on your PlayStation 5 or PlayStation 5 Digital Edition system, you may get the following error message:

“Your TV Doesn’t Support VRR”

To see how you can potentially fix this problem when trying to use the display feature with your television set or computer monitor, you can check out this troubleshooting article from Seeking Tech.

1. The first step we recommend taking is to make sure that your television set or computer monitor is compatible with the PlayStation 5 when it comes to taking advantage of the Variable Refresh Rate feature.

For best compatibly, you will need the following:

  • HDMI 2.1 port for your TV or monitor
  • Variable Refresh Rate support of your TV or monitor
  • HDMI 2.1 cable

The VRR feature of some television sets and monitors may also work over a HDMI 2.0 connection with the PS5. Your PlayStation 5 console should also come with a HDMI 2.1 cable included.

2. Make sure you are connecting the HDMI 2.1 cable to the correct HDMI 2.1 port. Some television sets or monitors may have different versions of HDMI ports available.

3. You should also make sure that you are connecting your console directly to your television set or monitor. Using a HDMI splitter or HDMI pass-through may cause issues when it comes to VRR.

4. We also recommend that you check to see if there is a new firmware update available for your television set or monitor.

Your screen may not support Variable Refresh Rate right out of the box. Not to mention that the updates may also improve VRR compatibility with the PlayStation 5.

To update the firmware, please refer to the user manual of your television set or computer monitor. If you can’t connect your TV or monitor online, then you will most like need an USB storage device to update its software.

5. You should also update the firmware of your PlayStation 5 or PlayStation 5 Digital Edition system if you haven’t done so already as doing so may help improve the VRR support.

In order to update the firmware of your console, you can try doing the following:

  • Turn of your PS5 or PS5 Digital Edition system.
  • Make sure that your system is connected to the internet and you are signed into the PlayStation Network.
  • If you don’t get a message asking you to download or install the new firmware, then you can manually do so by first selecting the gear icon, which can be found in the top right side of the home screen.
  • Inside the Settings menu, you then need to go to System.
  • From the System menu, you first need to select System Software from the left column.
  • You should then select System Software Update and Settings on the right side in the same System menu.
  • In the next screen, you need to select System Software.
  • Afterwards, we recommend that your select Update Using Internet.
  • Wait until the firmware update is completed.

Try to enable Variable Refresh Rate support on your PlayStation 5 or PlayStation 5 Digital Edition again after updating the console to see if the new firmware helps with the compatibility of this feature.

How to turn on Variable Refresh Rate for PS5 and PS5 Digital Edition

Sony has finally added Variable Refresh Rate to the PlayStation 5 and PlayStation 5 Digital Edition. Enabling this very helpful feature can be somewhat confusing, however.

If you can’t find the VRR settings in the system menus, then you can take a look at this troubleshooting guide at Seeking Tech.

Where is the Variable Refresh Rate setting on PS5 and PS5 Digital Edition

In order to find the Variable Refresh Rate setting on your PlayStation 5 or PlayStation 5 Digital Edition, you need to do the following:

  • From the home screen, which is the menu where you can select which videogame to play, head into Settings by selecting the gear icon on the top right side of the screen.
  • Inside of Settings, select Screen and Video.
  • In the Screen and Video menu, you need to select Video Output on the left side.
  • Afterwards, you should find the Variable Refresh Rate setting on the right side of the same menu. The VRR setting should be in between the 4K Video Transfer Rate and HDR settings.
  • Keep in mind that VRR will still appear in the system menus even if your television set or monitor don’t support the feature.

What to do if the VRR setting is missing on PS5 and PS5 Digital Edition

If the Variable Refresh Rate setting does not appear in the system menus of your PlayStation 5 or PlayStation 5 Digital Edition, then you can try doing the following:

1. Sony stealthily added Variable Refresh Rate in a recent firmware update. So, if you haven’t updated your PS5 or PS5 Digital Edition system in a long time, then you can do so by taking the following steps:

  • Turn on your console and then make sure that it is connected online to the PlayStation Network.
  • If you didn’t get a prompt to download and install the new firmware immediately, then you need to go to Settings. In order to do so, select the gear icon from the home screen.
  • From the Settings menu, select System.
  • In the System menu, select System Software on the left side and then System Software Update and Settings on the right side in the same screen.
  • Next, you need to select update System Software.
  • You then need to select Update Using Internet.
  • Follow the on-screen instructions to complete the firmware update.

2. If the firmware of your PlayStation 5 or PlayStation 5 Digital Edition system is up to date but the Variable Refresh Rate is still not appearing, then make sure that your console is connected to the PlayStation Network.

3. If your console is connected to the PSN, then you can try restarting to see if VRR will show up.

4. Moreover, you can turn off your game system and then turn it back on again to see if doing so will fix the missing VRR issue.

4. You can also try opening a game or media app. Afterwards, press and hold the PS button to go to the home menu. You can then go to Settings > Screen and Video > Video Output to see if the VRR setting is now available.

LG 27GP950-B desk and wall mount specs

The 27GP950-B is one of the newest Ultragear gaming monitors.

You can take a look at this guide from Seeking Tech to see what are the most suitable desk mounts and wall mounts for this LG monitor.

What is the LG 27GP950-B?

The 27GP950-B is an Ultragear Gaming Monitor that is capable of displaying at the full 4K resolution, which is 3840 pixels x 2160 pixels.

The screen includes two HDMI 2.1 ports, which mean that can take advantage of displaying PlayStation 5, Xbox Series X and Xbox Series S games running at up to 120 frames per second. With a 160 Hz native refresh rate, it can also display PC games at a maximum of 160 fps.

The other notable features include support for DisplayPort 1.4, HDR10, FreeSync, GSYNC, Variable Refresh Rate and Wide Color Gamut.

Dimensions without Stand

Before installing the on your desk or wall, you need to make sure that you have enough space. This is especially important if you are planning to extend, rotate, swivel and/or tilt the screen.

You can find the dimensions of the 27GP950-B, without the inclusion of its default stand, below (the measurements are shown in millimeters, centimeters and inches):

  • Dimensions without Stand (in millimeters): 607.06 mm x 353.06 mm x 53.34 mm
  • Dimensions without Stand (in centimeters): 60.71 cm x 35.31 cm x 5.34 cm
  • Dimensions without Stand (in inches): 23.9 inches x 13.9 inches x 2.1 inches

Weight without Stand

Desk mounts and wall mounts for monitors can only hold a certain amount of weight. Therefore, it is important to know how heavy is the LG 27GP950-B.

You can find the weight specifications in pounds and kilograms for this product without the inclusion of its default stand, below:

  • Weight without Stand (in pounds): 12.6 lbs.
  • Weight without Stand (in kilograms): 5.72 kg

VESA Mounting Pattern

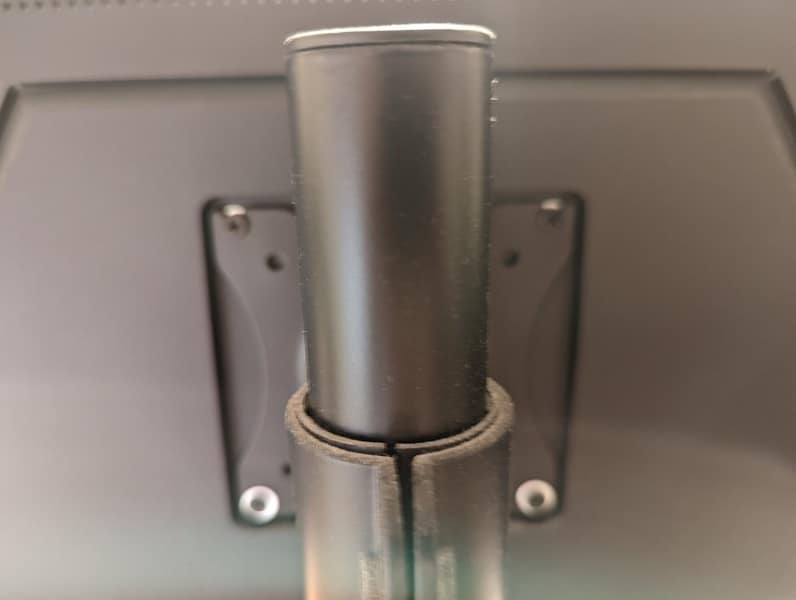
The 27GP950-B has four screw holes located on its back that you will need to install it on a desk mount or wall mount. The VESA Mounting Pattern is a measurement of the horizontal and vertical distances of these holes for your LG 4K monitor.

You can find the measurements in millimeters, centimeters and inches below:

  • VESA Mounting Pattern (in millimeters): 100 mm x 100 mm
  • VESA Mounting Pattern (in centimeters): 10 cm x 10 cm
Desk mount example.

What desk and wall mounts can be used with the LG 27GP950-B?

In terms of the general desk and wall mount requirements, you can find the compatibility information below:

What desk mounts are compatible with the LG 27GP950-B?

A vast majority of desk mounts should be compatible with the 27GP950-B as 100 mm x 100 mm is a common VESA Mounting Pattern. Furthermore, the monitor is lightweight enough that you shouldn’t experience any issues.

With a desk mount, you get to save some space as you won’t have to deal with a stand. You can also easily customize the screen’s position as you are able to extend, rotate, swivel and/or tilt it.

With desk mounts, you can use a clamp or grommet hole to attach them to your desk.

What wall mounts are compatible with the LG 27GP950-B?

The 27GP950-B should also work with a vast majority of monitor wall mounts thanks to the common 100 mm x 100 mm VESA Mounting Pattern in addition to being light in weight.

Just like a desk mount, a monitor wall mount, will save you a little bit of space as you don’t need a stand. Of course, you will also be able to extend, rotate, swivel and/or tilt the LG 27GP950-B.

Work wall mounts, you can use a stud or concrete wall for installation.

If you are looking for specific product recommendations, then you can check out our monitor desk mount and wall mount buyer’s guide with this link.

Resource:

Recommended monitor desk mounts and wall mounts

If you are looking for a desk mount or wall mount for your monitor, then we highly recommend going with the Ergotron brand.

You can check out this guide at Seeking Tech to find the most suitable options for your specific monitor.

Single Monitor Desk Mounts

For single monitor desk mounts, we suggest getting the Ergotron LX Single Monitor Arm is for screen size is 34 inches or less. For bigger flat and curved screens, you should get the Ergotron HX Desk Ultrawide Arm instead.

You can find the specifications for both single monitor desk mounts below.

Ergotron LX Single Monitor Arm

  • Supported Monitor Screen Size: Up to 34″
  • Supported Monitor Weight: Up to 25 lbs. (or 11.3 kg)
  • Lift: 13″
  • Tilt: 75 degrees
  • Pan: 360 degrees
  • Extension: 25.6”

Supported Attachment Options:

  • Clamp
  • Grommet

Supported VESA Mounting Patterns (millimeters):

  • 75 mm x 75 mm
  • 100 mm x 100 mm

Supported VESA Mounting Patterns (centimeters):

  • 7.5 cm x 7.5 cm
  • 10 cm x 10 cm

Supported VESA Mounting Patterns (inches):

  • 3” x 3”
  • 4” x 4”

You can buy the Ergotron LX Single Monitor Arm on Amazon with this link. (#CommissionsEarned).

Ergotron HX Desk Ultrawide Arm

  • Supported Monitor Screen Size: Up to 49″
  • Supported Monitor Weight: Up to 42 lbs. (or 19 kg)
  • Lift: 11.5”
  • Tilt: 75 degrees
  • Pan: 180 degrees
  • Extension: 23.6”

Supported Attachment Options:

  • Clamp
  • Grommet

Supported VESA Mounting Patterns (millimeters):

  • 75 mm x 75 mm
  • 100 mm x 100 mm
  • 200 mm x 100 mm
  • 200 mm x 200 mm

Supported VESA Mounting Patterns (centimeters):

  • 7.5 cm x 7.5 cm
  • 10 cm x 10 cm
  • 20 cm x 10 cm
  • 20 cm x 20 cm

Supported VESA Mounting Patterns (inches):

  • 3” x 3”
  • 4” x 4”
  • 8” x 4”
  • 8” x 8”

You can purchase the Ergotron HX Desk Ultrawide Arm on Amazon via this link. (#CommissionsEarned).

Dual Monitor Desk Mounts

For a dual monitor desk mount, we recommend getting the Ergotron LX Dual Desk Arm if you want to stack them side-by-side or the Ergotron LX Dual Stacking Desk Arm if you want to stack one on top of another.

You can find the specs for both below:

Ergotron LX Dual Desk Arm

  • Supported Monitor Screen Size: Up to 27″
  • Supported Monitor Weight: Up to 40 lbs. (or 18 kg)
  • Lift: 13″
  • Tilt: 75 degrees
  • Pan: 360 degrees
  • Extension: 25.6”

Supported Attachment Options:

  • Clamp
  • Grommet

Supported VESA Mounting Patterns (millimeters):

  • 75 mm x 75 mm
  • 100 mm x 100 mm

Supported VESA Mounting Patterns (centimeters):

  • 7.5 cm x 7.5 cm
  • 10 cm x 10 cm

Supported VESA Mounting Patterns (inches):

  • 3” x 3”
  • 4” x 4”

You can buy the Ergotron LX Dual Desk Arm from Amazon with this link. (#CommissionsEarned).

Ergotron LX Dual Stacking Desk Arm

  • Supported Monitor Screen Size: Up to 24″
  • Supported Monitor Weight: Up to 40 lbs. (or 18 kg)
  • Lift: 13″
  • Tilt: 75 degrees
  • Pan: 360 degrees
  • Extension: 25.6”
  • Supported Attachment Options:
  • Clamp
  • Grommet

Supported VESA Mounting Patterns (millimeters):

  • 75 mm x 75 mm
  • 100 mm x 100 mm

Supported VESA Mounting Patterns (centimeters):

  • 7.5 cm x 7.5 cm
  • 10 cm x 10 cm

Supported VESA Mounting Patterns (inches):

  • 3” x 3”
  • 4” x 4”

You can purchase the Ergotron LX Dual Stacking Desk Arm from Amazon via this link. (#CommissionsEarned).

Single Monitor Wall Mounts

For a single monitor wall mount, you should get the Ergotron LX Wall Arm if you have a smaller monitor that is 34 inches are less. For larger screens, you should get the Ergotron HX Wall Arm instead.

You can check out the specs for these wall mounts below.

Ergotron LX Wall Arm

  • Supported Monitor Screen Size: Up to 34″
  • Supported Monitor Weight: Up to 25 lbs. (or 11.3 kg)
  • Lift: 13″
  • Tilt: 75 degrees
  • Pan: 360 degrees
  • Screen Depth: 3.6”
  • Extension: 25.7”

Supported VESA Mounting Patterns (millimeters):

  • 75 mm x 75 mm
  • 100 mm x 100 mm

Supported VESA Mounting Patterns (centimeters):

  • 7.5 cm x 7.5 cm
  • 10 cm x 10 cm

Supported VESA Mounting Patterns (inches):

  • 3” x 3”
  • 4” x 4”

You can purchase the Ergotron LX Wall Arm with this Amazon link. (#CommissionsEarned).

Ergotron HX Wall Arm

  • Supported Monitor Screen Size: Up to 49″
  • Supported Monitor Weight: Up to 42 lbs. (or 19 kg)
  • Lift: 11.5″
  • Tilt: 75 degrees
  • Pan: 180 degrees
  • Screen Depth: 6”
  • Extension: 24.8”

Supported VESA Mounting Patterns (millimeters):

  • 75 mm x 75 mm
  • 100 mm x 100 mm
  • 200 mm x 100 mm
  • 200 mm x 200 mm

Supported VESA Mounting Patterns (centimeters):

  • 7.5 cm x 7.5 cm
  • 10 cm x 10 cm
  • 20 cm x 10 cm
  • 20 cm x 20 cm

Supported VESA Mounting Patterns (inches):

  • 3” x 3”
  • 4” x 4”
  • 8” x 4”
  • 8” x 8”

You can buy the Ergotron HX Wall Arm via this Amazon link. (#CommissionsEarned).

Dual Monitor Wall Mount

For a dual monitor wall mount, we suggest picking up the Ergotron HX Dual Wall Arm. You can find the specs for this mount below:

Ergotron HX Dual Wall Arm

  • Supported Monitor Screen Size: Up to 32”
  • Supported Monitor Weight: Up to 35 lbs. (or 15.8 kg)
  • Lift: 11.5″
  • Tilt: 75 degrees
  • Pan: 180 degrees
  • Screen Depth: 3”
  • Extension: 24.5”

Supported VESA Mounting Patterns (millimeters):

  • 75 mm x 75 mm
  • 100 mm x 100 mm

Supported VESA Mounting Patterns (centimeters):

  • 7.5 cm x 7.5 cm
  • 10 cm x 10 cm

Supported VESA Mounting Patterns (inches):

  • 3” x 3”
  • 4” x 4”

If you are interested, you can purchase the Ergotron HX Dual Wall Arm with this link from Amazon. (#CommissionsEarned).

Is the Odyssey Neo G9 suitable for PS5, Xbox Series X and other consoles?

In 2021, Samsung released the Neo version of the Odyssey G9. So, is this gaming monitor any good when it comes to displaying consoles games from the PlayStation 5, Xbox Series X, Xbox Series S, Nintendo Switch and other systems?

You can find out in this guide at Seeking Tech.

Quick Summary

The Samsung Odyssey Neo G9 is one of the best monitors for the PlayStation 5, Xbox Series X and Xbox Series S as it supports HDMI 2.1, 120 frames per second, HDR10 and Variable Refresh Rate.

When it comes to performance, the Odyssey Neo G9 is capable of outputting excellent contrast and really good HDR brightness in addition to providing extremely low input lag.

You can also check out our desk and wall mount guide for the Neo G9 with this link.

Native Resolution

The Samsung Odyssey Neo G9 is an ultrawide screen monitor with a native resolution of 5120 x 1440 with an aspect ratio of 32:9.

The PS3, PS4, PS4 Pro, PS5, Wii U, Switch, Xbox 360, Xbox One, Xbox One S, Xbox One X, Xbox Series S and Xbox Series X mainly use the 16:9 aspect ratio.

As a result, this monitor will display console games with horizontal black bars on half of the screen. Alternatively, you can use half to display another 16:9 images. You can also stretch out the 16:9 image to fit into the entire 32:9 screen.

Native Refresh Rate

The Odyssey Neo G9 has a native refresh rate of 240 Hz, which means that it is capable of playing up to 240 frames per second on PC.

When it comes to consoles, you can play games at up to 120 fps on the PlayStation 5, Xbox Series S and Xbox Series X.

The older HDMI consoles (PS3, PS4, PS4 Pro, Wii U, Switch, Xbox 360, Xbox One, Xbox One S and Xbox One X) will top out at 60 frames per second.

HDMI Ports

The Neo G9 comes with two HDMI 2.1 ports, which is supported by the PS5, Xbox Series S and Xbox Series X.

HDMI 2.1 is also compatible with older HDMI versions. So, you shouldn’t notice any issues when connecting your PS3, PS4, PS4 Pro, Wii U, Switch, Xbox 360, Xbox One, Xbox One S or Xbox One X to this gaming monitor.

Supported Resolutions and FPS for PS5

The PlayStation 5, as well as the PlayStation 5 Digital Edition, does not natively support 1440p. With that said, the Samsung Odyssey Neo G9 should be able to downscale the 4K video signal from the PS5 to 1440p.

You can find the supported frame rate and resolutions from Sony’s latest home console below:

  • Up to 120 frames per second in 1080p
  • Up to 120 frames per second in 1440p downscaled from 4K

Supported Resolutions and FPS for Xbox Series X and Xbox Series S

The Xbox Series S and Xbox Series X do natively support 1440p. As a result, you should be able to pick between native 1440p or 4K downscaled to 1440p when using the Neo G9.

You can check out a breakdown of the supported Xbox Series X/S frame rates and resolutions below:

  • Up to 120 frames per second in 1080p
  • Up to 120 frames per second in 1440p
  • Up to 120 frames per second in 1440p downscaled from 4K

Contrast Ratios

According to tests done by RTINGS.com, the Odyssey Neo G9 has a really good contrast with a ratio of 2,866 to 1. With local dimming, the Odyssey Neo G9 has one of the best contrasts of any gaming monitors currently on the market with a ratio of 14,843 to 1.

Odyssey Neo G9’s HDR Brightness Levels

According to tests from RTINGS.com, the Samsung Odyssey Neo G9 is one of the best HDR monitors currently available as it can output 644 nits of brightness when playing an HDR-enabled videogame.

In other scenarios, this screen is also able to easily output above our recommended minimum of 500 nits if you want a good HDR experience.

You can take a look at the full tests results below (via RTINGS):

  • HDR Real Scene Peak Brightness: 644 nits
  • HDR Peak 2% Window: 1,030 nits
  • HDR Peak 10% Window: 2,211 nits
  • HDR Peak 25% Window: 897 nits
  • HDR Peak 50% Window: 831 nits
  • HDR Peak 100% Window: 630 nits
  • HDR Sustained 2% Window: 1,014 nits
  • HDR Sustained 10% Window: 1,004 nits
  • HDR Sustained 25% Window: 890 nits
  • HDR Sustained 50% Window: 824 nits
  • HDR Sustained 100% Window: 629 nits
  • HDR ABL: 0.026

FreeSync, G-Sync and Variable Refresh Rate Support

The Samsung Odyssey Neo G9 supports FreeSync, G-Sync and Variable Refresh Rate.

The only consoles that use Variable Refresh Rate is the Xbox Series X and Xbxo Series S. The PlayStation 5 should also get VRR support via an upcoming firmware update.

Variable Refresh Rate is designed for games that run at an unstable frame rate as it eliminates stutters and tearing.

Samsung Odyssey Neo G9’s Input Lag

As expected from a gaming monitor, the Odyssey Neo G9 has extremely low input lag.

According to tests done by RTINGS, the latency is just 2.9 ms at native resolution, 2.8 ms with Variable Refresh Rate enabled and 8.9 ms at native resolution at 60 Hz.

Samsung Odyssey Neo G9’s HDR Capabilities

The Neo G9 is compatible with the HDR10 format that is utilized by the PS4, PS4 Pro, PS5, Xbox One S, Xbox One X, Xbox Series S and Xbox Series X.

This Samsung monitor does not support Dolby Vision, which is used by the Xbox Series S and Xbox Series X.

You can find the full list of HDR features below:

  • HDR10
  • Local Dimming
  • Wide Color Gamut

Is the Odyssey Neo G9 good for PS5, Xbox Series S and Xbox Series X?

The Samsung Odyssey Neo G9 is one of the better console gaming monitors as it supports HDMI 2.1, 120 Hz, HDR10 and Variable Refresh Rate.

The monitor also features a very good HDR brightness output in addition to very low input lag. With local dimming, you will get great contrast as well.

Is the Odyssey Neo G9 for Switch, PS4, and Xbox One?

Due to the aforementioned stellar contrasts and low input lag, the Odyssey Neo G9 should also be a great monitor for older gaming consoles such as the PS3, PS4, Wii U, Switch, Xbox 360 and Xbox One.

It should also be a great HDR monitor for playing HDR games running on the PS4, PS4 Pro, Xbox One S and Xbox One X.

How to fix flickering issues with Samsung Odyssey Neo G9

When using the 49″ Samsung Odyssey Neo G9 Gaming DQHD Quantum Mini-LED Monitor, your screen may flicker.

To fix these flickering issues, you can check out this troubleshooting guide at Seeking Tech.

Potential Fix #1: Checking the Connected Cables

The first step we recommend taking is to check if the cables are properly connected to your Odyssey Neo G9.

First off, make sure that the monitor is securely connected to the power cable.

You should also make sure that the DisplayPort and/or HDMI cable are connected snugly to the ports on your monitor as well as the input device.

Furthermore, you should inspect to see if the cables have any damage. If you see some peeling and/or fraying, you can try using a different cable to see if doing so will help get rid of the flickers.

Potential Fix #1: Enabling VRR Control

If you believe that your connections to the monitor is normal, then the next step we suggest taking is to enable VRR Control. This feature is designed to help with alleviating screen flickers by optimizing the input video signal process.

To enable VRR Control you need to use the Function Key Guide on your Samsung Odyssey Neo G9 to go the Menu and then System.

Potential Fix #2: Disabling FreeSync and G-SYNC

Disabling adaptive sync on your monitor may also resolve the flicking problems with the Samsung Odyssey Neo G9.

In order to do so, use the Function Key Guide on the Samsung Odyssey Neo G9. Afterwards, select Menu and then Game. Here, you can disable Adaptive-Sync (which is the G-SYNC setting for NVIDIA graphics cards) or FreeSync Premium Pro (which is the FreeSync setting for AMD graphics cards).

Potential Fix #3 Changing the Refresh Rate

If you are still experiencing flickering issues with your Odyssey Neo G9, then you can try changing the refresh rate of the screen.

This Samsung monitor supports the following refresh rates:

  • 60 Hz, 120 Hz and 240 Hz when using the DisplayPort
  • 60 Hz, 120 Hz and 144 Hz when using the HDMI port

On the monitor, you can change the refresh rate by using the Function Key Guide, going to Menu and then Game.

Potential Fix #4: Updating Your Graphics Card Drivers

You can also try updating the drivers of your graphics cards.

You can download and install the latest drivers for AMD cards with this link.

You can also download and install the latest drivers for NVIDIA graphics cards with this link.

Potential Fix #5: Changing the Frequency of Graphics Card

The next step we recommend taking is to try changing the frequency of your graphics card.

If you have a Windows 10 PC, you can change the frequency by doing the following:

1. Open the Window taskbar and then go to Settings.

2. In Settings, select System.

3. In the next screen, select Display on the left side.

3. On the right side of the same Display menu, select Advanced display settings.

4. In the Advanced display settings menu, select Display adapter properties.

5. In the monitor tab of the pop-up menu, you will be able to change the screen refresh rate.

Potential Fix #6: Changing the Resolution of Input Source

You can also try changing the resolution on your input source.

If you are using your Windows 10 PC, for example, then you can take the following steps:

1. Select Settings from the Windows taskbar.

2. Once you are inside the Settings menu, go to System.

3. In the System menu, select Display from the list of the left side.

4. On the right side, you then need to select the Advanced display settings.

5. Here, you should be able to change the resolution of the Samsung Odyssey Neo G9.

Potential Fix #7: Lowering Game Graphical Settings

If your Odyssey Neo G9 is only flickering when you are playing a specific game, then we recommend changing the graphical setting of the game to be less intensive.

We suggest lowering the resolution, frame rate and other visual effects to see if doing so will eliminate the screen flickers.