How to clean the Alienware AW3423DW Curved QD-OLED Gaming Monitor

The Alienware AW3423DW is a 34” Curved QD-OLED Gaming Monitor. You can check out this guide at Seeking Tech to see how you can properly clean this screen.

What cleaning solution can you use for Alienware AW3423DW?

When it comes to what solution you can use for the Alienware AW3423DW, plain tap water should work fine.

With that said, we recommend highly concentrated isopropyl alcohol as it dries much faster than water, which will prevent any potential liquid damage if some managed to get inside of the monitor. Furthermore, it will also help sanitize the screen from germs.

If you are looking for a specific recommendation for the AW3423DW, then you can pick up the MG Chemicals 824-1L 99.9% Isopropyl Alcohol Electronics Cleaner Liquid Bottle on Amazon with this link. (#CommissionsEarned).

Avoid using ammonia, benzene, detergent, soap and thinner as these solutions may end up damaging the screen.

What cleaning materials can you use to wipe the AW3423DW?

As for what you can use to wipe the screen of your Alienware monitor, a lint-free cloth should work well.

If don’t have one lying around, then we recommend picking up the MagicFiber Microfiber Cleaning Cloth, which you can get from Amazon via this link. (#CommissionsEarned).

How to clean the Alienware AW3423DW

In order to clean the 34” Curved QD-OLED Gaming Monitor, you can try taking the following steps:

1. Before doing anything else, you need to unplug the monitor from the power outlet. Otherwise, you will risk damaging the screen and potentially causing electrical shock.

2. If you are planning to clean more than just the display area of the AW3423DW, then make sure you have enough room where you can easily move around so that you don’t accidentally knock down the monitor.

If possible, you should put the screen on a soft surface, such as a bed, when cleaning.

3. Next, apply the water or isopropyl alcohol directly to the lint-free cloth.

You should avoid applying the solution directly on the monitor as the excess water could end up seeping inside, potentially causing liquid damage.

When applying the water or water or isopropyl alcohol to the cloth, make sure you don’t overdo it to make the cloth extra wet. If you did, then you should squeeze out any excess water from the damp cloth before moving on to the next step.

4. Next, you can start gently wiping your Alienware AW3423DW. When wiping, we suggest using a circular motion to efficiently remove any dust, dirt and grimes from the surface.

5. Once you are done wiping the gaming monitor, we recommend that you let it sit until it complete dries up at room temperature.

To speed up the drying process for the AW3423DW, you can put a fan next to so that you can get better air circulation.

You should avoid using any heat source, such as a hair blow dryer, as doing so could end up causing damage to the gaming monitor.

6. After making sure that the screen has completely dried, you should be able to plug it back into the power outlet and turn it on without any issues.

Alienware AW3423DW desk and wall mount specs

The Alienware AW3423DW is the first ever QD-OLED gaming monitor to be released. If you want to use a desk mount or wall mount with this screen, then you can take a look at this compatibly guide from Seeking Tech.

About the Alienware AW3423DW

The 34” Alienware Curved QD-OLED Gaming Monitor (AW3423DW) can output up to 1,000 nits of HDR brightness in addition to being certified for VESA Display HDR True Black 400.

The screen supports resolutions of up to 3440 x 1440. In terms of refresh rate, you can get up to 175 Hz with DisplayPort 1.4 as well as up to 100 Hz with HDMI 2.0.

The other notable features include 0.1 ms gray-to-gray response time, 99.3% DCI-P3 color coverage and adaptive sync support.

Does the Alienware AW3423DW come with a stand?

The Alienware AW3423DW does come with a stand included inside its retail box.

With this optional accessory, you will be able to adjust the following ranges:

  • 0 mm to 110 mm height range
  • -5° to 21° tilt range
  • -20° to 20° swivel range
  • -5° to 5° slant range

Dimensions without Stand

If you rather use a desk mount or wall mount for the AW3423DW, then it is important to know the dimensions of the gaming monitor without the inclusion of the stand in order to make sure you have enough space for mounting.

You can find the dimensions, which are displayed in millimeters, centimeters and inches, for the Alienware AW3423DW Curved QD-OLED Gaming Monitor below:

Dimensions without Stand (in millimeters):

  • Height: 364.15 mm
  • Width: 815.25 mm
  • Depth: 137.11 mm

Dimensions without Stand (in centimeters):

  • Height: 36.42 cm
  • Width: 81.53 cm
  • Depth: 13.71 cm

Dimensions without Stand (in inches):

  • Height: 14.34 in.
  • Width: 32.10 in.
  • Depth: 5.40 in.

Weight without Stand

Desk mounts and wall mounts for monitors have weight capacity limits. Fortunately, the Alienware AW3423DW is relatively lightweight.

You can check out the weight specifications for this gaming monitor below:

  • Weight without Stand (in pounds): 15.26 lbs.
  • Weight without Stand (in kilograms): 6.92 kg

VESA Mounting Pattern

The desk mount or wall mount must support the VESA Mounting Pattern of the Alienware AW3423DW in order for you to attach it.

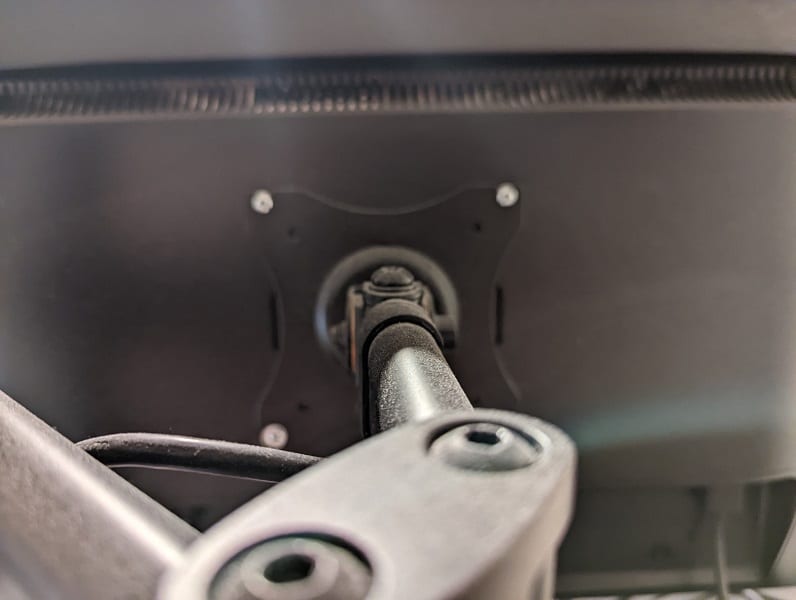
For the uninformed, the pattern refers to the four screw holes located on the back of the screen.

The Alienware AW3423DW features the 100 mm x 100 mm VESA Mounting Pattern.

Desk mount example.

What desk mounts or wall mounts are compatible with the Alienware AW3423DW?

For a desk mount of wall mount to be compatible with the 34” Alienware Curved QD-OLED Gaming Monitor (AW3423DW), it needs to be able to hold at least 15.26 lbs. (or 6.92 kg). Furthermore, the bracket must support the 100 mm x 100 mm VESA Mounting Pattern.

If you are looking for specific product recommendations, then you can take a look at this article.

In order to attach the desk mount or wall mount to this monitor, you first need to remove the monitor stand and then attach the VESA adapter that came included inside the box of your AW3423DW.

Afterwards, you can install the mount by screwing in the M4 x 10 mm screws, which also came with the monitor, into the screw holes located at the back of the screen.

Resource:

How to enable BenQ MOBIUZ EX2710U and EX3210U VRR support for Xbox Series X and S

The BenQ MOBIUZ EX2710U and EX3210U gaming monitors are capable of displaying Xbox Series X and Xbox Series S with Variable Refresh Rate.

To find out how you can enable VRR for these game consoles, you can take a look at this tutorial from Seeking Tech.

This guide will be based on the following models:

  • 27″ BenQ MOBIUZ 4K True HDMI 2.1 Gaming Monitor (EX2710U)
  • 32″ BenQ MOBIUZ 4K True HDMI 2.1 Gaming Monitor (EX3210U)

1. To start off, we recommend that you update your MOBIUZ EX2710U or MOBIUZ EX3210U to the latest available firmware. This is because a new driver may improve the performance and compatibility of the monitor’s Variable Refresh Rate capabilities.

In order to update, you can visit the following links from the official BenQ website:

2. We also recommend that you update your Xbox Series X or Xbox Series S to the latest firmware too as doing so may help improve the console’s VRR feature.

3. If you haven’t done so already, connect your game console to the HDMI port of your monitor. Make sure you are using the HDMI cable than came with your system.

The Xbox Series X should come with a HDMI 2.1 cable while the less powerful Xbox Series S should come with a HDMI 2.0 cable. Both should work with Variable Refresh Rate.

4. Next, you need to power on your monitor and game console.

5. If your EX2710U or EX3210U isn’t showing the input source from your Xbox Series X or Xbox Series, then you need to switch over to the correct input before continuing.

6. Afterwards, you need to use the 5-way controller on your EX2710U or EX3210U to head to the Quick Menu.

7. In the Quick Menu of your monitor, head over to Menu.

8. Inside of Menu, select Input.

9. You then need to select the input source that is connected to your Xbox Series X or Xbox Series S.

10. Lastly, set the HDMI input to Game to get your EX2710U or EX3210U ready for Variable Refresh Rate.

11. In the menu of your Xbox Series X or Xbox Series S console, head over to Settings.

12. Inside the Settings menu of your game console, select General on the left column.

13. Afterwards, select “TV & display options” on the right portion of the same menu.

14. From the “General – TV & display options” menu, you then have to select “Video modes.”

15. Now that you arrive at the “General – Video modes” menu, make sure that the box next to the “Allow variable refresh rate” setting is checked.

You should now be able to play videogames on your Xbox Series X or Xbox Series S game console with Variable Refresh Rate enabled on your E 27″ BenQ MOBIUZ 4K True HDMI 2.1 Gaming Monitor (EX2710U) or 32″ BenQ MOBIUZ 4K True HDMI 2.1 Gaming Monitor (EX3210U).

If you also have a PlayStation 5 or PlayStation 5 Digital Edition, then you can take a look at this article to see how you can enable Variable Refresh Rate support for these consoles with the EX2710U or EX3210U.

How to enable MSI MPG321UR-QD VRR support for Xbox Series X and S

With the 32″ MSI Optix MPG321UR-QD 16:9 4K 144 Hz IPS Gaming Monitor, you can play games with Variable Refresh Rate on the Xbox Series X and Xbox Series S gaming consoles. To find out how you can properly enable this feature, you can take a look at this article from Seeking Tech.

Xbox Series X and Xbox Series S VRR benefits

By using Variable Refresh Rate, games running on the Xbox Series X or Xbox Series S that don’t originally run at a stable frame rate will look smoother. Furthermore, screen tearing should also be eliminated.

How to turn on MSI MPG321UR-QD VRR support for Xbox Series X and S

In order to use the Variable Refresh Rate feature of the 32″ MSI Optix MPG321UR-QD on your Xbox Series X or Xbox Series S system, you need to take the following steps:

1. Before everything else, we recommend that you update the firmware of your PG321UR-QD as a new version may help improve the VRR performance of the screen.

You can download the latest firmware for this product with the following link:

2. Furthermore, you should also keep your Xbox Series X or Xbox Series S updated to the newest firmware release as well. A new update may also help when it comes to using Variable Refresh Rate.

3. Next, you need to connect your Xbox game console to the HDMI 2.1 port of the MSI Optix MPG321UR-QD. We recommend that you use the HDMI cable that came with your console.

For the uninformed, the Xbox Series X comes with a HDMI 2.1 cable included in the box while the Xbox Series S comes with a HDMI 2.0 cable.

You should be able to still get Variable Refresh Rate support of MPG321UR-QD the monitor with a HDMI 2.0 cable for both of these consoles.

4. Turn on the screen and game console if you haven’t done so already.

5. Make sure that the MSI Optix MPG321UR-QD is displaying the correct input source for your Xbox console. If not, you need to switch over to the right input before continuing.

6. Next, use the Navi Key on your monitor to open the on-screen display (OSD) menu.

7. Inside the OSD menu, you first need to scroll down and then select Setting on the left column.

8. You then need to go to HDMI 2.1.

9. For the HDMI 2.1 setting, select 4K 120Hz – Console.

10. Head back to the OSD menu and then select Gaming.

11. You then need to select Adaptive-Sync.

12. In the Adaptive-Sync setting, make sure you select On.

13. On your Xbox Series X or Xbox Series S console, go to Settings.

14. From the Settings menu, go to General in the left column and then select “TV & display options” on the right side.

15. In the “General – TV & display options” menu, select “Video modes.”

16. From the “General – Video modes” menu, make sure that the “Allow variable refresh rate” setting is checked, which indicates that VRR has been enabled for your Xbox Series X or Xbox Series S game console.

To see how you can enable VRR support for the MSI Optix MPG321UR-QD when playing PS5 games, you can check out this article.

How to enable Acer Nitro XV282K VRR support for PS5

The 28″ Acer Nitro XV282K KVbmiipruzx is one of several select gaming monitors that currently supports the Variable Refresh Rate feature of the PlayStation 5 and PlayStation 5 Digital Edition systems.

To see how you can enable VRR with the XV282K KVbmiipruzx when playing PS5 games, you can check out this tutorial at Seeking Tech.

What are the benefits of using Acer Nitro XV282K VRR with PS5

By enabling Variable Refresh Rate support of the 28″ Acer Nitro XV282K KVbmiipruzx 4K UHD IPS Monitor on your PlayStation 5, you will be able to remove any stuttering and screen tearing from games that can’t to run at a consistent frame rate.

VRR currently only supports PlayStation 5 games as backwards compatible PlayStation 4 games running on a PS5 won’t work.

Furthermore, the PlayStation 5 game must run at a minimum of 48 frames per second for this feature to be effective.

How to enable Acer Nitro XV282K VRR support for PS5

To turn on the Variable Refresh Rate for the 28″ Acer Nitro XV282K KVbmiipruzx 4K UHD IPS Monitor, you need to take the following steps:

1. To start off, we recommend that you update the firmware of your Acer Nitro XV282K as it may help improve performance and fix any bugs.

You can find the update file and instructions for this computer screen on the official Acer website with the following link:

2. You should also keep your PlayStation 5 or PlayStation 5 Digital Edition system updated as well with the latest firmware.

3. If you haven’t done so already, connect your PS5 to the HDMI 2.1 port of the Acer Nitro XV282K KVbmiipruzx via a HDMI 2.1 cable.

4. Turn on the monitor and game system.

5. Make sure that your gaming monitor is displaying the input of your PlayStation 5. If not, then you need to switch over to it.

6. On the on-screen display menu of the XV282K KVbmiipruzx and then select the System option on the left column.

7. Next, you need to scroll down and then select HDMI 2.1.

8. Make sure that the HDMI 2.1 setting is set to On. Your Acer 4K monitor should now be ready for Variable Refresh Rate support.

9. From the home screen of your PS5, which is the main menu where you can select which game to play, head to Settings by selecting the gear icon located on the top right side of the screen.

10. After getting to the Settings menu of your PS5, you then need to select Screen and Video.

11. Inside the new Screen and Video menu, you then need to select Video Output on the left column side.

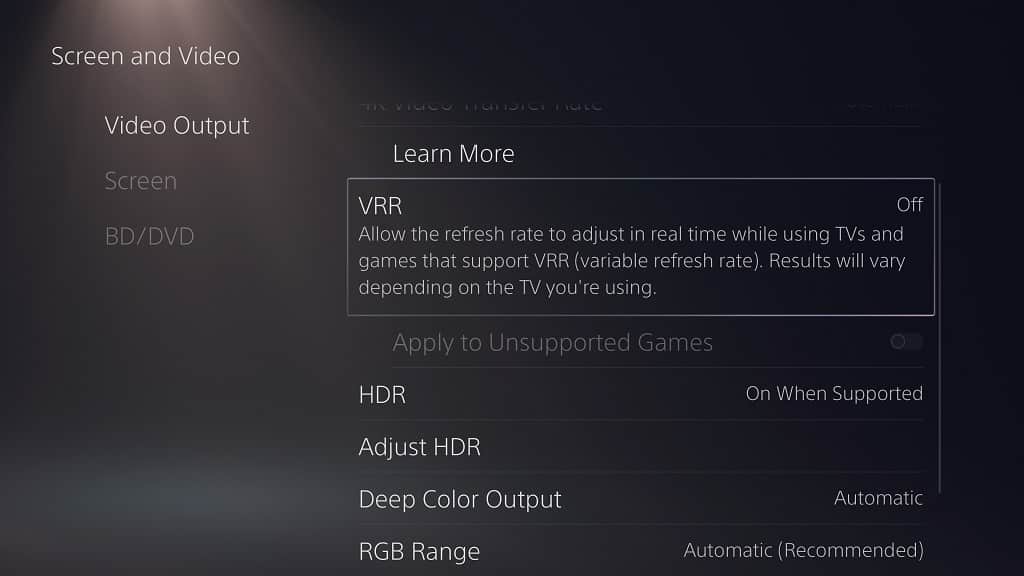
12. You should then find the VRR setting on the right side of the Screen and Video menu. By setting it to Automatic, you will enable Variable Refresh Rate for games that natively support this feature.

13. You can also turn on the “Apply to Unsupported Games” setting, which will enable VRR for PS5 videogames that currently don’t natively support it. Since it is not native, you may run into issues when trying to force VRR on unsupported games.

How to fix GIGABYTE M28U and M32U power issues

If you can’t seem to turn on your GIGABYTE M28U 28″ 144Hz 4K FreeSync Compatible Gaming Monitor or GIGABYTE M32U 32″ 144Hz 4K FreeSync Compatible Gaming Monitor, then you can check out this troubleshooting article at Seeking Tech to see what you can do to potentially fix this issue.

1. The first step we recommend taking is to make sure that the power supply is properly connected to both your computer screen as well as the power outlet.

2. You can also try unplugging the power supply from the monitor, waiting a few minutes, and then plugging it back in again.

3. If your monitor is still getting no power, then you may want to consider using a different power outlet as well since the current outlet you are using could be defective.

4. We also recommend checking if there is any damage on the power cable. If you see that it is starting to break apart, then you should consider getting a replacement.

In this case, you should contact the customer service at GIGABYTE to see if you can get a new power cable.

5. Moreover, you can also try pressing other buttons on the screen to see if you can get anything to show up on your M28U or M32U.

6. If you still aren’t getting any power after taking all of the aforementioned steps, then your GIGABYTE M28U 28″ 144Hz 4K FreeSync Compatible Gaming Monitor or GIGABYTE M32U 32″ 144Hz 4K FreeSync Compatible Gaming Monitor may have been damaged in one way or another.

In general, a computer screen can stop working due to the following reasons:

  • Extreme Temperatures – The GIGABYTE M28U and GIGABYTE M32U have a recommended operating temperature range of 0°C to 40°C or 32°F to 104°F. If you try to use these monitors at a colder or hotter range, then you could end up damaging the screens to the point where they can’t be turned on.
  • Liquid Damage – The M28U and M32U do not have an IP rating, which means that they are extremely vulnerable to liquid damage. Water or beverages may have seeped into the internal components of your screen, causing it to short circuit and become inoperable.
  • Extreme Humidity – If you use your M28U or M32U in an extremely humid environment, then the moist air could also end up getting inside your gaming monitor, causing liquid damage as a result.
  • Power Surge – Last but not least, a power surge caused by a power outage or lightning strike could have easily damaged the power supply or any other internal components of the monitor.

If you believe that your GIGABYTE M28U 28″ 144Hz 4K FreeSync Compatible Gaming Monitor or GIGABYTE M32U 32″ 144Hz 4K FreeSync Compatible Gaming Monitor is still under warranty, then we recommend contacting the customer service team at GIGABYTE to see if you can get your screen repaired or replaced. Otherwise, you will most likely need to get a new computer screen.

How to enable LG 27GP950-B VRR support for PS5

The 27” LG 27GP950-B UltraGear 4K UHD Nano IPS 1ms 144Hz HDR600 Gaming Monitor is capable of displaying PlayStation 5 games with Variable Refresh Rate. To see how you can enable VRR support for this computer screen, you can take a look at this tutorial at Seeking Tech.

What is Variable Refresh Rate?

Variable Refresh Rate is designed for videogames that are unable to run at a consistent frame. Without VRR, these games may end up suffering from stuttering and/or screen tearing.

How does Variable Refresh Rate work on PS5?

When enabled, Variable Refresh Rate will help games run smoother and eliminate screen tearing on select PlayStation 5 games.

For VRR to work, the game needs to run for at least 48 frames per second. Furthermore, only PS5 games are currently supported as backwards compatible PS4 games won’t work.

How to turn on VRR support for LG 27GP950-B on PS5

In order to use Variable Refresh Rate on your PlayStation 5 games, you can take the following steps:

1. If you haven’t done so already, we recommend updating the driver and firmware of the LG 27GP950-B UltraGear UHD Gaming Monitor.

To download the update file and instructions, you need to visit the following link from the official LG website:

2. Of course, you should also keep your PlayStation 5 and PlayStation 5 Digital Edition updated to the latest available firmware. This is because VRR was just added to a recent update. Not to mention that a new firmware may improve the support for this feature as well.

3. Next, make sure you connect your PS5 to the HDMI 2.1 port of the gaming monitor by using a HDMI 2.1 cable.

4. Turn on both the LG 27GP950-B and your PlayStation 5.

5. If your monitor isn’t showing the PS5 input, then make sure you switch over to it.

6. Press the joystick button located on your monitor to open the main menu.

7. Press the joystick button again to bring up the Settings menu for your 27GP950-B.

8. In the Settings menu, select Game Adjust.

9. You then need to select Adaptive Sync or FreeSync Premium Pro.

10. Finally select Extended.

11. On your PlayStation 5 or PlayStation 5 Digital Edition console, head over to the Settings menu.

12. From the Settings menu of your game system, go to Screen and Video.

13. Inside the Screen and Video section, select Video Output in the left column.

14. On the right side, you should find the VRR setting (if it doesn’t appear, then you can check out this article to make it visible).

15. Make sure you set VRR to Automatic in order to enable support for games that natively take advantage of this feature.

16. You can also turn on the “Apply to Unsupported Games” setting in the same menu. By doing so, you will force Variable Refresh Rate support on unsupported games.

The “Apply to Unsupported Games” setting may end up causing issues with certain games; therefore, you might want to only turn this feature on in a case-by-case basis.

How to enable MSI MPG321UR-QD VRR support for PS5

The MSI MPG321UR-QD is capable of displaying PlayStation 5 games with Variable Refresh Rate turned on. To find out how you can enable VRR support for the PS5 and PS5 Digital Edition systems, you can take a look at this article at Seeking tech.

What are the benefits of playing PS5 games with VRR on MSI Optix MPG321UR-QD?

With the 32″ MSI Optix MPG321UR-QD 16:9 4K 144 Hz IPS Gaming Monitor, you can play PlayStation 5 games with no stuttering or screen tearing when Variable Refresh Rate is enabled.

VRR will only work if the PS5 game you are planning maintains a frame rate of at least 48 fps. It if falls below that threshold, then you will start seeing stutters and/or screen tears.

Furthermore, this feature currently only works with PlayStation 5 native games. Backwards compatible PlayStation 4 games are not compatible even if you play them on a PS5 system.

How to turn on MSI MPG321UR-QD VRR support for PS5

In order to enable Variable Refresh Rate for your MSI MPG321UR-QD Gaming Monitor when playing videogames on the PlayStation 5, you need to take the following steps:

1. To begin, we suggest that you update the firmware of your 32″ MSI Optix MPG321UR-QD in case a new update improve the performance and/or fix issues with the computer screen.

You can download the latest firmware file and directions on the official MSI website with the following link:

2. Of course, you should also keep the firmware of your PlayStation 5 or PlayStation 5 Digital Edition updated to ensure that the VRR support is optimized.

3. Next, make sure you connect your PS5 system directly to the HDMI 2.1 port of the 32″ MSI Optix MPG321UR-QD 16:9 4K 144 Hz IPS Gaming Monitor. For the connection, you need to be using a HDMI 2.1 cable.

3. You should also turn on the MPG321UR-QD monitor and PS5 game system.

4. You then need to make sure that the screen is on the correct input source as it should be displaying the PlayStation 5.

5. Open the on-screen display, or OSD, of the MPG321UR-QD by pressing the Navi Key.

6. In the OSD menu, scroll down on the left column and then select Setting.

7. You then need to select HDMI 2.1.

8. Make sure that the HDMI 2.1 setting is set to 4K 120Hz – Console.

9. Go back to the OSD menu and then select Gaming on the left column.

10. You then need to make sure that the Adaptive-Sync setting is set to On. This should make your monitor VRR-ready for PlayStation 5.

11. On your PS5, make sure you are in the home screen, which is the main menu where you have the option to pick which game to open.

12. From the home screen of your game system, go to Settings, which you can do by selecting the gear icon located on the top right side of the menu.

13. In Settings, you next need to head over to Screen and Video.

14. From the Screen and Video sub-menu, select Video Output on the left column.

15. On the right side of the same Screen and Video sub-menu, select VRR.

16. Set the VRR setting to Automatic.

17. Optionally, you may also want to turn on “Apply to Unsupported Games” to force Variable Refresh Rate on PS5 games that don’t officially support the feature.

How to properly clean the GIGABYTE M28U and M32U monitors

If you want to properly clean the GIGABYTE M28U Gaming Monitor or GIGABYTE M32U Gaming Monitor, then you can check out this guide from Seeking Tech to see how you can properly do so.

What cleaning cloth should you use for the GIGABYTE M28U and M32U?

When it comes to cleaning the screen, GIGABYTE recommends using a soft cloth that is lint free. Otherwise, a dirty and/or more abrasive cloth could end up scratching your screen.

If you don’t have any clean soft cloths currently, then we recommend picking up the Magic Fiber Microfiber Cleaning Cloths. If you are interested, you can purchase a pack of these on Amazon with this link. (#CommissionsEarned).

What cleaning solution should you use for the GIGABYTE M28U and M32U?

When it comes to the cleaning solution, GIGABYTE recommends that you avoid using any acidic or abrasive cleaners. Therefore, we suggest that you use either plain water or highly-concentrated isopropyl alcohol.

Isopropyl alcohol dries a lot faster when compared plain water and will also help disinfect your computer screen.

If you are interested in using isopropyl alcohol, then we recommend picking up the MG Chemicals brand. You can find it on Amazon via the following link:

How to clean the GIGABYTE M28U and M32U

Once you have all the necessary cleaning tools, we recommend that you take the following steps in order to properly clean your GIGABYTE M28U Gaming Monitor or GIGABYTE M32U Gaming Monitor:

1. Before doing anything else, make sure you turn off your M28U or M32U.

2. After powering down your computer monitor, unplug the power cable as well as any other cables you have attached to the screen.

3. Next, we recommend that you pour the cleaning solution on the cleaning cloth.

Do not pour or spay the solution directly on your gaming monitor as the excess liquid could end up seeping through inside, causing liquid damage.

You should also make sure that your cleaning cloth doesn’t become too damp. If you think you accidentally put too much of the solution on the cloth, then you can simply squeeze the cloth over a sink to remove the excess liquid.

4. After applying the cleaning solution to the cloth, you can start wiping your M28U or M32U Gaming Monitor.

We recommend wiping the screen gently as any excessive pressure may end up damaging the screen.

You should also wipe your monitor in a circular motion. This is because wiping is straight lines will leave behind streaks and residuals.

5. Once you are done wiping your M28U or M32U, the next step is to simply wait until the monitor dries out in room temperature.

If you are in a hurry, then you can put the gaming monitor next to a fan for better air circulation.

Do not put the screen near any heat source as doing so may end up causing heat damage.

6. After making sure that the GIGABYTE M28U Gaming Monitor or GIGABYTE M32U Gaming Monitor has fully dried up, you should be able to plug it back in and turn it back on.

Compatible resolution and refresh rate combinations for GIGABYTE M28U and M32U

The GIGABYTE M28U Gaming Monitor and GIGABYTE M32U Gaming Monitor are both capable of displaying at a resolution of up to 4K in addition to a refresh rate of 144 Hz at the same time.

You can check out this guide at Seeking Tech to see what other resolution and refresh rate combinations are also compatible with these two screens.

GIGABYTE M28U Gaming Monitor’s supported resolution and refresh rate combinations

The GIGABYTE M28U support the same resolution and refresh rate combinations over the HDMI 2.1 and Display Port 1.4 connections.

The lowest resolution it can display is 480p with a refresh rate of 60 Hz.

You can find the compatible combos for both connection types of the M28U below:

GIGABYTE M28U Gaming Monitor’s HDMI 2.1 supported resolution and refresh rate combinations

  • 640×480 at 60 Hz
  • 640×480 at 75 Hz
  • 720×480 at 60 Hz
  • 800×600 at 60 Hz
  • 800×600 at 75 Hz
  • 1024×768 at 60 Hz
  • 1024×768 at 75 Hz
  • 1280×720 at 60 Hz
  • 1280×720 at 120 Hz
  • 1920×1080 at 60 Hz
  • 1920×1080 at 120 Hz
  • 1920×1080 at 144 Hz
  • 2560×1440 at 60 Hz
  • 2560×1440 at 120 Hz
  • 2560×1440 at 144 Hz
  • 3840×2160 at 60 Hz
  • 3840×2160 at 120 Hz
  • 3840×2160 at 144 Hz

GIGABYTE M28U Gaming Monitor’s Display Port 1.4 supported resolution and refresh rate combinations

  • 640×480 at 60 Hz
  • 640×480 at 75 Hz
  • 720×480 at 60 Hz
  • 800×600 at 60 Hz
  • 800×600 at 75 Hz
  • 1024×768 at 60 Hz
  • 1024×768 at 75 Hz
  • 1280×720 at 60 Hz
  • 1280×720 at 120 Hz
  • 1920×1080 at 60 Hz
  • 1920×1080 at 120 Hz
  • 1920×1080 at 144 Hz
  • 2560×1440 at 60 Hz
  • 2560×1440 at 120 Hz
  • 2560×1440 at 144 Hz
  • 3840×2160 at 60 Hz
  • 3840×2160 at 120 Hz
  • 3840×2160 at 144 Hz

GIGABYTE M32U Gaming Monitor’s supported resolution and refresh rate combinations

The HDMI 2.1 connection of the GIGABYTE M32U is the only one capable of displaying 1920×1080 at 24 Hz, 2560×1440 at 100 Hz and 3840×2160 at 24 Hz. Otherwise, the two connection types offer the same compatible resolution and refresh rate combinations.

The lowest possible combo for the M32U is 640×480 at 60 Hz.

You can find the full lists below:

GIGABYTE M32U Gaming Monitor’s HDMI 2.1 supported resolution and refresh rate combinations

  • 640×480 at 60 Hz
  • 640×480 at 75 Hz
  • 720×480 at 60 Hz
  • 800×600 at 60 Hz
  • 800×600 at 75 Hz
  • 1024×768 at 60 Hz
  • 1024×768 at 75 Hz
  • 1280×720 at 60 Hz
  • 1280×720 at 120 Hz
  • 1920×1080 at 24 Hz
  • 1920×1080 at 60 Hz
  • 1920×1080 at 120 Hz
  • 1920×2160 at 60 Hz
  • 1920×1080 at 144 Hz
  • 2560×1440 at 60 Hz
  • 2560×1440 at 100 Hz
  • 2560×1440 at 120 Hz
  • 3840×2160 at 24 Hz
  • 3840×2160 at 60 Hz
  • 3840×2160 at 120 Hz
  • 3840×2160 at 144 Hz

GIGABYTE M32U Gaming Monitor’s Display Port 1.4 supported resolution and refresh rate combinations

  • 640×480 at 60 Hz
  • 640×480 at 75 Hz
  • 720×480 at 60 Hz
  • 800×600 at 60 Hz
  • 800×600 at 75 Hz
  • 1024×768 at 60 Hz
  • 1024×768 at 75 Hz
  • 1280×720 at 60 Hz
  • 1280×720 at 120 Hz
  • 1920×1080 at 60 Hz
  • 1920×1080 at 120 Hz
  • 1920×2160 at 60 Hz
  • 1920×1080 at 144 Hz
  • 2560×1440 at 60 Hz
  • 2560×1440 at 120 Hz
  • 3840×2160 at 60 Hz
  • 3840×2160 at 120 Hz
  • 3840×2160 at 144 Hz