How to turn off DualSense haptic feedback in Final Fantasy XVI

Final Fantasy XVI supports the haptic feedback of the DualSense controller. If you find that the rumble is too distracting and/or draining the battery life of your gamepad, then you will be able to disable it.

To see how you can turn off vibrations for this JRPG, you can take a look at this tutorial from Seeking Tech.

Method #1

You will be able to disable haptics from the in-game menu of Final Fantasy 16 by taking the following steps:

1. To begin, you need to open the System menu, which you can do by selecting Config from the title screen.

If you already loaded into your save, then you need to open the Main Menu by pressing the Optins button on the DualSense. From there, use the L2 and R2 buttons to switch over to the System menu.

2. From the System menu, use the L1 and R1 buttons to move over to the Game Settings tab.

3. You should find the Wireless Controller Vibration setting from the Game Settings tab with the following description:

  • “Toggle wireless controller vibration on/off.”

4. Select the Wireless Controller Vibration setting in order to turn it off.
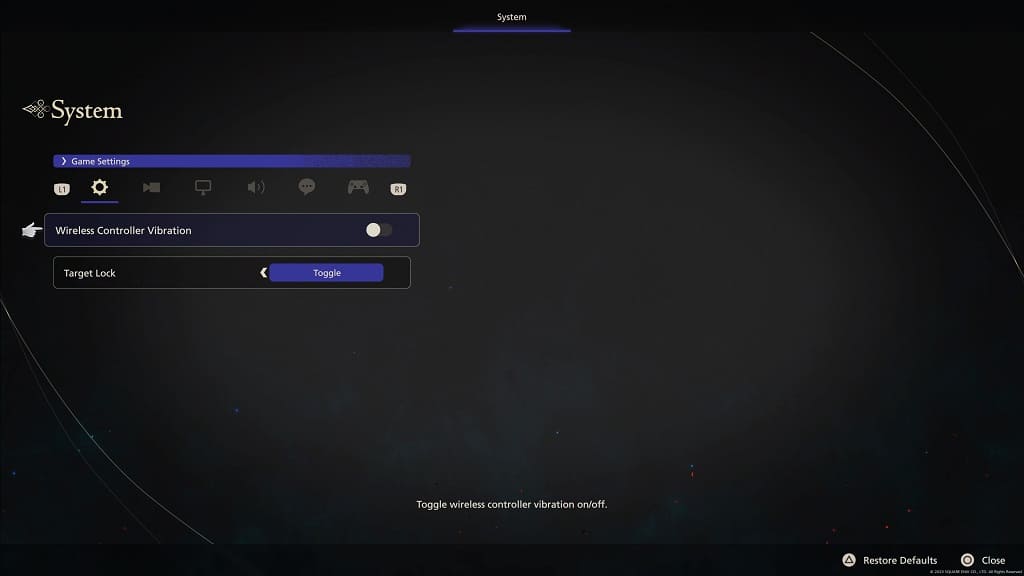
5. Press the circle button to exit the System menu to return to your game.

You should no longer feel any rumble coming from your DualSense.

Method #2

You can also disable haptics from the PS5 system menu, which will turn off rumble for Final Fantasy XVI as well as other games on your console. In order to do so, you need to do the following:

1. Go to the home screen of your PlayStation 5 or PlayStation 5 Digital Edition console. You can do so quickly by pressing and holding the PS logo button of the DualSense.

2. Head into the Settings menu by selecting the gear icon that appears on the top right corner.

3. After getting to Settings, you have to scroll down and then select Accessories.

4. In the Accessories screen, select Controller (General) on the left and then Vibration Intensity on the right.

5. In the pop-up menu, make sure that the Vibration Intensity is set to Off.
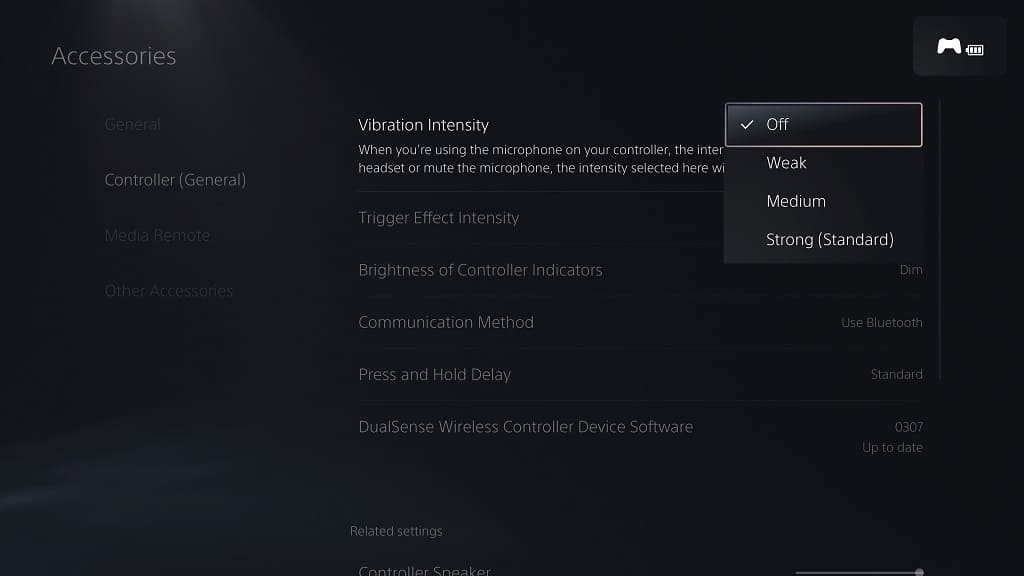
You should no longer feel any force feedback when playing FF16 or any other game on your PS5.

How to turn off DualSense controller speaker in Final Fantasy XVI

You may hear certain sound effects, especially in battles, coming out of the DualSense controller when playing Final Fantasy XVI. To see how you can mute the gamepad speaker while playing the Japanese role-playing game, you can take a look at this tutorial from Seeking Tech.

Method #1

For the first method, you can use the System menu while playing the game. You can do so by taking the following steps:

1. To start off, you need to head over to the System menu, which you can do by selecting Config from the title screen.

If you are currently playing the game, then you need press the Options button to bring up the Main Menu. From there, use the L2 and R2 buttons to change tabs until you get to System.

2. After getting to the System tab, use the L1 and R1 buttons to change section until you get to Sound Settings.

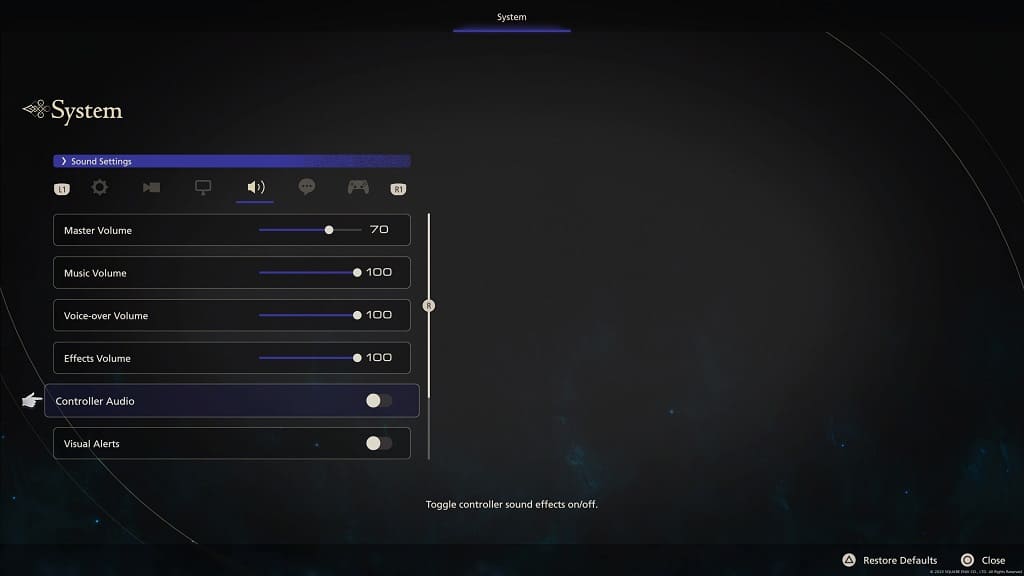
3. From the Sound Settings section, move the cursor to Controller Audio, which should have the following description:

“Toggle controller sound effects on/off.”

4. Make sure that the Controller Audio setting is disabled.

5. Press the Circle button to exit the System menu and return to your game.

You should no longer hear any audio output coming out of your DualSense.

Method #2

You can also try muting the audio output of the DualSense controller for all PlayStation 5 games by doing the following:

1. Press and hold the PS button to return to the home screen of your PS5 or PS5 Digital Edition.

2. Select the gear icon located on the top right side of the home screen to head into Settings.

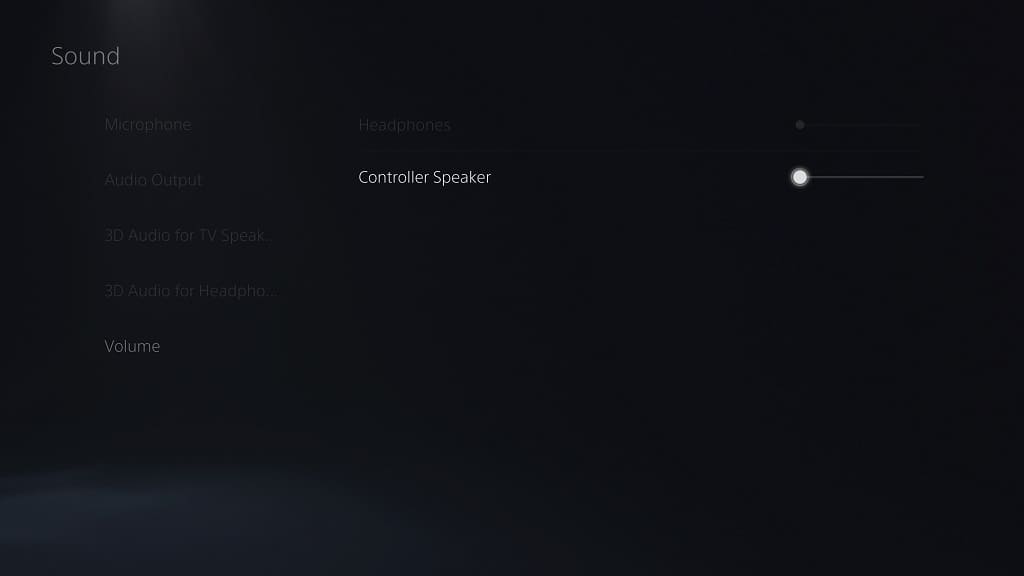
3. Scroll down and then select Sound from the Settings menu.

4. From the Sound section, select Volume on the left side.

5. On the right side of the same screen, you should see the slider for the Controller Speaker. To mute the DualSense audio output for all PS5 games, you need to move this slider all the way to the left.

How to fix Beat Saber PS VR2 low volume issues

You may find that the music volume is too low when playing the PlayStation VR2 version of Beat Saber. To see how you can make it louder, you can take a look at this troubleshooting article from Seeking Tech.

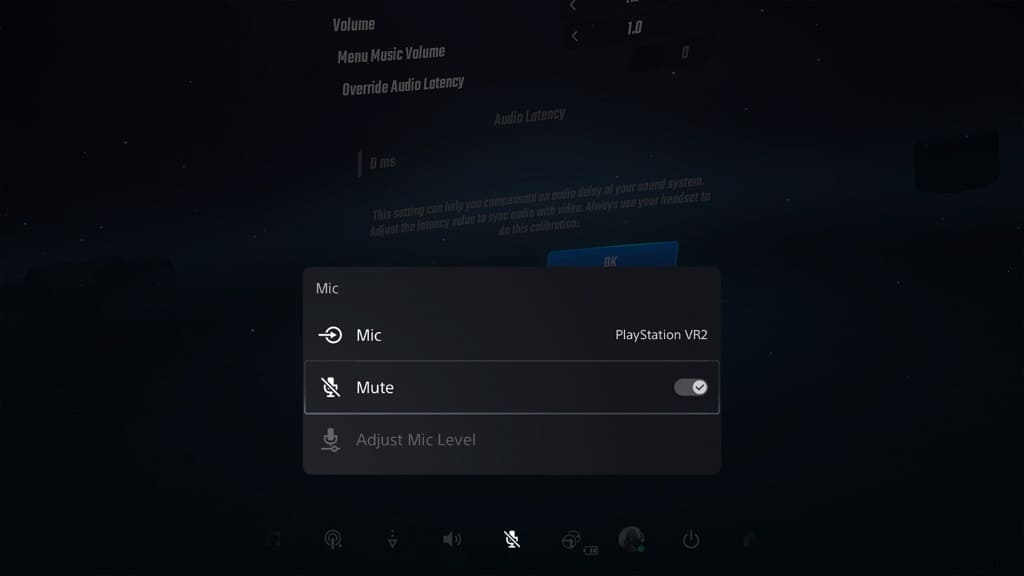
1. For the first step, you should make sure that you mute the microphone on the virtual reality headset. In order to do so, you need to take the following steps:

  • Open the Control Center quick menu by pressing the PS button.
  • Select the Mic icon at the bottom.
  • Make sure that Mute is enabled in the Mic menu.

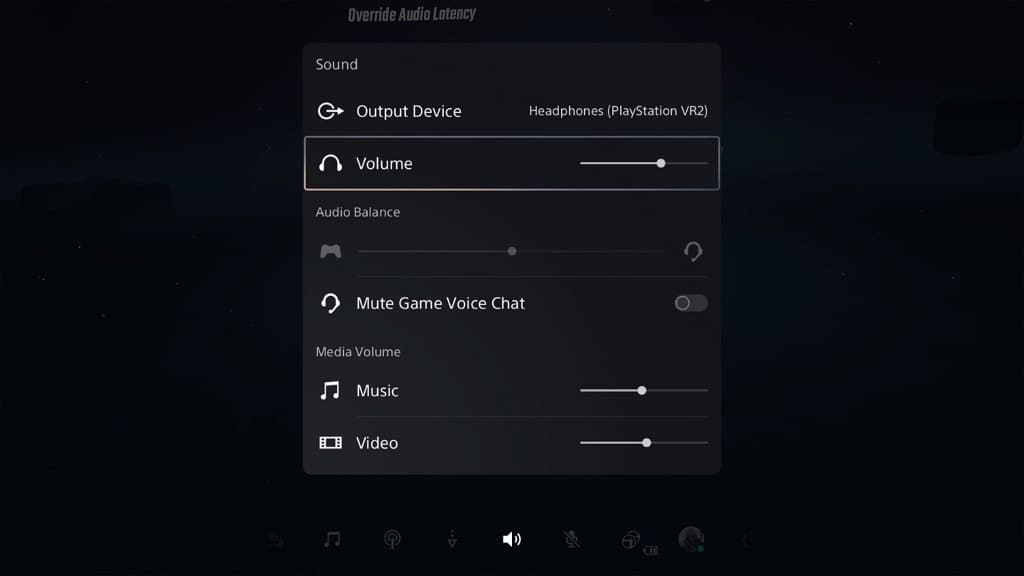
2. You can also turn up the volume by doing the following:

  • Open the Control Center quick menu.
  • Select the Sound icon located at the bottom.
  • Move the Volume slider to the right to increase the volume.

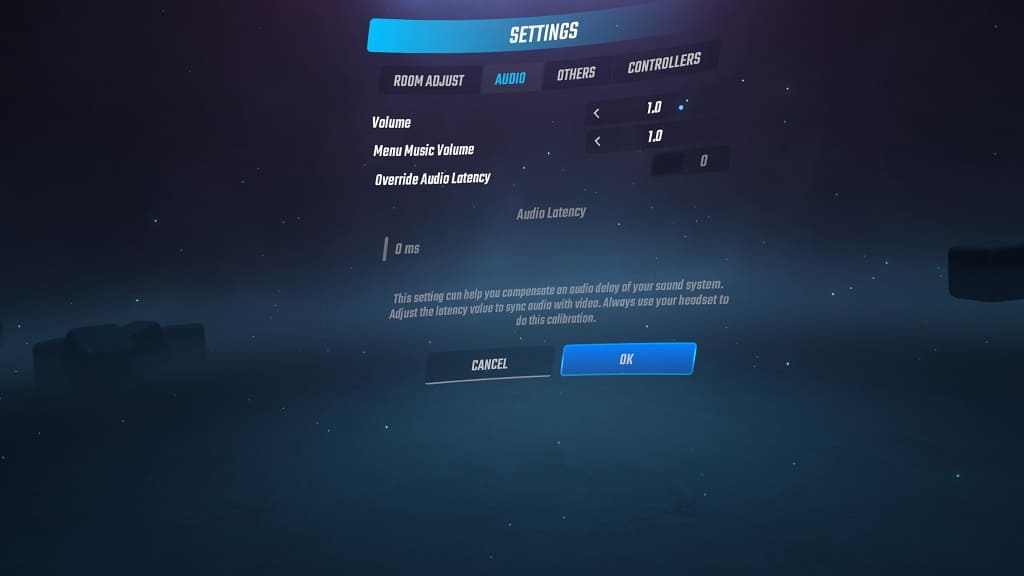
3. You should make sure that you have the volume turned all the way up to the maximum in Beat Saber as well. You can do so by taking the following steps:

  • Go to the main menu of the PS VR2 game. This is where you can select which game mode to play.
  • From the main menu, select the gear icon to head into the Options menu.
  • Select Settings from the Options screen.
  • Inside of Settings, you need to select the Audio tab.

You should find the Volume setting in the Audio tab. Make sure that it is set to the maximum, which is the value of 1.0.

4. You can also try turning down the sound effects volume by doing the following:

  • Go back to the aforementioned Options screen.
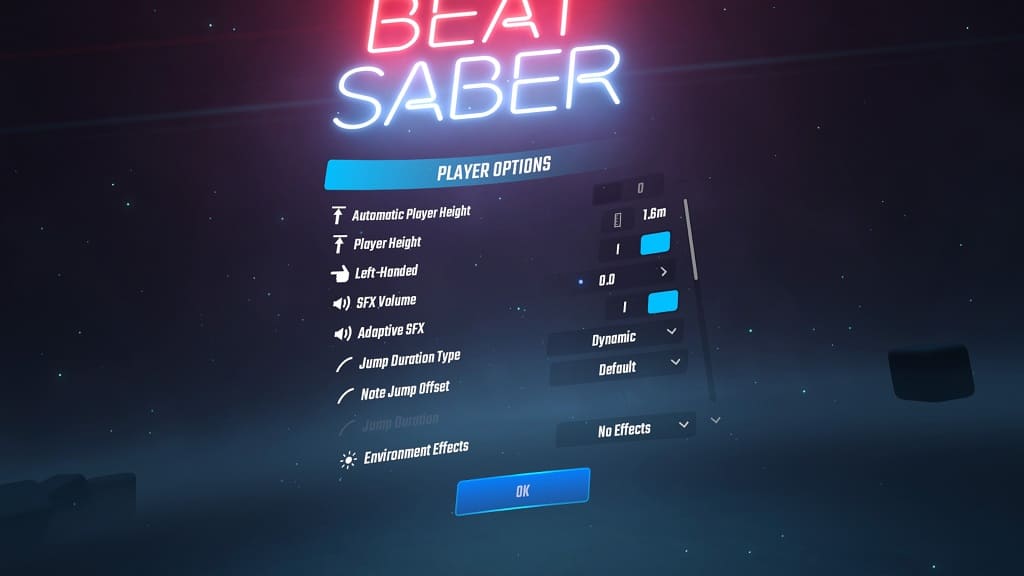
  • This time, you need to select Player Options.
  • You should find the SFX Volume setting here. By default, this is set to 0.7. To lower its volume, you can try reducing it to a lower value.

Hopefully, the music will end up sounding louder when you play through a stage in the PlayStation VR2 version of Beat Saber after you make the previous adjustments.

How to fix Final Fantasy XVI PS5 overheating issues

When playing Final Fantasy XVI on your PlayStation 5 or PlayStation 5 Digital Edition console, you can see the following message:

  • “Your PS5 is too hot. Turn off your PS5 until the temperature goes down.”

To see how you can prevent this JRPG from overheating your system, you can take a look at this troubleshooting article from Seeking Tech.

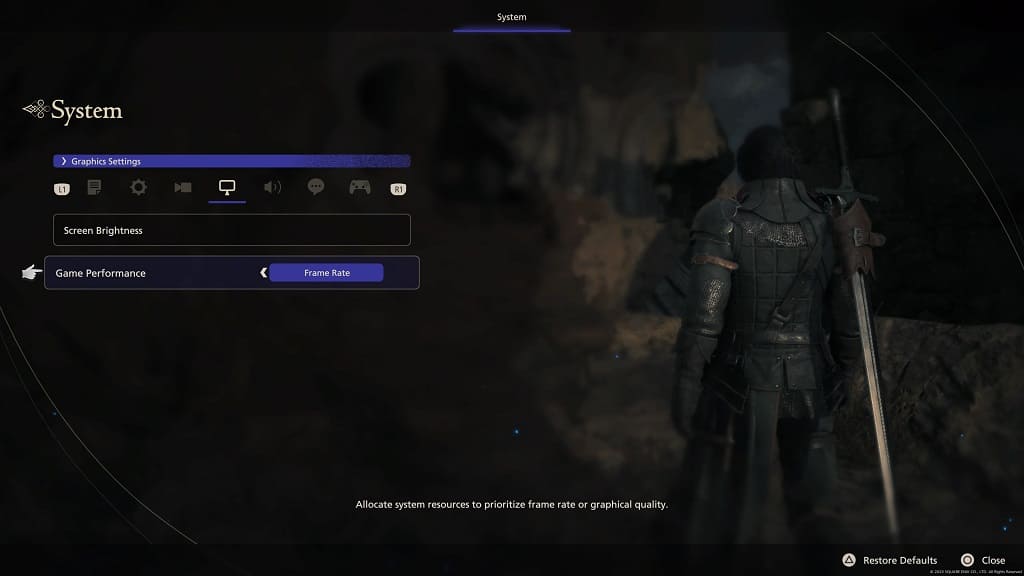
1. For the first step, you can try switching the Game Performance settings by taking the following steps:

  • During gameplay, press the Options button on the DualSense to open the in-game menu.
  • Next, you need to press R2 to switch over to the System tab.
  • In the System tab, press R1 until you get to Graphics Settings.
  • You should be able to change the Game Performance mode in the Graphics Settings section. If your console was overheating when playing with Graphics Mode, then you can try changing this to Frame Rate or vice versa.

2. If you are still getting the “your PS5 is too hot” warning, then you need to make sure that you have enough free airspace around the console.

You should leave at least four inches of room all around the PlayStation 5. Furthermore, avoid putting the system in an enclosed space; instead, you should place it on top of a desk, table or cabinet.

3. The PS5 tends to overheat if the room temperature is already hot. Therefore, you can try to use a fan and/or air conditioner to cool down your room when playing this demanding game.

4. You can also try cleaning your PlayStation 5. By removing dust from the internals of the console, including the fac and heatsink, you should end up getting better air flow. As a result, your PS5 should be less prone to getting overheated.

To see how you can properly take the system apart to clean it, we recommend that you check out the TronicsFix video guide on YouTube:

5. You may also want to consider checking to see if the liquid metal has dried out on the APU. If it is, then you may need to replace it.

To find out how you can properly check and replace the liquid metal, you can take a look at the TronicsFix video guide from YouTube:

6. If you haven’t done so already, you should make sure you have the latest patch downloaded for Final Fantasy 16.

The overheating issues appear to be a common problem even for those who have proper ventilation. Hopefully, the development team at Square Enix will optimize the game via a new patch so that it would cause the PlayStation 5 to overheat.

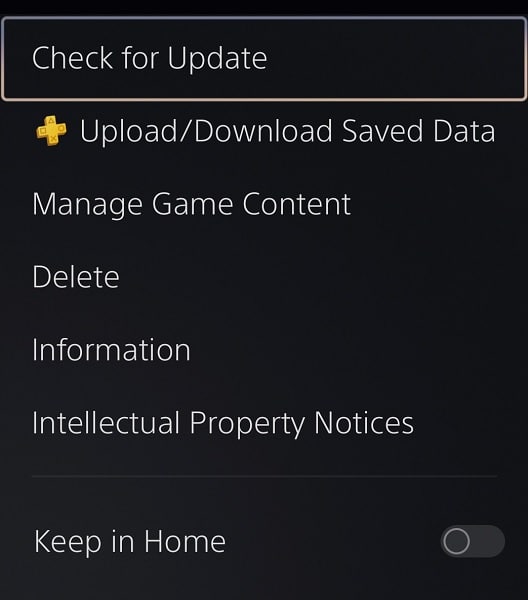
To manually download a patch, move the menu cursor over to the Final Fantasy XVI game logo in the home screen of your PS5. Afterwards, press the Options button on the DualSense to bring up a small pop-up menu, which is where you can then select the Check for Update option.

7. You should also make sure that you have the latest firmware installed for your PlayStation 5 or PlayStation 5 Digital Edition console.

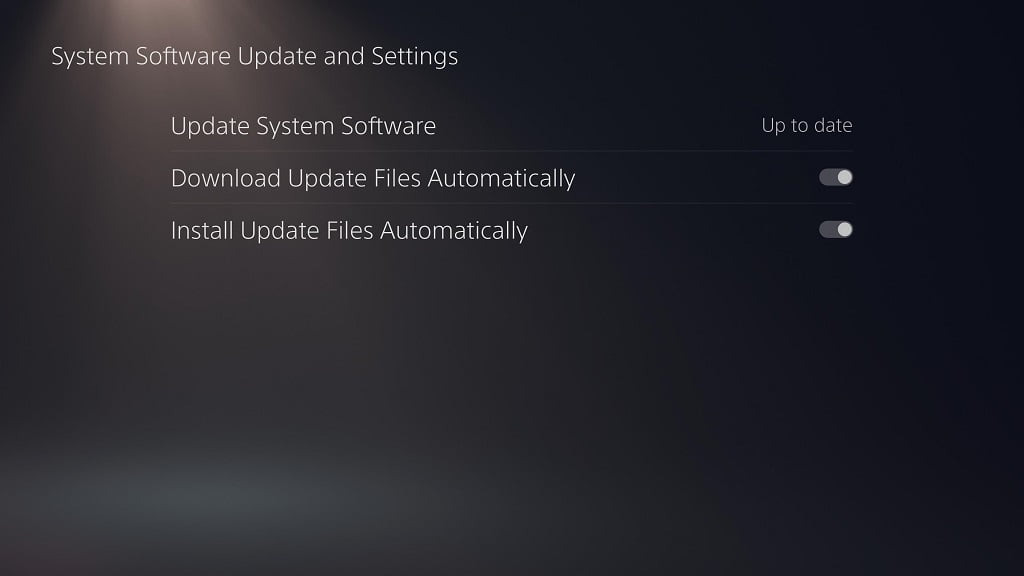
To manually update the system software, start by heading over to the console’s Settings menu. From there, select System > System Software > System Software Update and Settings > Update System Software > Update Using Internet.

How to increase vibration intensity in PS VR2 of Beat Saber

You may feel that the vibration to be too weak when you are hitting the notes in the PlayStation VR2 version of Beat Saber. In some cases, there may not be any rumble at all. To see how you can fix these haptic feedback issues, you can take a look at this troubleshooting article from Seeking Tech.

1. For the first potential fix, you should make sure that you have the latest patch downloaded and installed for the PS5 version of Beat Saber.

To force a manual update, press and hold the PS button on the controller to bring up the home menu of your PlayStation 5 console. From there, move the menu cursor to the Beat Saber icon and then press the options button on the controller. Finally, select the Check for Update option, from the small pop-up sub-menu.

The development team recently released an update that addresses the rumble issues in the music rhythm game.

2. If the haptics still feel weak and/or nonexistent, the you should make sure that you have your Left and Right PlayStation VR2 Sense Controllers fully charged. If these motion controls are running low on battery life, then they may lower the vibration feedback in order to conserve more energy.

3. You should also make sure that the vibration intensity for your controllers is set to Strong. In order to do so, you need to do the following:

  • Go back to the home screen of your PS5 by pressing and holding the PS button.
  • From there, select the gear symbol that can be found in the top right side.
  • In Settings, select Accessories.
  • From the Accessories menu, select Controller (General) on the left side and then Vibration Intensity on the right side.
  • Finally, make sure you set Vibration Intensity to Strong (Standard).

4. If the rumble still feels too weak, then there is not much else you can do aside from waiting for a new patch for the game that will, hopefully, make them feel stronger.

How to control the Street Fighter 6 camera with an arcade stick

A lot of players prefer using an arcade stick when it comes to playing Street Fighter 6. When exploring the environments in the Battle Hub or World Tour mode, however, controlling the camera can be confusing as there is no second analog stick for a vast majority of fight sticks.

To see how you can control the camera when using an arcade stick, you can take a look at this tutorial from Seeking Tech.

How to control the camera with a PlayStation theme fight stick

In order to control the camera with a PlayStation arcade stick you need to press and hold the R1 button along with a corresponding face button. You can find the button layout for the camera movement below:

  • Move Camera Upwards: R1 and X
  • Move Camera Downwards: R1 and Circle
  • Rotate Camera to the Right: R1 and Triangle
  • Rotate Camera to the Left: R1 and Square

How to control the camera with an Xbox theme fight stick

If you are using an Xbox fighting stick, then you have to press and hold the RB button to go along with a corresponding face button. You can find the button layout below:

  • Move Camera Upwards: RB and A
  • Move Camera Downwards: RB and B
  • Rotate Camera to the Right: RB and Y
  • Rotate Camera to the Left: RB and X

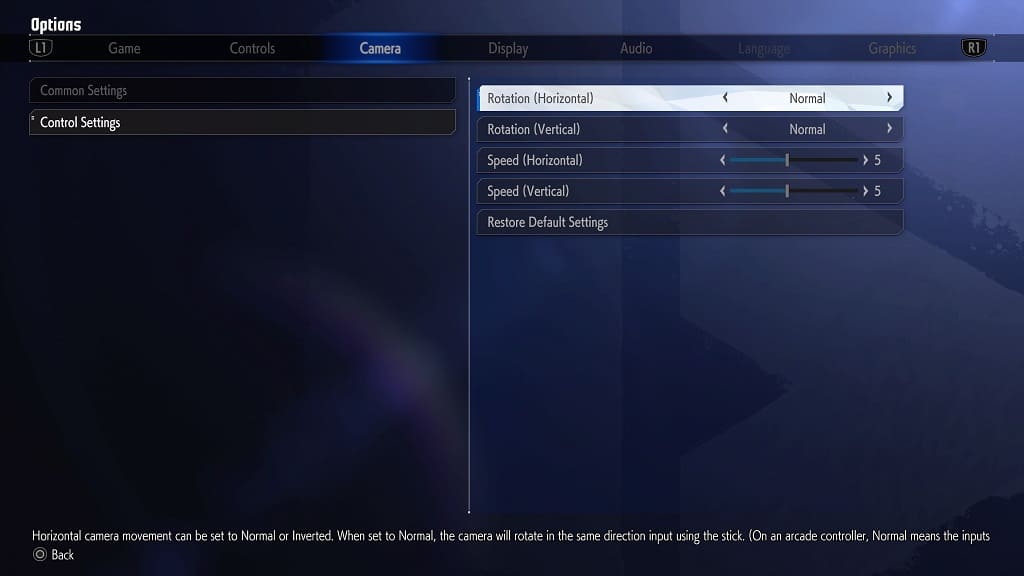
If you would like to invert your camera controls, then you need to head over Camera tab from the Options menu. From there, select Control Settings on the left side.

On the right side, you should see the Rotational (Horizontal) and Rotational (Vertical) settings. You can set these to Normal or Inverted.

In the same Controls Settings menu, you can also adjust the horizontal and vertical camera movement speed.

Once you are done, exit the Options menu and then play the Battle Hub or World Tour mode. Test out the new camera settings to see if you prefer it to the default settings.

How to fix Beat Saber PS VR2 tracking issues

When playing the PlayStation VR2 version of Beat Saber, you may notice that you are missing notes that you are absolutely sure you are hitting. This can be noticeable if you are trying to slash at notes downwards or to the left/right on the outer edges of the screen. To see how you can potentially fix these tracking issues with this music rhythm, you can take a look at this troubleshooting article from Seeking Tech.

1. We noticed that the tracking problems became more prominent during a recent system update for the PlayStation 5. Unfortunately, you aren’t able to revert the firmware as you will need the latest one in order to play PS VR2 games like Beat Saber.

Instead, you should check to see if there is newer system software update available by going to the PS5’s Settings menu and then selecting System > System Software Update and Settings > Update System Software > Update Using Internet.

Afterwards, turn on your PlayStation VR2 and PlayStation VR2 Sense controllers to see if these need to be updated as well. If they do, then make sure you do so. Hopefully, the new firmware will fix your tracking issues.

2. Of course, you should also check to see if there is a new update available for Beat Saber.

You can do so by moving the menu cursor over to the game icon on the home screen of your PlayStation 5. Afterwards, press the Options button on your controller and then select the Check for Update option in the small pop-up window.

3. You can also try using the Tacking Camera Calibration function by doing the following:

  • While wearing your virtual reality headset, press the PS button on the controller to open the Control Center quick menu.
  • From these, select the PlayStation VR2 Quick Settings card.
  • Next, scroll all the way down and then select Other Settings.
  • From the PlayStation VR2 section of the Accessories menu, scroll down and then select Tracking Camera Calibration.
  • Follow the instructions that appear in the lens of your headset. You will need to look straight at your television screen and then create another play area.

4. Your headset can lose tracking of your Left and Right PlayStation VR2 Sense Controllers due to poor room lighting conditions.

Therefore, try to make sure that your room is brightly lit. With that said, try to avoid staring at overly bright light sources as these may blind the tracking cameras of the headset.

5. If the internal batteries of the Left and Right PlayStation VR2 Sense Controllers get too low, then it may cause the tracking to not work properly. You can check the batter status of these accessories by pressing the PS button to open the Control Center quick menu.

From there, scroll down to the bottom menu and then to the side until you see the PS VR2 Sense Controllers icon.

If you see one or no bars, then we recommend that you fully charge the controllers before you play Beat Saber again.

6. Last but not least, you should make sure that the tracking camera lens of your virtual reality headset aren’t covered up or dirty. You should also inspect the two Sense controllers as well as they shouldn’t be covered up or dirtied.

How to automatically restart after failing in PS VR2 version of Beat Saber

You will get a “Level Failed” screen if you managed to make too many mistakes while playing through a stage in the PlayStation VR2 version of Beat Saber. To restart the same stage, you have to manually move to the Restart option with the pointer and then press the L2 or R2 button with the Left or Right PlayStation VR2 Sense Controller.

If you would rather have the game automatically restart the failed stage for you, then you can take a look at this tutorial from Seeking Tech to see how you can properly do so.

Method #1:

For the first step, you can try doing the following:

  • Move the PlayStation VR2 headset to the left side while you are playing in Solo or Campaign mode.
  • Using the pointer, select Player Options from the top.
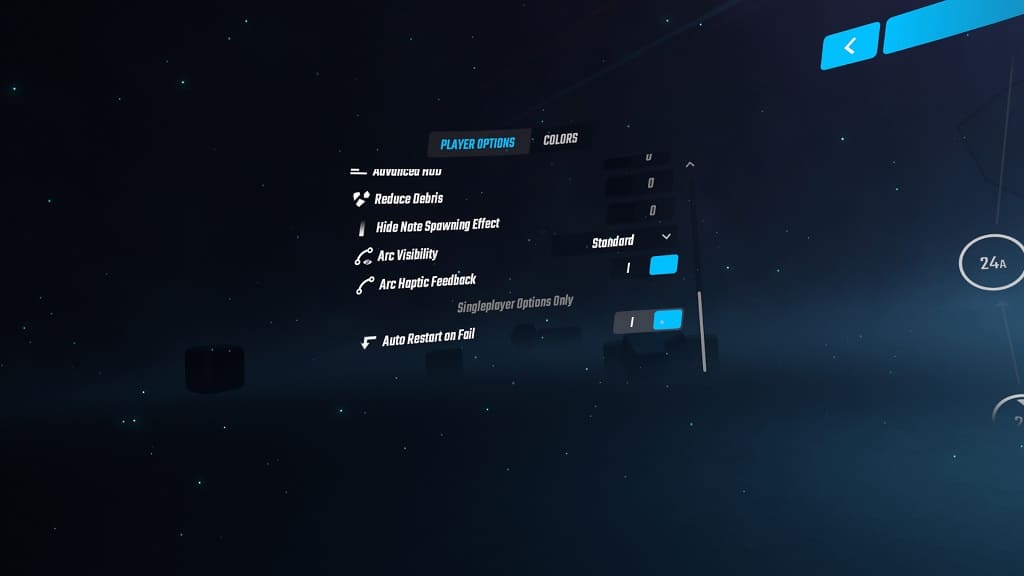
  • Next, you need to scroll down until you get to the Auto Restart on Fail. You can scroll easily by using analog sticks of the Left or Right PlayStation VR2 Sense Controllers.
  • By default, the Auto Restart on Fail setting is set to 0, which is Off. To turn it on, make sure you change it to 1.

Method #2:

You can also enable this feature from the mode selection menu by taking the following steps:

  • Select Settings from the mode selection screen.
  • Next, you need to select Player Options.
  • Scroll down until you get to the Auto Restart on Fail.
  • Finally, make sure that Auto Restart on Fail is turned on.

The next time you fail a stage, the game will automatically restart it for you without any manual input.

If you keep failing the stage and would like to exit with the Auto Restart on Fail turned on, then you can do so from the pause screen. To bring up the pause screen, press the X, Circle, Triangle or Square buttons of the Left or Right PlayStation VR2 Sense Controllers.

How to find the tutorial in the PS VR2 version of Beat Saber

Before you start playing the PlayStation VR2 version of Beat Saber, you will need to go through a short tutorial on how to play the music rhythm game. If you are using the same PlayStation Network account as someone who previously play this title, then you won’t be able to get the instructions to appear automatically.

Thankfully, you can still view the tutorials from withing the in-game menus of Beat Saber. To find out how you can properly do so, you can take a look at this guide from Seeking Tech.

1. If you haven’t done so already, make sure you head over to the mode select screen from the game.

If you are currently playing a stage, then you can either exit it or finish it. Afterwards, move the pointer over to the back arrow and then select that option by pressing L2 on the Left PlayStation VR2 Sense Controller or R2 on the Right PlayStation VR2 Sense Controller.

2. From the mode selection screen, select the question mark icon.

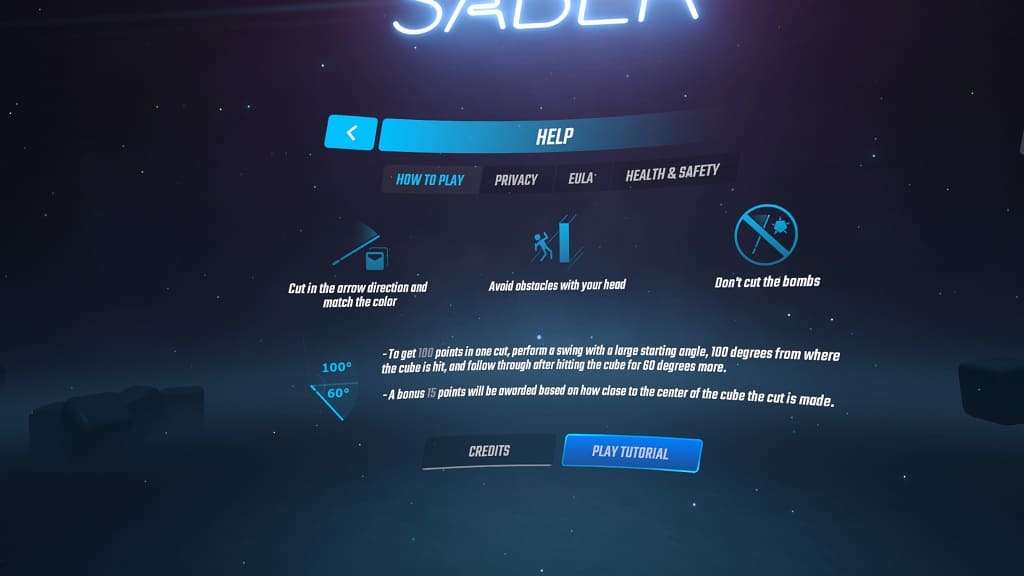
3. You should now be in the Help screen.

Here, you should see some graphics and texts about how Beat Saber is plated on the PlayStation VR2. You will also get an explanation on how scoring in the game works.

4. If you want a more interactive tutorial, then you can select the Play Tutorial option located at the bottom of the Help screen.

You should then be able to play a short introductory level that explains the core elements in this music rhythm game.

5. Unfortunately, the game doesn’t tell you how the newer note types, which are the Arc Notes and Chain Notes, work. The good news is that the development team at Beat Games did upload a YouTube video that explains these new elements. You can find the video guide below:

Xbox Elite Wireless Controller Series 2 settings for Street Fighter 6

You can use the Xbox Elite Wireless Controller Series 2 to gain the upper hand in Street Fighter 6. To see which settings you should use for the premium gamepad when playing this fighting game, you can check out this guide from Seeking Tech.

P1, P2, P3 and P4 Button Assignments

There are additional actions that you can assign to the back paddles of your Xbox Elite Wireless Controller Series 2.

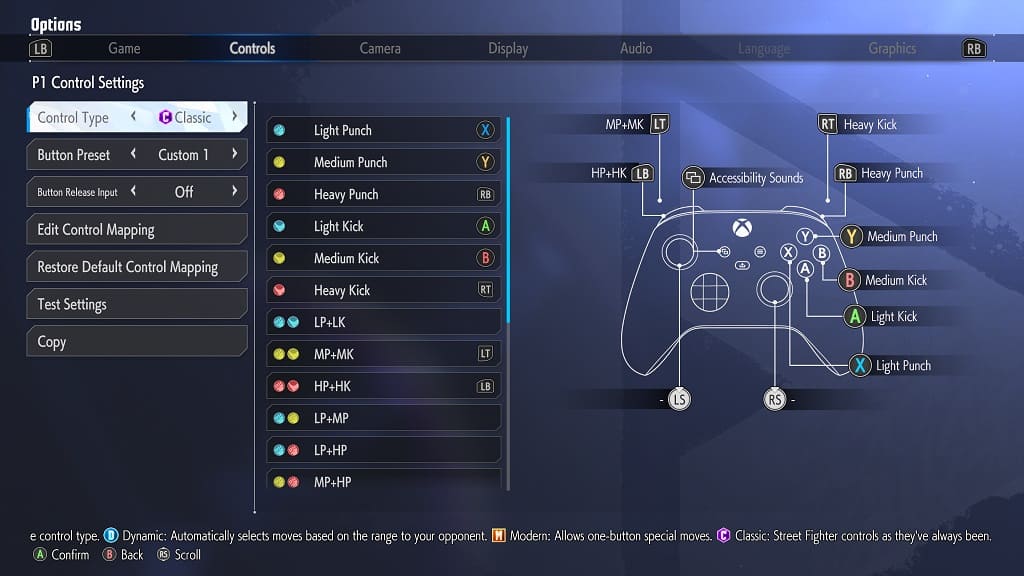
If you are using the Classic control type, then you will have the following default button layout:

  • X Button: Light Punch
  • Y Button: Medium Punch
  • RB Button: Heavy Punch
  • A Button: Light Kick
  • B Button: Medium Kick
  • RT Button: Heavy Kick
  • LT Button: Medium Punch and Medium Kick
  • LB Button: Heavy Punch and Heavy Kick

The following actions can also be assigned if you are using Classic controls:

  • Light Punch and Light Kick
  • Light Punch and Medium Punch
  • Light Punch and Heavy Punch
  • Medium Punch and Heavy Punch
  • Light Punch, Medium Punch and Heavy Punch
  • Light Kick and Medium Kick
  • Light Kick and Heavy Kick
  • Medium Kick and Heavy Kick
  • Light Kick, Medium Kick and Heavy Kick
  • Taunt
  • Simultaneous Input Assistance

The Classic control type unlocks more move and higher damage potential when compared to the Modern control type. You can find the Modern button layout, which is the default setting for Street Fighter VI, below:
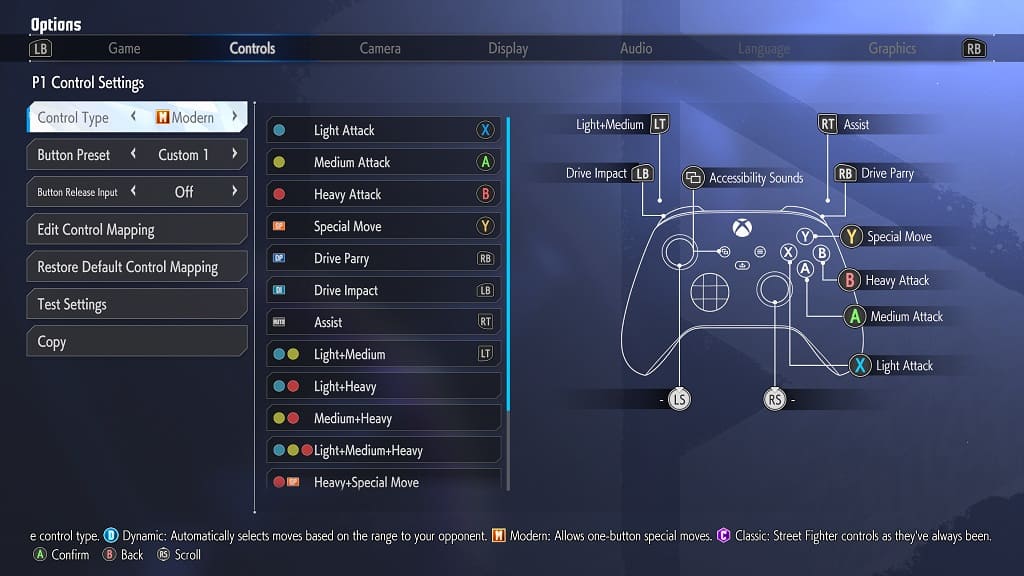
  • X Button: Light Attack
  • A Button: Medium Attack
  • B Button: Heavy Attack
  • Y Button: Special Move
  • RB Button: Dive Parry
  • LB Button: Drive Impact
  • RT Button: Assist
  • LT Button: Light and Medium

You can also add the following actions if you are using the Modern control type:

  • Light and Heavy Attack
  • Medium and Heavy Attack
  • Light, Medium and Heavy Attack
  • Heavy and Special Move
  • Taunt

We recommend assign any of the actions that you used most often to the Left Analog Button and Right Analog Button from the Controls tab in the Options menu. You can then use the Mapping menu to set the Left Analog Button to P3 or P4 and the Right Analog Button to P1 or P2.

You can assign which ever back paddles you didn’t previously use to any other buttons. If you don’t feel like using the LT or RT buttons to pull off certain attacks, for example, then you can assign these actions to the two remaining back paddles.

While Street Fighter 6 also features a Dynamic control type, you won’t be able to add any additional actions to it.

Trigger Locks

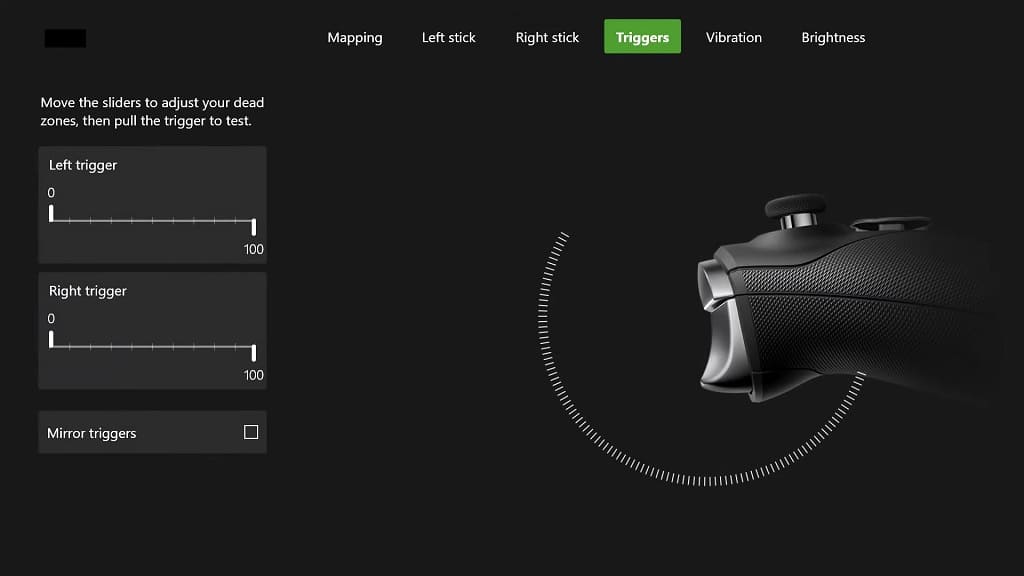
If you still want to use the LT and RT buttons, then we recommend that pull the trigger lock sliders located on the backside of the Xbox Elite Wireless Controller Series 2 all the way down. By doing so, the game will be able to register the input for these triggers much quicker.

You can further customize the deadzones of these buttons from the Triggers menu of the gamepad.

Stick Deadzones

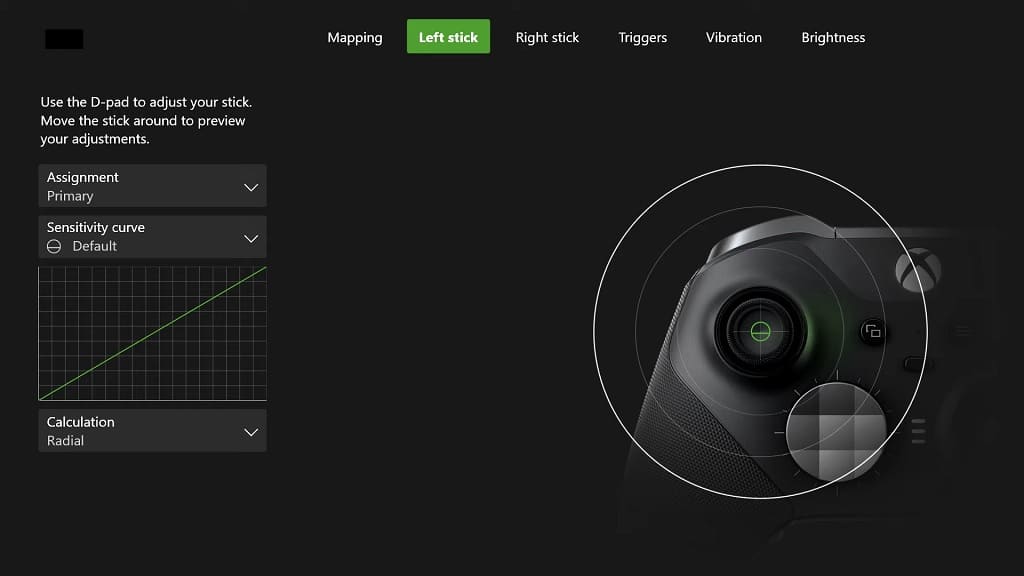
If you are using the left analog for movement inputs, then you may want to use the Left Stick menu of the Xbox Elite Wireless Controller Series 2 to adjust the pad’s deadzone. This can be helpful if the game isn’t recognizing the analog movements.

Wired Connection

Last but not least, we recommend that you plug in the Xbox Elite Wireless Controller Series 2 to your Xbox Series X or Xbox Series S. By doing so, the communication will be done through the USB cable, which should result in less input lag when compared using the same controller over a wireless connection.