How to fix Diablo 4 Temple of the Primes crash

In the Descent into Flame from Act III of Diablo IV, you will need to enter the Temple of the Primes. When you do so, however, the game may end up crashing. To see how you can fix this freezing glitch, you can take a look at this troubleshooting article from Seeking Tech.

1. For the first potential solution, try to head left immediately after talking to Lorath the next time you reload your saved data.

2. If Diablo 4 is still freezing when you try to open the door to the Temple of the Primes, then you can try unequipping all of your equipment beforehand.

3. If the game is still bugging out, then you can try changing the World Tier difficulty before you enter the door.

In order to do so, you can select Change World Tier from the main menu before loading into your save file. You can also change tiers by using the World Tier Statues found in the bigger towns in the world.

4. If you haven’t done so already, you should make sure you have the latest patch installed for Diablo IV. The Descent into Flame freeze seems to be a common problem on all platforms that should hopefully get patched out by the development team in the near future.

5. Of course, you should also make sure that you have the latest firmware installed on your PlayStation 4, PlayStation 4 Pro, PlayStation 5, Xbox One, Xbox One S, Xbox One X, Xbox Series S and Xbox Series X consoles.

If you are playing Diablo IV on a PC, then you should make sure you have the latest drivers for your graphics card, as well as the latest version of the Steam client, downloaded and installed.

Hopefully, the new firmware and drivers will fix the freezing issues associated with entering he Temple of the Primes.

What to do if Diablo 4 is causing PS5 to overheat

When playing Diablo IV on your PlayStation 5 or PlayStation 5 Digital Edition console, you may get the following warning:

  • “Your PS5 is too hot. Turn off your PS5 until the temperature goes down.”

If your gaming system keeps overheating while you are playing this action role-playing game, then you can check out this troubleshooting article from Seeking Tech.

1. For the first step, you should make sure you have enough free air space around your PlayStation 5 to allow for proper heat dissipation. Sony recommends leaving at least 4 inches on all sides.

Therefore, you should avoid placing the console near any walls or other obstacles. You should also avoid enclosed compartments as well.

2. If your PS5 gets too dusty, then it will impact the heat dissipation. To it from overheating when playing high-demanding games such as Diablo 4, we recommend removing as much of the dust from the internals as possible.

To see how you can take apart a PS5 and clean it, we recommend that you take a look at TronicsFix video guide from YouTube below:

3. If you have been placing your PlayStation 5 vertically, then it may be causing the liquid metal responsible for cooling the APU due to uneven distribution. Therefore, you can play placing the console horizontally.

There is also a possibility that the liquid metal may have dried out and may need to be replaced. If you are interested in doing so, the you can check out a video, also from the TronicsFix YouTube channel, below:

4. If you are using a M.2 solid state drive for your PS5, then the expanded storage may be causing the console to overheat.

Keep in mind that the expansion SSD needs its own heat sink. If you don’t have one installed, then you should get one.

5. Make sure you have the latest system software installed on your PlayStation 5. In most updates, Sony usually adds a stability update that improves the performance of the console.

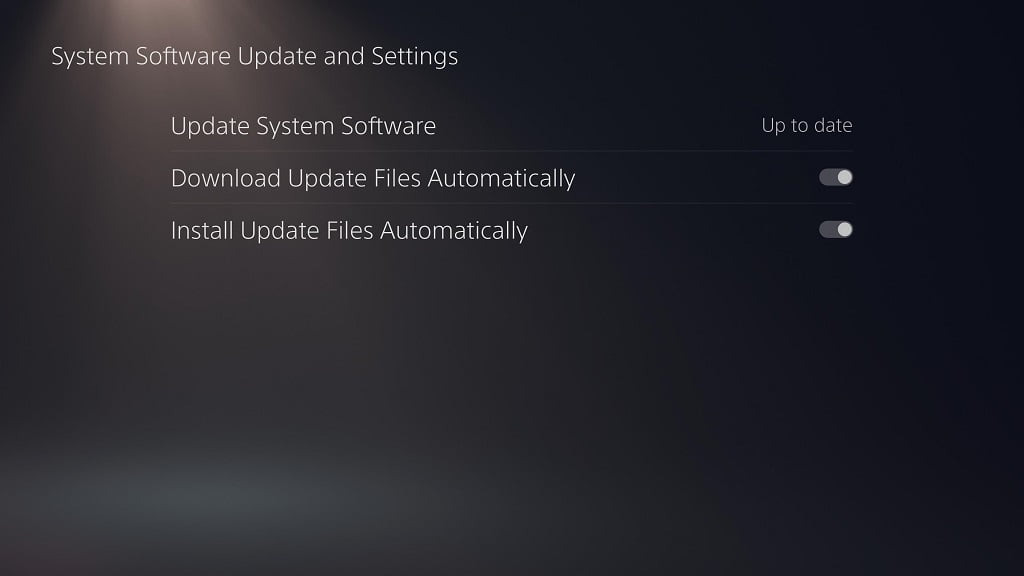
You can manually update by going to the Settings menu of the PS5 and then selecting System > System Software > System Software Update and Settings > Update System Software > Update Using Internet.

6. You should also make sure you have the latest patch installed for Diablo IV as a new update may come with improved optimizations.

7. If your console is still overheating, then you may have some kind of hardware issue. In this scenario, you will most likely need to get your PS5 repaired.

Can you upgrade physical edition of Diablo 4 to Deluxe or Ultimate Editions?

The standard edition of Diablo IV can be bought on a physical disc. So, are you able to upgrade the physical version of this action role-playing game to the Digital Deluxe or Ultimate Edition? You can find out in this article from Seeking Tech.

According to a forum post made by Adam Fletcher, the Global Community Development Director of Diablo, there is currently no way to upgrade from the standard physical version of Diablo 4 to the Digital Deluxe or Ultimate Edition.

You can find the full comments below (via the official U.S. Blizzard forums):

There are currently no upgrade paths for the Deluxe/Ultimate Edition skus via a physical disk.

For the uninformed, you will get the following items from the Diablo IV Digital Deluxe to go along with the content you get from the base game:

  • Temptation Mount
  • Hellborn Carapace Mount Armor
  • Premium Seasonal Battle Pass Unlock

For the Diablo IV Ultimate Edition, you will receive the following bonuses to go along with the base game contents:

  • Temptation Mount
  • Hellborn Carapace Mount Armor
  • Accelerated Seasonal Battle Pass Unlock
  • Wings of the Creator Emote

You can check out this comparison to see what the major differences are between the Battle Pass, Premium Seasonal Battle Pass and Accelerated Seasonal Battle Pass.

While you aren’t able to upgrade from the standard physical edition, you should be able to upgrade if you bought the standard digital edition to the Digital Deluxe or Ultimate Edition. You can also upgrade from the Digital Deluxe to the Ultimate Edition.

In order to upgrade the digital editions of Diablo IV, you have to do so by using Platinum from the in-game store. You won’t be able to upgrade from the PlayStation Store, Xbox Store or Steam. Instead, you can buy Platinum from these platform stores and then spend the Platinum to purchase your upgrade from the in-game store of Diablo 4.

What to do if Capcom ID log in is not working in Street Fighter 6

If you want to play multiplayer matches with others over the internet, as well as partake in other activities that require an online connection, then you will need a Capcom ID account for Street Fighter 6. If you can’t seem to sign into your account in this fighting game, then you can take a look at this troubleshooting article from Seeking Tech to see what you can do.

1. For the first step, we recommend that you visit the My Page section of the official Capcom ID website.

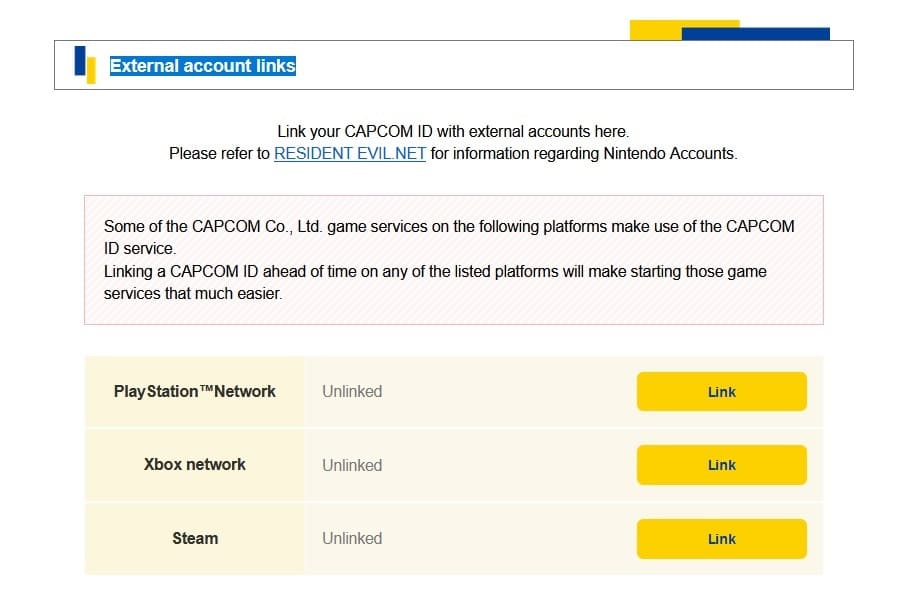
Once you are signed in, scroll down to the “External account links” section. Here, you should see the Xbox Live, PlayStation Network and Steam accounts that are linked to your Capcom ID.

External account links section from the official Capcom ID website

You should make sure that your Xbox, PSN or Steam account matches the one you are using to play Street Fighter VI. Otherwise, you won’t be able to log in.

If you are using a different account on your PC or console, then you need to switch to the one that is listed in the aforementioned “External account links” section.

It is very important to note that you won’t be able to link to a different Xbox Live, PlayStation Network or Steam account to your Capcom ID. You also won’t be able to use the same Xbox, PSN or Steam you previously linked to a newer ID even if you unlink them beforehand.

2. If you still aren’t able to get past the “Yes, I agree” screen when signing into your Capcom ID account in Street Fighter 6, then you can try creating a new ID account.

As we stated above, you can link your Xbox Live, PlayStation Network or Steam account to a new Capcom ID if you already linked then to an older ID.

Keep in mind that you will also lose out on any data that is stored online by changing your Capcom ID. These include your avatar as well as your rankings.

3. There is a possibility that the Street Fighter 6 servers are down at the moment. In this case, wait until the servers are fully operational again before trying to log into your account in the game.

4. You should also make sure that you have the latest patch installed for this fighting game.

5. If you are still stuck in the sign in screen, then we suggest that you contact the customer service team on the official Street Fighter 6 website to get direct support for your log-in problems.

Recommended DualSense Edge settings for Street Fighter 6

You can gain a little bit of an advantage when playing Street Fighter 6 with a DualSense Edge controller as opposed to a standard DualSense. You can check out this guide from Seeking Tech to see what are the best settings you should be using for the Edge for the latest SF installment.

Custom Button Assignments

The two back buttons can be used to add additional actions.

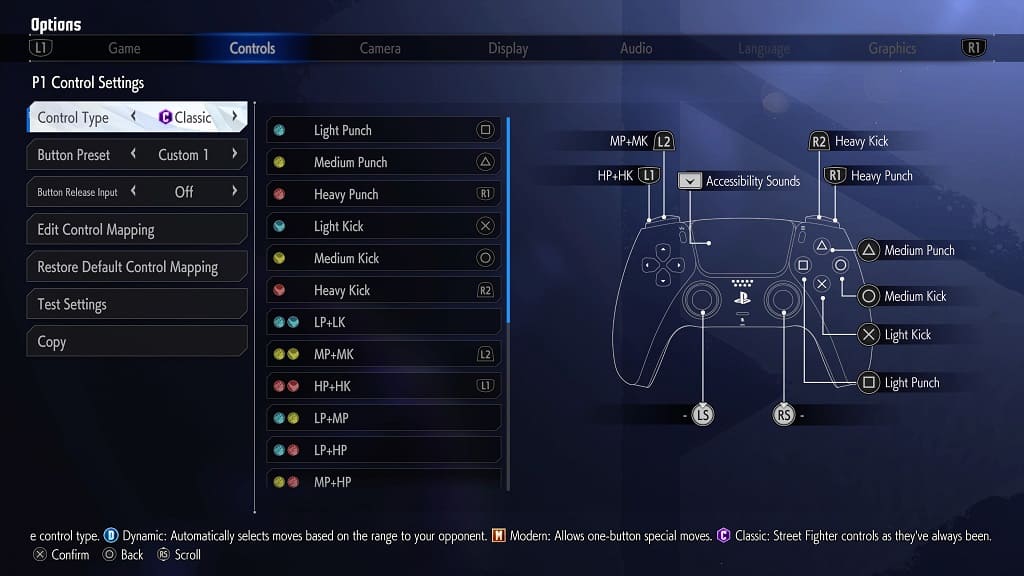
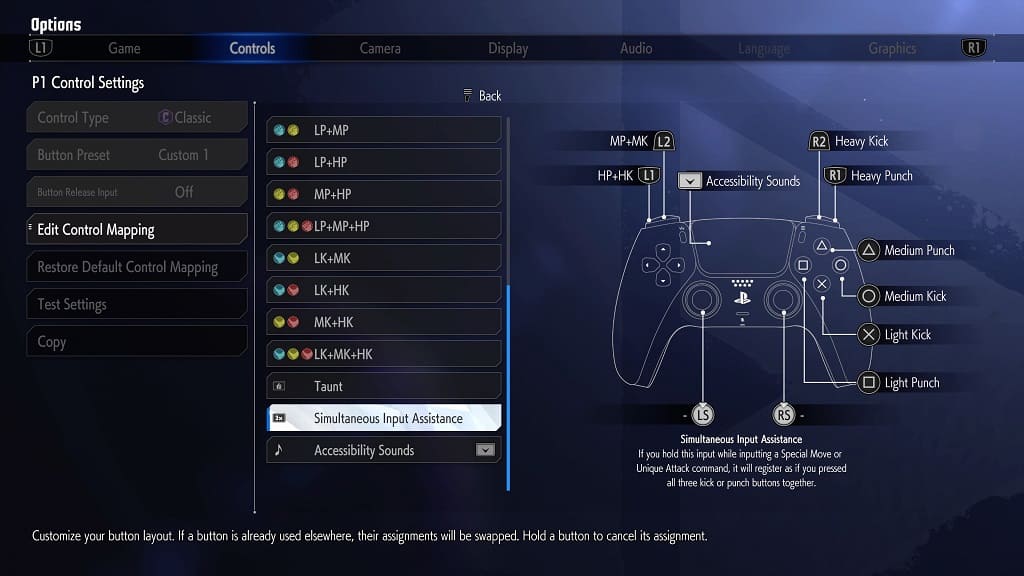
If you are using the Classic control type, which we highly recommend doing so as you will unlock the full move set and damage potential of your characters, then you will have the following default layout:

  • Square Button: Light Punch
  • Triangle Button: Medium Punch
  • R1 Button: Heavy Punch
  • X Button: Light Kick
  • Circle Button: Medium Kick
  • R2 Button: Heavy Kick
  • L2 Button: Medium Punch and Medium Kick
  • L1 Button: Heavy Punch and Heavy Kick
  • Touch Pad Button: Accessibility Sounds

The following actions can also be assigned to any buttons on the controller:

  • Light Punch and Light Kick
  • Light Punch and Medium Punch
  • Light Punch and Heavy Punch
  • Medium Punch and Heavy Punch
  • Light Punch, Medium Punch and Heavy Punch
  • Light Kick and Medium Kick
  • Light Kick and Heavy Kick
  • Medium Kick and Heavy Kick
  • Light Kick, Medium Kick and Heavy Kick
  • Taunt
  • Simultaneous Input Assistance

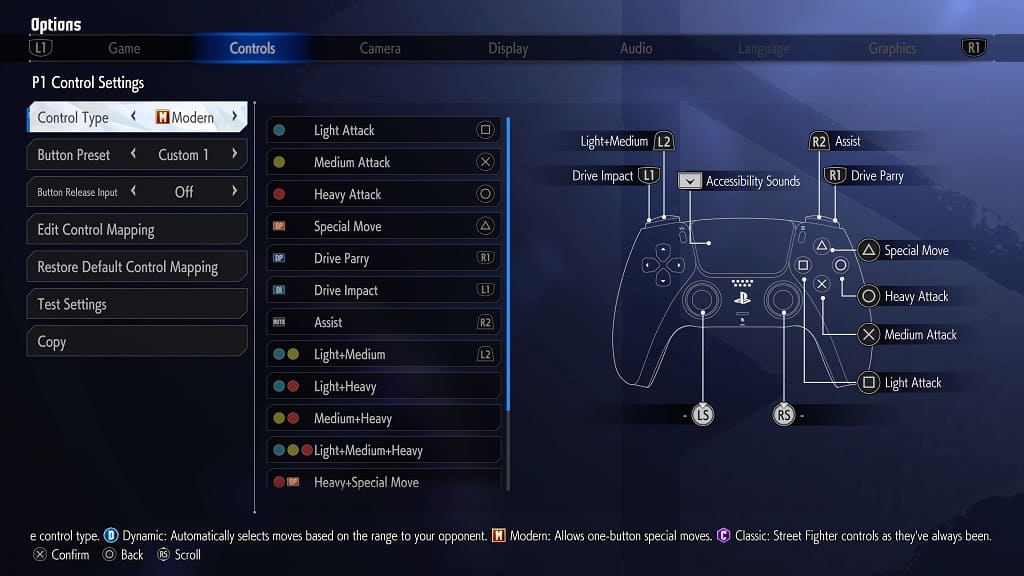
If you want to stick with the Modern control type, then you should see the following default button layout:

  • Triangle Button: Light Attack
  • X Button: Medium Attack
  • Circle Button: Heavy Attack
  • Triangle Button: Special Move
  • R1 Button: Dive Parry
  • L1 Button: Drive Impact
  • R2 Button: Assist
  • L2 Button: Light Attack and Medium Attack
  • Touch Pad Button: Accessibility Sounds

You can also add the following actions to any buttons on the gamepad:

  • Light and Heavy Attack
  • Medium and Heavy Attack
  • Light, Medium and Heavy Attack
  • Heavy and Special Move
  • Taunt

While the Dynamic control type is also available, there aren’t any additional actions you can add to your controller for this simplified layout.

To add any of the aforementioned unassigned actions to the two back buttons of the DualSense, go to the Controls section of the Options tab and then select either Player 1 Side Control Settings (Battle) or Player 2 Side Control Settings (Battle). Afterwards, select Edit Control Mapping.

Look for the actions that you want to map to the back buttons of the Edge and then set it to L3 and R3.

Once you are done saving your changes, open the Customize Button Assignments menu of the controller and then add L3 and R3 to the two back buttons.

Trigger Stops

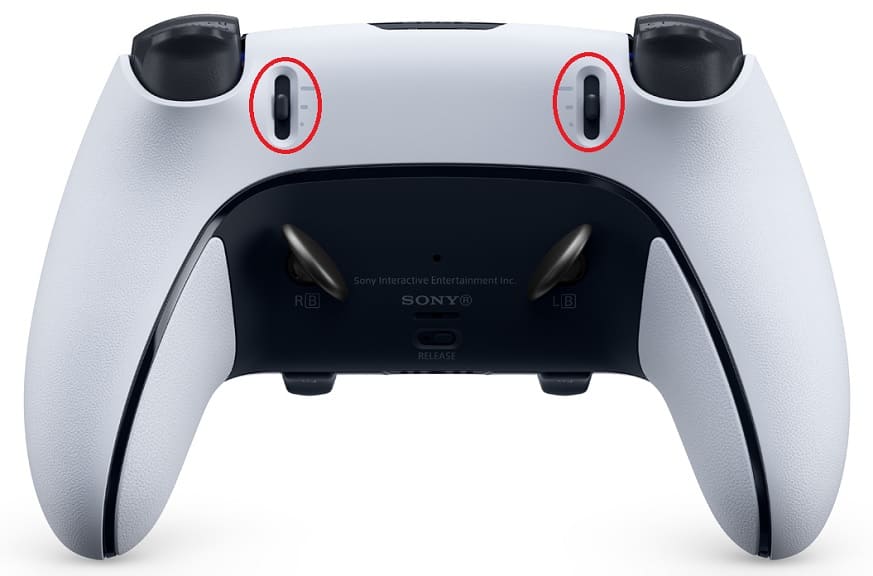
If you haven’t done so already, pull the sliders located on the backside of your Edge all the way down. By doing so, Street Fighter 6 should be able to register your L2 and R2 inputs a lot quicker. In a fighting game, a few extra milliseconds can make all the difference.

You can also further adjust the sensitivity of these trigger buttons from the DualSense Edge’s Trigger Deadzone menu.

Stick Sensitivity and Deadzones

If you prefer using the analog stick instead of the directional pad, then you can use the Stick Sensitivity and Deadzones menu of the controller to adjust the left analog if you are having problems getting your command inputs registered in Street Fighter VI.

Analog Caps and Back Buttons Attachments

As for the analog caps and back button attachments that came with the DualSense Edge, we recommend going with whichever combination that gives you the most comfort as you will most likely by constantly mashing your controller.

Wired Communication

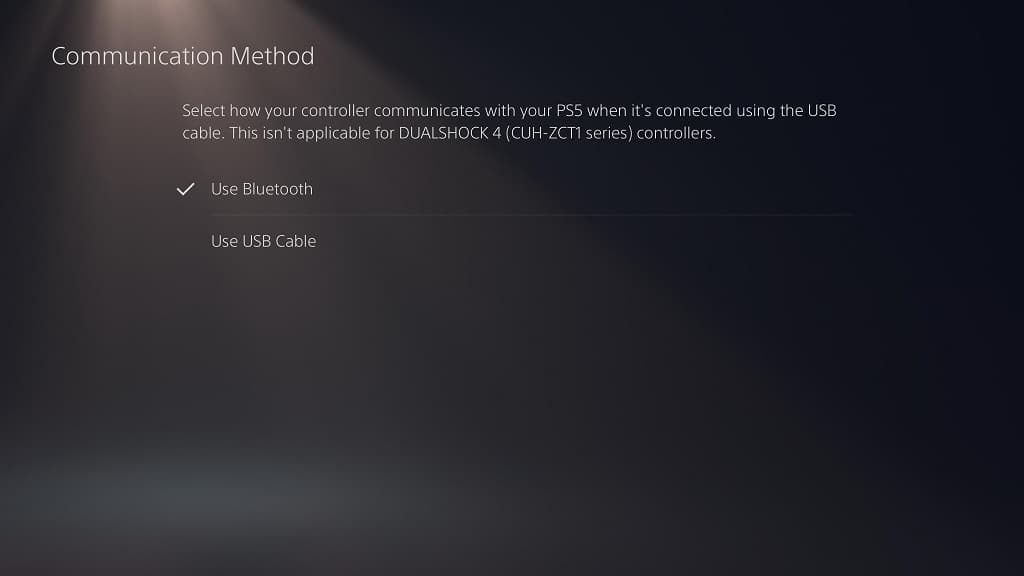
To reduce input lag, we suggest that you plug your Edge controller directly to one of the USB ports of your PS5 console. Afterwards, open the Settings menu of your system and then go to Accessories > Controller (General) > Communication Method. Finally, make sure that Use USB cable is selected.

By doing so, you should be able to reduce the latency when it comes to your button inputs.

How to enable Street Fighter 6 simultaneous input assistance

You can turn on simultaneous input assistance when playing Street Fighter 6 when using the Classic control type. To find out how can enable the feature for this fighting game, you can take a look at this tutorial from Seeking Tech.

What is simultaneous input assistance?

You can read the official description for this feature below:

If you hold this input while inputting a Special Move or Unique Attack command, it will register as if you pressed all three kick or punch buttons together.

So, if you press the simultaneous input assistance button and a punch button together, it will register as if you are pressing the light, medium and heavy punch buttons at the same time. If you press the simultaneous input assistance button and a kick button together, then it will register as if you are pressing the light, medium and heavy kick buttons at the same time.

This feature may be helpful if you have a hard time pulling off some of the special moves and/or unique attacks with the Classic control type.

How to turn on simultaneous input assistance

In order to enable simultaneous input assistance in SF6, you need to take the following steps:

1. Go to the Mode Select menu. You won’t be able to turn this feature on from the Options menu from the pause screen in the middle of a match. Therefore, you have to exit back out all the way to the main menu.

2. From the Mode Select screen, press the Options button if you are playing with a PlayStation controller layout or Menu button if you are playing with an Xbox controller layout to open the Multi Menu.

3. Head into Options from the Multi Menu.

4. After getting to the Options menu, press L1/R1 on the PlayStation controller or LB/RB on the Xbox controller to switch to the Controls tab.

5. In the Controls tab, select either Player 1 Side Control Settings (Battle) if you prefer starting out the match on the left side of the screen or Player 2 Side Control Settings (Battle) if you prefer starting on the right side.

6. In the P1 Control Settings or P2 Control Settings screen, you first need to make sure that the Control Type is set to Classic.

This is because the simultaneous input assistance function isn’t available if you are playing with the Modern or Dynamic control type.

7. Afterwards, scroll down and then select Edit Control Mapping.

8. Scroll down the list of configurable actions until the cursor gets to Simultaneous Input Assistance.

9. Press a button you want to assign this action to.

10. Once you are done, press the Options button on the PlayStation controller or Menu button on the Xbox controller to back out of the Edit Control Mapping section.

11. You should get a Confirmation notification asking if you want to save your changes. Here, you need to select Yes in order to save and apply the simultaneous input assistance feature.

To use this function in a match, you can press the simultaneous input assistance button and the kick/punch button at the same time. Alternatively, you can also hold the simultaneous input assistance button and then press the kick/punch button.

Diablo 4 Battle Pass vs. Premium Battle Pass vs. Accelerated Battle Pass

As a live service game, Diablo IV offers seasonal battle passes where you can earn additional rewards. You can check out this comparison guide to see what the main differences are between the Battle Pass, Premium Battle Pass and Accelerated Battle Pass.

Diablo IV Battle Pass vs. Premium Battle Pass vs. Accelerated Battle Pass Comparison Chart

You can check out our comparison table for the Battle Pass, Premium Battle Pass and Accelerated Battle Pass below:

Diablo IV Battle PassDiablo IV Premium Battle PassDiablo IV Accelerated Battle Pass
Free Tiers272727
Premium Tiers06363
Tier Skips0020
Special Cosmetic001
Update FrequencyAround every 3 monthsAround every 3 monthsAround every 3 months
PricingFree1,000 Platinum (or around $9.99)2,800 Platinum (or around $24.99)

Free Tiers

The regular Battle Pass is completely free as you will be able to unlocked 27 free tiers. The unlocks include cosmetic items as well as Smoldering Ashes.

For the uninformed, Smoldering Ashes can be used to activities Season Blessings, which could give you additional XP, Gold or Obols.

These freebies are also included if you decide to get the Premium Battle Pass or Accelerated Battle Pass.

Premium Tiers

Exclusive to the two paid battle passes are premium tiers, which adds another 63 bonuses that you can unlock. These extras include cosmetic items that are unique to that season; therefore, you may not want to miss out on completing these tiers if you see something you really want.
Tier Skips

The Accelerated Battle Pass is the only one out of these three to offer tier skips. These will allow you to instantly earn a reward without having to grind. So, if you find yourself running out of time when a season is ending, then you can use this feature.

The Accelerated Battle Pass comes with 20 tier skips.

Special Cosmetic

You will also get an exclusive special cosmetic by purchasing the Accelerated Battle Pass.

Update Frequency

According to Activision Blizzard, each new season in Diablo IV will come with a new Battle Pass, Premium Battle Pass and Accelerated Battle Pass. Thus, you can expect new passes around every three months.

Pricing

As we mentioned above, the Battle Pass is completely free.

With the Premium Battle Pass, you will have to pay 1,000 Platinum, which is around $9.99 in USD.

For the Accelerated Battle Pass, the price is 2,800 Platinum, which is approximately $24.99 in USD.

Recap

The Diablo IV Battle Pass is completely free as you will be able to unlock up to 27 items, which includes cosmetics as well as Smoldering Ashes.

By spending 1,000 Platinum (or $9.99), you can get the Premium Battle Pass, which unlocks an additional 63 bonuses for you to unlock.

The Accelerated Battle Pass is the most expensive version as it is priced at 2,800 Platinum (or $24.99). With this bundle, you will get everything from the Battle Pass and Premium Battle Pass to go along with 20 tier skips as well as a special cosmetic item.

If don’t want to miss out on any time limited seasonal cosmetics, then the Accelerated Battle Pass is the best option. Not to mention that you will also get 20 instant unlocks in case you don’t have a lot of time to play Diablo IV during the season.

If you don’t mind the extra grind and/or missing out on the Accelerated Battle Pass exclusive cosmetic item, then the Premium Battle Pass costs a lot less.

If you don’t mind missing out on the Premium tier exclusive cosmetics, then you can just play Diablo IV with the regular Battle Pass.
How to fix missing Diablo 4 cut scenes and conversations

You may notice that you may missed out on some cinematics and conversations when playing Diablo IV. To see how you can potentially fix these story issues, you can take a look at this troubleshooting article from Seeking Tech.

Based on our experience, the missing cut scenes and dialogues occur when we are playing cooperatively with other players online. These bugs can occur regardless of whether you are playing on PC, PlayStation 4, PlayStation 4 Pro, PlayStation 5, Xbox One, Xbox One S, Xbox One X, Xbox Series S or Xbox Series X.

The skipping glitch is more likely to happen when you are further away from the player who initiated to cinematic or conversation. With that said, you may miss out on these story elements even if you standing at close range as well.

For the best results, we recommend that you coordinate with your other party members by pressing the button to initiate a conversation with the NPC at the same time. Hopefully, you won’t miss out on any story by using this method.

If you did end up missing out on any of the cut scenes and/or conversations, then we suggest that you look it up on YouTube if you don’t feel like starting over.

Hopefully, the development team at Activision Blizzard will fix this problem in a future update. Therefore, you should make sure that you have the latest patch downloaded for this action role-playing game.

Until the missing cut scenes and conversations get addressed by the company, we recommend just following the temporary fixes we mentioned earlier in this article.

How to find missing items you bought from the Street Fighter 6 Goods Shop

When you purchase an item from the Goods Shop in Street Fighter 6, you may not be able to unlock it immediately. To see how you can get these missing items to show up, you can take a look at this troubleshooting article from Seeking Tech.

According to Capcom, the in-game times may take longer than usual to appear due to server congestion if a lot of players are using the Goods Shop at the same time.

1. For the first potential fix, you can try restarting your PC or console.

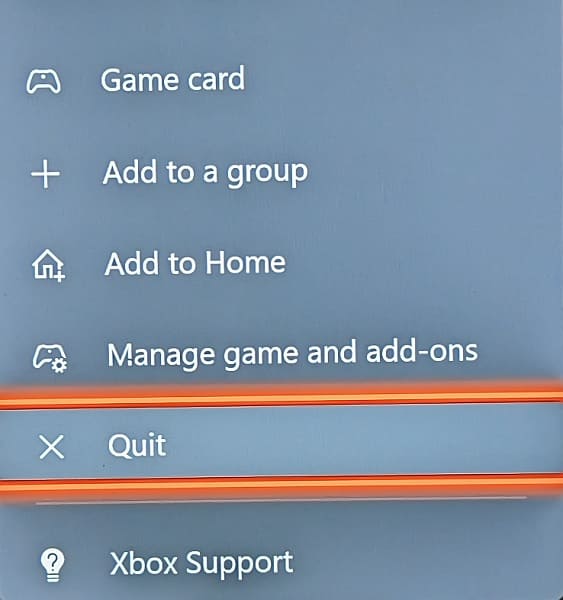
Keep in mind that the Xbox Series X and Xbox Series S use quick resume; therefore, you should quit the game before you restart your console by doing the following:

  • Press the Xbox logo on the controller to open the Guide menu.
  • Move the cursor in the Guide menu over to the Street Fighter 6 icon.
  • Press the Menu button on the controller.
  • Finally, select Quit from the small window menu.
  • Press and hold the Xbox button and then select the “Restart console” option.

After the reboot, log back into your account in Street Fighter 6 to see if you are able to locate the items you previously bought.

2. If the Goods Shop you purchased still isn’t showing up after a system restart, then you should make sure you have the latest firmware downloaded for your PlayStation 4, PlayStation 4 Pro, PlayStation 5, PlayStation 5 Digital Edition, Xbox Series X or Xbox Series S.

If you are playing SF6 on a PC, then can try downloading the latest client update for Steam.

Once you updated your hardware, open the game and log into your Capcom ID account to see if your missing Goods Shop items show up.

3. If you still can’t find the in-game content you purchased in the store, then we recommend that you contact the Capcom customer service team at the official Street Fighter website. You can do so by using this form.

When contacting Capcom, make sure you know the full name, as well as the quantity, of the missing item you purchased from the Goods Shop.

You will also need your User Code, which can be found in the Profile section of the Multi Menu. You can open this menu from the Mode Select screen by pressing the Options button if you are using a PlayStation controller or Menu button if you are using an Xbox controller.

Hopefully, they will be able manually add your lost Goods Shop item.

What to do if you can’t create a clan in Diablo 4 on consoles

If you are playing a console version of Diablo IV, you may not be able to create a clan. To see how you can potentially fix this issue to get this feature to appear, you can take a look at this troubleshooting article from Seeking Tech.

Before we start, it should be noted this guide should be applicable to the PlayStation 4, PlayStation 4 Pro, PlayStation 5, Xbox One, Xbox One S, Xbox One X, Xbox Series S and Xbox Series X versions of the action RPG.

1. To start off, you need to head over to the Options menu.

From the main menu, you can get there by pressing the Options button on the DualSense/DualShock 4 or Menu button on the Xbox Series/Xbox One controller and then selecting Options.

If you are currently in the game, then you need to press the touch pad of the DualSense/DualShock 4 or the View button on the Xbox gamepad to open the Map. From there, use the L1/R1 or LB or RB buttons to switch over to the Game tab and then select Options.

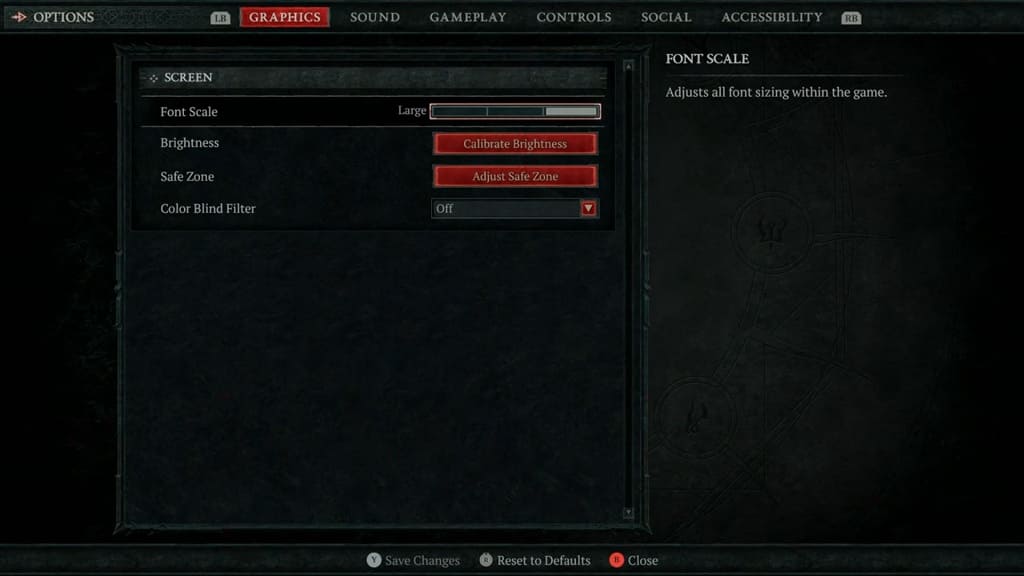
2. Once you get to the Options menu, make sure you are viewing the Graphics tab. If you aren’t then use the L1/R1 or LB or RB buttons to change tabs until you get there.

3. In the Graphics tab, scroll down until you move the cursor to Font Scale, which should have the following description:

  • “Adjusts all font sizing within the game.”

4. By default, the Font Scale setting is set to Medium. You need to change this to Small instead.

5. Once you are done, press the Triangle button if you are using a PlayStation controller or the Y button if you are using an Xbox controller to save the change.

6. You should now be able to see the Create Clan option in the in-game Clan menu.