How to prevent and fix Alienware AW3423DW burn-in and uneven brightness issues

The 34” Alienware AW3423DW Curved QD-OLED can be susceptible to screen burn-in and uneven brightness issues if you don’t take proper care of the product.

To see how you can prevent, as well as potentially fix these problems, you can check out this guide at Seeking Tech.

How to prevent AW3423DW image retention and uneven brightness

Displaying a static image for a long time will lead to image retention issues such as ghosting in addition to brightness levels not being evenly disputed across the screen.

To prevent these from occurring on your AW3423DW, you can try taking the following precautionary steps:

1. The easiest way to prevent any potential retention problems is to occasionally turn off your monitor during long, multi-hour sessions.

After every hour of continuous use, it is a good idea for your eyes to take a short 5-to-10-minute break from looking at the screen. During this break time, you should also turn off the monitor so that it won’t get stuck displaying static images.

2. Anytime you don’t plan on looking at the screen for a long time, you should also power down the AW3423DW.

3. We also recommend setting a short timer where the screen will be turned off after a certain amount of inactivity.

On computers, you can find this feature in the Windows Power Options menu if you have a Windows PC or Mac Energy Saver menu if you are using a Macintosh.

4. With some devices (such as the PlayStation 5, PlayStation 5 Digital Edition, Xbox Series S and Xbox Series X), there is also a setting you can use to dim the screen after a certain amount of passed since activity was detected.

5. If you would rather leave your monitor powered on, then you can try setting up a dynamic screen saver in order to prevent any static images from being displayed for an extended amount of time.

6. You can also try turning down the brightness level by opening the on-screen display of the AW3423DW. Afterwards, go to Mene and then select Brightness/Contrast. In this section, you need to lower the brightness level.

7. Some videogames may have a lot of static images due to the user interface.

Fortunately, most modern games have settings that will increase the opacity of the static graphics. There may also be options where you can customize the user interface to appear dynamically or remove certain elements.

8. The Alienware AW3423DW uses a ultrawide screen ratio. As a result, you will get a lot of black bars as most videos or games don’t support that aspect ratio.

Therefore, you should be more cautious when viewing content that don’t completely fill the screen.

How to fix AW3423DW burn-in and uneven brightness issues

If you notice that your AW3423DW has some screen burn-ins and/or uneven brightness spots, then we recommend that you refresh its pixels.

If the Pixel Refresh feature does not help fix the image retention, then you can try refreshing the panel.

To see how you can do both of these actions, we recommend that you take a look at the steps laid out in this article.

Recommended Samsung S95B settings for PS5, Xbox Series X and S

The Samsung S95B OLED is one of the better 2022 television sets you can get for your PlayStation 5, PlayStation 5 Digital Edition, Xbox Series X and/or Xbox Series S. You can take a look at this guide to see what recommended settings you should use to get the most out of these gaming consoles.

1. To start off, make sure you connect your console directly to your Samsung S95B OLED. Using a HDMI splitter or HDMI pass-through may end up causing issues with input lag and picture quality.

Keep in mind that the Xbox Series S only comes with a HDMI 2.0 cable. Therefore, you may want to get a HDMI 2.1 cable if you want to take full advantage of the Series S display capabilities.

Both versions of the PS5, as well as the Xbox Series X, come with a HDMI 2.1 cable included.

2. Next, you can head into the Setting of your Samsung S95B and then go to the Connections > Game Mode Settings. From there, make sure you set Game Mode to Auto. By doing so, the OLED TV will automatically detect when you are playing a game and switch over to the Game Mode.

In this mode, you will get lower input lag. Furthermore, the Variable Refresh Rate feature will automatically be enabled for the television set.

3. Also in the Game Mode Settings menu, we recommend that you set the Dynamic Equalizer to 0.

4. In the same menu, you can also select Game Motion Plus. From there, we recommend that you disable the Game Motion Plus feature as it could introduce additional lag and unwanted visual effects to your games.

5. You can also get to the HDR Tone Mapping menu in the Game Mode Settings. From there, set HDR10+ Gaming to Basic and then enable the Game HDR Setting.

6. Go back to the Settings menu and then head over to Picture > Expert Picture Settings.

Inside Expert Settings, we recommend setting Sharpness to 0. Otherwise, there could be unwanted visual articles that come with an over-sharpened picture.

7. For the rest of the Expert Picture Settings make sure you do the following:

  • Set Brightness to 50.
  • Set Contrast to 50.
  • Set Color to 30.
  • Set Tint (G/R) to 0.
  • Set Contrast Enhancer to Off.
  • Set Color Tone to Warm 2.
  • Set Gamma to 0.
  • Set Shadow Detail to 0.
  • Set Color Space Settings to 0.
  • Set Peak Brightness to High.

8. You should also make sure that you turn off an energy saving features for your Samsung S95B OLED that may be automatically lowering its screen brightness level.

To do so, head over to Settings > All Settings > General & Privacy > Power and Energy Saving. Afterwards, make sure that the following are disabled:

  • Brightness Optimization
  • Brightness Reduction
  • Motion Lighting

9. Furthermore, you should make sure that you have the right picture settings on your console.

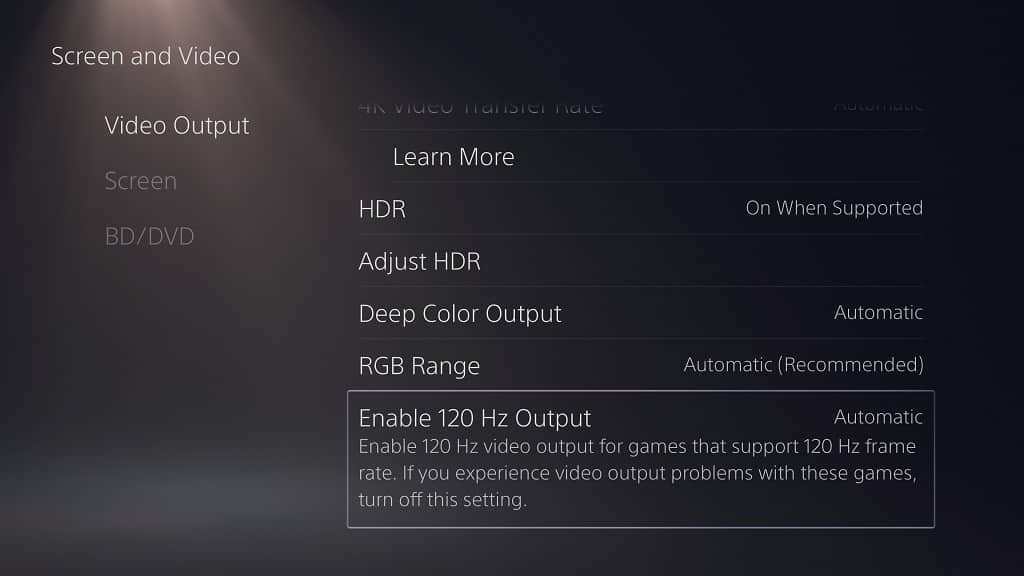
On the PlayStation 5 and PlayStation 5 Digital Edition system, you need to go to the Settings > Screen and Video.

From the Screen and Video menu, make sure the following settings are correct:

  • Resolution is set to 2160p.
  • 4K Transfer Rate is set to Automatic.
  • VRR is Set to Automatic.
  • ALLM is set to Automatic.
  • HDR is set to On When Supported.
  • Deep Color Output is set to Automatic.
  • RGB Range is set to Automatic.
  • Enable 120 Hz Output is set to Automatic.

On the Xbox Series X and Xbox Series S, go to Settings > General > TV & display options. Inside the TV & display options menu, make sure that Resolution is set to 4K UHD.

From the same menu, go to “Video modes” and then make sure the following are enabled:

  • Allow auto-low latency mode
  • Allow variable refresh rate
  • Allow 4K
  • Allow HDR10

We recommend that you disable the Auto HDR setting in the “Video modes” menu if you want games that don’t support HDR to look as accurate as possible.

10. The Samsung S95B OLED TV Set should now be optimized for your PlayStation 5, PlayStation 5 Digital Edition, Xbox Series X and/or Xbox Series S.

With that said, you may still need to do some tweaking in some games. Fortunately, most modern releases come with in-game settings where you can adjust the brightness and/or contrast levels so that you don’t have to change your TV and/or console settings in order to get the best picture quality for that specific title.

How to fix Google Pixel Buds A-Series pairing issues

Before you need to connect your Google Pixel Buds A-Series to another device, you first need to go through the pairing process.

If you are having a hard time trying to pair these wireless ear buds, then you can take a look this troubleshooting guide to see how you can potentially fix this issue.

1. The first step we recommend taking is to charge your Google Pixel Buds A-Series in order to make sure that it has plenty of battery life for the pairing process.

If you are encountering problems trying to recharge this device, then you can check out this article.

2. Next, you should restart the device that you are trying to pair with your Google Pixel Buds A-Series.

3. After restarting the other device, make sure you enable its Bluetooth connection.

4. If the device also offers a location feature, then you should turn that on as well.

5. Furthermore, make sure that the other device is in the Bluetooth menu where it shows a list of devices that can be paired.

6. You then need to put your Google Pixel Buds A-Series in pairing mode by taking the following steps:

  • Open the charging case of your Google Pixel Buds A-Series.
  • If you haven’t done so already, place the left and right ear buds into their designated positions in the case. If place correctly, both buds should snap into place.
  • Press and hold the button located on the back of the charging case until you see a pulsating white light appear on the front of the case.
  • You should now be able to see the Google Pixel Buds A-Series appear on the Bluetooth menu of the other device.
  • Tap on the icon on the Bluetooth menu and you should see the option to pair your Pixel Buds A-Series.

7. If your ear buds still aren’t paired to the other device, then you can try resetting the buds by doing the following:

  • To begin, make sure you plug the Google Pixel Buds A-Series into a power source by using a USB cable.
  • Open the charging case and make sure you place the buds in their designated positions.
  • Press and hold the button on the back of the case for at least 30 seconds.
  • The status indicator on the case should blink white and orange during the reset process.
  • Once the status indicator only blinks, you can try to pair it to the other device again.

10. If you already have a Google Pixel Buds A-Series paired on the other device, then you can try deleting or forgetting it. Afterwards, you can try pairing your ear buds to see if you are able to do so.

11. We also recommend that you update the driver or firmware of the other device to see if a new release help improve the Bluetooth pairing process.

12. Moreover, you may want to consider factory resetting the other device. In order to do so, please refer to the instruction manual for the other device.

13. You can also factory reset the Google Pixel Buds A-Series by following the steps laid out in this tutorial.

If none of the aforementioned potential solutions help, then you can contact Google for additional support.

How to fix Alienware AW3423DW flickering issues

When using the 34” Alienware AW3423DW Curved QD-OLED, the screen may start to flicker. To see how you can potentially fix this problem with your gaming monitor, you can take a look at this troubleshooting article from Seeking Tech.

1. The first step you can try is to disconnect the HDMI or DisplayPort cable from the monitor and then reconnect it again.

Before connecting it back again, inspect the cable and port to see if there are any potential defects.

2. If possible, you may want to consider using a new cable as the current HDMI or DisplayPort cable could be defective.

3. You can also try turning off the monitor and then turning it back on again.

4. A power cycle may help with getting rid of the flickers as well.

In order to do, you can take the following steps:

  • Shut down the AW3423DW.
  • With the monitor turned off, you then need unplug its power cord from the power outlet.
  • You should then wait for around a minute.
  • After waiting, plug the power cord right back into the power outlet.
  • Turn on your monitor to complete the power cycle.

5. If you are connected the power cord of the Alienware AW3423DW to a power strip, then another device plugged into the same strip could be sending electromagnetic fields that may be causing the monitor to flicker.

In this case, you can try disconnecting the power cord of the other device from the power strip. Alternatively, you can either plug the monitor to a different power strip or directly to a wall outlet.

6. Furthermore, you can try restarting the connected device.

7. If you have the monitor connected to a computer or laptop, then you can try updating the driver of the graphics cards.

8. Moreover, you should also consider updating the firmware of the connected device as a new release may help fix the screen flickers.

9. You may want to consider setting the resolution of connected device to a different resolution.

If possible, try to set the connected device to 3440 x 1440, which is its native resolution of the 34” Alienware AW3423DW Curved QD-OLED Gaming Monitor.

10. You should also try setting to the monitor to a higher refresh rate.

11. The adaptive sync feature of the Alienware AW3423DW may also cause the screen to flicker.

If you are using a computer or laptop with an NVIDIA graphics cards, then you need to disable GSYNC.

If you are using a computer or laptop with an AMD graphics cards, then you need to disable FreeSync.

For game consoles like the PlayStation 5, PlayStation 5 Digital Edition, Xbox Series S and Xbox Series X, you need to disable Variable Refresh Rate.

12. If you are only experiencing screen flickering when using a specific app or playing a specific game, then you can try updating the app or game to see if a new version will fix the problem.

13. If the 34” Alienware AW3423DW Curved QD-OLED is still flickering after you try all of the aforementioned potential solutions, then you might want to consider contacting Dell to get additional support.

How to restart the Google Pixel 6a

Restarting your Pixel 6a can be somewhat confusing if you aren’t familiar with using the smartphone. To see how you can properly reset this Google device, you can take a look at this tutorial from Seeking Tech.

Why you should restart your Pixel 6a

Restarting your Google Pixel 6a should provide the following benefits:

  • Close all opened apps.
  • Clear out any lingering processes.
  • Free up other hardware resources.
  • Refresh your wireless connections.

Google recommends that you restart your Pixel 6a occasionally so that your smartphone will be able to run efficiently.

How to restart your Pixel 6a

In order to restart your Google Pixel 6a, we recommend that you take the following steps:

1. To start off, you first need to get to the power menu.

The fastest way to do so is to press and hold both the power and volume up buttons at the same time.

If you have a hard time trying to open the power menu by using the power and volume up buttons, then you can change to a setting where you only need to hold the power button. If you are interested in doing so, then you need to do the following:

  • Go to the Settings App.
  • Inside of Settings, scroll down the list and then select System.
  • From the System menu, you then need to select Gestures.
  • After getting to the Gestures menu, you then need to tap the “Press and hold power button” option.
  • Now that you are in the “Press and hold power button” menu, you need to make sure that the “Hold for Assistant” option is disabled.

For more information about the “Press and hold power button” setting, you can check out this post.

2. With the power menu opened, you can then tap the Reset option.

3. The smartphone will then show a Restarting screen before it reboots.

4. Once the phone has rebooted, you should be able to start using normally again.

How to restart your Pixel 6a into safe mode

You can also restart your Google Pixel 6a in safe mode. In order to do so, press and hold the Power Off option or the Restart option in the power menu.

To exit out of the safe mode, you can tap the Restart option to reboot your Google Pixel 6a back to its normal mode.

To learn more about the safe mode for this phone, you can take a look at this article.

How to fix pixel and line issues with the Alienware AW3423DW

When using the Alienware AW3423DW, you may notice missing or stuck pixels. There may also be horizontal or vertical lines that appear on screen. To see how you can potentially fix these problems, you can take a look at this troubleshooting article at Seeking Tech.

1. The first step you can take is to power cycle your 34” Alienware AW3423DW Curved QD-OLED Gaming Monitor. In order to do so, you can try taking the following steps:

  • Turn off the screen if you haven’t done so already.
  • After turning off the monitor, unplug the power cable from the power outlet.
  • We then recommend that you wait for at least 1 minute.
  • After waiting for a minute, plug the power cable back into the power outlet.
  • With the screen plugged back into the power, turn it on to see if you still see any dead pixels or visible lines.

2. You can also try initiating the Alienware AW3423DW to do a self-test by doing the following:

  • Turn off the screen if you haven’t done so already.
  • Remove any HDMI or DisplayPort cables that are connected to the ports of the monitor.
  • After disconnecting the video cables, turn on your monitor.

If you see a message show up on the monitor, then it indicates that it is able to turn on normally. If you see any abnormal pixels or lines, then it means that there is an issue with the screen.

3. Moreover, you can also try using a built-in diagnostic tool of the 34” Alienware AW3423DW Curved QD-OLED Gaming Monitor to determine if the abnormal pixels and/or lines appears.

In order to do so, you need to follow the steps laid out in this guide.

4. If you don’t any problems when using the built-in diagnostic tool of the Alienware AW3423DW Curved QD-OLED Gaming Monitor, then the visual artifacts could be related to the HDMI or DisplayPort.

If you believe that there is a problem with the video connection, then you can try disconnecting the video cables from the screen. Afterwards, you can try examine the cables and ports to see if there are any damage.

If possible, you can try using a different HDMI or DisplayPort cable.

You can also try updating the graphics card driver if you are connecting to a computer. Moreover, make sure that the firmware of the connected device is up to date as well.

5. You can also try doing a factory reset for the AW3423DW by taking the following steps:

  • Move the joystick of the monitor to open the on-screen display.
  • Select the Menu option.
  • Inside of Menu, select Others.
  • You then need to select Factory Reset.

5. If the abnormal pixels and/or lines show up when you are using the built-in diagnostic tool, then it mostly means that there is something wrong with the screen.

In this case, you can try doing a pixel refresh. If you don’t see any improvements after a doing a pixel refresh, then you can try doing the more comprehensive panel refresh.

To see how you can manually do both of these actions, then you can take a look at this tutorial.

6. If you are still having problems, then you may need to get your monitor replaced.

What to do if your 2022 Roku Ultra (4802R) is not turning on

If you are having issues when trying to turn on the 2022 Roku Ultra, which has a model number of 4802R, then you can follow this guide at Seeking Tech to see what steps you can take to power on the media player.

1. The first step we recommend taking is to look at the status light indicator located at the front of the 2022 Roku Ultra.

If you see a solid or blinking white light, then it indicates that your media player should be currently turned on.

If you don’t see an image appear on the connected television screen or computer monitor, then we recommend taking a look at this troubleshooting article to see what you can do.

2. If you see a red light coming from the status light indicator, then it means that the device is overheating.

To see how you can deal with a 2022 Roku Ultra that gets too hot, you can check out this post.

3. If the status indicator is showing no lights at all, then you need to make sure that the power adapter is connected securely into the media player.

Make sure you are using the adapter that came with the 2022 Roku Ultra. This is because other types, including those made for other Roku players, may not work.

4. You should also make sure that the other end of the power cable is securely connected to a power outlet.

5. Furthermore, you may want to try a different power outlet if you aren’t getting your media player to power on with the current one.

6. If you have been trying to plug your 2022 Roku Ultra to a power outlet of a power strip, then the power strip could be defective.

If you believe that this is the case, then you can try plugging the media player directly to the wall outlet to see if doing so fixes your problem.

7. If you still can’t get your 2022 Roku Ultra to turn on, then the device could be defective.

In this case, you can contact Roku to provide additional support. If the product is still under warranty, then you may be able to get a replacement.

How to find all installed applications on Pixel 6a

Finding a list of all the applications you have downloaded and installed on your Google Pixel 6a can be somewhat tricky if you aren’t familiar with the user interface of the smartphone. To see how you can view the apps on your phone, you can take a look at this tutorial from Seeking Tech.

How to find installed applications on Pixel 6a

In order to find installed applications on your Google Pixel 6a, you need to take the following steps:

1. If you haven’t done so yet, turn on your phone and then unlock its screen.

2. Next, you need to be in the home screen.

If you aren’t, then you can swipe upwards from the bottom of the screen if you are using gestures-based navigation. If you are using buttons-based navigation, then you need to tap the circle button located at the bottom of the screen.

To see how you can switch between these two navigation types, you can check out this article.

3. From the home screen, look for an empty space.

4. Touch the empty space and then swipe upwards.

5. You should now see a list of applications you have installed on your Pixel 6a.

6. In this screen, you can also use the search bar located at the top.

Afterwards, you can input the name of the app on the virtual keyboard and then tap the icon that has the arrow pointing to the right in order to search for an app.

How to find all applications on Pixel 6a

The aforementioned method will show the installed applications on your Google Pixel 6a but not any of the disabled apps. In order to view both the disabled and installed apps, you need to do the following:

1. Start by opening the Settings App.

If you can’t find it, then you can pull down the Quick Settings menu from the top of the screen and then pull it down further in order to expanded it. From there, you should be able to find and select the gear icon in order to open the Settings App.

2. Inside of Settings, make sure you select Apps.

3. After getting to the Apps menu, you then need to select the See All Apps options.

4. In the All Apps menu, you will find all the disabled and installed apps you have on your Google Pixel 6a.

5. You can tap the drop-menu located at the top of the All Apps menu to filter your list based on the following categories:

  • All apps
  • Installed apps
  • Disabled apps

6. In the All Apps menu, you can also tap the magnifying glass icon located at the top left side of the screen in order to search for an application.

Afterwards, input the app’s name by using the virtual keyboard and then tap the magnifying glass icon located at the bottom right side to go to the search results page.

What to do if Alienware AW3423DW isn’t displaying a picture

When turning on your 34” Alienware AW3423DW Curved QD-OLED Gaming Monitor, you may get a blank screen.

To see what you can do in order to get the monitor to display a picture, you can check out this article from Seeking Tech.

What to do if there is no picture and no power LED light

If your Alienware AW3423DW isn’t showing any picture, and you see no light coming out of the power LED indicator, then you can try doing the following:

1. The first thing you can try is to push down on the power button again. This time, you can try putting more pressure in order to push it further down.

2. You can also try unplugging the monitor from the power outlet and then plugging it back again.

3. If you still can get the power LED light to show anything, then you can try using a different power outlet as the current one you are using may be defective.

4. You can also try disconnecting and reconnecting the HDMI or DisplayPort cables.

5. Furthermore, you should make sure that the connected device is currently turned on.

If the connected device is set to sleep mode, rest mode, hibernation mode or any other low-power states modes, then you need to wake it.

6. There is a possibility that the AW3423DW may be displaying the incorrect source.

In this case, push down or move the joystick located below on the monitor to open the on-screen display menu and then select the input source option. Next, select the input source that is connected to the device is currently turned on.

What to do if the power LED light is on but there is no image

If the power LED of the 34” Alienware AW3423DW Curved QD-OLED Gaming Monitor is displaying a light but no picture is showing up on the screen, then you can try doing the following:

1. The first step you can take is to increase the brightness and contrast levels of the screen.

You need to take the following steps in order to do so:

  • Press down or move the joystick located on the monitor.
  • From the on-screen display, select Menu.
  • Inside Menu, select Brightness/Contrast.
  • Next, increase the Brightness levels.
  • Afterwards increasing the screen’s brightness, you then need to increase the contrast levels.

2. You can also try looking at the HDMI cable, DisplayPort cable, HDMI port and/or DisplayPort ports to see if there are any potential damage.

3. Make sure you try switching inputs as the AW3423DW could be displaying a different source.

4. You can also perform a self-test to see if there is anything wrong with your monitor by taking the following steps:

  • Turn off your monitor and disconnect any HDMI and/or DisplayPort cables you have connected.
  • Turn on your monitor again.
  • If the screen is working properly, then you should see a message show up.

5. Moreover, you can try using the diagnostic tool that has been built into the 34” Alienware AW3423DW Curved QD-OLED Gaming Monitor.

You can take a look at this guide to see how you can use this feature.

If you still can’t get an image to show up on the monitor, then we recommend that you contact Dell to get additional support.

How to fix HDCP Error Detected issues with the 2022 Roku Ultra (4802R)

When trying to watch TV movies or movies with your 2022 Roku Ultra (4802R), you may get a message that shows “HDCP Error Detected.” To see how you can remove this copy protection warning, you can take a look at this troubleshooting article at Seeking Tech.

1. The first step we recommend taking is to make sure that your television set or computer monitor is compatible with HDCP 2.2.

For the uninformed, HDCP 2.2 is a copy protection feature that will block a video if it believes that you are trying to record it.

We recommend looking at the settings menu of your TV or monitor to find if it supports version 2.2 of HDCP. You may also be able to find the copy protection information in the user manual and/or official website of the manufacturer of the screen.

2. If your screen supports HDCP 2.2 but you are still seeing the HDCP Error Detected warning, then you can try unplugging the HDMI cable and the power cycling the connected devices.

In order to do so, you can try taking the following steps:

  • Unplug the HDMI cable from both the 2022 Roku Ultra (4802R) and the screen.
  • Unplug the 2022 Roku Ultra from the power outlet.
  • Turn off the screen and then unplug it from the power outlet.
  • If you connect your Roku Ultra to another device (such as an AV system or soundbar), then you need to turn the other device off and then unplug it from the power outlet.
  • Wait for at least 10 minutes.
  • You then need to re-connected the HDMI cable to your Roku Ultra, screen and other the other device.
  • Plug the power cables back into the power outlet.
  • Turn the media player, screen and other device back on.
  • Test to see if you are able to watch a video without the HDCP Error Detected message showing up.

3. If the aforementioned fix did not resolve the problem, then you can try connecting the 2022 Roku Ultra to a different HDMI port if your screen has multiple inputs.

4. Your AV system, sound bar and/or HDMI splitter may not support HDCP 2.2. In this case, we recommend that you connect the media player directly to your TV or monitor.

5. You should also inspect the HDMI cable to see if it hasn’t been damaged. If you believe that it is, then you try losing another HDMI cable that is no longer than 6 feet in length.

6. If possible, you can also try connecting the 2022 Roku Ultra to a different TV or monitor to see you are able to view videos without any problems.

7. Moreover, you can try changing the display type. In order to do so with the 2022 version of the Roku Ultra, you can take the following steps:

  • Press the home button on the 2022 Roku Ultra remote.
  • In the menus, find and select Settings.
  • Next, you need to select Display Type.
  • Change the Display Type to something else.
  • Afterwards, try to watch a video to see if the HDCP issues are still present.

8. You may want to factory reset the Roku Ultra as well.