What to do if the Xbox Series X or S Guide Menu is not showing up

By pressing the Xbox logo button on your controller, you should be able to get the Xbox Guide menu to show up. If you don’t see the quick menu appear, then you can check out this troubleshooting article to see how you can potentially fix your problem.

1. The guide menu issue may be related to the game you are currently playing. In this case, the first step you can take is to restart your console.

In order to do so, you need to press and hold the Xbox button on your controller. You should then see a “What do you want to do?” notification. From there, select the Restart Console option.
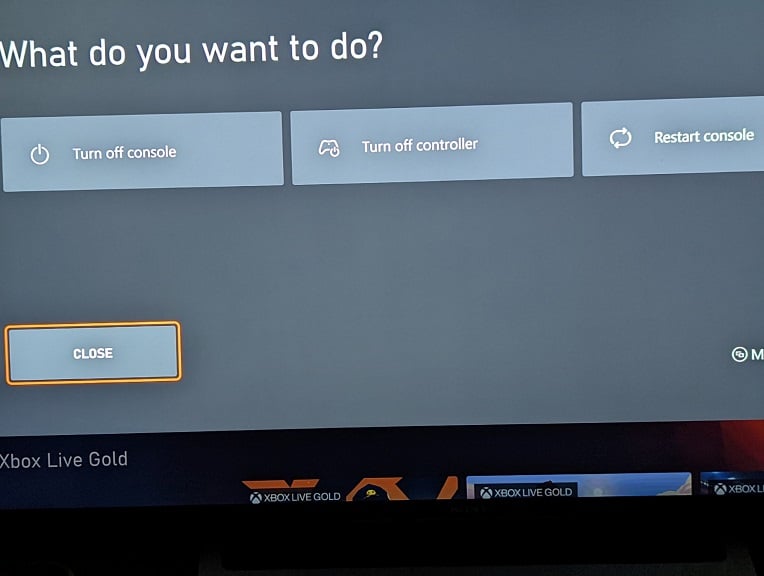
After restarting your Xbox Series X or Xbox Series S, press the Xbox button to see if you are able to get the Guide menu to show up.

2. If you still can’t get the Guide menu to appear, then you can try quitting the game that you are currently playing. In order to do so, you need to do the following:

  • In the Home menu of your Series X or Series S, hover over the game that you currently have suspended.
  • Next, you need to press the Menu button, which has the three horizontal lines, on your controller.
  • In the pop-up menu, select the Quit option to completely close the game.
  • Afterwards, press the Xbox button to see if you are able to bring up the Guide menu.

3. You can also try clearing the cache of your console by doing a power cycle. In order to do so, you can take the following steps:

  • To start off, you need to turn off your console. You can do so, by long pressing the Xbox button on your controller and then select the Turn Off Console option. Alternatively, you can press the Xbox power button located on the console to turn it off.
  • Once the system has been shut down, unplug the power cord.
  • With your Xbox Series X or Xbox Series S unplugged, you then need to wait for at least 2 minutes.
  • After at least 2 minutes have passed, you can plug the power cord back into the console.
  • Next, you need to power on the gaming system again.
  • Once the Series X or Series S have booted up, trying pressing the Xbox button to see if you are able to bring up the Guide menu.

4. You can also try connecting another controller and then pressing its Xbox button. If the other game pad works, then there may be a problem with your current controller.

How to turn off the sleep mode for Xbox Series X and S

When you try to shut down your Xbox Series X or Xbox Series S console, the system may go into sleep mode instead. To see how you can disable this low power state mode, you can follow the steps laid out in this tutorial at Seeking Tech.

What are the benefits of using sleep mode?

If you decide to leave sleep mode on, then you can boot up your Xbox Series X and Xbox Series S faster when compared to cold booting the console after it has been completely shut down. This can be helpful if you can’t currently save your progress in a video game but don’t want to leave your system turned completely on while you are away.

You will also be able to remotely turn on your system by using the official Xbox app from another device.

What are the issues associated with using sleep mode?

The main problem with using sleep mode is that it will use a lot more power consumption. According to Microsoft, this low power state mode can consume around 20 times more power as opposed to using the normal shutdown method.

As a result, your gaming system will end up costing you on your energy bill even if you aren’t actively using it.

You may also experience crashes or other problems with certain games when using the sleep mode of your Xbox Series X or Xbox Series S.

Due to the increased power consumption and potential glitches, we recommend that you avoid using sleep mode whenever possible.

How to disable sleep mode

If you want to disable the sleep mode on your Xbox Series X or Xbox Series S console completely, then you need to take the following steps:

1. To start off, make sure you have the latest firmware downloaded as the ability to fully disable sleep mode was added through a new update.

If you haven’t done so already, then you need to turn on your console, connected it to the Internet and then open the Settings App.

From there, you need to go to System > Updates. If there is a new console update available, make sure you download and install it to your Xbox Series X or Xbox Series S.

2. With your console updated, go back to the front page of the Settings App.

3. On the left column of the first Settings page, you need to select General.

4. On the right side of the same screen, you need to select Power Options.

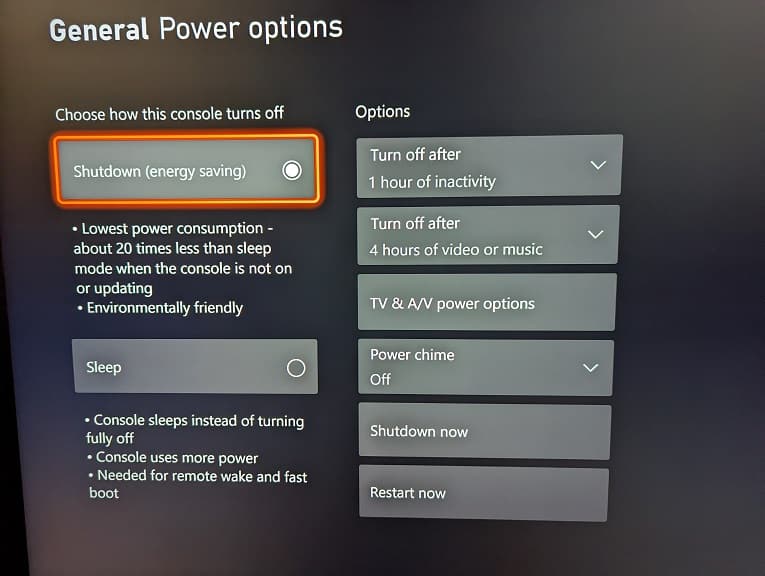
5. In the General – Power Options menu, you should see the “Choose how this console turns off” column. From there, make sure you select the Shutdown (Energy Saving) option.

The next time you turn off your Xbox Series X or Xbox Series S, the console will now fully shut down as opposed to going into sleep mode.

How to use your Xbox Series X or S to change the TV volume

Thanks to a new system software update, you can now directly control your TV volume from your Xbox Series X or Xbox Series S console. To find out how to do so, you can follow the steps laid out in this article from Seeking Tech.

1. To start off, make sure that you have the latest firmware installed as this feature was only added recently.

To force your Xbox Series X or Xbox Series S to update, you can try doing the following:

  • If you haven’t done so already, power on your console and then connect it to the Internet.
  • Next, open up the Settings app.
  • In Settings, scroll down to System in the left column and then select Updates on the right side.
  • If you see the “Update console” option located at the top, then you need to select it to start the download and installation process. If you see the top option greyed out with the “No console update available” wording, then it indicates that your Series X or Series S has already been updated to the latest system software.

2. Go back to the first page of the Settings app.

3. From the front page of Settings, scroll to General on the left column and then select “TV & display options” on the right side.

4. In the “General – TV & display options” menu, you need to select the “Device control” option that should be underneath the Display column.

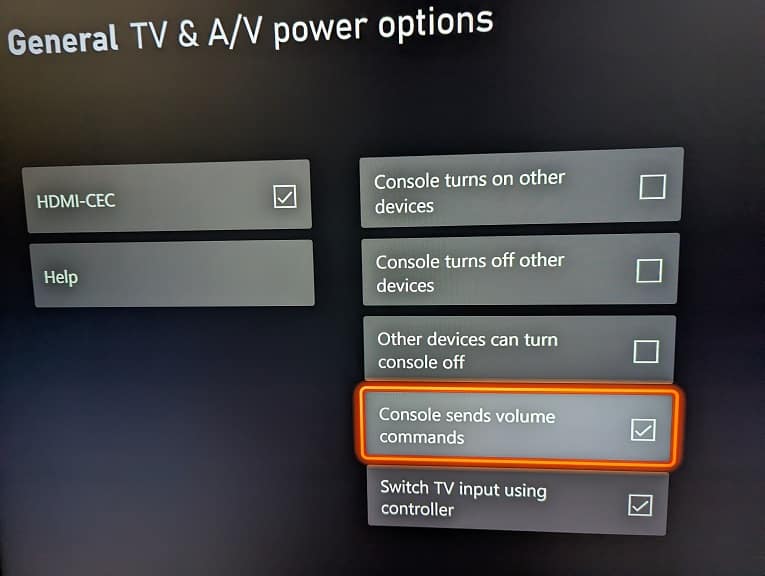
5. Inside of the “General – TV & A/V power options” menu, you first need to make sure that the HDMI-CEC box is checked.

6. In the same menu, you also need to make sure that the “Console sends volume commands” box is checked as well.

7. Afterwards, back out of the “General – TV & A/V power options” menu.

8. You should then see a notification asking you to restart your Xbox Series X or Xbox Series S for the changes to take effect. Here you need to select the Restart Now option.

9. Once you have everything set up, press the Xbox logo button on your controller in order to bring up the Xbox guide menu.

10. You should be on the left-most tab. If you are in another tab, then you need to press the LB button to switch to the tab that has the Xbox logo icon.

11. In the left-most tab of the Xbox Guide menu, select the “Audio & music” icon, which is the right-most option located at the very bottom.

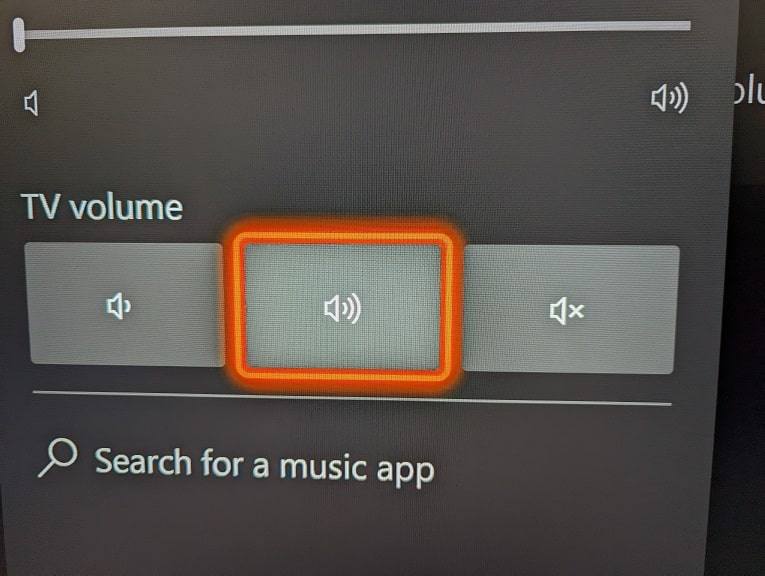
12. After getting to the “Audio & music” in the Xbox Guide menu, you should see the “TV volume” row near the bottom.

The left-most icon on this row will lower the volume of your television speakers. The middle icon will increase the TV volume. The right-most icon will mute the sound coming out of your television set.

If you can’t change the TV volume after following all of the aforementioned steps, then your TV may not support HDMI-CEC or may have the feature turned off in its settings.

How to turn off Xbox Series X and S beeping noise

When you turn on or turn off your Xbox Series X or Xbox Series S, you will hear an audible beeping sound coming from the game console. This noise can be quite loud, especially if you are trying to get in some quality gaming time while someone is sleeping nearby.

Thankfully, a new firmware update for the Xbox Series consoles enabled the ability to turn off the beeping noise. To see how you can do so, you can check out this tutorial from Seeking Tech.

Downloading and installing the new Xbox Series X and S system software

If you haven’t done so already, make sure you download and install the latest system software for your Series X or Series S console.

To manually update, you can try doing the following:

  • Turn on your gaming console and then make sure that it is connected to the internet.
  • In the home menu, go to the Settings app.
  • Inside of Settings, select System from the left column.
  • On the right side of the same screen, you then need to select Updates.
  • After getting to the System – Updates menu, you may see the Update Console option. If you do, select it in order to start downloading and installing the update. If you see “No console update available” instead, then it means that your system is already up to date when it comes to firmware.

Method #1:

For the first method of turning off the beeping sound coming from your Xbox Series X or Xbox Series S, you can use the Power Options menu by taking the following steps:

  • Go to the Settings app of your console.
  • From the front page of Settings, you need to select General from the list of options available on the left side.
  • You then need to select Power Options on the right side of the same menu.
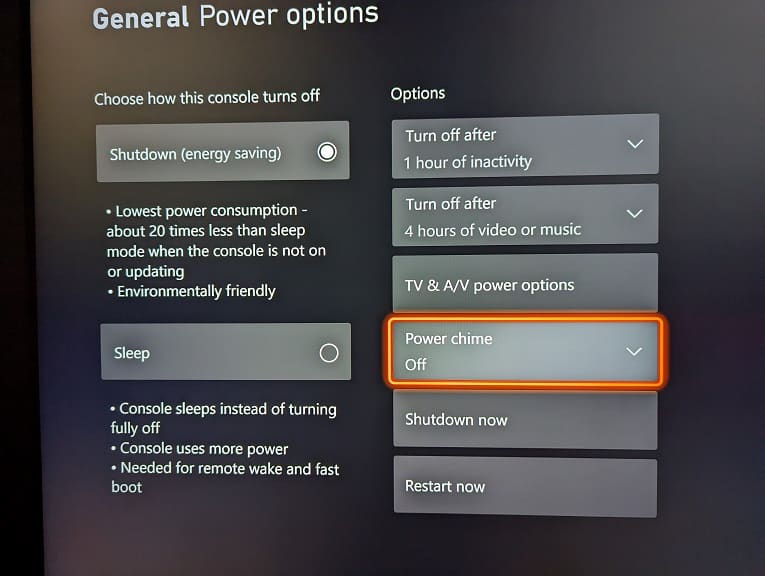
  • In the General – Power Options menu, select Power Chime.
  • In the drop-down menu, you can choose between the “Off” option to disable the startup and shut down beeping noises in all scenarios. Alternatively, you can also choose the “Only with power button or voice” option, which limits the beeping noise to only when you use voice controls or when you press the power button on the console to turn it on or off.

Method #2:

For the second method, you need to use the Volume & Audio Output menu by doing the following:

  • Head over to the Settings app on your Xbox Series X or S.
  • After getting to Settings, you first need to select General from the left side.
  • You then need to select Volume & Audio Output on the right side.
  • From the General – Volume & Audio Output menu, you need to select Additional Options.
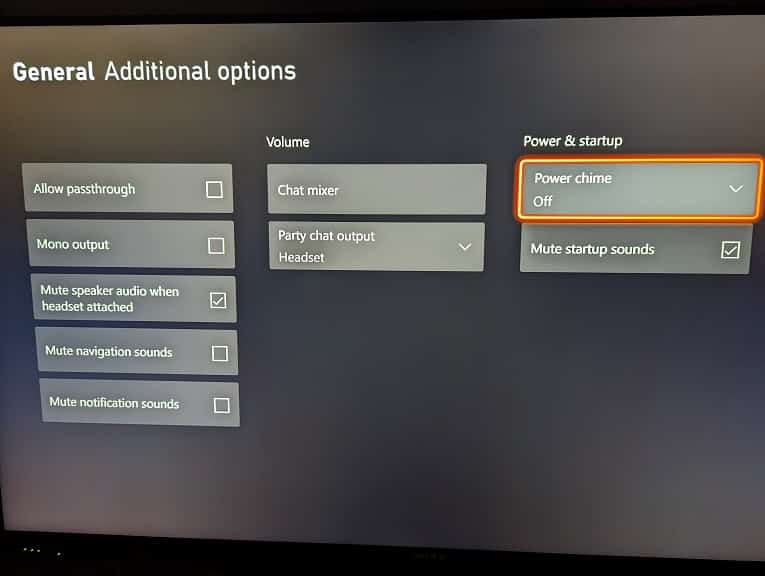
  • Once you arrived in the General – Additional options menu, select Power Chime.
  • In the Power Chime drop-down menu, you can select either the “Off” or “Only with power button or voice” options.

LG UQ8000 wall mount specs

In 2022, LG released the UQ8000 AUB series. If you have this 4K LED television screen, and would like to mount it to your wall, then we recommend that you first take a look at this mounting bracket guide at Seeking Tech.

Screen Sizes

All available screen sizes of this TV series can be mounted to a wall. You can find the model number for each size that this guide will be covering below:

  • 43” LG UQ8000 AUB series LED 4K UHD Smart webOS 22 with ThinQ AI TV (43UQ8000AUB)
  • 50” LG UQ8000 AUB series LED 4K UHD Smart webOS 22 with ThinQ AI TV (50UQ8000AUB)
  • 55” LG UQ8000 AUB series LED 4K UHD Smart webOS 22 with ThinQ AI TV (55UQ8000AUB)
  • 65” LG UQ8000 AUB series LED 4K UHD Smart webOS 22 with ThinQ AI TV (65UQ8000AUB)
  • 70” LG UQ8000 AUB series LED 4K UHD Smart webOS 22 with ThinQ AI TV (70UQ8000AUB)
  • 75” LG UQ8000 AUB series LED 4K UHD Smart webOS 22 with ThinQ AI TV (75UQ8000AUB)
  • 86” LG UQ8000 AUB series LED 4K UHD Smart webOS 22 with ThinQ AI TV (86UQ8000AUB)

The aforementioned model numbers may be a little different depending on your region.

Dimensions (without Stand)

Dimensions without Stand (in inches):

  • 43” LG UQ8000: 38.1 inches x 22.2 inches x 2.2 inches
  • 50” LG UQ8000: 44.1 inches x 25.6 inches x 2.2 inches
  • 55” LG UQ8000: 48.6 inches x 28.1 inches x 2.3 inches
  • 65” LG UQ8000: 57.2 inches x 33.0 inches x 2.3 inches
  • 70” LG UQ8000: 61.5 inches x 35.7 inches x 2.4 inches
  • 75” LG UQ8000: 66.1 inches x 38.0 inches x 2.4 inches
  • 86” LG UQ8000: 75.9 inches x 43.5 inches x 2.4 inches

Dimensions without Stand (in centimeters):

  • 43” LG UQ8000: 96.8 cm x 56.4 cm x 5.6 cm
  • 50” LG UQ8000: 112.0 cm x 65.0 cm x 5.6 cm
  • 55” LG UQ8000: 123.4 cm x 71.4 cm x 5.8 cm
  • 65” LG UQ8000: 145.3 cm x 83.8 cm x 5.8 cm
  • 70” LG UQ8000: 156.2 cm x 90.7 cm x 6.1 cm
  • 75” LG UQ8000: 167.9 cm x 96.5 cm x 6.1 cm
  • 86” LG UQ8000: 192.8 cm x 110.5 cm x 6.1 cm

Dimensions without Stand (in millimeters):

  • 43” LG UQ8000: 967.7 mm x 563.9 mm x 55.9 mm
  • 50” LG UQ8000: 1120.1 mm x 650.2 mm x 55.9 mm
  • 55” LG UQ8000: 1234.4 mm x 713.7 mm x 58.4 mm
  • 65” LG UQ8000: 1452.9 mm x 838.2 mm x 58.4 mm
  • 70” LG UQ8000: 1562.1 mm x 906.8 mm x 61.0 mm
  • 75” LG UQ8000: 1678.9 mm x 965.2 mm x 61.0 mm
  • 86” LG UQ8000: 1927.9 mm x 1104.9 mm x 61.0 mm

Weight (without Stand)

Weight without Stand (in pounds):

  • 43” LG UQ8000: 19.4 lbs.
  • 50” LG UQ8000: 25.8 lbs.
  • 55” LG UQ8000: 30.9 lbs.
  • 65” LG UQ8000: 47.4 lbs.
  • 70” LG UQ8000: 62.6 lbs.
  • 75” LG UQ8000: 69.2 lbs.
  • 86” LG UQ8000: 99.6 lbs.

Weight without Stand (in kilograms):

  • 43” LG UQ8000: 8.8 kg
  • 50” LG UQ8000: 11.7 kg
  • 55” LG UQ8000: 14.0 kg
  • 65” LG UQ8000: 21.5 kg
  • 70” LG UQ8000: 28.4 kg
  • 75” LG UQ8000: 31.4 kg
  • 86” LG UQ8000: 45.2 kg

VESA Mounting Pattern

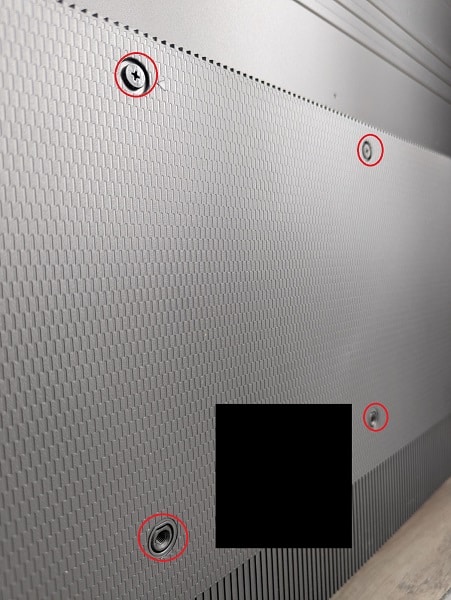
The VESA Mounting Pattern, also known as the VESA Hole Pitch, refers to the horizontal and vertical dimensions of the four mounting screw holes located on the backside of your UQ8000. If you wall mount does not support this pattern, then it won’t be able to attach to the LED screen.

You can find the VESA Mounting Pattern for each screen size below:

VESA Mounting Pattern (in inches):

  • 43” LG UQ8000: 7.9 inches x 7.9 inches
  • 50” LG UQ8000: 7.9 inches x 7.9 inches
  • 55” LG UQ8000: 11.8 inches x 11.8 inches
  • 65” LG UQ8000: 11.8 inches x 11.8 inches
  • 70” LG UQ8000: 15.7 inches x 15.7 inches
  • 75” LG UQ8000: 15.7 inches x 15.7 inches
  • 86” LG UQ8000: 23.6 inches x 15.7 inches

VESA Mounting Pattern (in centimeters):

  • 43” LG UQ8000: 20 cm x 20 cm
  • 50” LG UQ8000: 20 cm x 20 cm
  • 55” LG UQ8000: 30 cm x 30 cm
  • 65” LG UQ8000: 30 cm x 30 cm
  • 70” LG UQ8000: 40 cm x 40 cm
  • 75” LG UQ8000: 40 cm x 40 cm
  • 86” LG UQ8000: 60 cm x 40 cm

VESA Mounting Pattern (in millimeters):

  • 43” LG UQ8000: 200 mm x 200 mm
  • 50” LG UQ8000: 200 mm x 200 mm
  • 55” LG UQ8000: 300 mm x 300 mm
  • 65” LG UQ8000: 300 mm x 300 mm
  • 70” LG UQ8000: 400 mm x 400 mm
  • 75” LG UQ8000: 400 mm x 400 mm
  • 86” LG UQ8000: 600 mm x 400 mm
VESA Mounting Pattern (example from different TV).

What wall mounts are compatible with the LG UQ8000?

For a wall mount to be compatible with the LG UQ8000 AUB series, it needs to be able to support the VESA Mounting Pattern on the television screen.

The 43” and 50” screen sizes feature a 200 mm x 200 mm pattern while the 55” and 65” variations use 300 mm x 300 mm. The 70” and 75” version have a 400 mm x 400 mm pattern while the 86” variant is the only one out of this group to utilize 600 mm x 400 mm.

You also need to make sure that the maximum carrying weight capacity of the mount is more than the weight of your UQ8000 screen. These televisions can weigh as much as 99.6 lbs. (or 45.2 kg).

You can check out this article to see our list of recommended wall mounts you can get for your UQ8000.

Resource:

Samsung Q80B wall mount specs

The Q80B is a new 4K QLED television set that came out in 2022. If you are looking for a fixed, tilting or full motion wall mount for this Samsung TV, then we recommend that you first take a look at this guide at Seeking Tech.

Screen Size

The Q80B comes in five screen size options, all of which can be mounted on a wall.

You can find the model number for each of these variations, which could be slightly different depending on which region you bought your television from, below:

  • 50″ Samsung Q80B QLED 4K Smart TV (QN50Q80BAFXZA)
  • 55″ Samsung Q80B QLED 4K Smart TV (QN55Q80BAFXZA)
  • 65″ Samsung Q80B QLED 4K Smart TV (QN65Q80BAFXZA)
  • 75″ Samsung Q80B QLED 4K Smart TV (QN75Q80BAFXZA)
  • 85″ Samsung Q80B QLED 4K Smart TV (QN85Q80BAFXZA)

Dimensions

Dimensions without Stand (in inches):

  • 50″ Samsung Q80B: 43.9 inches x 25.4 inches x 2.1 inches
  • 55″ Samsung Q80B: 48.3 inches x 27.8 inches x 2.2 inches
  • 65″ Samsung Q80B: 56.9 inches x 32.7 inches x 2.2 inches
  • 75″ Samsung Q80B: 65.8 inches x 37.7 inches x 2.2 inches
  • 85″ Samsung Q80B: 74.5 inches x 42.6 inches x 2.2 inches

Dimensions without Stand (in centimeters):

  • 50″ Samsung Q80B: 111.5 cm x 64.5 cm x 5.3 cm
  • 55″ Samsung Q80B: 122.7 cm x 70.6 cm x 5.6 cm
  • 65″ Samsung Q80B: 144.5 cm x 83.1 cm x 5.6 cm
  • 75″ Samsung Q80B: 167.1 cm x 95.8 cm x 5.6 cm
  • 85″ Samsung Q80B: 189.2 cm x 108.2 cm x 5.6 cm

Dimensions without Stand (in millimeters):

  • 50″ Samsung Q80B: 1115.1 mm x 645.2 mm x 53.3 mm
  • 55″ Samsung Q80B: 1226.8 mm x 706.1 mm x 55.9 mm
  • 65″ Samsung Q80B: 1445.3 mm x 830.6 mm x 55.9 mm
  • 75″ Samsung Q80B: 1671.3 mm x 957.6 mm x 55.9 mm
  • 85″ Samsung Q80B: 1892.3 mm x 1082.0 mm x 55.9 mm

Weight (without Stand)

Weight without Stand (in pounds):

  • 50″ Samsung Q80B: 30.2 lbs.
  • 55″ Samsung Q80B: 39.5 lbs.
  • 65″ Samsung Q80B: 53.1 lbs.
  • 75″ Samsung Q80B: 75.8 lbs.
  • 85″ Samsung Q80B: 95.5 lbs.

Weight without Stand (in kilograms):

  • 50″ Samsung Q80B: 13.7 kg
  • 55″ Samsung Q80B: 17.9 kg
  • 65″ Samsung Q80B: 24.1 kg
  • 75″ Samsung Q80B: 34.4 kg
  • 85″ Samsung Q80B: 43.3 kg

VESA Mounting Pattern

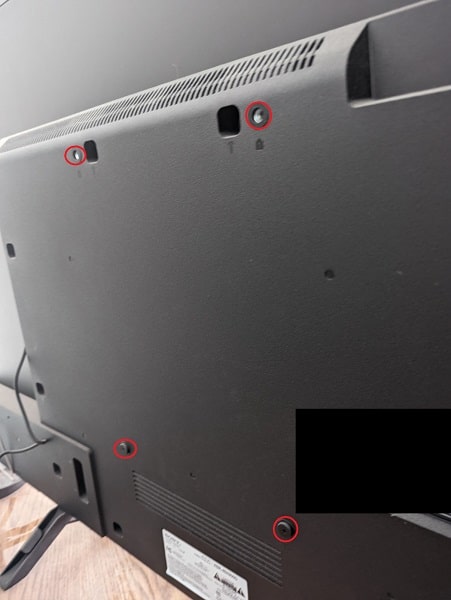
You should be able to see four screw holes located on the back side of your Q80B. You need to use them in order to install a part of the wall mount to your television set.

Depending on the screen size of your QLED, the horizontal and vertical dimensions may be different.

You can find these measurements below:

VESA Mounting Pattern (in inches):

  • 50″ Samsung Q80B: 7.9 inches x 7.9 inches
  • 55″ Samsung Q80B: 7.9 inches x 7.9 inches
  • 65″ Samsung Q80B: 15.7 inches x 11.8 inches
  • 75″ Samsung Q80B: 15.7 inches x 15.7 inches
  • 85″ Samsung Q80B: 23.6 inches x 15.7 inches

VESA Mounting Pattern (in centimeters):

  • 50″ Samsung Q80B: 20 cm x 20 cm
  • 55″ Samsung Q80B: 20 cm x 20 cm
  • 65″ Samsung Q80B: 40 cm x 30 cm
  • 75″ Samsung Q80B: 40 cm x 40 cm
  • 85″ Samsung Q80B: 60 cm x 40 cm

VESA Mounting Pattern (in millimeters):

  • 50″ Samsung Q80B: 200 mm x 200 mm
  • 55″ Samsung Q80B: 200 mm x 200 mm
  • 65″ Samsung Q80B: 400 mm x 300 mm
  • 75″ Samsung Q80B: 400 mm x 400 mm
  • 85″ Samsung Q80B: 600 mm x 400 mm
VESA Mounting Pattern (example from different TV).

Mounting Screw Type

The 50-inch, 55-inch, 65-inch, 75-inch and 85-inch variants of this QLED series use the M8 screw type in order to attach the mounting bracket to the back of the screen.

Mounting Screw Hole Depth

The 50-inch, 55-inch, 65-inch and 75-inch screen sizes have a mounting screw hold depth of 26 mm to 28 mm. For the 85-inch version, the depth is 25 mm to 27 mm.

What wall mounts are compatible with the Samsung Q80B?

For a fixed, tilting or full motion wall mount to be compatible with the Samsung Q80B, it needs to support the VESA Mounting Pattern and weight of the television set.

The 50” and 55” screen sizes have the same Mounting VESA Pattern at 200 mm x 200 mm. The 65″ variant uses 400 mm x 300 mm while the 75” features 400 mm x 400 mm. The biggest size, the 85”, uses 600 mm x 400 mm.

In terms of weight, the 50” Q80B weigh just 30.2 lbs. while the 55” screen size is slightly heavier at 39.5 lbs. The 65” version measures in at 53.1 lbs. while the 75” variant is 75.8 lbs. The 85” model is the heaviest at 95.5 lbs.

For specific product recommendations, you can take a look at this guide to find a fixed, tilting or full motion mounting bracket that should be able to work with the Q80B.

Resource:

How to fix input lag when playing backwards compatible PS4 games on PS5

When playing a backwards compatible PlayStation 4 game on your PlayStation 5 or PlayStation 5 Digital Edition console, you may experience noticeable input lag. To see how you can potentially make your game more responsive, you can take a look at this troubleshooting article from Seeking Tech.

1. The first step we recommend taking is to make sure that the PS4 game you are playing doesn’t have any issues when running on the PS5.

You can check out the Backwards-Compatible website to see if your game is among those that are experiencing problems when being played on a PlayStation 5 system.

2. If the PS4 game appears to be fully backwards compatible, then you can try to see if there are any graphical settings you can change from the in-game menus.

In general, the performance or frame rate priority mode should feature lower latency. You can also try lowering the resolution or graphical fidelity, if these options are available, to see if doing so will improve the input response.

3. You should also make sure that you are using the game mode or game optimizer mode on your television set. These picture settings are designed for videogames as they will lower the input delay.

4. Furthermore, make sure that you aren’t using any HDMI splitters or HDMI pass-through devices as these may introduce latency. Instead, connect your PS5 or PS5 Digital Edition console directly to your television screen or computer monitor.

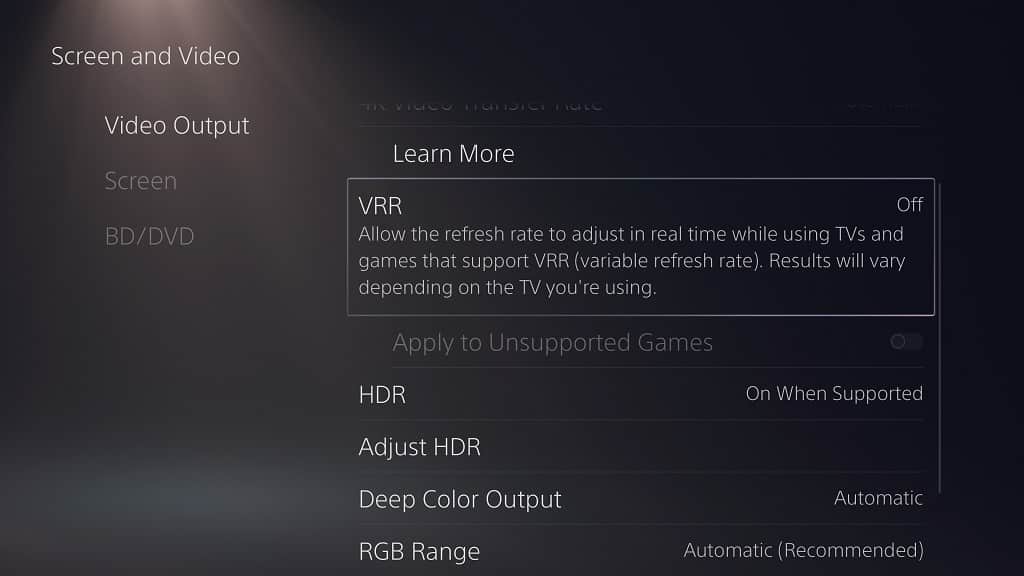
5. If your console is connected to a TV or monitor that supports Variable Refresh Rate, then we recommend enabling it as this feature may help fix some of the input lag problems you may be experiencing.

To enable this feature, make sure you do the following:

  • Go to Settings on your PS5.
  • From the first page of Settings, select Screen and Video.
  • In the Screen and Video sub-menu, select Video Output on the left column and then make sure that the VRR setting is set to Automatic on the right side. You may also want to enable the “Apply to Unsupported Games” setting as well.
  • On your television set or monitor, make sure you enable Variable Refresh Rate. For some screens, you turn this feature on automatically when using the game mode display setting.

6. You can also try plugging your DualSense or DualShock 4 to the USB port of your PlayStation 5 and then use it as a wired controller. In order to do so, you can take the following steps:

  • Plug your controller into your PS5.
  • Go to Settings.
  • In Settings, select Accessories.
  • From the Accessories sub-menu, select Controller (General) on the left column and then Communication Method on the right side.
  • In the Communication Method screen, select the Use USB Cable option.

6. Make sure that the PlayStation 4 game you are playing has been updated to the latest patch release, which may help improve input latency.

7. It is also a good idea to update the system software of your PlayStation 5 or PlayStation 5 Digital Edition console.

Samsung Q60B wall mount specs

The Q60 or Q60B is Samsung’s 2022 entry level television model. If you have one of these affordable TVs, and would like to attach it to a wall, then we suggest that you first take a look at this compatibility guide at Seeking Tech.

Screen Size

The 43-inch, 50-inch, 55-inch, 60-inch, 65-inch, 70-inch 75-inch and 85-inch size options can all be mounted up on a wall.

This article will cover the following model numbers, which may be slightly different depending on which region you bought your TV:

  • 43″ Samsung Q60B QLED 4K Smart TV (QN43Q60BAFXZA)
  • 50″ Samsung Q60B QLED 4K Smart TV (QN50Q60BAFXZA)
  • 55″ Samsung Q60B QLED 4K Smart TV (QN55Q60BAFXZA)
  • 60″ Samsung Q60B QLED 4K Smart TV (QN60Q60BAFXZA)
  • 65″ Samsung Q60B QLED 4K Smart TV (QN65Q60BAFXZA)
  • 70″ Samsung Q60B QLED 4K Smart TV (QN70Q60BAFXZA)
  • 75″ Samsung Q60B QLED 4K Smart TV (QN75Q60BAFXZA)
  • 85″ Samsung Q60B QLED 4K Smart TV (QN85Q60BAFXZA)

Dimensions

Dimensions without Stand (in inches):

  • 43″ Samsung Q60B: 38.0 inches x 22.0 inches x 1.0 inch
  • 50″ Samsung Q60B: 44.0 inches x 25.4 inches x 1.0 inch
  • 55″ Samsung Q60B: 48.5 inches x 27.9 inches x 1.0 inch
  • 60″ Samsung Q60B: 53.3 inches x 30.6 inches x 1.0 inch
  • 65″ Samsung Q60B: 57.1 inches x 32.7 inches x 1.0 inch
  • 70″ Samsung Q60B: 61.4 inches x 35.5 inches x 1.0 inch
  • 75″ Samsung Q60B: 66.0 inches x 37.8 inches x 1.0 inch
  • 85″ Samsung Q60B: 74.8 inches x 42.7 inches x 1.1 inch

Dimensions without Stand (in centimeters):

  • 43″ Samsung Q60B: 96.5 cm x 55.9 cm x 2.5 cm
  • 50″ Samsung Q60B: 111.8 cm x 64.5 cm x 2.5 cm
  • 55″ Samsung Q60B: 123.2 cm x 70.9 cm x 2.5 cm
  • 60″ Samsung Q60B: 135.4 cm x 77.7 cm x 2.5 cm
  • 65″ Samsung Q60B: 145.0 cm x 83.1 cm x 2.5 cm
  • 70″ Samsung Q60B: 156.0 cm x 90.2 cm x 2.5 cm
  • 75″ Samsung Q60B: 167.6 cm x 96.0 cm x 2.5 cm
  • 85″ Samsung Q60B: 190.0 cm x 108.5 cm x 2.8 cm

Dimensions without Stand (in millimeters):

  • 43″ Samsung Q60B: 965.2 mm x 558.8 mm x 25.4 mm
  • 50″ Samsung Q60B: 1117.6 mm x 645.2 mm x 25.4 mm
  • 55″ Samsung Q60B: 1231.9 mm x 708.7 mm x 25.4 mm
  • 60″ Samsung Q60B: 1353.8 mm x 777.2 mm x 25.4 mm
  • 65″ Samsung Q60B: 1450.3 mm x 830.6 mm x 25.4 mm
  • 70″ Samsung Q60B: 1559.6 mm x 901.7 mm x 25.4 mm
  • 75″ Samsung Q60B: 1676.4 mm x 960.1 mm x 25.4 mm
  • 85″ Samsung Q60B: 1899.9 mm x 1084.6 mm x 27.9 mm

Weight (without Stand)

Weight without Stand (in pounds):

  • 43″ Samsung Q60B: 18.5 lbs.
  • 50″ Samsung Q60B: 25.4 lbs.
  • 55″ Samsung Q60B: 34.2 lbs.
  • 60″ Samsung Q60B: 41.0 lbs.
  • 65″ Samsung Q60B: 46.1 lbs.
  • 70″ Samsung Q60B: 62.8 lbs.
  • 75″ Samsung Q60B: 69.2 lbs.
  • 85″ Samsung Q60B: 91.5 lbs.

Weight without Stand (in kilograms):

  • 43″ Samsung Q60B: 8.4 kg
  • 50″ Samsung Q60B: 11.5 kg
  • 55″ Samsung Q60B: 15.5 kg
  • 60″ Samsung Q60B: 18.6 kg
  • 65″ Samsung Q60B: 20.9 kg
  • 70″ Samsung Q60B: 28.5 kg
  • 75″ Samsung Q60B: 31.4 kg
  • 85″ Samsung Q60B: 41.5 kg

VESA Mounting Pattern

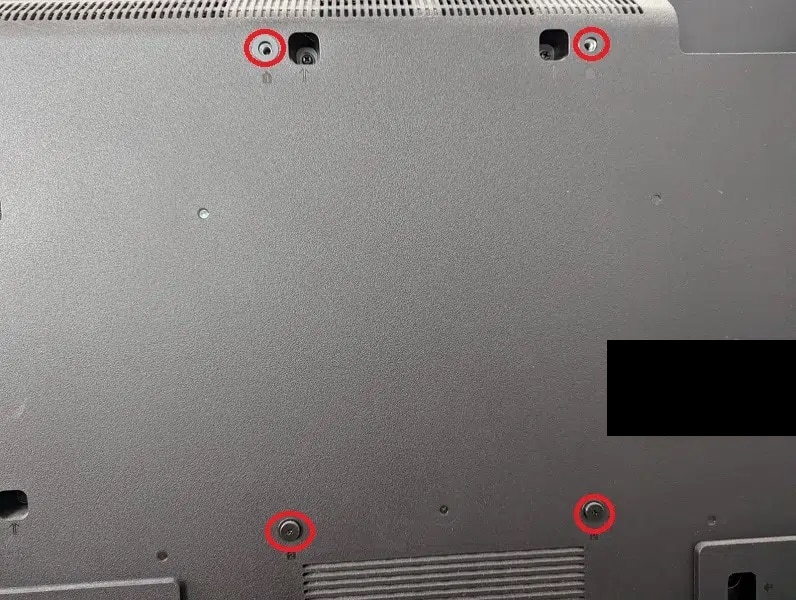
The mounting bracket must support the four mounting screw holes that are located at the back of the Q60B screen. The VESA Mounting Pattern, also known as the VESA Hole Pitch, measures the dimensions of these screw holes.

You can find the measurements, which is often displayed in millimeters, below:

  • 43″ Samsung Q60B: 200 mm x 200 mm
  • 50″ Samsung Q60B: 200 mm x 200 mm
  • 55″ Samsung Q60B: 200 mm x 200 mm
  • 60″ Samsung Q60B: 400 mm x 300 mm
  • 65″ Samsung Q60B: 400 mm x 300 mm
  • 70″ Samsung Q60B: 400 mm x 300 mm
  • 75″ Samsung Q60B: 400 mm x 400 mm
  • 85″ Samsung Q60B: 600 mm x 400 mm
VESA Mounting Pattern (example from different TV).

Mounting Screw Type

In order to attach a wall mount to the back of your Samsung Q60B, you need to use the M8 screw type.

Mounting Screw Hole Depth

The mounting screw holes of the Q60B have a depth range of 11 mm to 13 mm.

What wall mounts are compatible with the Samsung Q60B?

For a wall mount to be compatible with the Samsung Q60B, it will need to support the VESA Mounting Pattern of your TV’s screen size.

The 43”, 50” and 55” sizes have a 200 mm x 200 mm pattern while the 60”, 65” and 70” variants use the 400 mm x 300 mm pattern. The 75” version uses the 400 mm x 400 mm pattern while the 85″ screen size features the 600 mm x 400 mm pattern.

The mounting bracket should also be able to hold the weight of Q60B, which can weigh as much as 91.5 lbs. (or 41.5 kg).

As long as the mount support the VESA Mounting Pattern and weight of your screen size, then it should be compatible.

If you are looking at specific product recommendations when it comes to finding a fixed, tilting or full motion wall mount for your Q60B, then you can check out this article.

Resource:

How to compare 3D and stereo headphones audio outputs on PS5

Thanks to a new firmware release, you are now able to directly compare the 3D audio and stereo audio outputs when using headphones with your PlayStation 5 or PlayStation 5 Digital Edition console. To see how you can do so, you can follow the steps from this tutorial from Seeking Tech.

1. To start off, you should make sure that you have the latest firmware version installed on your PS5 or PS5 Digital Edition console. Otherwise, you won’t be able to do a direct comparison.

2. With your console updated, the first step you need to take is to head over to the Settings menu from the home screen.

The fastest way to navigate over to the home screen is to press and hold the PS logo button on your DualSense gamepad. You can also short press the PS logo button to bring up the quick menu, where you can select the house icon to go home.

3. Now that you are in the home screen, move the cursor to the top right side and then select the gear icon to head directly to Settings.

4. From the first page of Settings, you need to select Sound from the list of available options.

5. In the Sound menu, you first need to select the 3D Audio for Headphones on the left column.

6. On the right side of the same section, you should then make sure that the Enable 3D Audio for Headphones settings is turned on.

7. Next, you need to select the Adjust 3D Audio Profile option.

8. Inside the Adjust 3D Audio Profile menu, you need to choose the type of audio output that is closest to your ear level.

You can use the up and down directional buttons, or up and down directions of the left analog stick, to change the height of the sound output.

You can also use the left and right directional buttons, or the left and right directions of the left analog stick, to make the sound output only come out of one of the ear cups.

9. Once you set up your 3D Audio Profile, return to the 3D Audio for Headphones section of the Sound menu. This time, you need to select the Listen and Compare option on the right side.

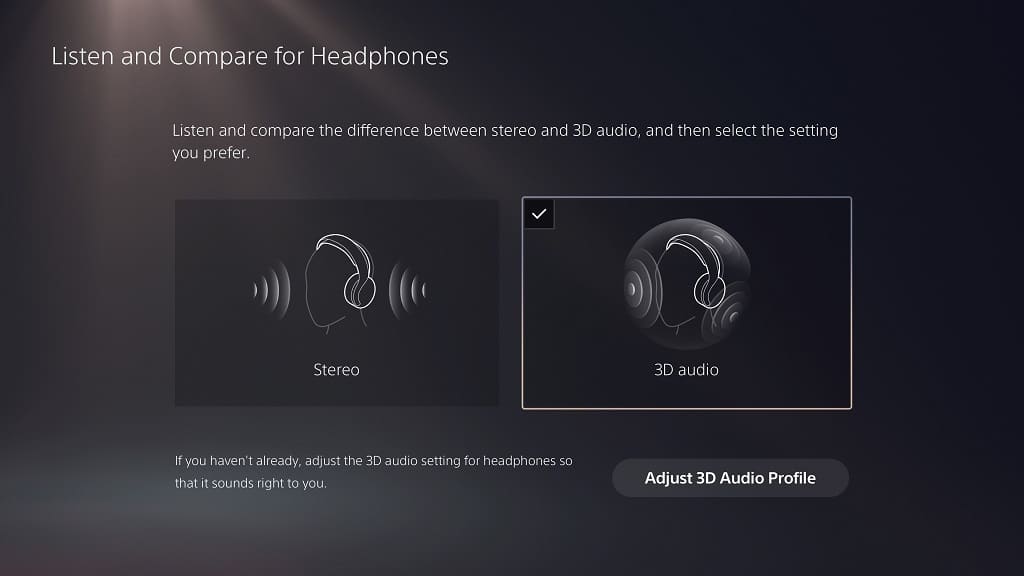
10. In the Listen and Compare for Headphones menu, you will be able to directly compare the Stereo and 3D Audio outputs.

In order to compare, move the cursor to the left or right. You can also select the “Adjust 3D Audio Profile” option if you want to customize the 3D Audio output again.

11. To change the audio output from the Listen and Compare for Headphones menu, select either Stereo or 3D Audio.

12. Once you are done making the change, you can exit the Listen and Compare for Headphones menu to return your previous screen.

13. Whether you decide to use 3D or stereo audio, we also recommend that you get the audio settings for the game you are currently playing to see make sure that its audio output matches your current system settings.

How to disable cookies, JavaScript and cross-site tracking on your PS5 web browser

The PlayStation 5 and PlayStation 5 Digital Edition systems come with a hidden web browser. To see how you can disable cookies, JavaScript and cross-site tracking when using this browser, you can follow the steps laid out in this article from Seeking Tech.

How to access the web browser settings menu on PS5

To start off, you need to head over to the web browser settings menu on your PS5 or PS5 Digital Edition console. In order to do so, you need to take the following steps:

1. To begin, you need to open the home screen menu, which is the place where you can pick and choose which game to play.

To go there, you can press the PS button on your DualSense in order to open the Command Center quick menu and then select the house icon that can be found on the bottom menu. A faster method is to long press the PS button on your controller until the home screen shows up.

2. From the home screen, press the triangle button on your DualSense to quickly move the cursor to the top right side, where you then need to select the gear icon in order to head over to the Settings menu.

3. Once you managed to get to the Settings menu, you need to select System.

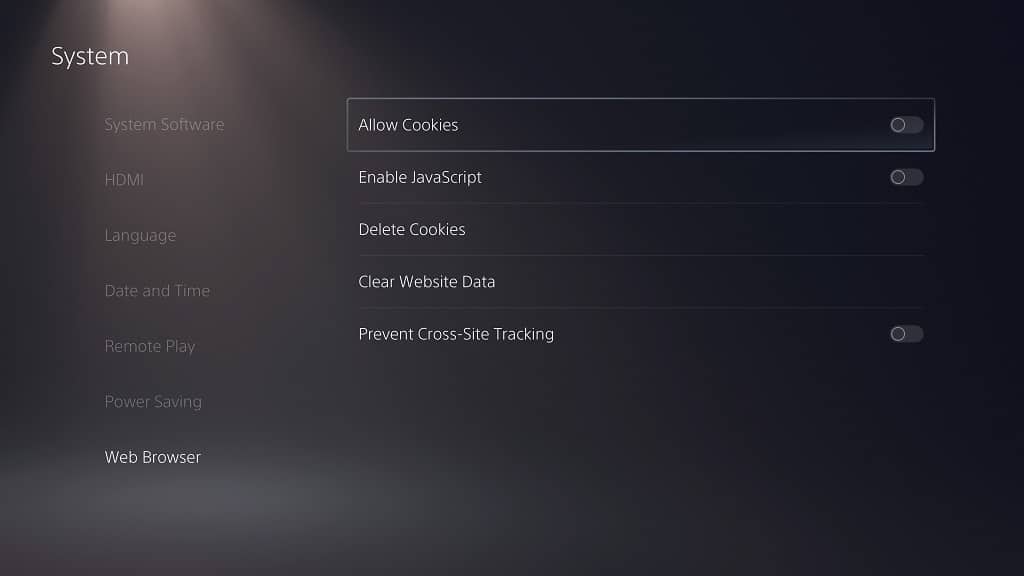
4. Inside of the System menu, you then need to select Web Browser from the list of available options located on the left column.

How to turn off the PS5 web browser disable cookies, JavaScript and cross-site tracking

Once you get to the Web Browser menu, you will be able to do the following:

1. Turn off the Allow Cookies setting in order to disable cookies when using the web browser on your PlayStation 5 or PlayStation 5 Digital Edition console.

2. Turn off the Enable JavaScript setting in order to disable JavaScript elements from running when you are using the web browser.

If you find that some web sites aren’t loading properly with this disabled, then you can try turning it back on again.

3. You can also use the Delete Cookies option in order to delete the previous cookies you have stored on your console’s web browser.

4. Furthermore, you can use the Clear Website Data option to remove your browsing history and more on the web browser.

5. Finally, you can enable the Prevent Cross-Site Tracking setting if you don’t want your activities to be tracked across multiple websites when using the web browser feature.