How to fix out of sync audio issues in Theathrhythm Final Bar Line on PS5

When playing Theathrhythm Final Bar Line on your PlayStation 5 or PlayStation 5 Digital Edition console, it is very crucial that you have audio that is in synced with what is being shown on the screen. Otherwise, you may have a hard time trying to hit the notes during gameplay.

If the music seems to be out of synced with the gameplay, then you can take a look at this troubleshooting article from Seeking Tech.

1. For the first step, you should make sure you have the audio setup correctly.

To reduce any audio delay, we recommend that you either use your television speaker or a wired headset that is directly connected to the console. Any other methods may add lag to the sound output.

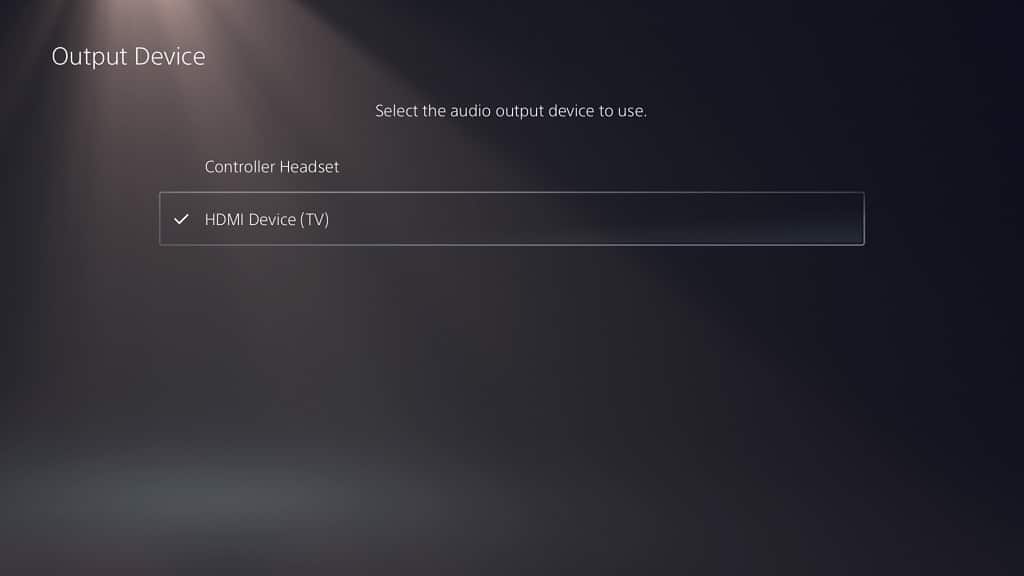
In order to change the audio output device on the PS5, you need to do the following:

  • Go to the home screen menu of the PlayStation 5. If you are currently playing Theathrhythm Final Bar Line, then you can get there by simply pressing and holding the PS button on the controller.
  • From the home screen, head into Settings be selecting the gear icon located on the top right side.
  • Select Sound from the Settings menu.
  • After getting to the Settings menu, you need to select Audio Output from the left column.
  • On the right side of the same screen, you should then select Output Device.
  • Finally, select your connected listening device from the Output Device menu.
2. For the second step, make sure that you have minimum lag when it comes to your screen.

If there appears to be a lot of latency, then you can take a look at this article to see how you can reduce it when playing this music rhythm game.

3. If you have been suspended your game and/or putting your game console in Rest Mode, then these actions may be causing performance issues with Theathrhythm Final Bar Line, including out of sync audio.

In order to fix any issues that may have resulted in the Rest Mode feature, you can simply restart your PlayStation 5 or PlayStation 5 Digital Edition console and then open the game again.

4. Of course, you should also make sure that you have the latest version of Theathrhythm Final Bar Line installed.

To manually check if there is a new patch available, move the cursor to the game’s icon on the home screen of your PS5. Next, you need to press the Options button to open the pop-up menu, where you can then select the Check for Update option.

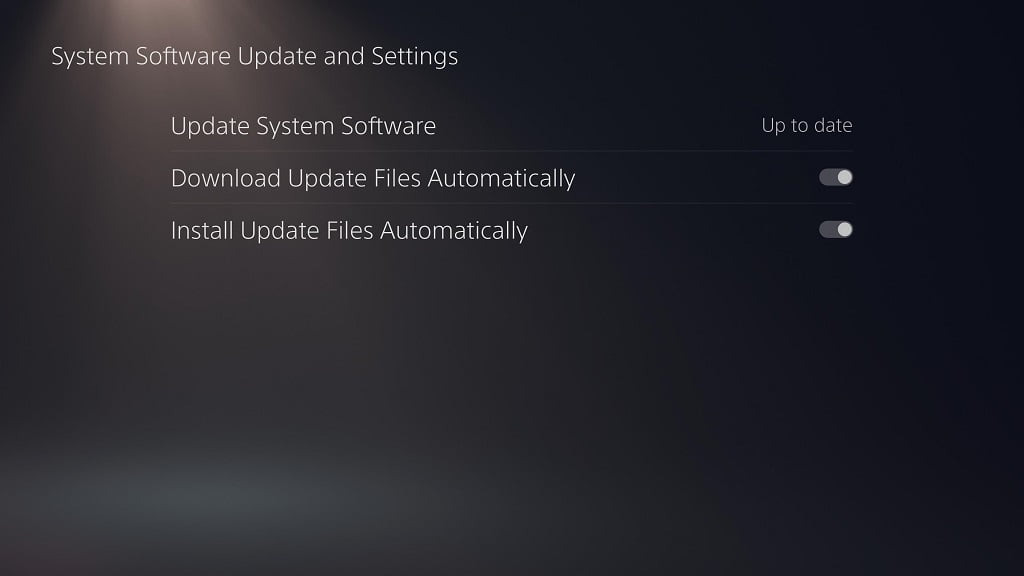
5. A firmware update to your PlayStation 5 may also help with the audio issues. To see if there is one available to download and install, you need to open the Settings menu and then select System > System Software > System Software Update and Settings > Update System Software > Update Using Internet.
After updating the game and/or your console, open Theathrhythm Final Bar Line again to see if the audio sync issues have been fixed.

How to fix input lag issues with Theathrhythm Final Bar Line on PS5

Theathrhythm Final Bar Line is a music rhythm game that you can play on the PlayStation 5. The gameplay works by you pressing a button to correspond to the beat of the music.

If you are experiencing a lot of input lag when playing the game, then you can take a look at this troubleshooting article from Seeking Tech to see how you can reduce the latency.

1. For the first step, you should make sure that your PS5 or PS5 Digital Edition console is connected directly to your television set.

Otherwise, using a pass-through or splitter device may make the video output out of sync.

2. If the console is connected to a television set, then you should make sure you have Game Mode, Game Optimizer Mode or another similar mode activated. These are designed for video games as it reduces the input lag of the screen.

3. If you are sitting far away from your PlayStation 5, then the extra distance may add to the latency of the DualSense or DualShock 4 controller. In this case, you can try moving closer to the console.

4. If you have any physical objects that is blocking the wireless communication between the game system and the controller, then you should remove them in order to make sure that there is a direct line of sight.

5. Other wireless devices may interfere with the DualSense communication as well.

In order to stop this from happening, then you can try turning off the other wireless devices you have nearby the console and controller.

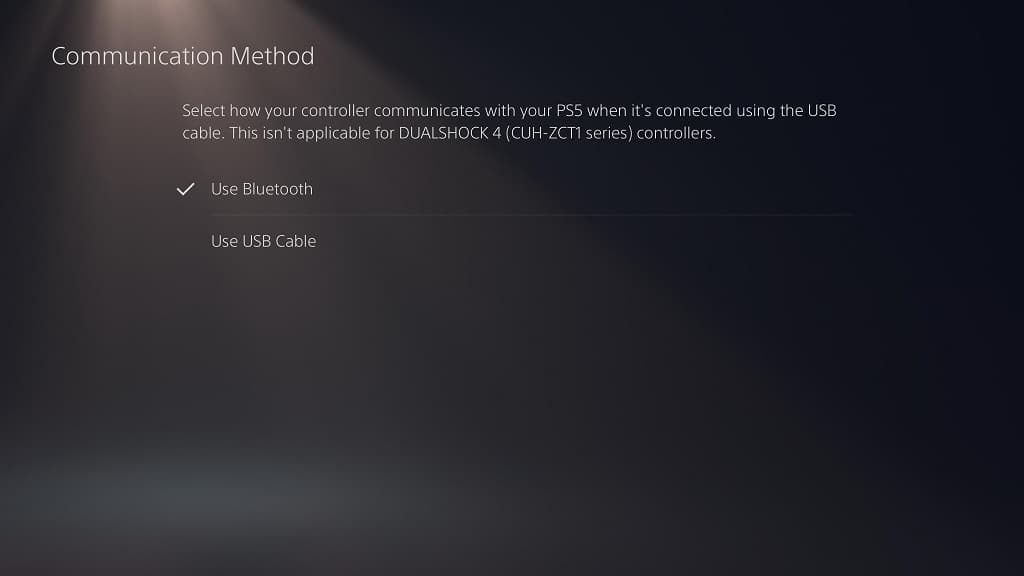
6. If you don’t mind using the DualSense as a wired controller that is tethered to the console, then you can connect the gamepad via a USB cable.

Afterwards, open the Settings menu of your PlayStation 5 and then select Settings > Accessories > Controller (General) > Communication Method > Use USB Cable.

When playing Theathrhythm Final Bar Line, make sure that you keep your DualSense connected to your console via a USB cable if you want to less input delay.

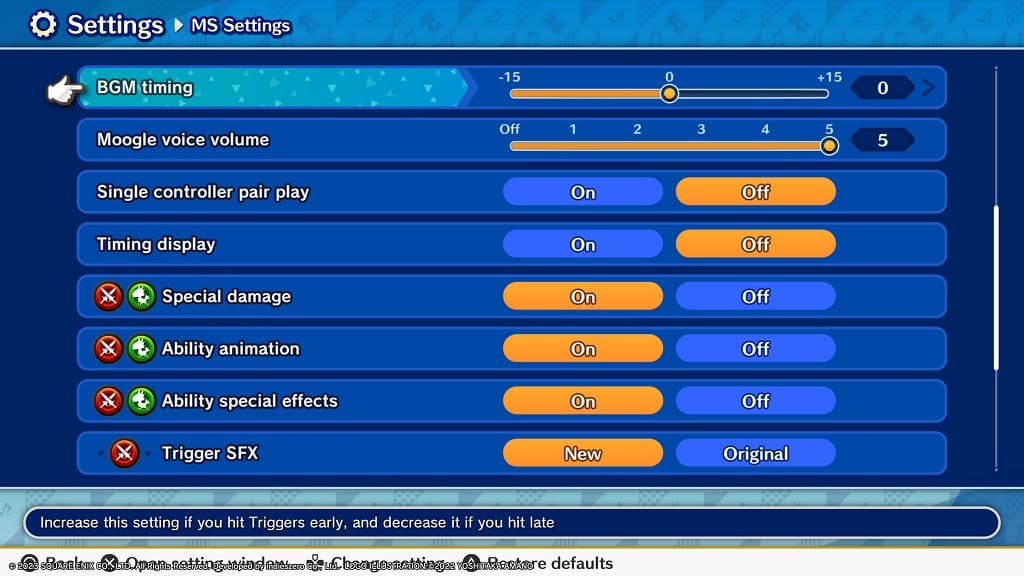
7. You can also adjust the timing of your inputs by using the in-game menu.

In order to do so, you first need to head over to the Main Menu and then select the gear icon. From inside the Settings menu, you then need to select MS Settings. Next, scroll down and then select BGM Timing.

With the BGM Timing setting, you can move the slider to the left or right. You will have a range of –15 to +15 with the default value being 0.

We recommend that you choose a value and then test it out by playing a music stage. If the input timing still doesn’t fell right, then you can re-adjust it again from the BGM Timing slider.

How to fix disable crossplay for Monster Hunter Rise on Xbox

With the Xbox versions of Monster Hunter Rise, you will be able to cross-play with other uses that are playing on Xbox One, Xbox One S, Xbox One X, Xbox Series S, Xbox Series X and Windows PC. If you would rather disable this feature, which is turned on by default, then you can check out this guide at Seeking Tech to see how you can properly do so.

Before we start, it is important to note that the following steps will only disable cross-play with the Windows PC version of the game as players on different Xbox consoles can still play with each other.

To disable the cross-play with the Monster Hunter Rise on Windows PC in you playing on an Xbox console, you need to take the following steps:

1. First off, you need to go to the Settings menu on your Xbox.

2. Inside of the Settings menu, you first need to select Account on the left column

3. Afterwards, you should select the “Privacy & online safety” option on the right side of the same screen.

4. From the “Account – Privacy & online safety” menu, select the “Xbox privacy” option.

5. Next, select the “View details & customize” option in the next screen.

6. Afterwards, you need to select the “Communication & multiplayer” option.

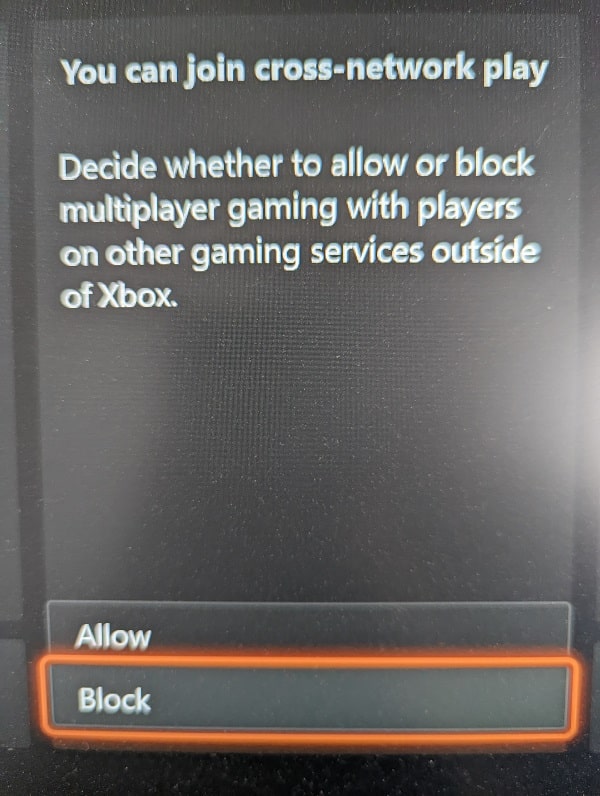
7. You should now be in the “Account – Communication & multiplayer” menu. Here, you should select the drop-down menu at the bottom of the “You can join cross-network” play column.

8. In the drop-down menu, you then need to select Block.

9. Return to Monster Hunter Rise. You may need to restart the game on your Xbox for the cross-play changes to take effect.

10. You should no longer be able to join an online lobby that has any Windows PC players in Monster Hunter Rise. No PC players should be able to join your created lobby as well.

If you want to limit cross-platform play to users for one specific Xbox console, then the only way you can do so is to create your one online lobby and then add a pass code. You can then share the pass code with other users that are playing on the specific Xbox console so that you can all play in the same private lobby.

How to fix disconnection issues with Monster Hunter Rise on Xbox Series X and S

You are able to play Monster Hunter Rise online with friends and strangers on your Xbox Series X and Xbox Series S. If you keep getting disconnected from the online lobby, then you can take a look at this troubleshooting article at Seeking Tech to see how you can potentially fix this connection issue.

1. It should be noted that, if you put your console in rest mode, then you will likely end up being disconnected from the online servers in Monster Hunter Rise.

Therefore, you may want to leave your Xbox Series X or Xbox Series S turned on instead if you don’t want to be removed from the current lobby.

2. Suspending Monster Hunter Rise in Quick Resume will mostly like cause internet connection issues as well. To prevent this from happening, you should avoid trying to go back to the Xbox system menu, opening another game or opening another app.

To read more about how you can avoid Quick Resume issues with this game, you can check out this troubleshooter.

3. You should also make sure that you have a stable internet connection on your Xbox Series X or Xbox Series S.

In order to test network stability, you need to head over to the Settings menu of the console. From there, select General > Network settings > Test multiplayer connection.

If there is an related to the internet connection, then you should see a link appear on the screen. Visit that link for tips on how to fix your problem in order to make the multiplayer experience smoother on the console.

4. If you are downloading and/or streaming at the same time on the same internet connection that you are using to play online multiplayer in Monster Hunter Rise, then you need to pause the other connections. Otherwise, you may end up seeing a lot of lag and/or disconnections.

5. Of course, you should also make sure you have the latest patch for Monster Hunter Rise downloaded on your console.

6. You can also try power cycling your internet setup by taking the following steps:

  • Turn off your Xbox Series X or Xbox Series S.
  • Turn off your modem and/or router.
  • Wait for at least 2 minutes.
  • Turn back on your modem and/or router.
  • Wait for the internet setup to connect online.
  • Turn back on your Xbox Series X or Xbox Series S.
  • Open Monster Hunter Rise and then try to play it online.

How to fix ‘can’t connect to server to verify your license’ error on PS5

When trying to play a videogame on your PlayStation 5 or PlayStation 5 Digital Edition console, you may run into the following error message:

  • “Can’t use this content. Can’t connect to server to verify your license. Wait a while and then try again.”

You may also see the WS-116521-6 error code pop up on screen when launch a game. To see how you can potentially fix these game license issues, you can check out this troubleshooting article from Seeking Tech.

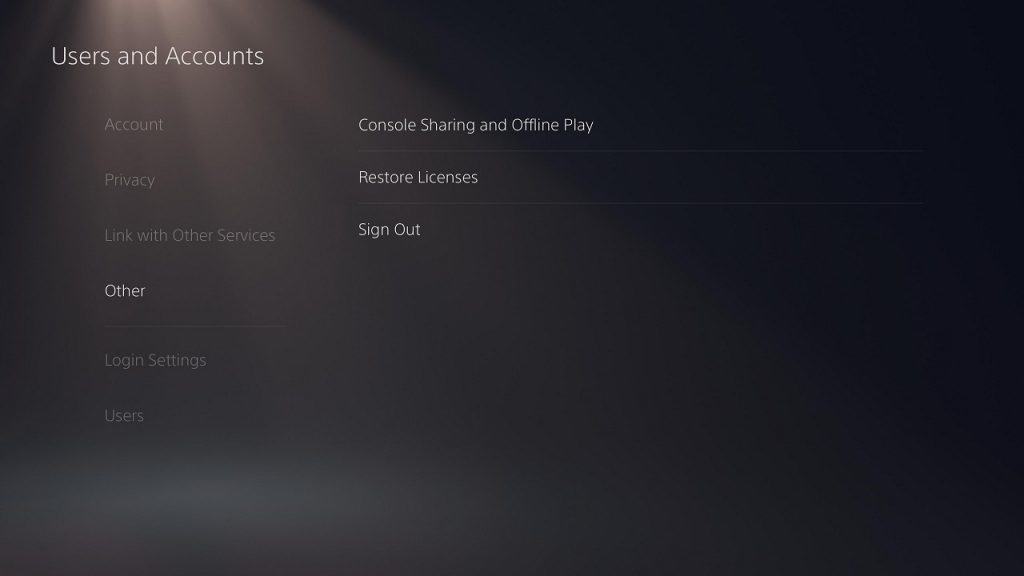
1. For the first step, you can try enabling the Console Sharing and Offline Play.

In order to do so, open the Settings menu on your PS5 and then select Users and Accounts > Other > Console Sharing and Offline Play. Afterwards, make sure you select Enable.

You may have to enable and disable Console Sharing and Offline Play a few times in order to get the game to launch without any licensing issues.

2. You can also try refreshing the internet connection on your PlayStation 5.

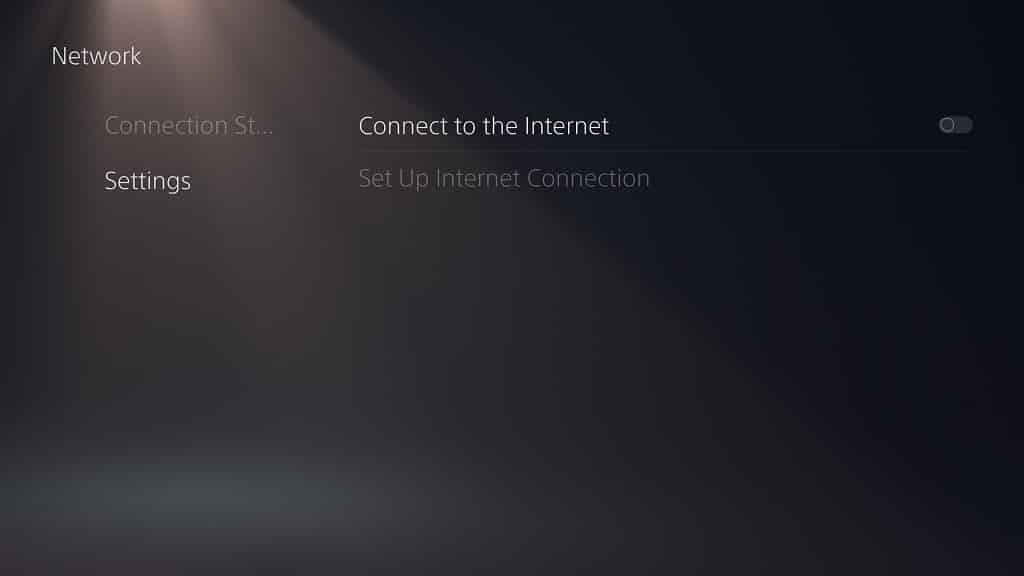
To do so, head over to Settings > Network > Settings. From there, you can disable and then re-enable the “Connect to the Internet” feature. You may have to do this several time to get the game license verification to work.

3. Furthermore, you can try forgetting your internet connection and then set it back up again.

To do so, go to Settings > Network > Settings > Set Up Internet Connection. In this menu, remove all of the registered networks by pressing the Options button on your controller and then selecting Forget in the pop-up menu. Repeat this process until the Registered Networks section is completely empty.

Afterwards, setup the internet connection again by selecting an option in the Networks Found section.

Once you set up the new network connection, try to open a game to see if you are now able to do so without running into any problems.

4. Restoring the game licenses of your PlayStation Network account may also help fix the “can’t connect to server to verify your license” and WS-116521-6 errors.

In order to do so, you need to head into Settings > Users and Accounts > Other > Restore Licenses. In the new screen, you need to select the Restore option.

5. There is a possibility that the PlayStation Network servers could be suffering from some issues, including outages and maintenance. To check the current status of PSN, you can visit the official PlayStation Network Service Status website with this link.

If there appear to be some issues that is related to servers, then we recommend that you wait until PSN is functioning normally again to see if you are still getting any licensing problems.

6. If none of the aforementioned potential solutions have worked, then we suggest contacting the PlayStation Support team to get direct help.

How to turn off voice, music and more in Monster Hunter Rise on PS5, Xbox Series X and S

With Monster Hunter Rise on the PlayStation 5, PlayStation 5 Digital Edition, Xbox Series X and Xbox Series S, you will be able to adjust the voice, music and sound effect volume settings. If you like, you can also mute these sounds.

To find out how to do so, you can take a look at this tutorial from Seeking Tech.

1. To start off, you need to head over to the Options menu, which is located in the Title Screen.

You can also access by Options menu in-game by pressing Menu button on Xbox or Options button on PlayStation. From the small pop-up menu, you need to press RB or R1 to switch over to the System tab, where you can then select Options.

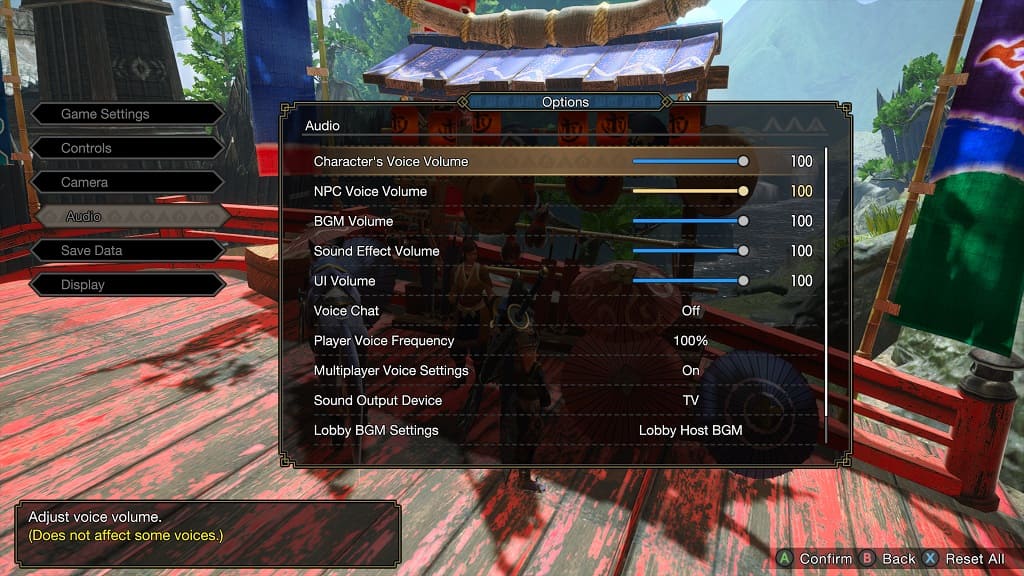
2. From the Options menu, select Audio in the left column.

3. In the Audio menu, you will be able to adjust the volume level for the following:

  • The Character’s Voice Volume setting controls how loud your character sounds.
  • The NPC Voice Volume setting is based on the loudness of the other characters in the game.
  • The BGM Volume setting will let you adjust how loud you want the background music to be.
  • The Sound Effect Volume setting will let you control the loudness of the sound effects.
  • The UI Volume setting will let you adjust the audio cues when browsing through the menus in Monster Hunter Rise.

4. To change any of these settings, you first need to select it.

5. Afterwards, you can move the slider with the left analog stick or directional pad. To lower the volume for that specific audio setting, you need to move the slider to the left. To increase the volume, you need to move the slider to the right.

By default, the Character’s Voice Volume, NPC Voice Volume, BGM Volume, Sound Effect Volume and UI Volume settings are all set to the maximum value of 100.

6. If you want to mute any of the aforementioned audio components, then you need to set the value of the sliders to zero.

7. In the same Audio menu, you will be able to adjust the following audio settings:

  • Voice Chat
  • Player Voice Frequency
  • Multiplayer Voice Settings
  • Sound Output Device
  • Lobby BGM Settings
  • 3D Audio

How to fix HDR issues with Persona 4 Golden on PS5, Xbox Series X and Xbox Series S

The colors may appear to be a little off when playing Persona 4 Golden on your PlayStation 5, PlayStation 5 Digital Edition, Xbox Series X or Xbox Series S. To see how you can get a more accurate color display for this acclaimed Japanese role-playing game, you can take a look at this guide from Seeking Tech.

1. It is very important to note that Persona 4 Golden does not natively support HDR. So, if you want to play this title in the most accurate colors, then you need to disable any SDR to HDR conversion features on your television screen or monitor. Afterwards, you should also make sure the same features are disabled on your console.

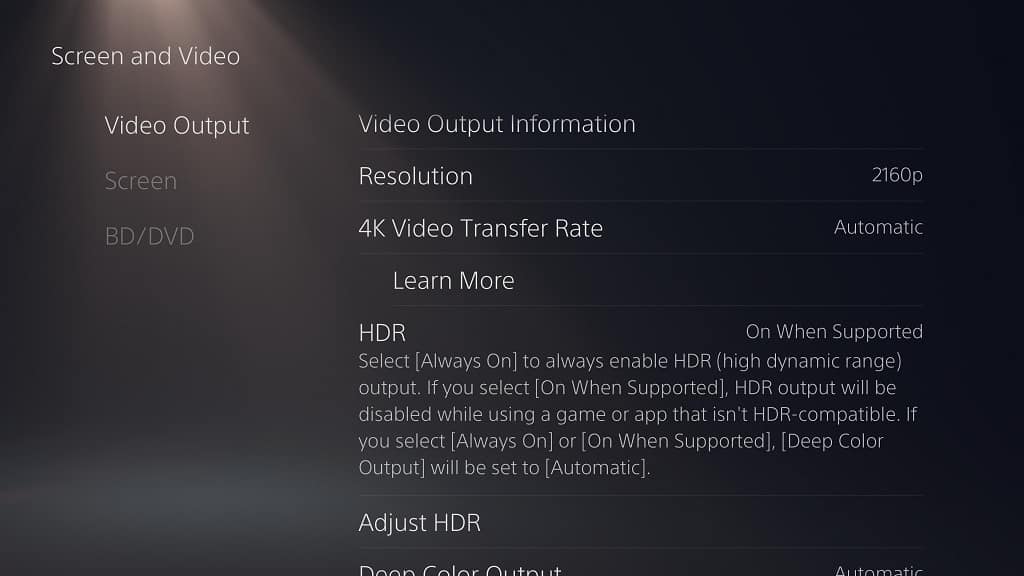
For the PlayStation 5 and PlayStation 5 Digital Edition consoles, you need to go to Settings > Screen and Video > Video Output. In the Video Output screen, you need to set HDR to On When Supported (or Off if you want to disable HDR altogether).

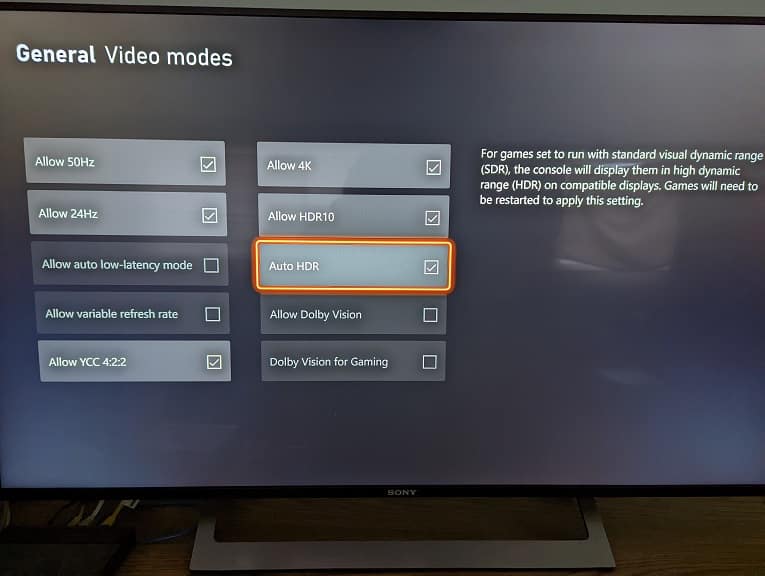
For the Xbox Series X and Xbox Series S consoles, you need to navigate to Settings > General > TV & display options > Video modes. Inside the General – Video modes screen, you need to uncheck the Auto HDR box.

2. If the colors in Persona 4 still look a little bit off when playing the game in SDR, then you can try changing the contrast intensity by doing the following:

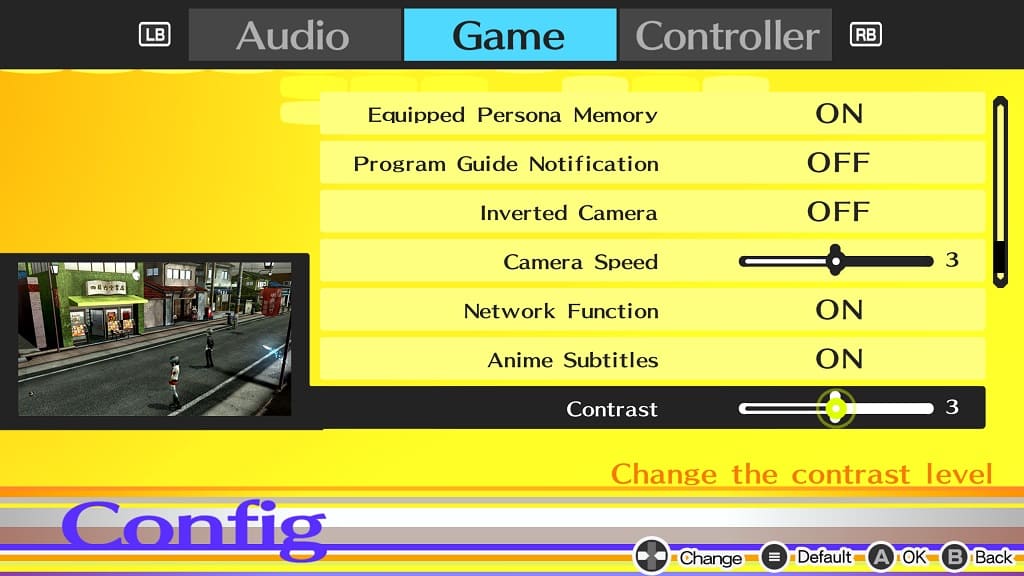
  • To start off, you need to head over to the Config menu. You can do so from the start screen. If you are playing the game, then you need to press the Y or triangle button to bring up the System menu, where you can then head into Settings (Config).
  • From the Config menu, press the RB or R1 button to move over to the Game tab.
  • From the Game tab, scroll down all the way down until the cursor is set to Contrast.
  • By default, the Contrast intensity is set to 3. You can use the analog stick or directional pad to lower or increase the value. This setting can be changed from a range of 1 to 5.

  • Press A on Xbox or X on PlayStation two times to confirm the change.
  • You should get a notification that says that the “Settings have been changed.”
  • Test out the new Contrast intensity while playing Persona 4 Golden to see if the colors are displayed more accurately. You can go back to the aforementioned Contrast setting in the Config menu if you need to make additional adjustments.

How to disable pop up notification sounds on Xbox Series X and S

When you get a message or unlock an achievement on your Xbox Series X or Xbox Series S, you will see a message appear on the screen accompanied by an audio cue.

If you want to keep the graphic but disable the sound effect, then you can take a look at this tutorial at Seeking Tech to see how you can do so.

1. For the first step, you need to open the Settings menu on your console. If you can’t find this option on the home screen menu, then you need to do the following:

  • Press the Xbox button to open the Guide menu and then the RB button several times to switch over to the Profile & System tab.
  • Select Settings from the Profile & System tab in the Guide menu.

2. Once you get to Settings, select General on the left column.

3. From the right side in the same screen, you should then select Voice & Audio Output.

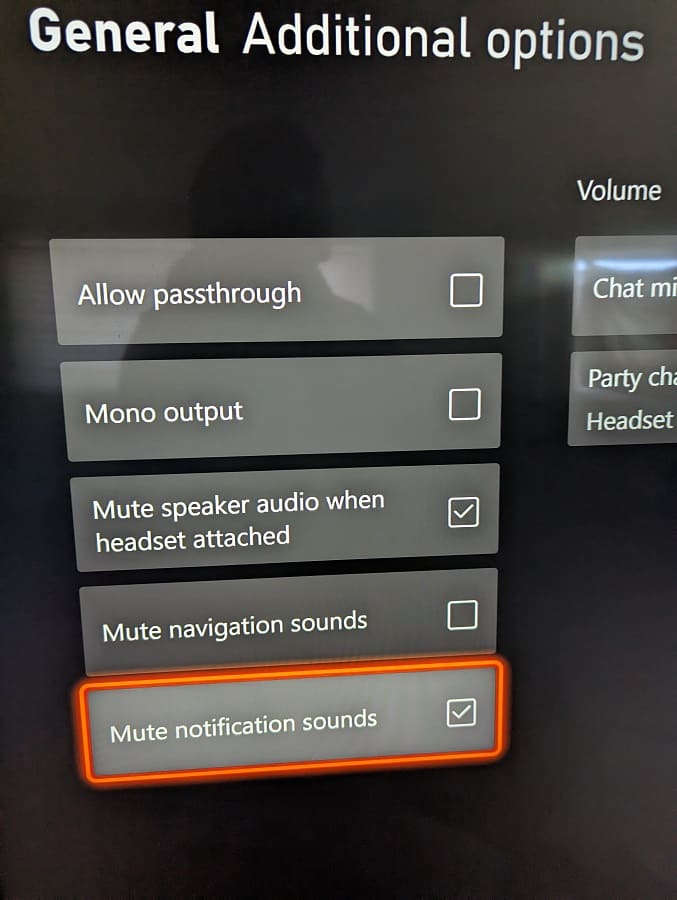
4. If done correctly, you should now be in the General – Volume Voice & Audio Output menu. Here, you need to select Additional Options from the Advanced column.

5. Inside of the General – Additional Options menu, you need to make sure that the Mute Notification Sounds box is checked.

By doing so, you should no longer hear any sound when an alert or achievement shows up on the screen.

If you want to re-enable the pop-up notification sound on your Xbox Series X or Xbox Series S, then you need to head back to the Settings menu and then go to General > Voice & Audio Output > Additional Options. You should then make sure that the Mute Notification Sounds box is unchecked if you want to hear the audio cues.

How to disable menu navigation sounds on Xbox Series X and S

When moving the cursor around in the system menus of your Xbox Series X or Xbox Series, you will hear a sound effect being played. To see how you can disable this audio cue, you can take a look at this tutorial from Seeking Tech.

1. For the first step, you need to head over to the Settings menu of your console.

If you can’t locate it from the home page menu, then you can press the Xbox button on your controller to open the Guide quick menu. From there, press the RB button a few times to get over Profile & System tab. You should then be able to find and select Settings.

2. From the front page of Settings, select General on the left column.

3. On the right side of the same screen, you then need to select the Volume & audio output option.

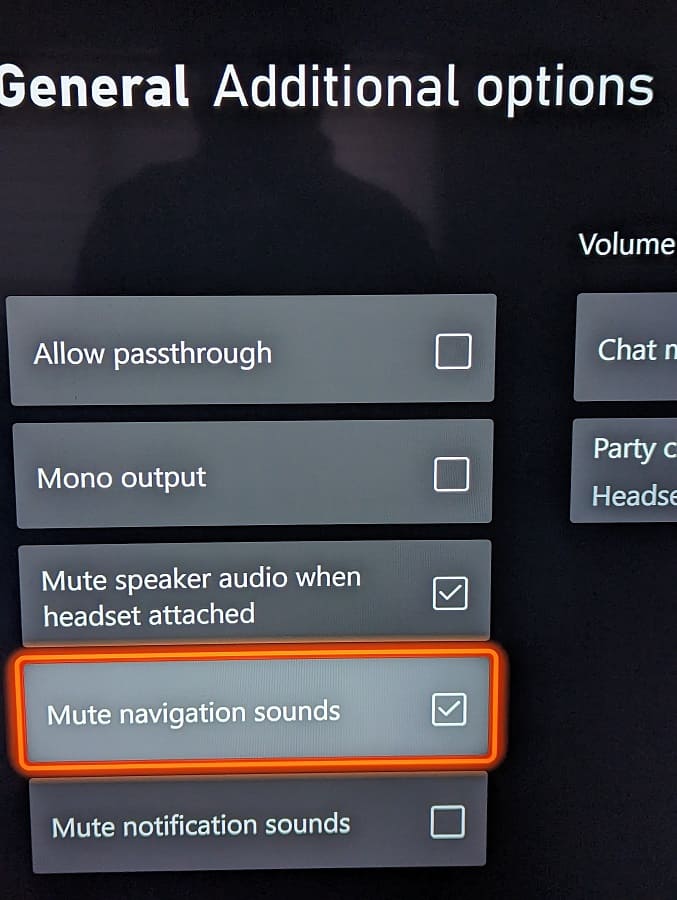
4. After getting to the General – Volume & audio output menu, you need to select Additional options under the Advanced column.

5. You should now be in the General – Additional options menu. Here, you need to make sure that the Mute navigation sounds box is checked.

You should no longer hear any audio feedback when navigation through the system menus of your Xbox Series X or Xbox Series S.

If you want to enable the navigation sound again, then you need to head back to the Settings menu and then select General > Volume & audio output > Additional options. In the General – Additional options menu, you need to make sure that the Mute navigation sounds box is unchecked to turn the sound effect back on again.

How to fix Persona 3 Portable HDR issues on PS5, Xbox Series X and Xbox Series S

When playing Persona 3 Portable on your PlayStation 5, PlayStation 5 Digital Edition, Xbox Series X or Xbox Series S, you may notice that the colors may look a little off when compared to the original PSP game.

To see how you can fix the HDR problems with this turn-based Japanese role-playing game, you can check out this troubleshooting article from Seeking Tech.

1. Before we begin, it is important to note that the new version of Persona 3 Portable only supports SDR.

So, if you have enabled HDR conversion on your screen and/or console, then it may be causing the colors to look off in the game.

Therefore, the first step you can take is to make sure that you disable any feature that may be converting a SDR image to HDR on your TV or monitor.

On the PlayStation 5, you should also head over to the console’s Settings menu and then select Screen and Video > Video Output. From there, make sure that HDR is set to On When Supported.

On the Xbox Series X and Xbox Series S, you need to go to the system’s Settings menu and then select General > TV & display options > Video modes. From there, make sure that Auto HDR is disabled.

2. If the colors still look a little bit off, then you can adjust the contrast level by using the in-game menu. In order to do so, you can take the following steps:

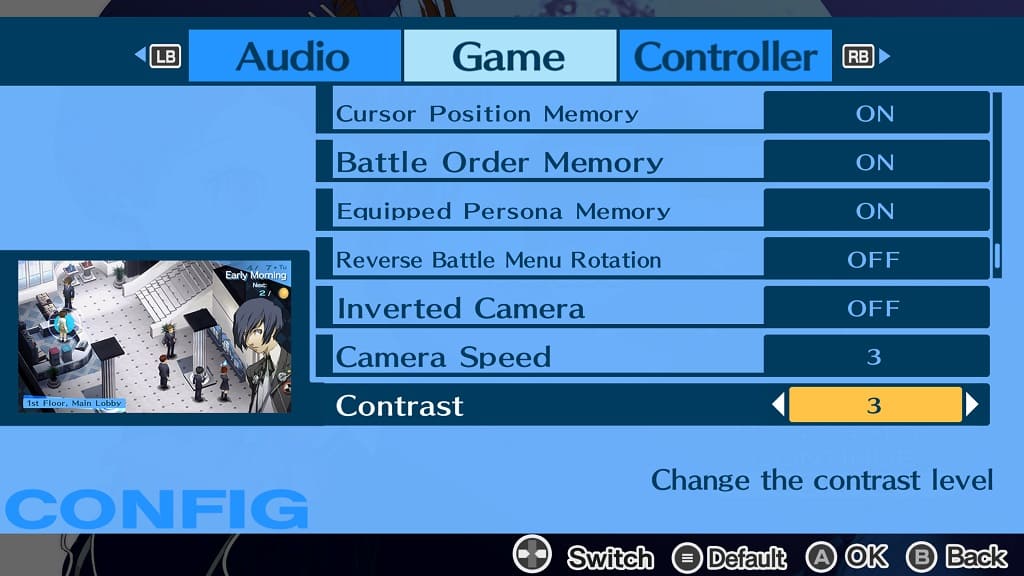
To start off, you need to head over to the Config menu. To do so, you can simply select Config from the Title screen. If you are currently playing the game, then you can bring up System menu by pressing the triangle on PS5 or Y button on Xbox; from there, select Config.

In the Config menu, press R1 on PS5 or RB on Xbox to switch over to the Game tab.

From the Game tab, move the cursor all the way down to Contrast.

By default, the Contrast level is set to 3. To decrease it, you need to move it to the left. If you want to increase the contrast, then you need to move to the right. The slider has a range of 1 to 5.

Once you are done making the change, press the X button two times on your PS5 to save the new contrast settings. On the Xbox Series X or Xbox Series S, you need to press the A button twice to save the new settings.