How to fix unresponsive PlayStation VR 2 Sense Controllers

When playing a PlayStation VR 2 game, you may notice that the left, right or both PlayStation VR 2 Sense controllers being unresponsive. If the motion controllers aren’t working at all, then you can take at this troubleshooting article from Seeking Tech.

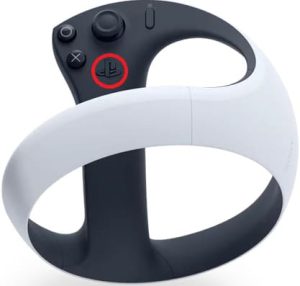
1. To start off, make sure that your PlayStation VR 2 Sense controller is actually turned on. You can do so by pressing the PS button on the gamepads.

If it is not powering on, then make sure that you charge it for at least 15 minutes before trying again.

2. We also recommend testing to see if the buttons work in the system menus of your PlayStation 5 or PlayStation 5 Digital Edition console.

If the console isn’t reading your inputs even in the system menus, then you may have a defective controller.

If your inputs are being read correctly in the system menus, then there may be nothing wrong with the controller from a hardware standpoint.

3. If the problematic Sense controller is powered on but the game you are playing is not responding to your button inputs, then you can try to turn the controller off and then turn it back on again with the game still open.

To turn off these motion controllers, you can simply press and hold the PS button. Afterwards, press the same button again to turn it on.

4. If you have a DualSense controller turned on at the same time, then you can try turning it off to see if the game you are playing will now be able to recognize your Sense controller inputs.

5. Other wireless devices in the same vicinity may also be causing interference. In this case, you can try turning off these wireless device to see if the PSVR2 Sense controller is working correctly.

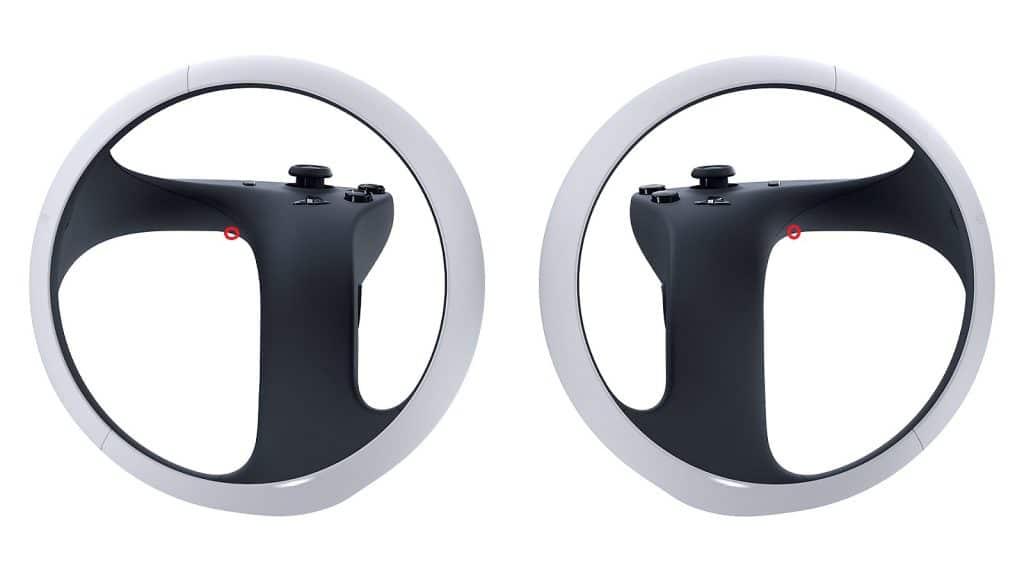
6. You can also try resetting your problematic PlayStation VR 2 Sense controller while the game is still open. In order to do so, you need to look for a small hole located on the gamepad.
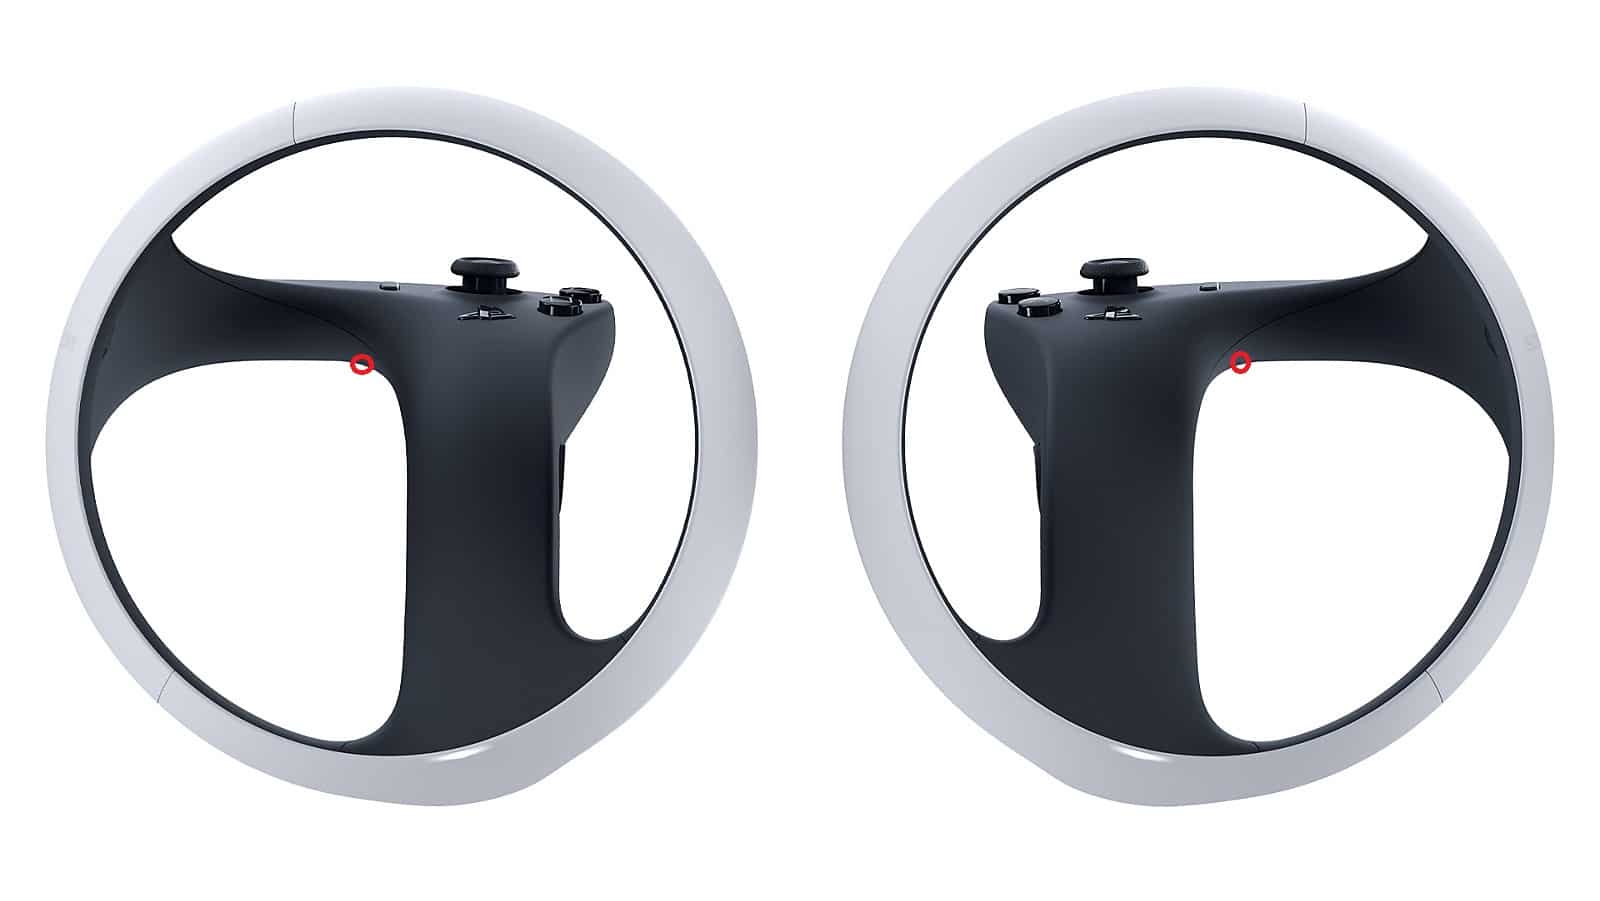
You need to use a thin pin in order to push the button located at the bottom of the small hole.

After resetting the controller, you need to pair it to the console again. To do so, connect the controller to the PS5 via a USB cable and then press the PS button.

7. You can also try clearing the cache and/or rebuilding the database on your PlayStation 5.

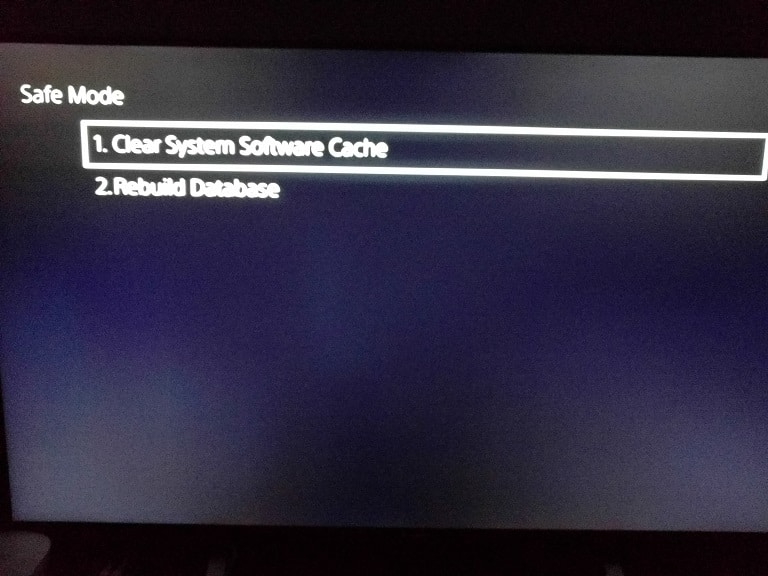
To do so, you need to head into Safe Mode by first turning off the PS5. Afterwards, hold the power button on the console until you hear a second beep. You are then asked to plug a controller into the PlayStation 5 and then press the PS button.

Once you do, you should be in Safe Mode, where you can go to the Clear Cache and Rebuild Database section.
8. You may also want to consider factory resetting the PlayStation 5.

To start off, back up your existing data by heading over to Settings > System > System Software > Back Up and Restore > Back Up Your PS5.

Next, you should go to Settings > System > System Software > Reset Options > Reset Your Console to factory reset the console.

Finally, head back to Settings > System > System Software > Back Up and Restore > Restore Your PS5 to get back your data.

9. You should also check if there are new firmware updates available for your PlayStation 5, PlayStation VR 2 as well as the PlayStation VR 2 Sense controllers.

If you still can’t get the motion controls to be responsive, then we suggest contacting PlayStation Support to get additional help.

How to reset the left and right PlayStation VR2 Sense Controllers

If you are experiencing issues when it comes to tracking and/or responsiveness of the PlayStation VR2 Sense Controllers, then you can try resetting these motion game pads. To find out how to do so, you can follow the steps laid out in this tutorial from Seeking Tech.

1. To start off, make sure that your PlayStation VR2 Sense Controller still has battery life. If it isn’t turning on, or turns off shortly after you turn it on, then we recommend that you try recharging it first before moving on to the next step.

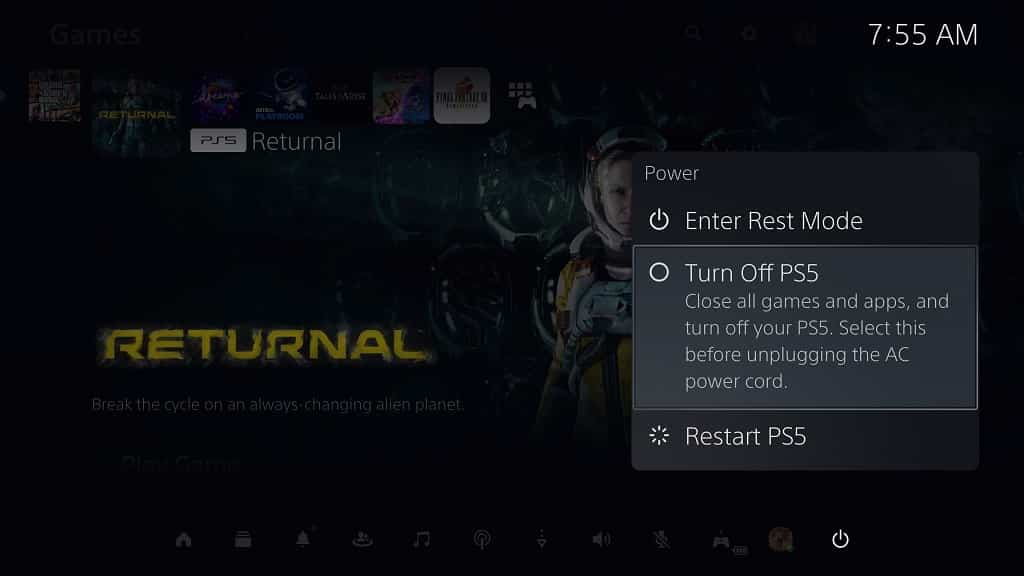
2. Once your controller is ready to be reset, you need to turn off your PlayStation 5 or PlayStation 5 Digital Edition console.

In order to do so, press the PS button on either your left or right PlayStation VR2 Sense Controller. You can also press the PS button on the DualSense game pad if you have it connected. In the quick menu, you can then select the Power option and then the Turn Off PS5 option.

2. You may also want to consider unplugging the power cord from the PlayStation 5. By doing so, you should be able to prevent accidentally turning on the console if you hit the PS logo button during the rest process.

3. With the PS5 turned off, look underneath the handle part of the left or right PlayStation VR2 Sense Controller. You should be able to find a small hole.

4. Use a pin that is thin enough to fit into a hole. You should eventually feel a button.

5. Press the button in the hole down in order to reset it.

6. If the other PlayStation VR2 Sense Controller is also having issues, then you should make sure that you reset it as well.

7. After you reset your controller, you will need to pair it again to your PlayStation 5. In order to do so, turn on your console.

8. Next, you need to use a USB cable to connect the VR2 Sense Controller you previously have to reset to the PlayStation 5.

9. Press the PS button on the Sense Controller in order to pair it to the console.

Once you have reset and paired the motion controller, try to test it in a PlayStation VR2 game to see if it is working normally.

How to access the PlayStation VR 2 volume control

The PlayStation VR 2 features a headphones jack that you can use to plug in wired earphones, headphones or headsets in order to listen to the sounds and music of a virtual reality game.

The default earphones piece that comes bundled with PSVR 2 does not feature in-line volume controls, however. There also aren’t any buttons you can use on the virtual reality headset to lower or increase the sound output.

So, if you are having a hard time trying to change the volume while wearing the PlayStation VR 2, then you can take a look at this tutorial from Seeking Tech to see how you can properly do so.

1. For the first step, we recommend that you pause the game if you are currently playing one. If you can’t pause the game, then you can head over to a safe area.

2. Next, you need to press the PS logo button located on either the left or right PlayStation VR Sense Controller to bring up a menu that should appear at the bottom of the screen.

3. From there, you need to select the Sound option, which has the speaker icon.

4. You should then be able to Sound menu, here you should see PlayStation VR 2 headphones as the Output Device. To change the volume, you need to select the Volume option.

5. You should then be able to adjust the volume for the earphones, headphones or headsets device that is connected to the PSVR 2.

To decrease the volume, move the slider to the left. In order to increase the volume, you need to move the slider to the right.

6. Once you are done, press the X button to confirm the change.

In addition to using the system menu, you can also check the in-game menus of the game you are currently playing. Most modern titles, including those created for the PlayStation VR2, come with adjustable Audio settings where you can change the level for the Master Volume. There may also be volume controls for the voice, sound effects and music components.

So, if some games sound fine while others sound either too loud or too quiet, then we recommend checking the Audio settings for the problematic game first before using the system menu of the PlayStation 5 for the volume control.

How to fix PlayStation VR 2 blurriness

When you put on the PlayStation VR 2 headset, you may notice that the graphics appear to be blurrier than what you are expecting. To see how you can get a sharper image quality, you can take a look at this troubleshooting article from Seeking Tech.

It is very likely that the blurry screen of the PSVR2 headset is due to incorrect positioning. When moving the headset around, you need to make sure that you hit the so-called “sweet spot” in order to get the sharpest image.

1. For the first step, we recommend that you look at a text in the PSVR 2 headset.

2. If the text appears to be blurry, then we suggest that you re-adjust the virtual reality headset’s position on your face.

Losen the headband and then make your adjustment. In most cases, most people were able to get a clearer image by moving the lens higher up on their face.

You can also try moving to the left or right, as well as diagonally, until the texts appear sharper on the VR screen.

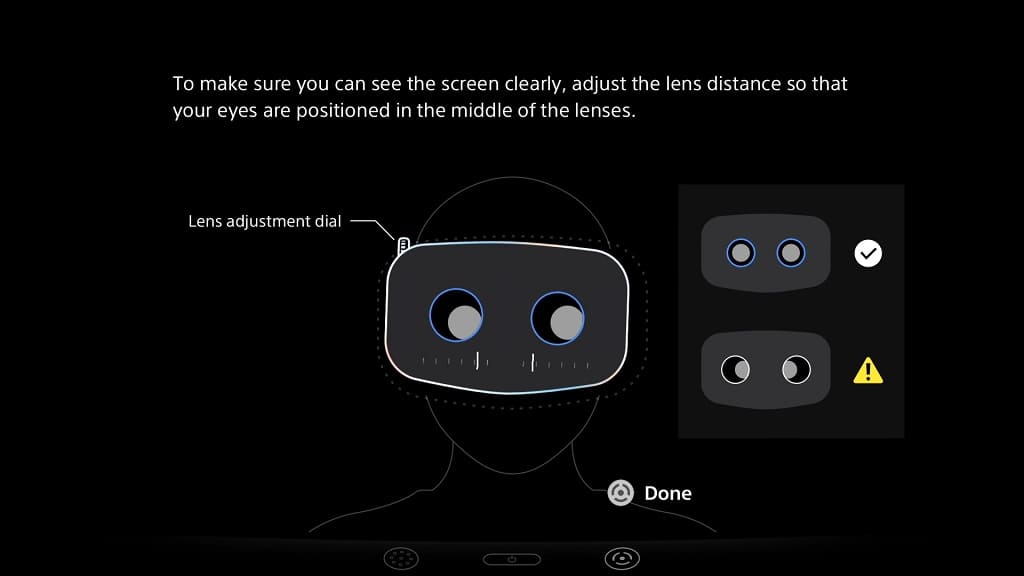
3. You may need to use the lens adjustment dial located on the headset as well if you still can’t get a sharper image.

If you need a visual guide, then you can head over to the Settings menu of your PlayStation 5 or PlayStation 5 Digital Edition console and then select Accessories > PlayStation VR2 > Adjust Lens and VR Headset Position menu.

You can also open the quick menu by quickly pressing the PS button button on the left or right PlayStation VR 2 Sense controller while wearing the virtual reality headset. You should then be able to select the Adjust Visibility option from there.

4. You should eventually reach the sweet spot with enough fiddling when it comes to finding the right placement. Once you do, make sure that you use the headband adjustment dial to secure the headset in place on your face.

If you move the VR screen higher up on your face, for instance, then you should lock in the headband on the lower half of the back of your head to make sure that it stays in place.

5. If you are able to see the texts more clearly on the VR screen, then you should get a sharper image when playing a game as well.

It is very important to note that the PlayStation VR 2 headset does not offer the same sharpness as a 4K television set. So, make sure that you have your expectations in check if you expect to see the same clarity as a 2160p TV.

The clarity also depends on the game you are playing. Some games may use image reconstruction from a lower native resolution, which will result in a softer look, especially in motion.

Other titles may feature re-projection, turning a 60 frames per second game into a 120 frames per second game when playing in virtual reality. This may add a ghosting effect in motion.

Another factor is the OLED panels used by the PlayStation VR 2, which aren’t as sharp as LCD panels when compared to other virtual reality headsets. With that said, OLED has the advantage when it comes to brightness and black levels.

So, if you are seeing a blurry image with one game, even after doing all the aforementioned steps, then we recommend trying another PSVR 2 title to see if you are encountering the same issue. If possible, try to play a game with a completely different visual style to see if you notice a difference in image quality.

What to do if PlayStation VR 2 is not working in Gran Turismo 7

The PlayStation 5 version of Gran Turismo 7 added support for the PlayStation VR 2. If you can’t seem to play this racing simulator in virtual reality, then you can take a look at this troubleshooting article to see how you can potentially fix this issue.

1. Make sure you go through the setup process for your PSVR2 headset if you haven’t done so already.

2. You should also make sure that you have the latest patch downloaded for Gran Turismo 7 as the ability to play this game in virtual reality was added in version 1.29.

If you are having issues getting the update to download, then you can take a look at this patch update tutorial.

3. It is important to note that the game does not natively support the PlayStation VR 2 Sense Controllers. So, once you are done setting up your virtual reality headset, you need to switch over to use either a DualSense controller or a wheel with buttons.

You can then use the DualSense controller or wheel to control the game while viewing it from your PlayStation VR 2 headset.

4. It is also important to note that the main menus of Gran Turismo 7 will be shown just like they would over a television set or monitor in your PSVR2 headset.

You won’t be able to see the virtual reality effects until you actually start a race. During the race, you should be sent right into the car’s cockpit view in full virtual reality a few seconds after the introduction.

Gran Turismo 7 also has a VR Showroom mode that you can find in the Garage section of the world map.

How to fix crashing issues when setting up the PlayStation VR 2

During the set-up process for the PlayStation VR 2, your PlayStation 5 or PlayStation 5 Digital Edition may end up crashing as you may see the “something went wrong with the system software” error or a similar message appear on the screen. This may occur when setting up your play area and/or scanning your room.

To see how you can fix these crashing problems, you can take a look at this troubleshooting article from Seeking Tech.

1. To start off we recommend that you check the USB connection on your headset and PlayStation 5. Make sure that the cable is securely connected on both ends.

2. Next, you can try clearing the cache on your PS5 by taking the following steps:

  • Completely turn off your console.
  • With the console turned off, press and hold the power button located directly on it for around 7 seconds. You should hear one beep initially and then a second beep a short while later.
  • The PS5 should ask you to connect the DualSense to the PlayStation 5 via a USB cable. Do so and then press the PS button on the controller.
  • Now that you have gained control in the Safe Mode menu, select Clear Cache and Rebuild Database.
  • You then need to select Clear System Software Cache.

3. If clearing the cache does not work, then you can try rebuilding the database.

To do so, you first need to go back to the Safe Mode menu and then select Clear Cache and Rebuild Database. Afterwards, select Rebuild Database.

4. You should also make sure that you have the latest firmware installed for your PlayStation 5 as the new update may improve the stability of the console.

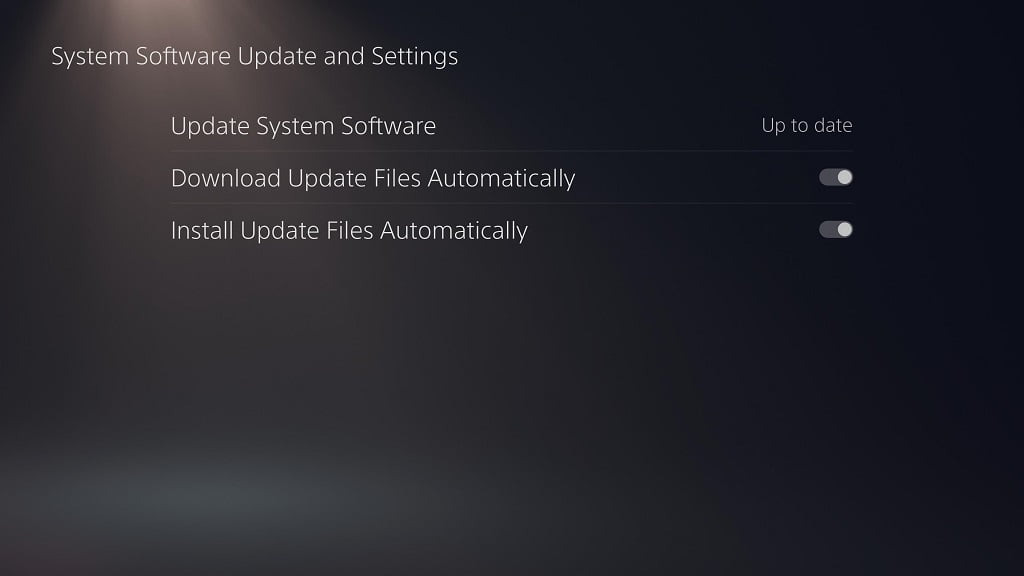
To update, make sure that the PS5 is connected to the internet and then head over to Settings > System > System Software > System Software Update and Settings > Update System Software > Update Using Internet.

5. Furthermore, make sure that you update the firmware of your PlayStation VR 2 headset as well.

If there is an update available, you should get an on-screen prompt when you plug the virtual reality headset into your PlayStation 5 with the console connected online.

6. Make sure that the room temperature is too hot; otherwise, the console and/or headset may end up overheating.

Furthermore, you should also avoid playing the PS5 in an enclosed place as it will trap the heat generated by the system. Instead, make sure that it is surrounded by open air.

7. As a last resort, you can also try factory resetting the PlayStation 5.

In order to do so, you first need to back up your data by going to Settings > System > System Software > Back Up and Restore > Back Up Your PS5.

Next, you need to factory reset the gaming system by heading over to Settings > System > System Software > Reset Options > Reset Your Console.

Finally, you can restore your back up data by going to Settings > System > System Software > Back Up and Restore > Restore Your PS5.

How to change the PlayStation VR 2 Sense Controller haptic feedback intensity

Just like the DualSense and DualSense Edge, the PlayStation VR 2 Sense Controller features haptic feedback. To see how you can change the intensity level for both the left and right virtual reality motion controllers, you can follow the steps laid out in this tutorial at Seeking Tech.

1. The PlayStation VR 2 Sense Controllers uses the same haptic feedback settings as the DualSense game pads. So, in order to change the rumble strength, your first step is to head over to the Settings menu of your PlayStation 5 or PlayStation 5 Digital Edition console.

You can do so by selecting the gear cog icon found on the upper right corner of the home screen.

If you are playing a game, using an app or in another menu, then you can go back to the home screen quickly by pressing and holding the PS button. You can also press the PS button and then select the home icon.

2. Inside of Settings, you need to go to Accessories.

3. From the Accessories menu, you first need to select Controller (General) from the left column.

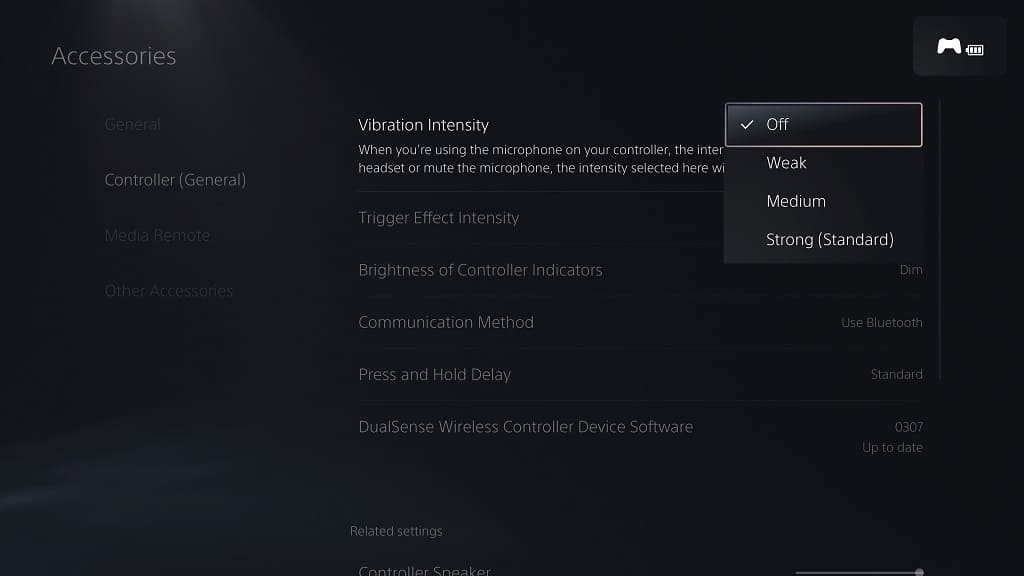
4. On the right side of the same screen, you then need to select Vibration Intensity.

5. In the pop-up window, you will be able to select the following options:

  • The Off option will completely turn off rumble for the left and right PSVR 2 Sense Controllers.
  • The Weak option will turn the vibration down to the lowest setting possible without turning the feature completely off.
  • The Medium option is weaker than the default rumble but should still be noticeable.
  • The Strong (Standard) option is the default force feedback strength.

6. After making your choice, the changes should be applied to both the left and right PlayStation VR 2 Sense Controllers.

Keep in mind that these changes will apply to all PlayStation VR 2 games that use the DualSense. Of course, it will also be applied to regular PlayStation 5 games that use the DualSense as well.

So, if you want to change the vibration intensity level again, then you need to go back to the Settings > Accessories > Controller (General) > Vibration Intensity menu.

What to do if ‘Output 120 Hz Video to VR Headset’ is greyed out on PS5

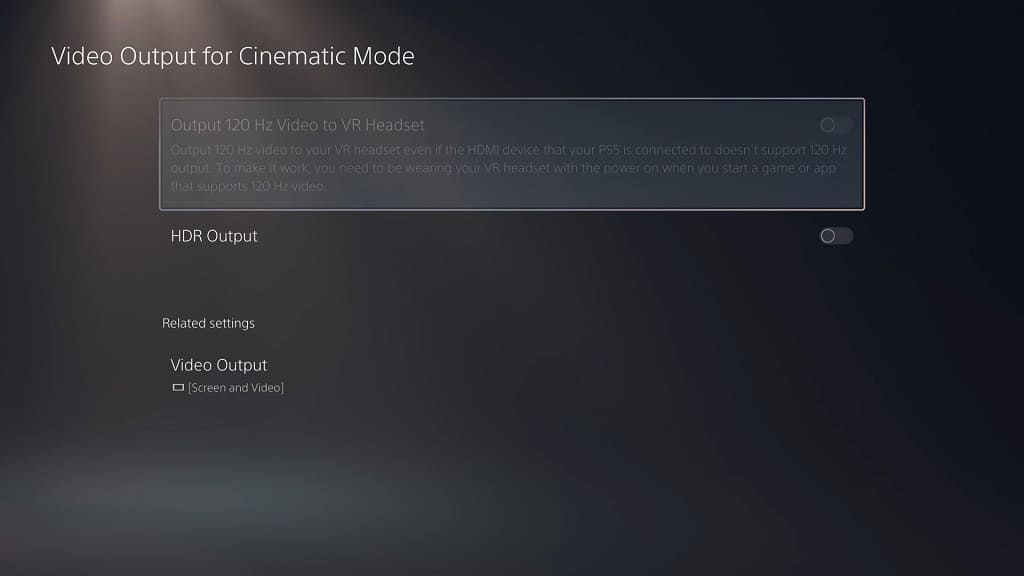
You are able to watch videos and play games at 120 frames per second with the PlayStation VR 2 headset on the PlayStation 5 and PlayStation 5 Digital Edition console. When you try to enable this feature from the menus, you may see that it is currently greyed out.

If you can’t select this setting, then you can take a look at this troubleshooting guide to see how you can enable it.

1. The reason why the “Output 120 Hz Video to VR Headset” setting is greyed out in the Video Output Cinematic Mode menu is most likely due to the “120 Hz Output” setting being set to Automatic in the Video Output menu.

So, for the first step, you need to head over to the first page of the Settings menu of your PS5.

2. From the front page of Settings, you need to go to Screen and Video.

3. Inside the Screen and Video menu, you need to select Video Output on the left column.

4. On the right side of the same screen, you should then select 120 Hz Output.

5. In the small pop-up window, select Off.

6. Go back to the first page of the Settings menu.

7. This time, you need to select Accessories from the Settings screen.

8. After getting to the Accessories menu, select PlayStation VR2 from the left column.

9. On the right side of the same screen, you then need to select Video Output from the Cinematic Mode section.

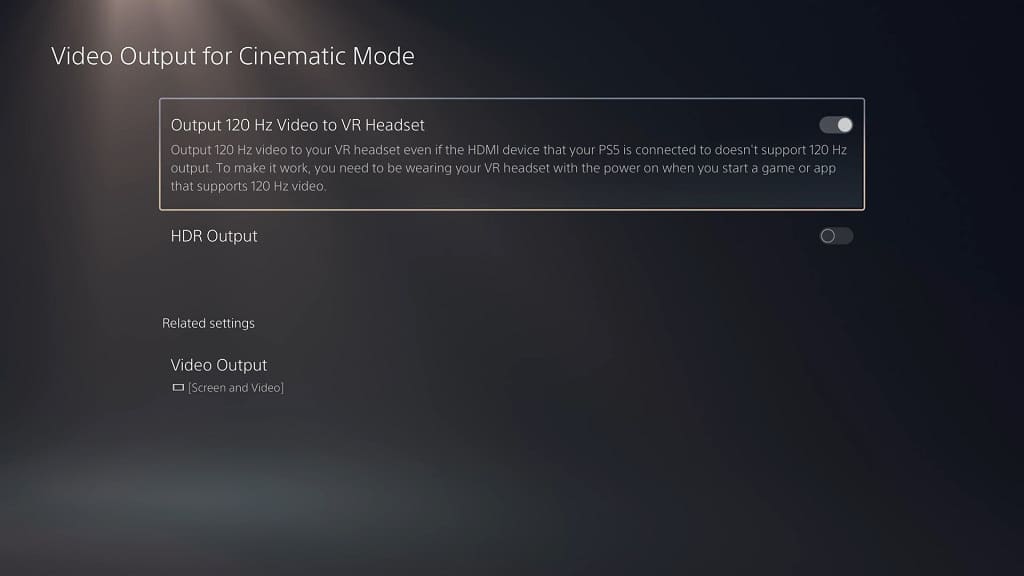
10. In the Video Output Cinematic Mode menu, the “Output 120 Hz Video to VR Headset” should no longer be greyed out. Select it in order to turn this feature on.

11. You should also make sure that you read the description to see how you can use this feature once you turn it on. You can find the details below:

“Output 120 Hz video to your VR headset even if the HDMI device that your PS5 is connected to doesn’t support 120 Hz output. To make it work, you need to be wearing your VR headset with the power on when you start a game or app that supports 120 Hz video.”

12. After you enable the “Output 120 Hz Video to VR Headset”, go back to the front page of Settings and then select Screen and Video.

13. Next, you need to select Video Output on the left side.

14. On the right side, you should then select 120 Hz Output.

15. Select Automatic from the small window menu. By doing so, you should be able to watch and play at up to 120 frames per second on both the PlayStation VR headset as well as the HDMI screen that is connected to your PlayStation 5.

The “Output 120 Hz Video to VR Headset” setting being greyed out is likely a bug that should eventually be fixed through an upcoming firmware update for the PS5 and PS5 Digital Edition consoles. For now, you need to follow the aforementioned steps if you can’t select it from the Video Output Cinematic Mode menu.

How to fix Atomic Heart HDR issues on PS5, Xbox Series X and S

When playing Atomic Heart in HDR on a home console, you may notice that the colors look a little bit off. To see how you can fix this issue on the PlayStation 5, PlayStation 5 Digital Edition, Xbox Series X or Xbox Series S, you can take a look at this troubleshooting article from Seeking Tech.

Before we begin, it is very important to note that Atomic Heart does not natively support HDR at launch. So, the issues you are having may be related to your screen or console converting the SDR picture into HDR.

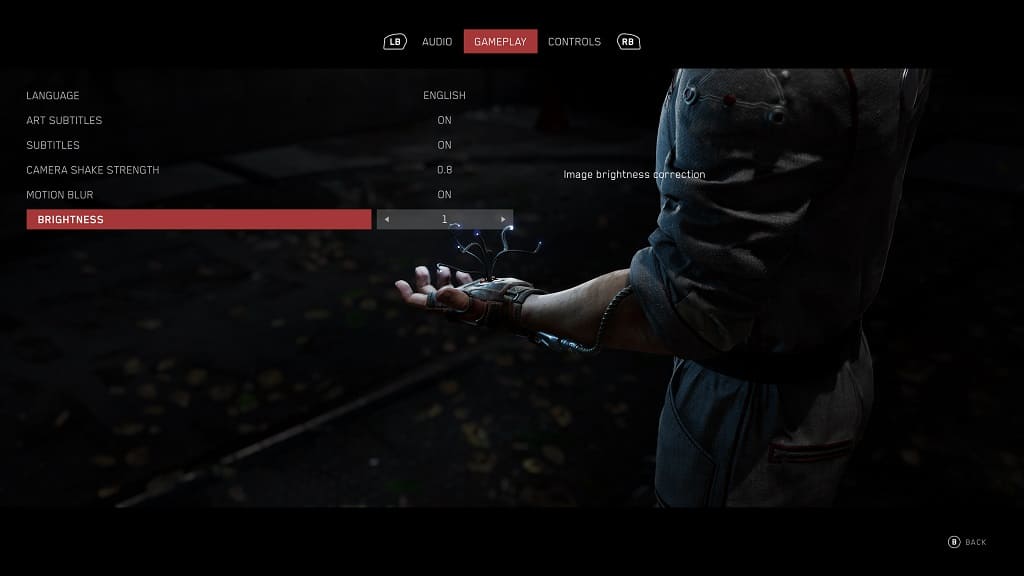
1. For the first potential fix, you can try adjusting the Brightness slider in Atomic Heart.

You can find this setting in the Options menu. From there, move to the Gameplay tab with the L1/R1 buttons on PS5 or LB or RB buttons on Xbox.

The Brightness slider is set to 1 by default. You are able to adjust it in increments of 0.2 from a range of 0 to 2. So, if you are finding some scenes to be too dark or too bright, then you can use this slider.

2. If you can’t still get the game to look right in HDR by using the in-game Brightness slider, then you can try calibrating your console’s HDR brightness output.

On the PlayStation 5 or PlayStation 5 Digital Edition console, you need to head over to Settings > Screen and Video > Video Output > Adjust HDR.

For the Xbox Series X or Xbox Series S, you need to go to Settings > General > TV & display options > Calibrate HDR for games.

Follow the on-screen instructions provided by your console to calibrate the HDR brightness output.

3. You should also make sure that the game has been updated. A new patch may fix the HDR issues and could even add native support.

4. If you still can’t get this game to look good in HDR, then we suggest that you play it in SDR instead.

If your television set or monitor automatically converts SDR to HDR, then look into its menus to see if you can turn this feature off.

On the PS5 or PS5 Digital Edition system, you need to go to Settings > Screen and Video > Video Output > HDR. Afterwards, make sure HDR is set to On When Supported.

For the Series X or Series S, you should go to Settings > General > TV & display options > Video modes. From the “General – Video modes” menu, make sure that the Auto HDR setting is disabled.

How to fix Wild Hearts ‘unable to connect to EA servers’ error on Xbox Series X and S

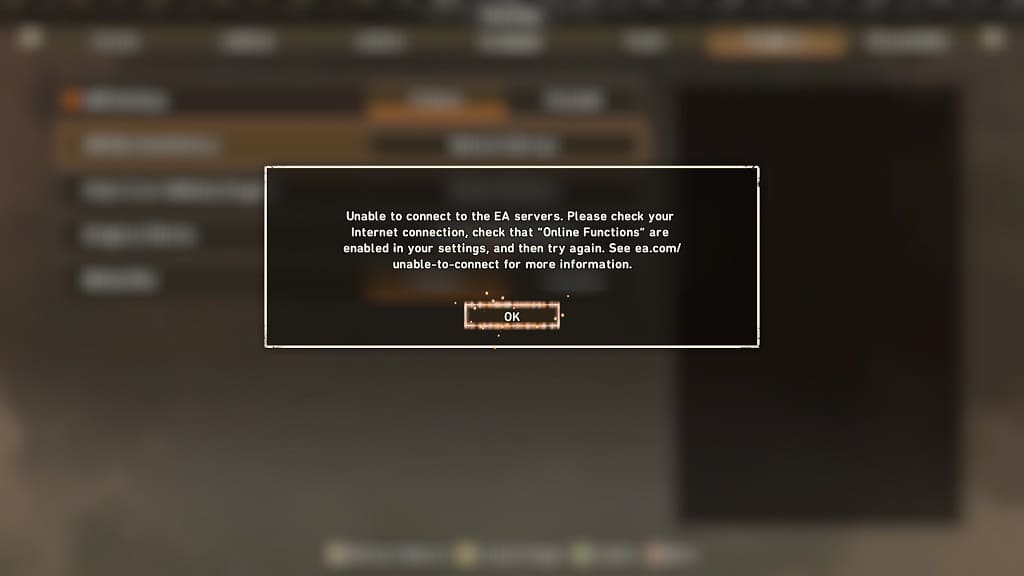
When playing Wild Hearts on your Xbox Series X or Xbox Series S console, you may see the following error message pop up:

  • “Unable to connect to the EA servers. Please check your Internet connection, check that ‘Online Functions’ are enabled, and then try again. See ea.com/unable-to-connect for more information.”

To see how you can fix this connection issue for this monster hunter game, you can take a look at this troubleshooting article from Seeking Tech.

1. We are able to replicate this error message by putting Wild Hearts in Quick Resume mode on our Xbox Series X. If we left the game suspended for quite some time, we would end up seeing the “unable to connect to the EA servers” error when we resume playing even if we aren’t playing online.

What we did to resolve the issue is to simply restart the game by taking the following steps:

  • If you are currently playing Wild Hearts, then you need to press the Menu button in order to bring up the quick menu.
  • Inside of the quick menu, we recommend that you select the Save option so that you won’t lose your current progress.
  • Afterwards, press the Xbox button to open the Guide menu.
  • In the Guide menu, move the cursor over to the Wild Hearts icon and then press the Menu button.
  • You then need to select Quit in the pop-up window.
  • Once the game has closed, open it again in order to restart it.
  • Try to play Wild Hearts online again to see if can connect without any issues.

2. You can also check to see if the internet connection of your Xbox Series X or Xbox Series S console is suitable for online multiplayer games.

To do so, open the Settings menu of your game console. Afterwards, you need to select General > Network Settings > Test Multiplayer Connection.

If there appears to be a problem with your internet setup, then you should see a link that appears on the screen. Visit this link to see how you can fix your problem.

3. If you have other downloads and/or streams running concurrently on the same network, then you may not have enough bandwidth to play Wild Hearts online.

In this case, you can wait for the downloads or streams to be finished. Alternatively, you can simply pause or cancel these activities to see if you are able to play multiplayer in the game.

4. If you haven’t done so already, make sure you have the latest updates installed for both Wild Hearts as well as your game consoles. These new versions may improve the internet connection for the video game.

5. There is a possibility that the servers from Electronic Arts are down at this moment. If this is the case, then you need to wait until they go back online before you play multiplayer in Wild Hearts.