How to find Xbox Game Pass games that support ray tracing

The Xbox Series S and Xbox Series X consoles are capable of using ray tracing effects, which provides supported games with more realistic lighting. You can check out this tutorial at Seeking Tech to see how you can find a list of video games from the Xbox Game Pass subscription service that support this feature.

1. To start off, you need to power on your Series X or Series S console if you haven’t done so already.

2. Next, you need to go to the home menu of your gaming system.

If you are doing something else, then you can press the Xbox logo button on the controller in order to open the guide menu. From there, select Home.

3. Afterwards, select the Store App from the Home menu.

While there is a dedicated Xbox Game Pass App available, it doesn’t let you filter its listing. Therefore, you need to head over to the Store App instead if you are looking for an Xbox Game Pass title that supports ray tracing.

4. Inside of the Store App, scroll down until you move the cursor over to the Xbox Game Pass row.

5. From there, you need to select the “All games A – Z” option.

6. You should now be in the All Console Games menu, which has the following description:

  • “Explore every game included with Xbox Game Pass Console.”

7. Here, you need to press the X button on the controller to bring up the Filter menu.

8. If you aren’t in the Filter tab already, you need to press the LB button to switch over.

9. In the Filter tab, you need to select Technical Features.

10. In the Technical Features section, make sure that the Ray Tracing box is checked.
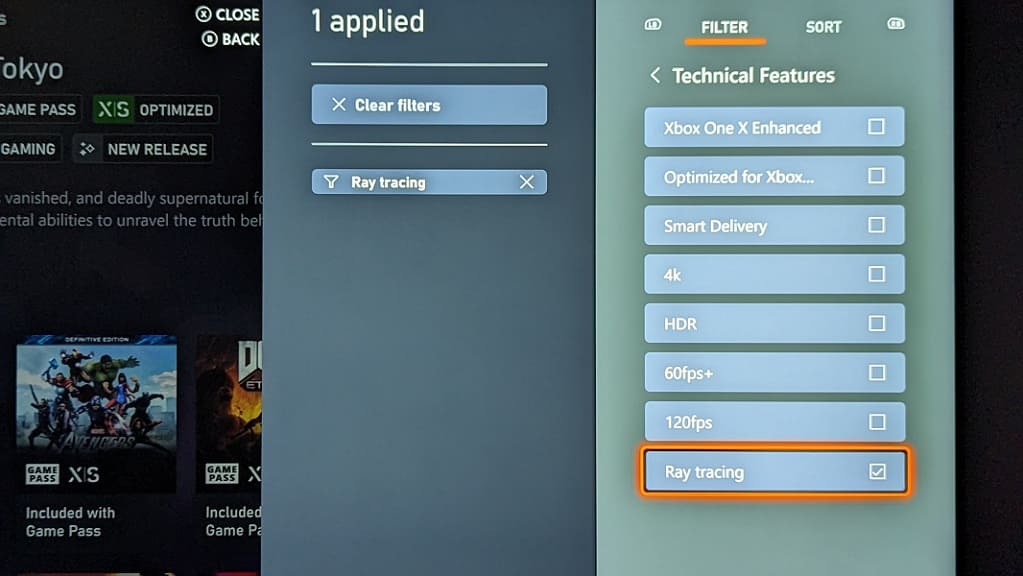
11. There are also other technical features that you might want to filter as well.

12. Once you are done, press the B button several times to back out of the Filter menu and return to the All Console Games menu.

13. You should now see a list of games that support ray tracing on the Xbox Game Pass.

Some of these titles offer separate graphics modes; as a result, you may need to enable ray tracing through the in-game menu in order to use this feature.

How to find Ubisoft+ games on Xbox Series X/S and Xbox One

Ubisoft has launched its subscription service, called Ubisoft+ Multi Access, on the Xbox One, Xbox One S, Xbox One X, Xbox Series X and Xbox Series S. To see how you can find these titles on the Store App of your console, you can take a look at this article from Seeking Tech.

1. If you haven’t done so yet, the first step is to open the Store App on your console. You can find this shopping application on the home screen of the dashboard menu.

You can also select it from the bottom of the Xbox Guide menu, which you can open at any time by pressing the Xbox logo button on the gamepad.

2. Once you open the Store App, move the cursor all the way to the left until you get to the left column menu.

3. Inside of the left column menu, move the cursor to Games.

4. Next, you need to move to the right of Games and then select Subscription.

5. From the Subscription section, scroll down until you get to the Ubisoft+ row.

6. On that row, navigate all the way to the right select the Show All tile.

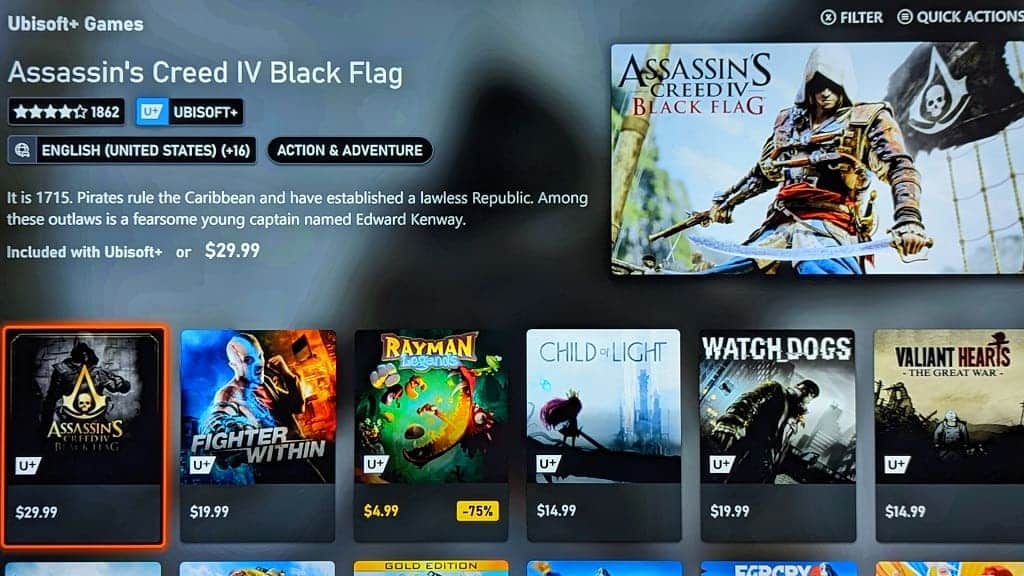
7. You should now be in the Ubisoft+ section of the Store App, which shows the full list of games that are currently available for members.

At launch, you should have access to the following titles:

  • Anno 1800
  • Assassin’s Creed Rogue Remastered
  • Assassin’s Creed IV: Black Flag with Assassin’s Creed Liberation
  • Assassin’s Creed Unity Gold Edition
  • Assassin’s Creed Valhalla Ultimate Edition
  • Assassin’s Creed Chronicles: China, India, and Russia
  • Assassin’s Creed III Remastered
  • Assassin’s Creed Odyssey Deluxe Edition
  • Assassin’s Creed Origins Gold Edition
  • Assassin’s Creed Syndicate Gold Edition
  • Assassin’s Creed: The Ezio Collection
  • Battleship
  • Boggle
  • Child of Light Ultimate Edition
  • Family Feud
  • Far Cry Primal Deluxe Edition
  • Far Cry 3: Blood Dragon Classic Edition
  • Far Cry 3 Classic Edition
  • Far Cry 4 Gold Edition
  • Far Cry 5 Gold Edition
  • Far Cry 6 Gold Edition
  • Far Cry: New Dawn
  • Fighter Within
  • For Honor
  • Ghost Recon Breakpoint Ultimate Edition
  • Ghost Recon Wildlands Ultimate Edition
  • Grow Up
  • Hungry Shark World
  • Immortals Fenyx Rising Gold Edition
  • Jeopardy!
  • Monopoly Plus
  • Monopoly Madness
  • Rabbids Invasion: The Interactive TV Show Gold Edition
  • Rabbids Party of Legends
  • Rainbow Six Extraction
  • Rainbow Six Siege Deluxe Edition
  • Rayman Legends
  • Riders Republic
  • Risk
  • Risk: Urban Assault
  • Scott Pilgrim vs. The World: The Game
  • Scrabble
  • Shape Up Gold Edition
  • South Park: The Fractured But Whole Gold Edition
  • South Park: The Stick of Truth
  • Starlink: Battle for Atlas Deluxe Edition
  • Steep
  • The Crew Ultimate Edition
  • The Crew 2
  • The Division Gold Edition
  • The Division 2
  • Trackmania Turbo
  • Transference
  • Trials Fusion
  • Trials of the Blood Dragon
  • Trials Rising Gold Edition
  • Trivial Pursuit Live
  • Trivial Pursuit Live 2
  • UNO Ultimate Edition
  • Valiant Hearts: The Great War
  • Watch Dogs Complete Edition
  • Watch Dogs 2 Gold Edition
  • Watch Dogs: Legion Deluxe Edition
  • Wheel of Fortune
  • Zombi

To sort and filter the listing from the Ubisoft+ menu, press the X button on the controller. You can then use the shoulder buttons to switch between the filter and sort options in order to customize the list to your desire.

How to disable time limits in Ghostwire Tokyo

With Ghostwire Tokyo arriving on the PlayStation Plus service on PlayStation 5 as well as the Xbox Game Pass service on the PC, Xbox Series S and Xbox Series X systems, many new players are jumping into this unique game.

This first-person action-adventure title contains some main and side missions that feature a time limit. If you don’t accomplish your tasks before the clock runs out, then you will need to start over.

If you would rather play these time constraint missions at your own leisure, then you can take a look at this tutorial from Seeking Tech to see how you can turn off time limits.

1. For the first step, you need to head over to the Options menu in Ghostwire Tokyo. You can do so from either the main menu or pause menu.

To bring up the pause menu while playing the game, you need to press the Options button on the DualSense controller if you are playing on the PlayStation 5 or PlayStation 5 Digital Edition console.

For the Xbox Series S or Xbox Series X consoles, you need to press the Menu button on the Xbox Series controller.

2. From the Options menu, you should already be in the Game tab.

If you are in another tab instead, then you need to press the L1 and R1 buttons on PS5 or LB and RB buttons on Xbox to change to the appropriate tab.

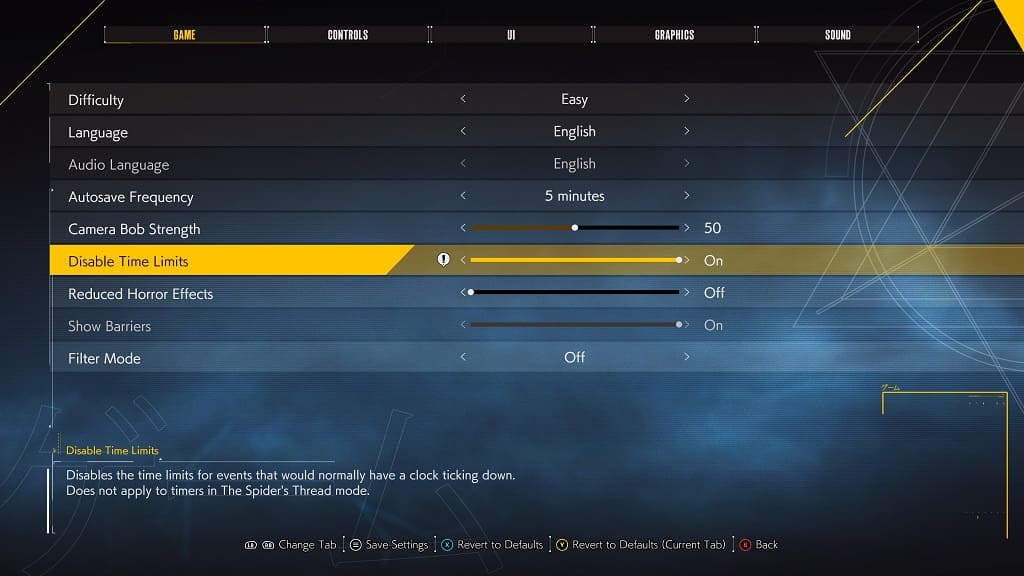
3. From the Game tab, you need to move the cursor down to Disable Time Limits, which should show the following description:

“Disables the time limits for events that would normally have a clock ticking down. Does not apply to the timers in The Spider’s Thread mode.”

By default, this feature is turned off. To turn it on, you can use the directional pad or left analog stick to change it from “Off” to “On.”

4. Afterwards, press the circle or B button to exit the Options menu.

5. You should see a warning notification pop-up. Here, you need to select Yes to save the change you made to the Disable Time Limits setting.

6. You should no longer see any time limits when playing the main and side missions in Ghostwire Tokyo.

The only mode where you will still get a time constraint is The Spider’s Thread mode, which is a rogue-like gauntlet that contains 30 levels. You can simply avoid this optional mode once you unlock it after completing the second chapter in the campaign.

How to turn off Ghostwire Tokyo film grain, chromatic aberration and motion blur

With the new Tokyo Spider’s Thread update to go along with the Xbox Series X and Xbox Series S release of Ghostwire Tokyo, many players are now jumping into the unique first-person action-adventure game.

When you are playing this game, you may not like the look of the film grain, chromatic aberration and/or motion blur effects have on the in-game graphics.

To see how you can disable these features, you can take a look at tutorial from Seeking Tech.

1. For the first step, make sure you launch Ghostwire Tokyo on your PC, PS5, Series X or Series S system if you haven’t done so already.

2. From the main menu, you need to select Options.

If you are currently playing the game, then you can also head into settings from the pause menu. To pause the game, press the Options button on the DualSense or the Menu button on the Xbox Series Controller.

3. Inside the Options menu, you need to use the L1 and R1 buttons on the DualSense or LB and RB buttons on the Xbox Series Controller to change tabs until you get to Graphics.

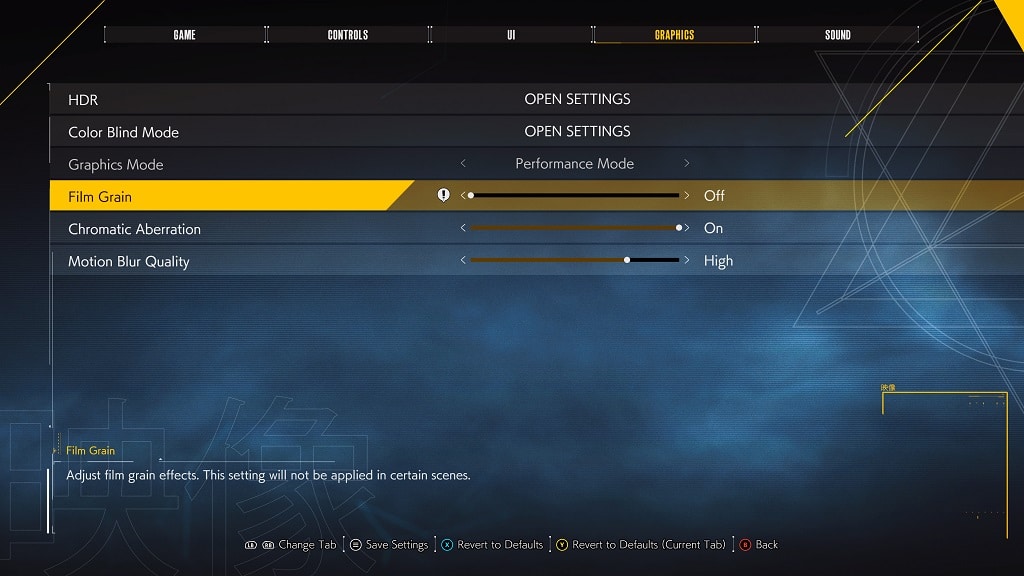
4. From the Graphics tab, move the cursor down to Film Grain, which should have the following description:

  • “Adjust film grain effects. This setting will not be applied in certain scenes.”

By default, this visual feature is set to On. You can use the directional pad or left analog stick to set it to Off.

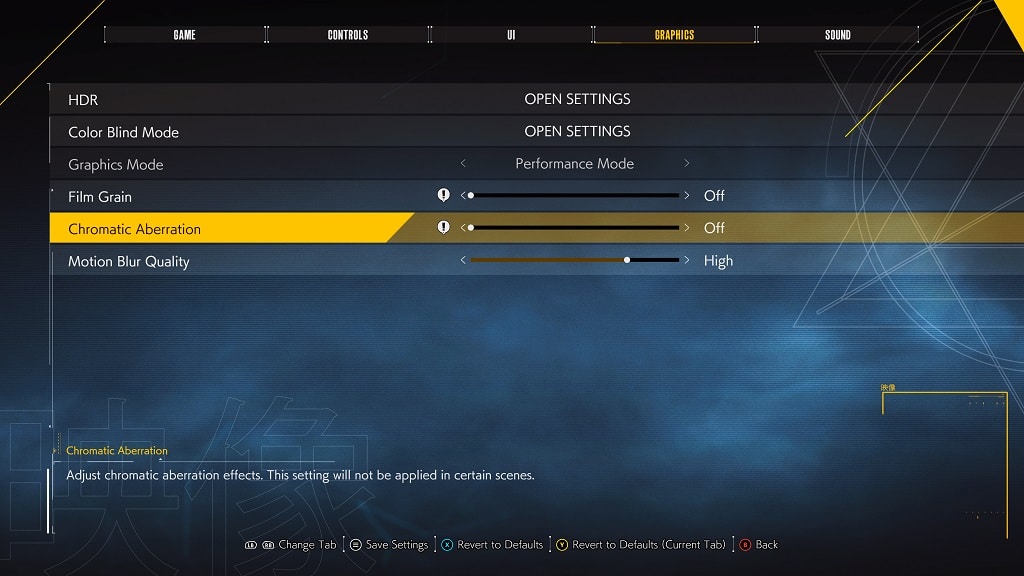
5. In the same tab, you can then move the cursor down to Chromatic Aberration, which contains the following description:

  • “Adjust chromatic aberration effects. This setting will not be applied in certain scenes.”

Once again, you can use the D-pad or left analog stick to change this setting from “On” to “Off.”

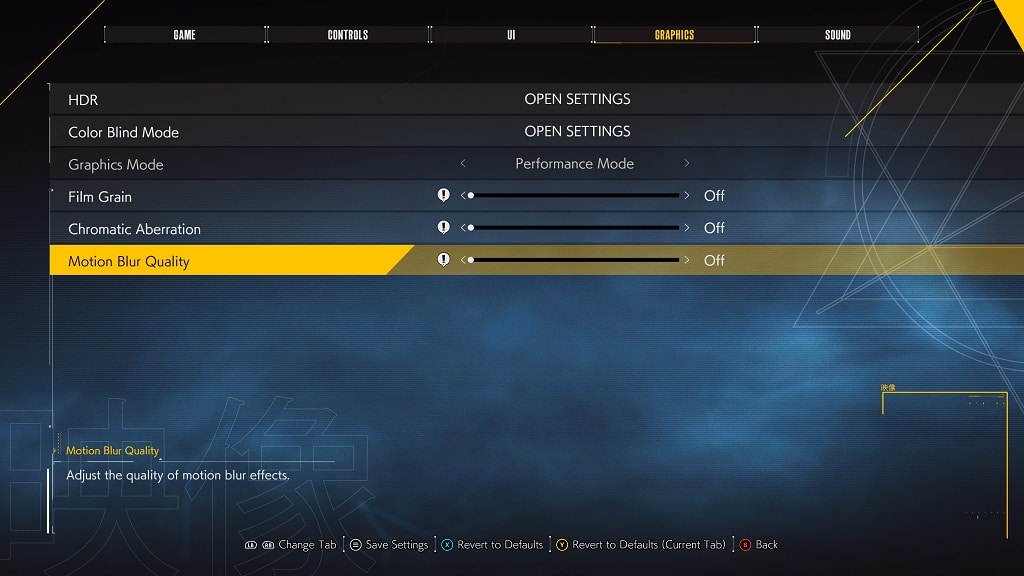
6. Last but not least, you should also find Motion Blur Quality in the Graphics tab with the following description:

  • “Adjust the quality of motion blur effects.”

By default, this setting is set to High. You can also use the directional pad or left analog stick to change it to Off, Low, Medium or Cinematic.

7. Once you are done disabling the film grain, chromatic aberration and/or motion blur effects, you need to press the circle or B button to back out of the Options menu.

8. You should then see a Warning screen asking if you want to save your changes. Here, you need to select Yes to apply the edits you made from the Options menu.

How to fix LG A3, B3, C3, G3 and Z3 remote pointer issues

You are able to use the magic remote as a pointer for your 2023 LG OLED. If you are having a difficult time trying to get the pointer to work accurately, or at all, then you can take a look at this troubleshooting article from Seeking Tech.

1. If you haven’t done so already, you should make sure that your magic remote is properly paired and registered for your LG A3, LG B3, LG C3, LG G3 or LG Z3.

To re-register your remote, you need to point it towards the TV screen. Afterwards, you should press and hold the home and settings buttons on the controller at the same time for a minimum of 5 seconds.

You can check out this troubleshooter if your TV isn’t able to recognize any inputs from the magic emote.

2. The IR sensor of your television set may not be able to detect the pointer input correctly if it is exposed to overly bright light.

So, if you have bright lights pointed directly at your television screen, you should try to turn them off. If you have sunlight directly shining on the sensor, then try to use blinders to block out the sun.

3. Of course, you should also make sure that you don’t have any obstacles that may be blocking the IR sensor of your OLED screen from receiving the signal of your television remote.

4. Other wireless devices may cause issues with the TV remote inputs as well. So, you can try turning off any nearby electronics that are actively using wireless communications.

5. If you haven’t done so already, try moving closer to your TV. The A3, B3, C3, G3 and Z3 have an IR range of around 10 feet.

6. If the control is working fine but the pointer isn’t showing up, then make sure that you disable the Audio Guidance feature.

In order to do so, press the Settings button on the remote and then select the gear icon. Afterwards, go to General > Accessibility > Audio Guidance. From there, set Audio Guidance to Off.

7. Keep in mind that you can’t use the directional buttons and the pointer at the same time. So, if you press the Up, Down, Left or Right button, then the pointer will disappear.

8. If you manage to get the magic remote pointer to appear but it isn’t moving very smoothly, then you should be able to reset its position by moving the pointer to the edge of the screen.

Of course, you should also make sure that you don’t have any bright lights and/or obstacles that may be blocking the IR sensor.

9. You can also adjust the pointer speed to fit your preferences so that it will appear to be smoother.

In order to do so, you first need to press the Settings button on the remote and then select the Settings option on the TV screen. Afterwards, head over to General > System > Additional Settings > Pointer Options. From there, you will be able to adjust the Tracking Speed as well as the Pointer Size.

How to fix LG A3, B3, C3, G3 and Z3 magic remote issues

If the magic remote control of your LG A3, B3, C3, G3 or Z3 does not appear to be working, then you can take a look at this troubleshooting guide from Seeking Tech to see how you can fix it.

1. For the first step, we recommend taking a look at the battery compartment of the TV remote. You should make sure that the batteries are properly aligned to the positive and negative terminals.

2. If possible, you can also try replacing the alkaline batteries to see if the magic remote controller will power on.

3. Make sure you aren’t blocking the middle front portion of the television; otherwise, you may be hindering the wireless signals between the remote and TV screen.

4. If you have a lot of wireless devices nearby, then these may also be interfering with the communications between the LG magic remote and the TV.

In this case, you can try moving the remote closer to the television. If possible, you can also try turning off other nearby wireless devices to see if you are able to get the TV remote to work correctly.

5. If the IR sensor of your LG is exposed to bright lights, including sun light, then it may not be able to proely detect your remote.

In this case, you can see if turning off the lights and/or using blinders on the windows will make the remote controller more responsive.

6. If the remote appears to power on just fine and there are no obstacles that may be hindering its communcation with the TV, then the next step is to ensure that you have pairred it to your LG A3, LG B3, LG C3, LG G3 or LG Z3.

In order to pair the controller, you need to take the following steps:

  • Turn on your television set.
  • Wait for at least 20 seconds.
  • Point the remote towards the OLED screen and then press the Wheel/OK button on the remote.
  • If done correctly, you should see a pairing complete message appear on the TV screen.

6. You can also try re-registering the television remote.

The fastest way in doing so is to press and hold both the home and settings buttons on the remote for at least 5 seconds while it is pointed towards the screen. You should see some instructions that appear on the TV about de-registering and re-registering the television remote.

Alternatively, you can press and hold the back and home buttons at the same time for at least 5 seconds with the remote pointed towards the OLED. This will de-register the remote controller. Afterwards, press the Wheel/OK button again to re-pair the remote.

How to factory reset the LG A3, B3, C3, G3, M3 and Z3

You are able to factory reset your LG A3, B3, C3, G3, M3 or Z3. This feature is helpful if you plan on selling or gifting your TV to someone else and you don’t want them to access any information you have saved. Some technical issues with the television set may also be fixed by restoring its settings to the factory default.

You can check out this tutorial at Seeking Tech to see how you can properly reset your 2023 LG OLED.

1. To start off, you need to press the gear cog button located on your LG television remote.

2. Next, you need to select the gear cog icon located in the menu on the screen.

3. Afterwards, go to General > System > Reset to Initial Settings.

4. You should be able to choose between the Reset All and Reset All Except Network Settings options.

The Reset All option will change all of the settings on your TV to the factory default. This is recommended if you are planning to sell or give away your television set.

The Reset All Except Network Settings will change every setting except for your internet connection setting. This is helpful if you don’t want to go through the network setup process again in order to connect your A3, B3, C3, G3, M3 or Z3 online. If you are factory resetting your TV to fix a technical problem, then you should pick this option.

5. If you set up a password for your TV, then you need to enter the four-digit pass code before you can continue with the factory reset.

If you forgot your password, then you can check out this 2023 LG OLED passcode reset guide.

6. Your television should then start the factory resetting process.

During this time, you should avoid turning off the TV or pulling its power cord from the power outlet.

How to reset the password for the LG C3 or G3

You are able to use a password to lock out content on your LG C3 or LG G3 television set. This is a four-digit numerical code that you need to enter in order to gain access the locked content on your TV.

If you forgot the pass code, then you can check out this guide at Seeking Tech to see how you can reset it for your 2023 LG OLED television set.

While this guide is meant for the C3 and G3, these steps should also be applicable for the A3, B3, M3 and Z3.

How to reset the password

In order to reset the password for your 2023 LG OLED, you need to press the Settings button on the television remote. Afterwards, select the gear cog icon on the screen and then go to General > System > Safety.

You should then be asked to enter your password. If you have never used a password for your television, then the default pass code is 0000. If you previously set up a password on the same TV, then you need to enter the four-digit code that you previously set up.

What to do if you lost your password

If you lost your pass code, then you can still reset it for your C3 or G3 television set.

In order to do so, start off by pressing the Settings button on your television remote. Next, you need to select the gear icon and then navigate over to General > System > Safety.

From there, you need to press the following buttons on the TV remote in sequence:

  • Channel Up Button
  • Channel Up Button
  • Channel Down Button
  • Channel Up Button

If done correctly, you should then see a master password window pop-up. Here, you need to enter 0313 as the pass code.

Your password should now be reset for your LG television.

How to fix blank screen issues when connecting a PC to your LG C3 or G3

When you try to connect your PC to the LG C3 or LG G3, you may end up getting a blank or black screen. To see how you can fix the display issues with these OLED screens, you can take a look at this troubleshooting article from Seeking Tech.

Before we begin, it should be noted that while this guide is intended for the C3 or G3, it should also be applicable to the A3 and B3 models as well.

1. For the first step, you should make sure that your computer is correctly connected to the C3 or G3.

If you are trying to connect the RGB port of your computer to the HDMI port of your TV, then you need to be using an RGB to HDMI converter. A HDMI to RGB converter does not work with these LG models.

If you are using a HDMI cable for the connection, then you should make sure that it has been HDMI certified; otherwise, a non-certified one may not work.

2. You should also check to see if the output resolution that you can set for your PC output is compatible with the television set.

You can find the full list of supported resolutions for the 2023 LG OLED models here.

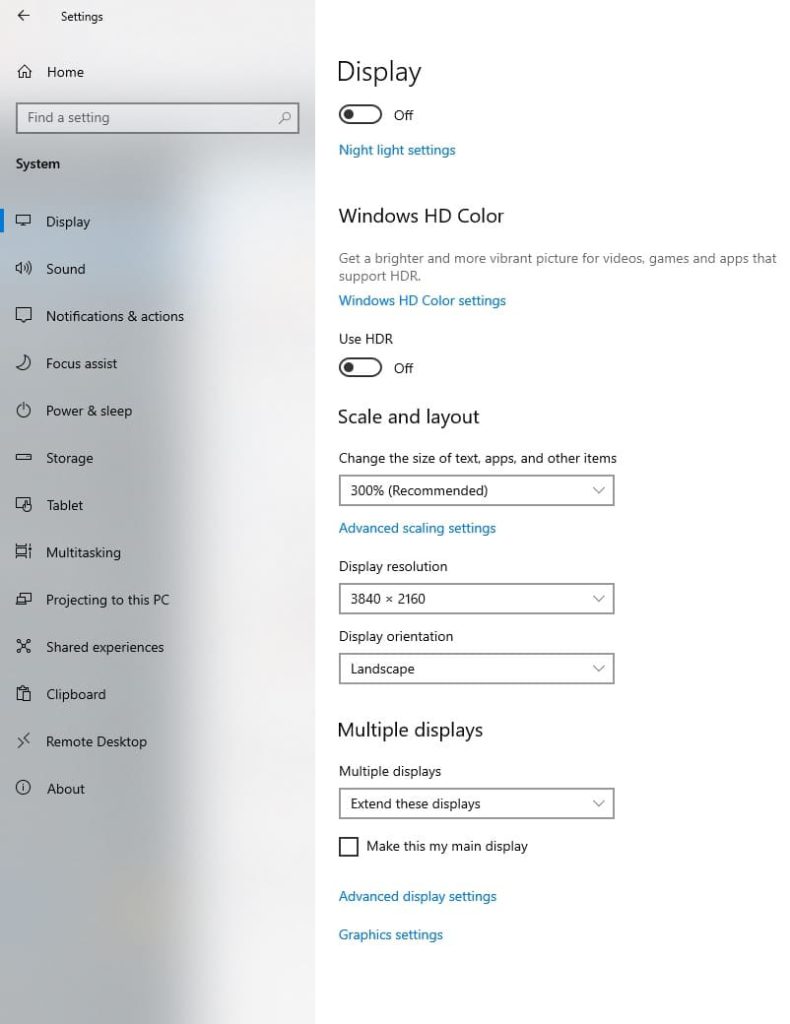
If the output resolution isn’t compatible, then you need to change to one that is supported. In order to do so on Windows 10, for example, you need to select Start > Settings > System > Display. From the Display menu, select the Display Resolution drop down menu and then select a compatible resolution.

3. If you are using the TV as a second monitor, then you should make sure that you configure the dual monitor setup properly.

If you are connecting a Windows 10 computer, then you can navigate over to Start > Settings > System > Display. From there, you should see the Multiple Display section, which is where you can set up your C3 or G3 as a second screen.

4. You can also try power cycling your television screen by turning it off and then turning it back on again.

5. If you are still getting a blank or black screen, you can restart your PC while your TV is still turned on to see if a reboot will help your computer output its display correctly.

6. You should make sure that you have the latest driver downloaded for your graphics card as well as the latest firmware downloaded for your LG TV.

How to fix LG A3, B3, C3, G3, M3 and Z3 media player app issues

The LG A3, LG B3, LG C3, LG G3, LG M3 and LG Z3 televisions come with a media player app that you can use in order to play files you have stored on an external storage or streamed directly from a computer.

If you are having a hard time trying to get this application to play your video and or audio files, then you can take a look at this troubleshooting article from Seeking Tech.

1. To start off, you should make sure that your video or audio file is supported by the LG media player.

For a video to be played, it needs to feature a compatible file extension, resolution, frame rate and video codec. For more information, you can take a look at this video file compatibility guide.

In terms of the audio file, it needs to come with a supported file extension, audio codec, bit rate and sample frequency. You can find information in our audio file compatibility guide.

2. If you are connecting an external storage drive to your LG TV via the USB port, then make sure that the television set is able to detect it properly.

If you are having issues with the USB drive, then you can take a look at this troubleshooter.

3. If you are sure that you have all the compatibility issues sorted out but aren’t able to find the file in the media player app, then make sure that you set the filter to “All” in order to view all your video and/or audio files.

4. If you manage to get the video to play but the audio is muted, then you may see the following error message:

  • “This audio is not supported”

In this case, you may have a compatible video file with incompatible audio codec. So, if possible, you can try converting the video file with a supported audio portion to see if you are able to get the audio to playback properly.

5. If you haven’t done so already, make sure you update the firmware of your LG OLED. A software update may improve support for video and audio codecs.

6. If you still can’t play the video or audio to play correctly, then you can try playing the same files on an external device that is connected to your A3, B3, C3, G3, M3 or Z3. An external device, such as a computer, may offer better support for your media.