How to change emotes in Omega Strikers on consoles

If you are playing Omega Strikers on a console, then you may be wondering how you can change your emotes. To find out how you can properly do so, you can take a look at this tutorial from Seeking Tech.

Before we begin, it is important to note that this guide is based on the Nintendo Switch, PlayStation 4, PlayStation 4 Pro, PlayStation 5, Xbox One, Xbox One S, Xbox One X, Xbox Series S and Xbox Series X versions of the competitive multiplayer game.

1. For the first step, you need to head to the main menu of the game. This is the screen where you will see a giant pink Play icon located on the bottom right corner.

2. From the main menu, you need to select Strikers on the top left side.

3. In the Strikers screen, you have to select the character with the emotes that you want to customize.

4. On the next screen, you should first select the Cosmetics option near the top.

5. Afterwards, you need to select the Emoticon.

6. You should see a list of emotes.

Depending on how far you are in your progression, some of these may have a grey lock icon attached. This indicates that you need to unlock the emoticon before being able to use them.

You can only add the Emoticons that don’t have any grey locks applied.

7. To swap out one emote for another, you need to move the cursor to the emote that you want to add to your list.

8. Next, you need to select and then hold the emote so that you can drag it to one of the five Emoticon slots located on the left side.
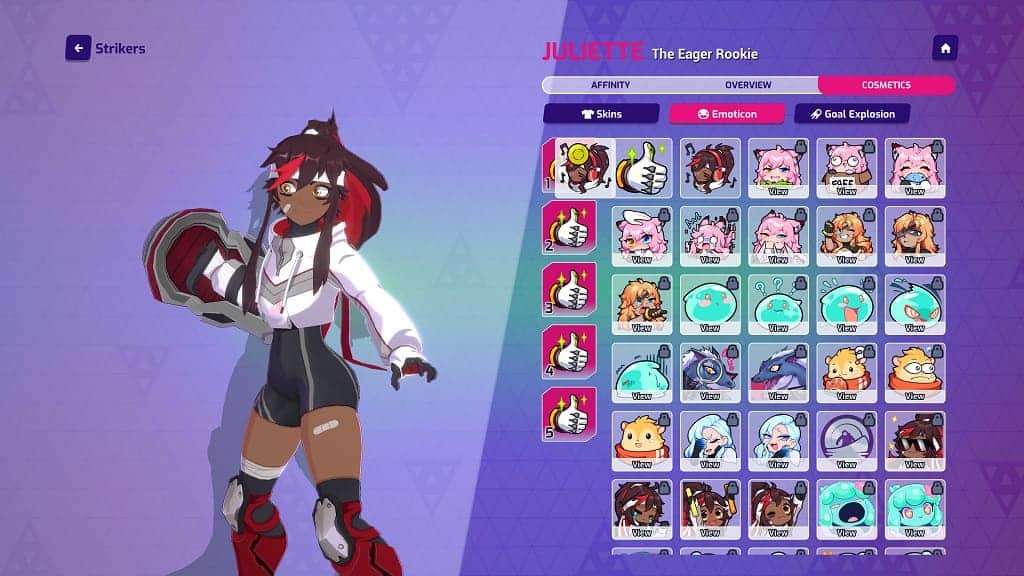
On Switch, Xbox One and Xbox Series platforms, you need to select and hold with the A button in order to drag. On the PlayStation 4 and PlayStation 5 consoles, you need to select to use the X button of the DualShock 4/Dualsense to perform the same action.

9. Keep in mind that, by default, you can only use the first two slots of emotes as Slot #1 is assigned to the left directional button while Slot #2 is assigned to the right directional button when you are playing the game with a gamepad.

If you want to assign buttons to the third, fourth and fifth emoticon, then you need to head over to the Controller section of the Settings menu in Omega Strikers. From there, you will be able to assign buttons for emotes as well as other actions.

How to sort by price on the Xbox Store App of Xbox Series X and S

Thanks to a new firmware update, you can now sort by price from the Microsoft Store App on your Xbox Series X or Xbox Series S console. To find out how to do so, you can take a look at this tutorial from Seeking Tech.

1. If you haven’t already, you should make sure that you have the latest software update downloaded on your gaming system as the price sorting feature was added recently.

You can check if there is a new firmware available by first opening the Settings App on your Series X or Series S. Afterwards, navigate over to System > Updates. If you see that there is an update available on the System – Updates page, then make sure you download and install it before you move on to the next step.

2. With your console updated, open the Microsoft Store App. You can do so quickly by pressing the Xbox logo button on the controller, which should bring up the Guide menu. From there, select the shopping bag icon located at the bottom.

3. Inside of the Store, navigate over a page that shows a list of content that you want to sort the pricing range for. For this guide, we will be heading to the Top Paid Games page.

4. Once you get to a page that shows a list of games or other content, press the X button on the controller to open the Filter menu.

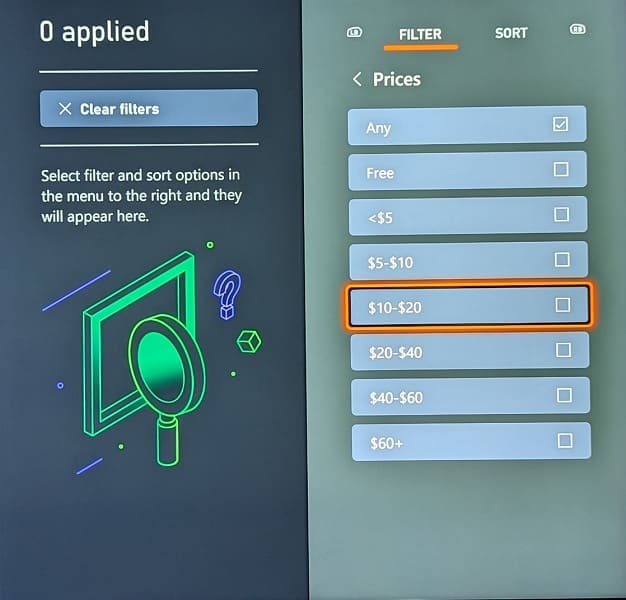
5. The Filter menu should appear on the right side of the screen. From there, you need to select Prices.

In the Prices section, you will be able to select the following:

  • Any
  • Free
  • <$5
  • $5-$10
  • $10 -$20
  • $20-$40
  • $46-$60
  • $60+

By default, the Prices filter is set to Any, which means that all price ranges will be shown in the listing. If you pick any of the other options, then Any will automatically be deselected.

Select the pricing range that you want to view. Keep in mind that you can combine multiple ranges in order to fit your browsing needs.

7. Once you are done applying the Price filter, press the B button twice, once to back out of the Prices section and one more time to exit the Filter menu.

You should now be able to view the games on the page based on the pricing range you selected.

How to disable crossplay in Omega Strikers

Cross platform play is enabled by default in Omega Strikers. This feature will allow you to play with players from other platforms such as Android, iOS, Nintendo Switch, PC, PlayStation 4, PlayStation 4 Pro, PlayStation 5, Xbox One, Xbox One S, Xbox One X, Xbox Series X or Xbox Series S.

With that said, crossplay matchmaking may put you at a disadvantage, especially if you are playing with a lower-powered hardware. So, if you want to disable the ability to match up with others on other platforms, then you can take a look at this guide from Seeking Tech to find out how to do so.

1. For the first step, you need to go to the main menu of the game. This is where you see a giant Play button located on the bottom right side of the screen.

2. From the main menu, move the cursor to the upper right corner and then select the gear cog icon.

3. You should now be in the Settings menu. Here, you need to scroll down until you get to the Gameplay section.

If you are using a controller, then you can use the right analog stick to scroll down the list.

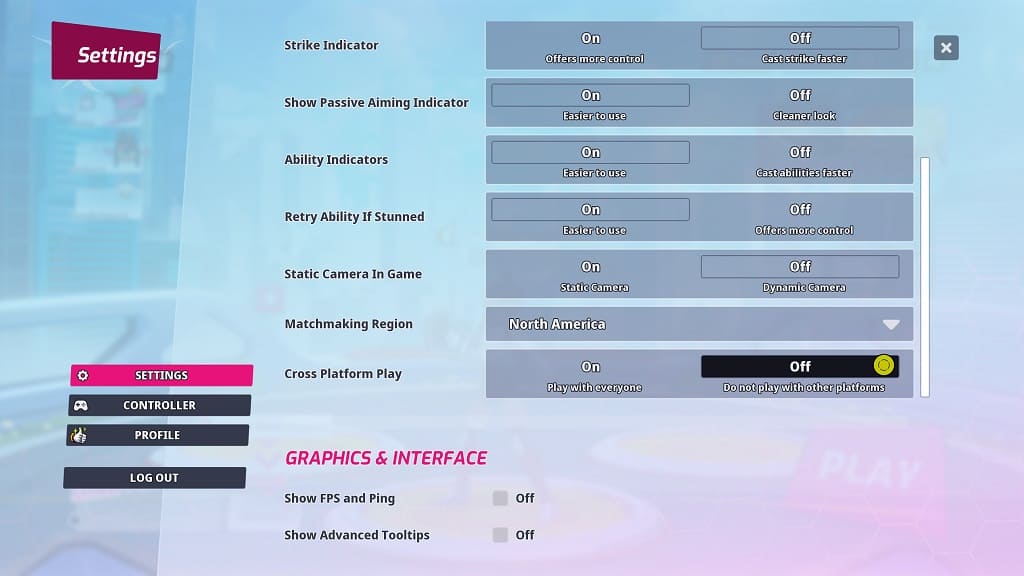
4. You should see the Cross Platform Play setting in the Gameplay section. By default, this is set to “On” with the following description:

  • “Play with everyone.”

Move the cursor and then select “Off,” which should show the following description:

  • “Do not play with other platforms.”

5. After disabling cross-play, exit out of the Settings menu.

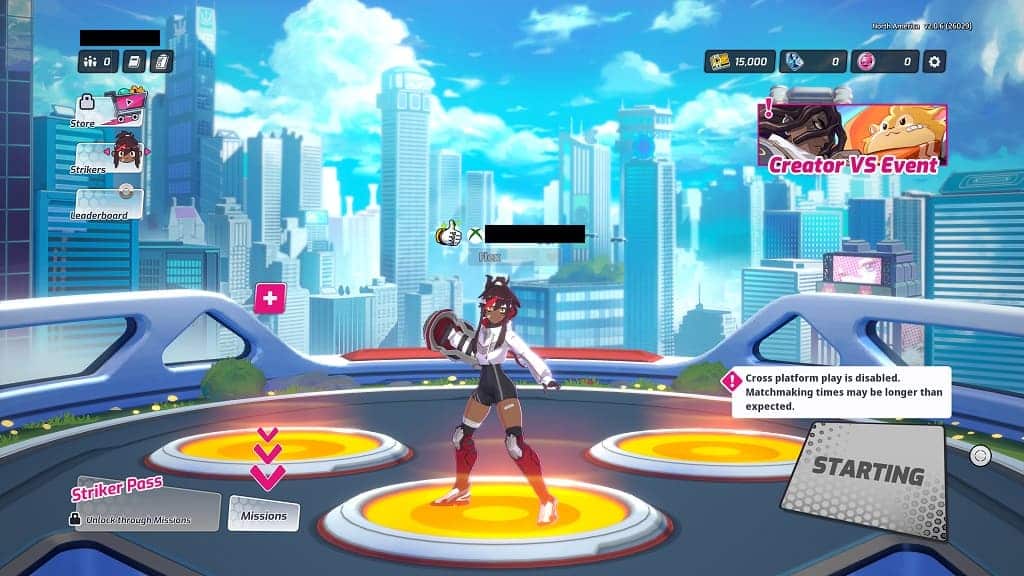
6. You should now be back in the main menu of Omega Strikers. If you properly turned off cross-platform play, then you should see the following message located above the pick Play button on the bottom right corner:

  • “Cross platform play is disabled. Matchmaking times may be longer than expected.”

The next time you play online, you will only be matched up with others that are playing on the same platform as you. As a result, you should be able to compete at a more even playing field.

How to fix Shadow of the Colossus texture streaming issues on PS5

While the PlayStation 4 version of Shadow of the Colossus is fully playable on the PlayStation 5 and PlayStation 5 Digital Edition consoles, the game does exhibit some texture streaming issues. As a result, some of the environment will look worse with less details, as well as a lower resolution, when compared to the same game being played on the PS4 or PS4 Pro.

To see how you can fix this problem, you can take a look at this troubleshooting article from Seeking Tech.

1. According to reports by many players on Reddit, the texture streaming bug in Shadow of the Colossus was mostly fixed through a recent firmware update for the PS5.

So, if you haven’t done so already, you should make sure you have the latest software version of your console installed.

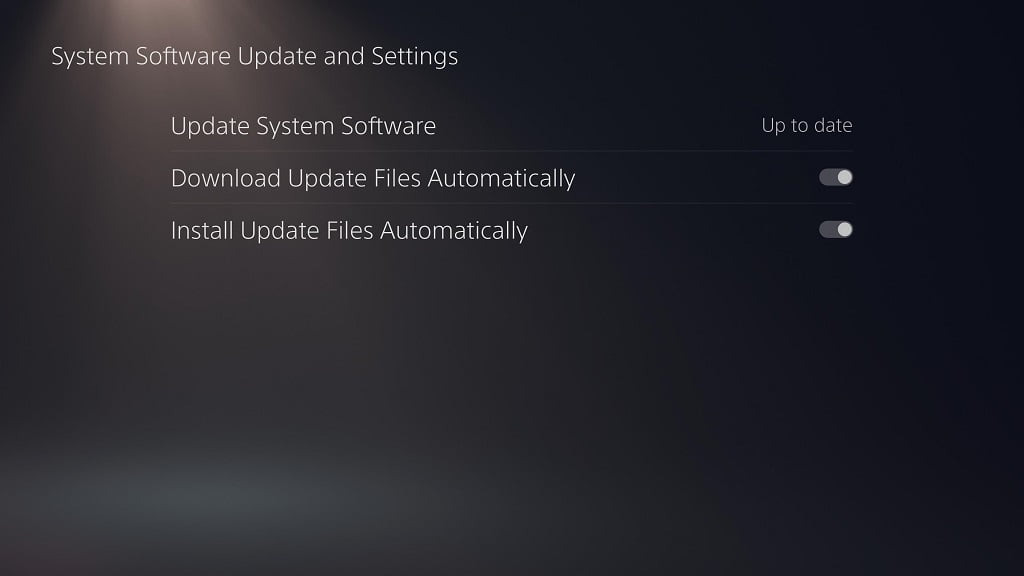
You can manually update by first opening the Settings menu. From there, select System > System Software > System Software Update and Settings > Update System Software > Update Using Internet.

2. With the new firmware updated, the texture filtering should mostly be fixed.

With that said, you may still see some issues as there are reports of the textures not loading in after you defeat a Colossus boss and warp back into the temple. The graphics may also not load properly if you suspend the game and then put your PlayStation 5 or PlayStation 5 Digital Edition in Rest Mode.

In either of these cases, you can quickly fix the glitch by restarting Shadow of the Colossus by taking the following steps:

  • To start off, make sure you save your game if you haven’t done so already.
  • Press and hold the PS button on the controller to open the home screen menu.
  • From the home screen menu, move the cursor over to the Shadow of the Colossus icon.
  • Press the Options button on the controller to bring up the pop-up window for the game.
  • Select Close Game in the pop-up window.
  • Once Shadow of the Colossus has closed, select its icon on the home screen to open it again.
  • The texture issues should now be fixed with the restart.

The development team at Bluepoint Games could also release a patch that addresses the texture streaming problem of the game when it is running on a PS5 console. However, it does not seem likely at this moment as the game came out all way back in 2018. Not to mention the studio is most likely busy with its current project.

How to enable A Plague Tale: Requiem 60 fps performance mode on PS5 and Xbox Series X

Thanks to a new patch, you can now play A Plague Tale: Requiem at up to 60 frames per second on the PlayStation 5, PlayStation 5 Digital Edition and Xbox Series X. While the action-adventure title was also released for the Xbox Series S, the performance mode is only available for the two more powerful consoles.

To see how you can unlock 60 fps for the PS5 and Series X versions of this game, you can take a look at this tutorial from Seeking Tech.

1. If you haven’t done so already, you should make sure that you download the latest patch for A Plague Tale: Requiem.

On the PS5 and PS5 Digital Edition, you can manually check if there is a new patch available by moving the cursor to the game’s icon on the home screen of the console. Afterwards, you need to press the Options button on the DualSense and then select Check for Update.

For the Xbox Series X, you need to move the cursor to the game’s icon on the Guide menu, home menu or My Games & Apps menu and then press the Menu button. Next, you need to press the Menu button on the Xbox controller and then select Manage Game and Add-Ons. Finally, select Updates in the Manage – Requiem menu.

2. Once the game has been updated, you need to head into the Settings menu in A Plague Tale Requiem. You can do so from either main menu or pause menu. You can pause the game by pressing the Options button on PlayStation or Menu button on Xbox.

Keep in mind that, if you decide to head into Settings from the pause menu, then you will be boot back out to the main menu when you change the graphics mode.

3. In the Settings menu, press the R1 button on the DualSense or RB button on the Xbox controller to change tabs until you get to Graphics

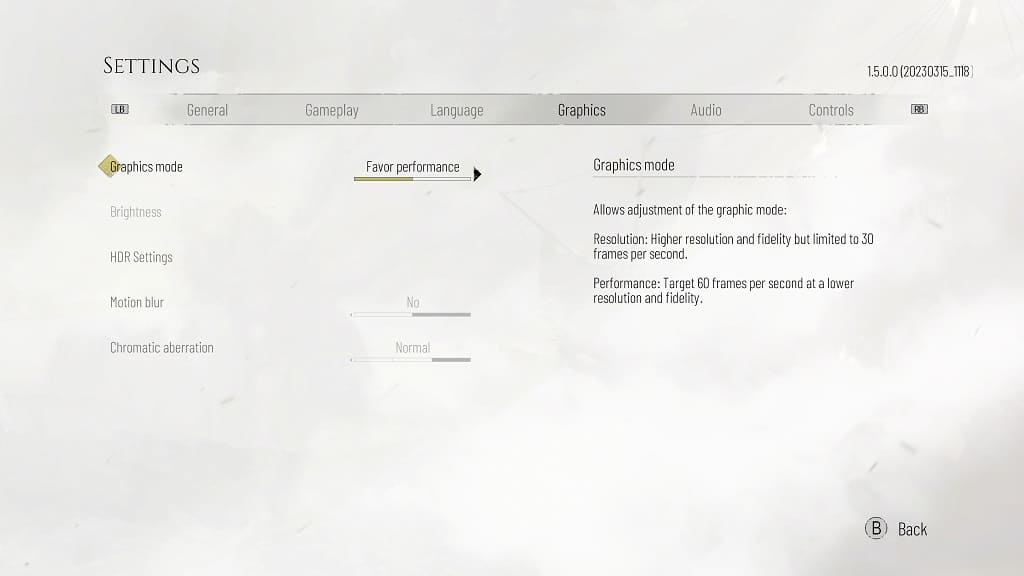
4. From the Graphics tab, you will find the Graphics Mode setting, which has the following description:

Allows adjustment of the graphics mode.

Resolution: Higher resolution and fidelity but limited to 30 frames per second.

Performance: Target 60 frames per second at a lower resolution and fidelity.

So, by playing this game at 60 fps, you will be trading a higher frame rate for less clarity and details.

5. Make sure you select Performance for the Graphics Mode.

6. If you change the Graphics Mode from the pause menu, then you should see the following message:

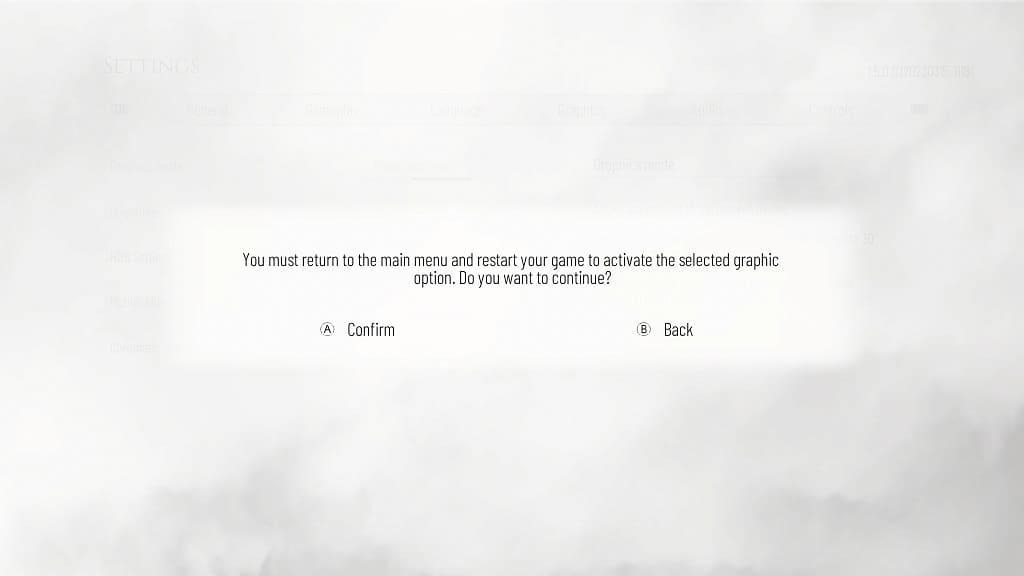
You must return to the main menu and restart your game to activate the selected graphics options. Do you want to continue?

If you already save your game, then you can select Confirm to go back to the main menu.

If you haven’t saved, then you can back out to the game and then save your progress before going through with the Graphics Mode change.

After returning to the main menu, select the Continue option to load back into your last save and then continue from where you left off. This time, you will be able to play the game at up to 60 fps on your PS5 or Series X.

How to view your purchase history from Xbox Series X and S

You are able to check your history for the content you purchased from the Store App of your Xbox Series X and Xbox Series S. This list includes games you bought on the PC, Xbox One, Xbox One S and Xbox One X.

To see how you can view these recent and past purchases, you can take a look at this tutorial from Seeking Tech.

1. For the first step, you need to open the Settings App on your Series X or Series S. You can do so by selecting it on the top right side of the home menu of the dashboard.

You can also get there by selecting the Settings option from the Profile & System tab of the Guide menu. For the uninformed, you can open the Guide menu by pressing the Xbox logo button on your controller. You can then press the RB buttons to change tabs until you get to Profile & System.

2. Once you get to Settings, you need to first select Account on the left side.

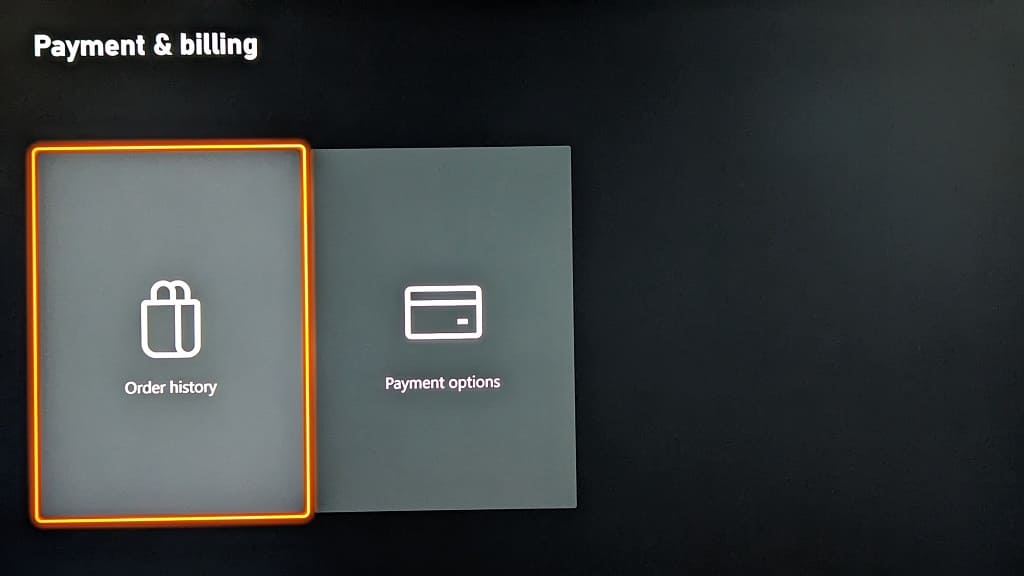
3. On the right side of the same screen, you then need to select Payment & Billing.

4. From the Payment & Billing menu, select Order History.

5. The Order History page should show the purchase you made. By default, you will be able to view your most recent purchases from the past month.

If you don’t see your orders here, then make sure you are logged into the same Xbox account you previously used to make the purchase.

6. To sort the listing, you can select the Show All drop-down menu. Afterwards, you can select any of the following filtering options:

  • All
  • In Progress
  • Returned/Refunded
  • Digital
  • Physical
  • Pre-Orders

7. You can also change how far back you want to view your purchase history. In order to do select the “From past 1 month” drop-down menu from the aforementioned Order History page. Afterwards, you can pick between any of the following timelines:

  • 1 month
  • 3 months
  • 6 months
  • Year
  • All available

How to see all games on the Xbox Store

The Xbox One, Xbox One S, Xbox One X, Xbox Series S and Xbox Series X can play thousands of digital games. To see how you can see the entire catalog of these titles, you can take a look at this guide from Seeking Tech.

Can you view all games on the Microsoft Store App of your Xbox?

Unfortunately, there is currently no way of viewing all the games available on the Microsoft Store App from your Xbox One, Xbox One S, Xbox One X, Xbox Series S and Xbox Series X console. Instead, you will need to visit the store from a web browser in order to do so.

How to see all games from the Xbox Store website

To find all the digital games that are currently available on the Xbox Store, you need to visit the official website from a web browser. If you are in the U.S. region, for example, then you will be able to find the full list of digital releases with this link.

How to sort the full catalog of games on the Xbox Store

From the Browse All Games page of the Xbox Store, you are able to sort the listing from the Sort By drop-down menu located on the left side if you are viewing the desktop version.

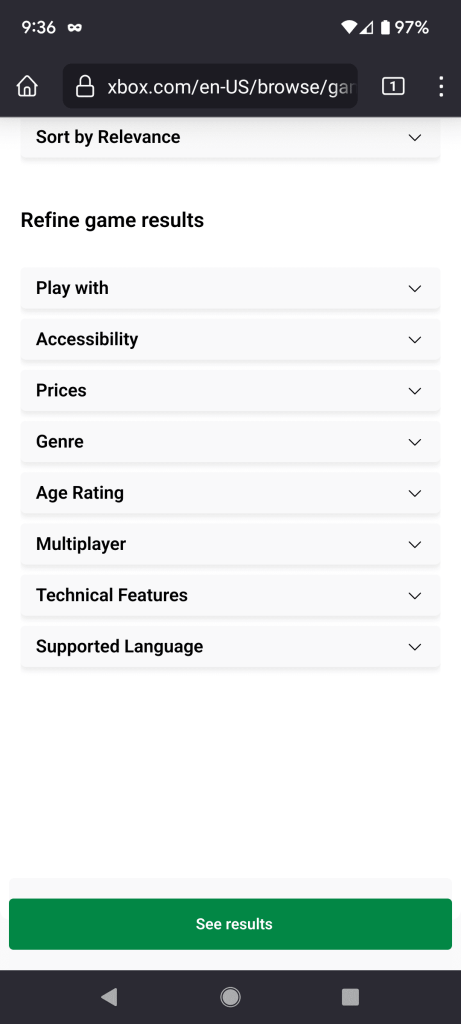
In the mobile version, you need to tap Refine Game Results before you can find the Sort By drop-down menu.

You can then sort the listing based on Relevance, Title A – Z or Title Z – A.

For the desktop version, any changes you made to the sorting order will be applied instantly. For the mobile version, the sorting changes will only be applied after tapping the See Results option located at the bottom.

Sort and filter menu from the Browse All Games webpage of the Xbox Store.

How to filter the complete list of Xbox games from the store

You can also filter the listing in the Filters section on the left side if you are viewing the desktop version of the Browse All Games page.

In the mobile version, you need tap Refine Game Result first to find the filters in the Refined Game Results section.

You will be able to filter the full games list based on the following categories:

  • Play With (aka the platforms you can use to play these digital games)
  • Accessibility
  • Prices
  • Genre
  • Age Rating
  • Multiplayer
  • Technical Features
  • Supported Language

For the desktop version of Browse All Games page, any filters you add will be instantly applied to the listing. For the mobile version, you need to tap the See Results options to apply to filters.

How to change controls in Street Fighter 6

While Street Fighter 6 features a new modernized button layout, you are able to change to a different control type as well as manually map your own actions. To find out how to do so, you can take a look at this article from Seeking Tech.

1. For the first step, you need to go to the main menu of the game if you aren’t there already. Otherwise, you won’t be able to switch the button layout from the pause menu during the middle of a match.

2. While in the main menu, you need to open the Multi Menu, which can be done by pressing the Options button on the DualSense/DualShock 4 or Menu button on the Xbox controller.

3. From the Multi Menu, you need to select Options.

4. Inside of the Options menu, you need to switch over to the Controls tab.

On consoles, you can do so by pressing the R1 button if you are playing on PS4/PS5 or RB button if you are playing on Xbox Series X/S.

5. In the Controls tab, you can choose Player 1 Side Control Settings (Battle) if you want to change the button layout for the controller that is assigned to the Player 1 slot or Player 1 Side Control Settings (Battle) for the controller that is assigned to the Player 2 slot.

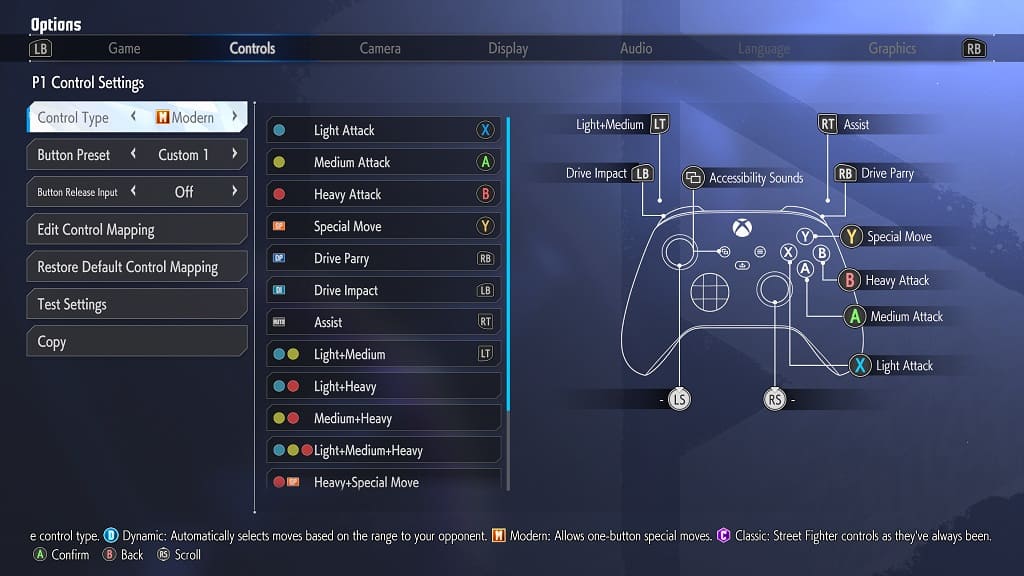
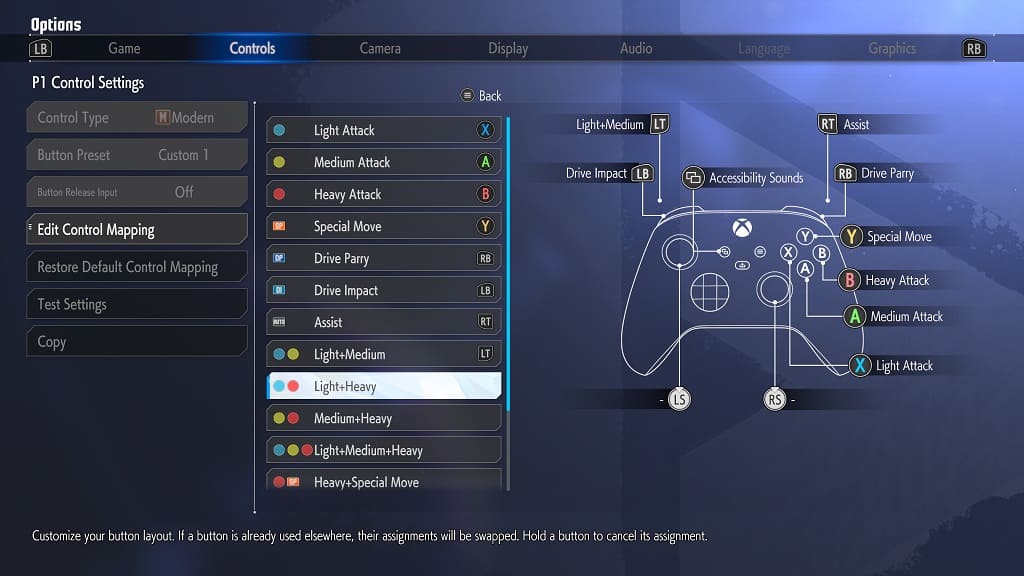
6. You should now be in the Control Settings screen. Here, you will be able to change between three Street Fighter 6 button layout presets. To find out more about these control types, you can take a look at this comparison.

7. You will also be able to manually change the button layout by selecting the Edit Control Mapping Option.

The number of actions that you can change depends on the control type. You can find a breakdown of the mappable options below:

Modern Control Type:

  • Light Attack
  • Medium Attack
  • Heavy Attack
  • Special Move
  • Dive Parry
  • Drive Impact
  • Assist
  • Light and Medium
  • Light and Heavy
  • Medium and Heavy
  • Light, Medium and Heavy
  • Taunt
  • Accessibility Sounds

Dynamic Control Type:

  • Light Attack
  • Medium Attack
  • Heavy Attack
  • Dive Impact
  • Dive Parry
  • Super Art
  • Normal Throw
  • Override Arts
  • Accessibility Sounds

Classic Control Type:

  • Light Punch
  • Medium Punch
  • Heavy Punch
  • Light Kick
  • Medium Kick
  • Heavy Kick
  • Light Punch and Light Kick
  • Medium Punch and Medium Kick
  • Heavy Punch and Heavy Kick
  • Light Punch and Medium Punch
  • Light Punch and Heavy Punch
  • Medium Punch and Heavy Punch
  • Light Punch, Medium Punch and Heavy Punch
  • Light Kick and Medium Kick
  • Light Kick and High Kick
  • Medium Kick and High Kick
  • Light Kick, Medium Kick and High Kick
  • Taunt
  • Simultaneous Input Assistance
  • Accessibility Sounds

8. To assign a button to a specific action, move the cursor down to the action you want and then press the button that you want to be assigned.

9. Once you are done making the change, you need to back out of the Edit Control Mapp section. This can be done by pressing the Options button on PlayStation or Menu button on Xbox.

10. When asked if you want to save your changes, select Yes to apply the new button layout.

11. The changes you make will be applied to the Custom 1 Button Prest profile. You can create up to 5 custom profiles for every control type.

How to fix ‘can’t use the USB extended storage drive’ error on PS5

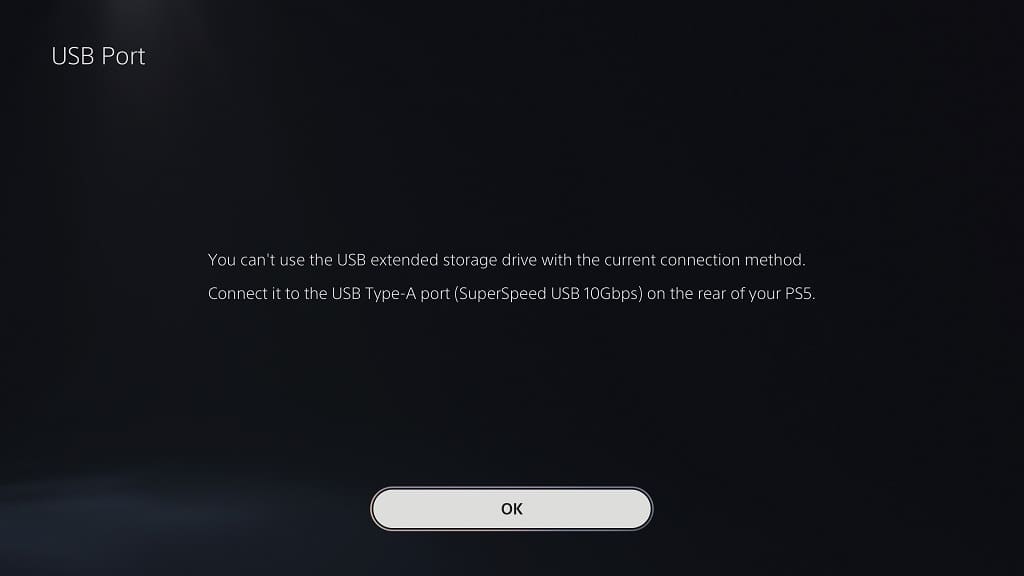
When you try to connect an external USB drive to your PlayStation 5, you may encounter the following error:

  • “You can’t use the USB extended storage drive with the current connection method. Connect it to the USB Type-A port (SuperSpeed USB 10 Gbps).”

To see how you can fix this issue, you can take a look at this troubleshooting article from Seeking Tech.

Why you are seeing this error

This error message will appear when you try to connect the USB Extended Storage Drive to the front-side USB port. The one on the front of both the PlayStation 5 and PlayStation 5 Digital Edition is USB 2.0, which has a maximum limit of 480 Mbit/s.

While this bandwidth is good enough for recharging your DualSense controller and transferring small files to a thumb drive, it is not fast enough to move bigger game data files or directly play PS4 games from the external drive.

How to fix the ‘USB extended storage drive with the current connection method’ error

In order to fix this external storage drive problem, you need to take the following steps:

1. If your PlayStation 5 or PlayStation 5 Digital Edition console is turned on, then you need to turn it off.

You can do so by pressing the PS logo button on the controller, selecting the Power option located at the bottom menu and then selecting the Turn Off PS5 option.

By turning off the system, you will prevent any potential damage to your USB storage drive. If you try to unplug the external drive while the PS5 is still powered on, then you could cause data corruption and even hardware failure.

2. With the console shut down, wait until your external drive stops spinning. If the drive has a power button, then you should make sure that you turn it off.

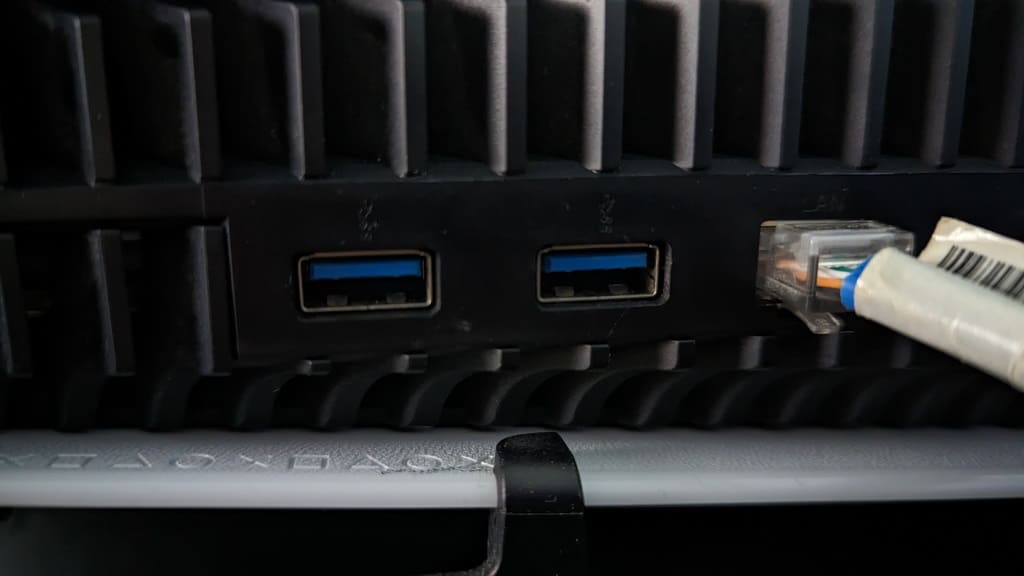
3. Next, you need to plug in the USB drive to any of the two USB ports located on the back of your console.

If you have a hard time finding them, they should have the two blue connectors.

These two ports are USB 3.0, which means that they can support transfer speeds of up to 10Gbps.

4. With the external drive connected, you can then turn back on your PS5.

5. If your USB drive uses an external power source, then you may need to manually turn it on as well.

6. The PlayStation 5 or PlayStation 5 Digital Edition should now be able to detect the USB Storage Drive.

How to fix WD MyPassport PS5 issues

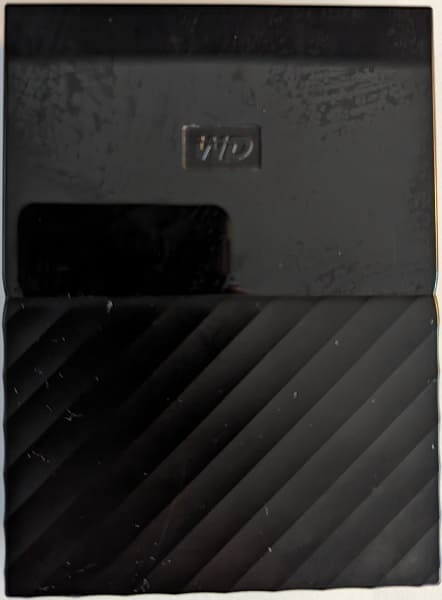
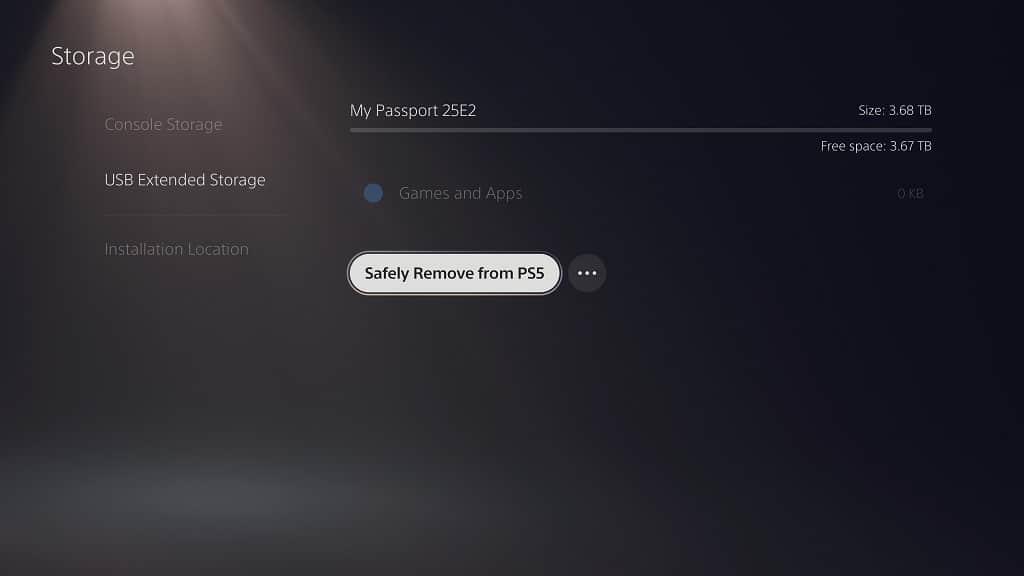
When trying to use the Western Digital MyPassport portable external hard drive on your PlayStation 5 or PlayStation 5 Digital Edition console, you may notice some issues. These may include the system not being able to detect the drive, your PS5 crashing, games freezing and more.

So, if the MyPassport does not appear to be working correctly on your PS5, then you can take a look at this troubleshooting article from Seeking Tech.

Is MyPassport compatible with PS5?

The WD MyPassport should be compatible with the PlayStation 5.

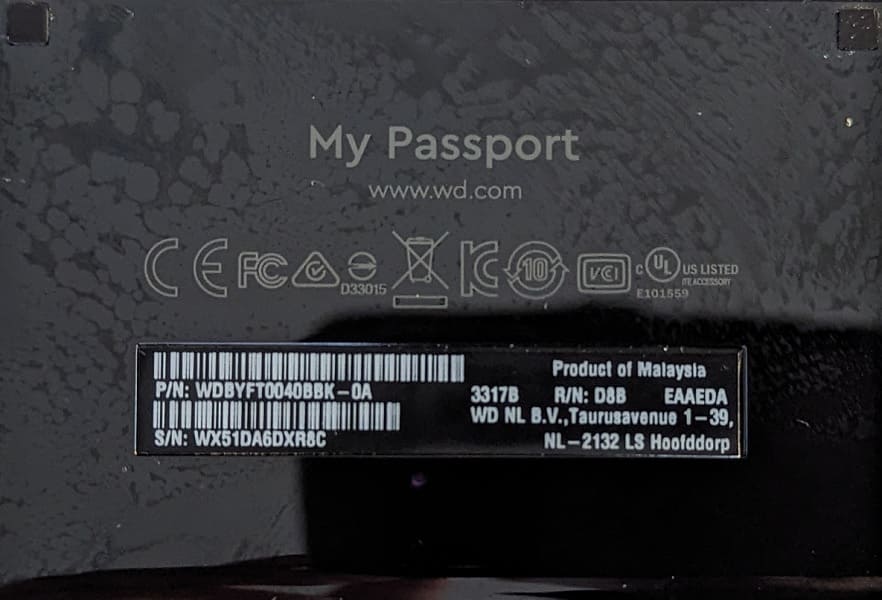
The older 2016 version, which we used, features a 5400 RPM speed.

On the other hand, the newer 2019 version is faster at 7200 RPM; as a result, you should get better load times.

Both of these should work as USB Extended Storage Drive for the PlayStation 5 and PlayStation 5 Digital Edition console.

How to fix MyPassport PS5 crashing issues

While these drives are compatible, they may cause your game or console to crash. To fix these stability problems, you can try doing the following:

1. If the external drive is causing the games to crash, then you can try turning off PlayStation 5.

If your console is completely frozen, then you can try pressing and holding the power button on the system until it shuts off. If that doesn’t work, then you can try unplugging the console from the power outlet.

2. Once the console has turned off, we recommend unplugging the MyPassport.

3. Next, turn back out your PS5. It may need to rebuild its database before it can boot up normally.

4. Once your console has boot back up, plug in your hard drive to see if it can run without any issue.

5. If the external drive works, then we recommend that you properly eject it in the future before turning off your PlayStation 5 or PlayStation 5 Digital Edition to prevent any potential problems.

6. If the PS4 game you are playing is still crashing when being played directly from the MyPassport, then you can try transferring it to the Console Storage to see if it can run more stable from there.

How to fix MyPassport PS5 detection issues

If your PS5 isn’t properly detecting your Western Digital hard drive, then you can try doing the following:

1. If you have been putting your console in rest mode, then you can try turning it off completely. Afterwards, turn the system back on to see if the USB hard drive can be detected.

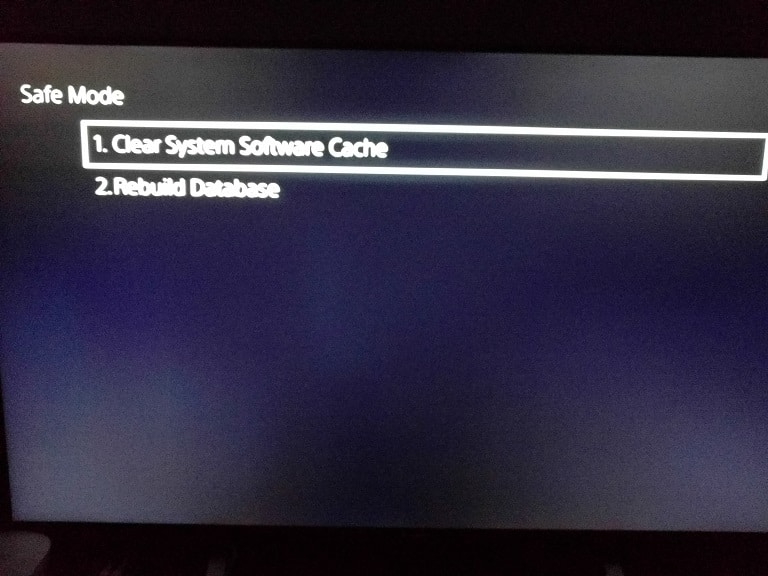
2. You can also try rebuilding the database of your PS5. In order to do so, you need to take the following steps:

  • Turn off your console.
  • Press and hold the power button on the PS5 until you hear a second beep.
  • Plug in your game controller and then press the PS button to go to the Safe Mode menu.
  • From there, select Clear Cache and Rebuild Database.
  • Finally, select Rebuild Database.

3. Reformatting the MyPassport on another device may help as well.

In order to do so, you can use a PlayStation 4 or PlayStation 4 Pro as these will format the drives to exFAT. Of course, you can also use a PC as well for the formatting.

4. If you decide to connect your hard drive to the PC, you can try updating the firmware of the MyPassport to see if doing so will improve its compatibility with the PlayStation 5.

5. Make sure that you have the latest system software installed for your PS5 as well.

6. If the external HDD also does not work on your PC or PS4, then there may be a general hardware issue. In this case, you can try to get it repaired or get a replacement.