How to find delete scenes and other extra content in the Disney Plus PS5 App

You are able to watch extra content in the official streaming application of Disney Plus on your PlayStation 5 or PlayStation 5 Digital Edition console. The content may include any of the following: 

  • Deleted scenes 
  • Extra scenes 
  • Behind-the-scenes footage
  • Interviews
  • Audio commentary 
  • Bonus Features 
  • Trailers 
  • Promo Videos 

Finding these extras can be somewhat confusing, however, if you aren’t familiar with navigating the menus of the Disney+ PS5 App. To see where you can locate these videos, you can take a look at this tutorial at Seeking Tech. 

1. For the first step, make sure you open the Disney Plus App on your PlayStation 5 if you haven’t done so previously.  

2. Inside the video streaming application, you then need to select the film or television series that you are interested in when it comes to watching its extras.  

Do not select a video from the Continue Watching section as doing so will send you right into the video. Instead, you need to select the same video in another section so that you will be sent to its product page. 

3. Once you reach the product page for the movie or TV show, you can press the down directional button or move the left analog stick downwards. 

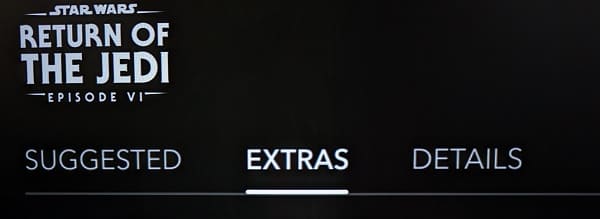
4. You should now be in the Suggested section of the product page. Here, you need to move to the right and then select the Extra section. 

5. After you finally arrived at the Extra section, you should see a list of bonus videos for the film or television show.  

If you are interested in watching one of these clips, then you need to select it in this section.

How to find 4K, HDR and IMAX Enhanced movies in the Disney Plus PS5 App

The Disney Plus streaming application on the PlayStation 5 and PlayStation 5 Digital Edition is capable of playing movies in the 4K Ultra HD, HDR10 and IMAX Enhanced formats. To see how you can locate these supported films, you can take a look at this tutorial from Seeking Tech. 

1. To start off, make sure you open Disney+ on your PS5 if you haven’t done so already.  

2. Inside of the application, press the circle button on the controller until you see a menu slide in from the left side of the screen.  

3. In the left column menu, you need to select Movies. 

4. After getting to the Movies menu, move the cursor up to the categories section and then scroll to the right.  

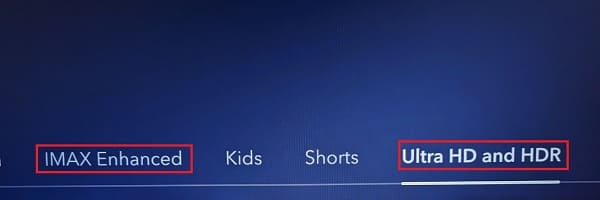
5. Among the listed categories should be IMAX Enhanced as well as Ultra HD and HDR. Here, you can select the category that you want to view. 

6. If you want to watch IMAX Enhanced, for instance, then you need to select IMAX Enhanced in the categories section and then select a movie from the subsequent listing.  

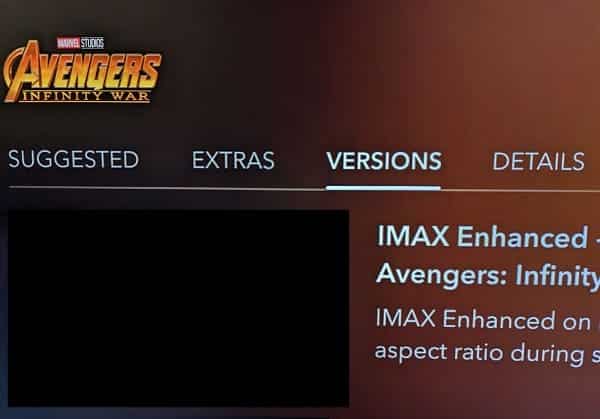
On the product page of the video, scroll down and then to the right so that you can select Versions. Finally, select the IMAX Enhanced video in the Versions category in order to play the movie in that format. 

7. If you want to watch a movie in 4K and/or HDR10, then you need to select the Ultra HD and HDR category in the Movies section of the Disney Plus App. 

Afterwards, select a film that you want to watch from the listing and then simply start playing the video.  

When it comes to 4K playback, you should make sure that the download speed of your PlayStation 5 reaches 25.0 Mbps at the minimum. Furthermore, the App Settings of the Disney Plus App should be set to Automatic.  

For HDR10 playback, you should make sure that you enable HDR on your PlayStation 5 as well as calibrate the HDR brightness output on the console.

You can do so by pressing and holding the PS button on the controller to open the home menu. Afterwards, select the gear icon on the top right side to head into Settings. From there, select Screen and Video > Video Output. You should then be able to turn on HDR as well as adjust the HDR brightness level.  

How to fix Disney Plus PS5 App error code 83

When using the official Disney Plus streaming application on your PlayStation 5 or PlayStation 5 Digital Edition console, you may encounter error code 83. You can check out this troubleshooting article from Seeking Tech. 

1. Error code 83 indicates that there is either a compatibility or internet connection issue with the Disney Plus App. 

So, for the first potential fix, we recommend that you restart your PS5 as doing so will accomplish the following: 

  • Refresh the internet connection of the console. 
  • Re-connect to the Disney Plus App. 
  • Clear out any temporary bugs that may have been causing the error 83 code.  

To restart, press the PS button and then select the Power option at the bottom-side menu. Afterwards, select Restart PS5 from the small window menu. 

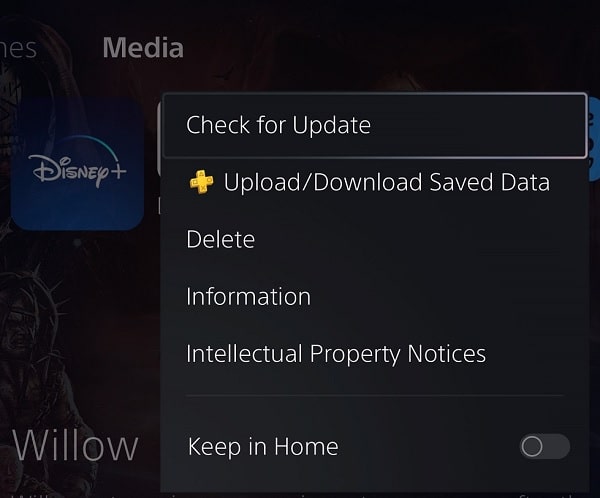
2. If a restart did not help, then you can try checking to see if there is a new update available for the Disney Plus PS5 App as a patch may improve its stability when running on the game console. 

In order to do so, move the cursor over to the Disney+ icon in the Media tab of the PS5’s home screen menu. In the pop-up menu, you can then select the Check for Update option. 

3. You can also try clearing your system cache by doing the following: 

  • Turn off your PS5 completely. 
  • Next, you need to press and hold the power button on the console until you hear a second beep. 
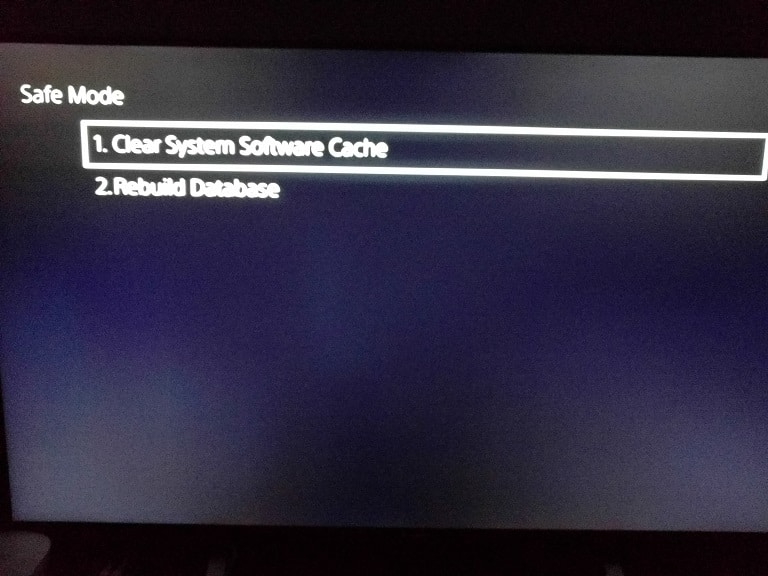
  • If done correctly, a screen should show up asking you to connect the controller to one of the USB ports of the PS5 and then press the PS button. So, make sure you do so in order to open the Safe Mode menu. 
  • In the Safe Mode menu, select “Clear Cache and Rebuild Database.” 
  • You then need to select “Clear System Software Cache.” 

4. Power cycling your home network may also be helpful if this issue is related to your internet connection. In order to do so, you can try taking the following steps: 

  • Turn off your PS5 console if you have it turned on. 
  • You should also turn off your modem and router(s). 
  • Next, you have to wait for a minimum of 2 minutes. 
  • After waiting, turn back on your modem and router(s). 
  • Wait for the home network to go back online again. 
  • You should then turn back on your PS5. 
  • Open the Disney+ App to see if you are still getting the same error code. 

5. If none of the potential fixes have worked so far in regards to the error 83 code, then you can try a fresh install of the Disney+ App. 

To do so, move the cursor over to the application’s icon on the home screen of your PlayStation 5 and then press the Options button. You then need to select Delete from the pop-up menu. 

Once the app has been deleted, download it again from the PlayStation Store. Afterwards, test out the application again to see if you are still getting the same error code.

What’s the difference between Wo Long: Fallen Dynasty Standard and Digital Deluxe Editions?

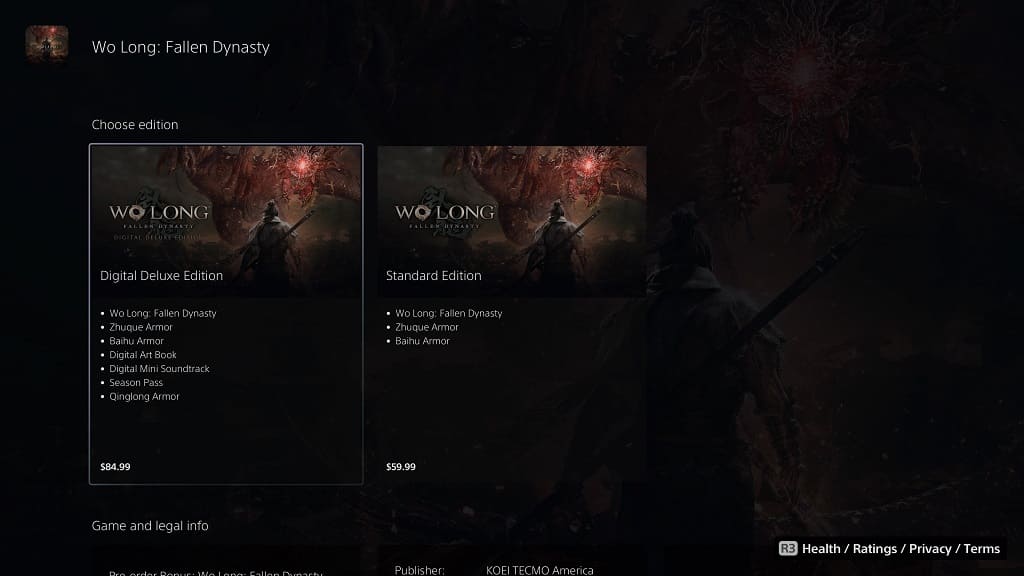
If you decide to purchase the upcoming Wo Long: Fallen Dynasty digitally, then you will be able to get either the Standard Edition or Digital Deluxe Edition. To find out what the major differences between these two options, you can take a look at this comparison article from Seeking Tech. 

Quick Summary 

Unlike the Standard Edition, the Wo Long: Fallen Digital Deluxe Edition comes with the season pass, which will grant you access to the Battle of Zhongyuan, Conqueror of Jiangdong and Upheaval in Jingxiang expansions along with the Qinglong Armor. Also exclusive to the Digital Deluxe Edition are the digital art book and digital mini soundtrack. 

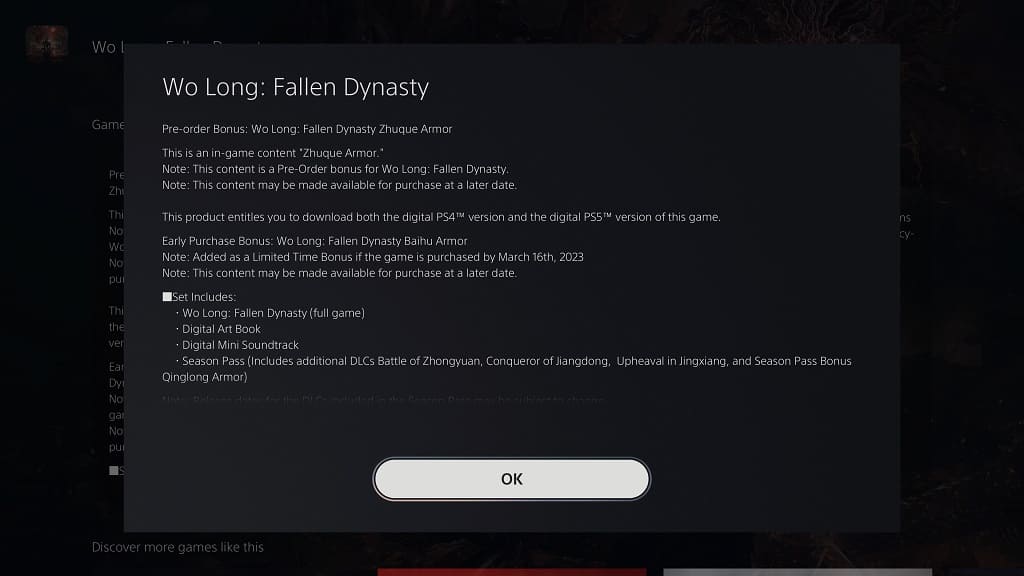
By pre-ordering either edition, you will get the Baihu Armor and Zhuque Armor. 

All of these in-game bonus content should most likely end up sold separately.  

Wo Long: Fallen Dynasty Standard Edition vs. Digital Deluxe Edition 

You can find our comparison chart between the Standard and Digital Deluxe Editions of Wo Long: Fallen Dynasty below:

Wo Long: Fallen Dynasty Standard EditionWo Long: Fallen Dynasty Digital Deluxe Edition
Base GameIncludedIncluded
Battle of Zhongyuan ExpansionNot IncludedIncluded
Conqueror of Jiangdong ExpansionNot IncludedIncluded
Upheaval in Jingxiang ExpansionNot IncludedIncluded
Qinglong ArmorNot IncludedIncluded
Baihu ArmorIncludedIncluded
Zhuque ArmorIncludedIncluded
Digital ArtbookNot IncludedIncluded
Digital Mini SoundtrackNot IncludedIncluded

Base Game 

Both editions come with the base game. For the uninformed, Wo Long: Fallen Dynasty is the latest new intellectual property developed by Team Ninja, a studio best known for Dead or Alive, Ninja Gaiden and Nioh. The upcoming title takes place during the Three Kingdoms period of Chinese History. 

Wo Long: Fallen Dynasty supports cross-buy on consoles. As a result, you will get both the PlayStation 4 and PlayStation 5 versions for the price of one on the PlayStation Store. On the Microsoft Store on Xbox, you will be entitled to both the Xbox One and Xbox Series X/S versions. 

Wo Long: Fallen Dynasty is coming out on March 2, 2023, in the U.S. region. 
Pre-Order Bonus Armors 

The Standard and Digital Deluxe Editions come with two in-game bonus items, with the Baihu Armor and Zhuque Armor, when you pre-order Wo Long. 
Season Pass  

Team Ninja plans to support their new game heavily post-launch with three major expansion packs. The first of which, titled Battle of Zhongyuan, is slated to arrive on June 2023. 

The second DLC pack, which has the name of Conqueror of Jiangdong, is scheduled to come out on September 2023. 

Finally, the third major release, Upheaval in Jingxiang, is expected to come out on December 2023. 

With the season pass, you will get all three of these expansions to go along with the Qinglong Armor. 
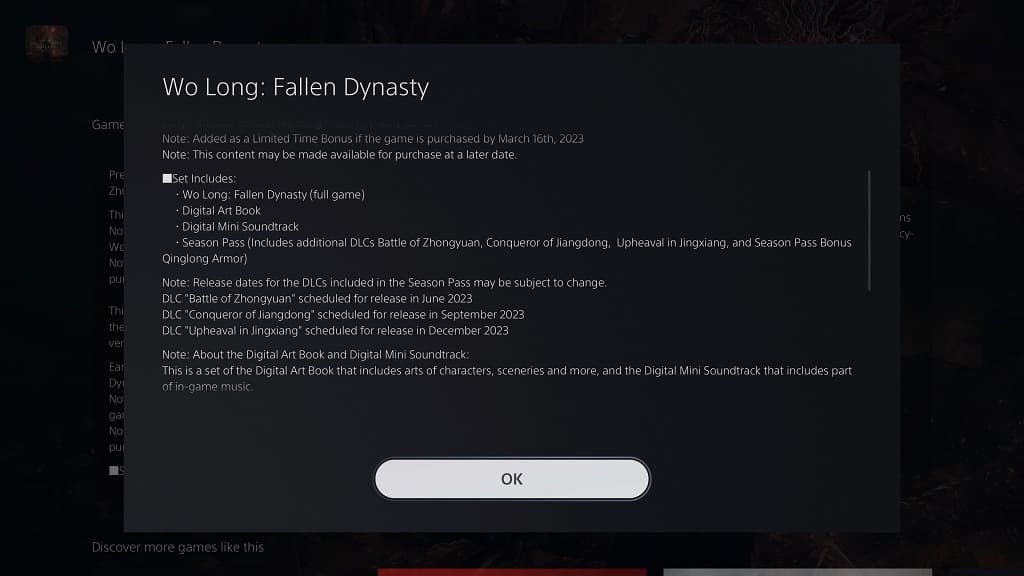
The Wo Long: Fallen Digital Deluxe Edition is the only one to come with this pass. If you are getting the standard edition, then you would need to buy the season pass, or any of these individual DLC releases, separately.  

Digital Bonuses 

With the Digital Deluxe Edition, you will also get a digital art book. Once downloaded, you are able to view artwork showing the characters, environments and more.  

The more expensive version also includes a digital mini soundtrack that features select songs from the game.  
How to turn off PS5 controller while watching Disney Plus

You can use the DualSense to control playback in the official Disney Plus application on your PlayStation 5 or PlayStation 5 Digital Edition console. By doing so, however, your controller may remain turned on even if you aren’t using it. This will cause the battery charge of the gamepad to drain. 

Fortunately, there are several ways that you can turn off the PS5 controller without pausing the Disney+ video. To find out how to do so, you can take a look at this tutorial from Seeking Tech.  

Using the Power Saving Feature 

If you don’t want to miss out on any of the action in the Disney Plus stream while turning off the DualSense, then you can use the power saving feature by taking the following steps: 

  • First off, you need to go to the Settings menu of your PlayStation 5. To do so, press and hold the PS button to open the home menu. From there, select the gear icon on the upper right corner.  
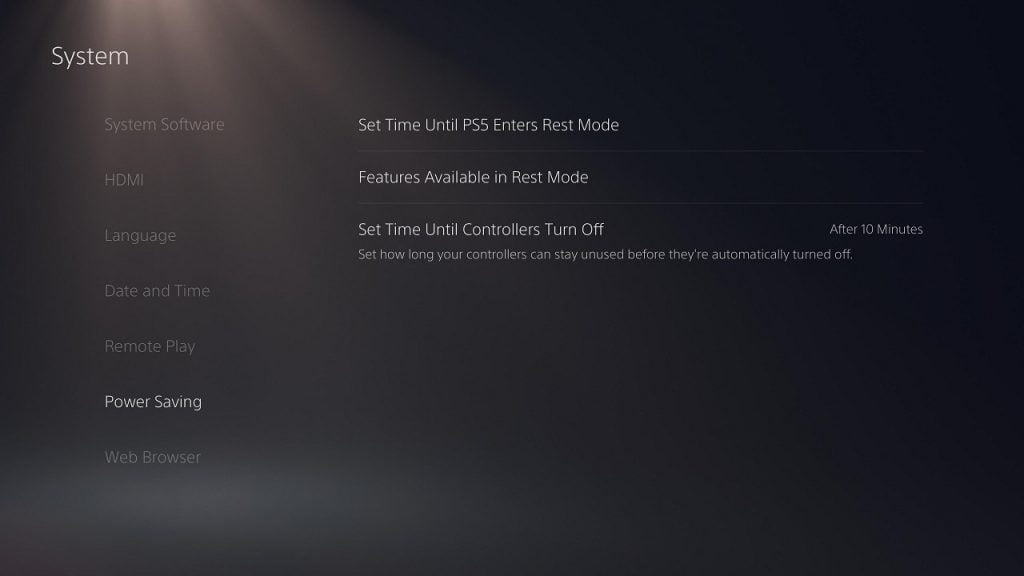
  • After getting to the Settings menu, you need to select System > Power Saving > Set Time Until Controllers Turn Off. In the pop-up menu, select the shortest duration, which should be After 10 Minutes. 

  • When the controllers turn off automatically, you should see a notification. If you don’t want to be distracted by this message, then you need to go back to the Settings menu of the PS5 and then select Notifications. From there, make sure that the Allow Pop-Up Notifications is disabled.  

Using the Control Center Menu 

If you don’t mind missing a few seconds of the Disney Plus video, then you can also use the Control Center Menu to quickly turn off the PS5 controller. You can do so by taking the following steps: 

  • While the video is currently playing press the PS button on the DualSense to bring up the Control Center. If done correctly, the video will still be playing in the background. 
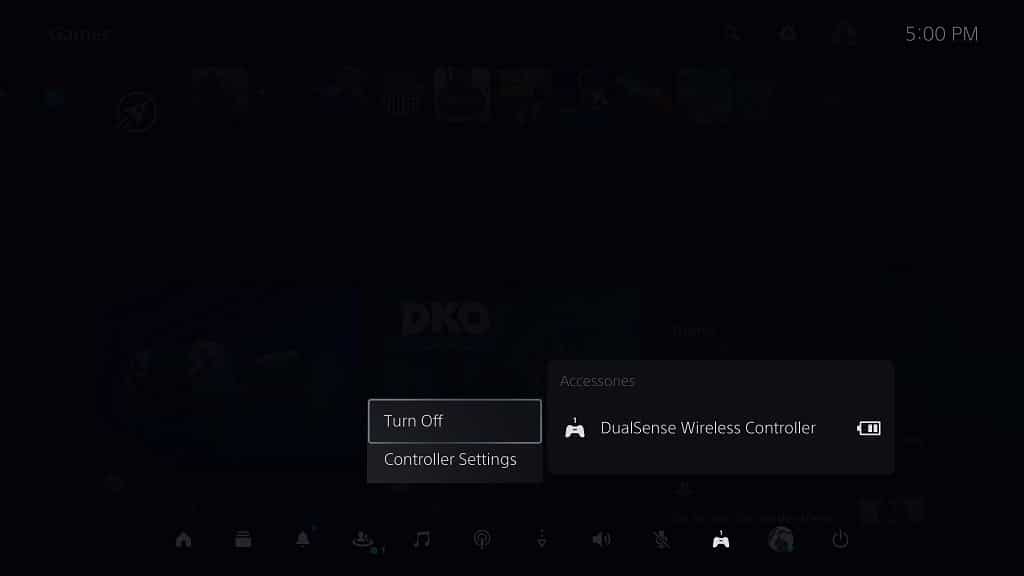
  • In the Control Center, move the cursor to the bottom menu and then select Accessories.  
  • From the small pop-up window, select the DualSense Wireless Controller. 
  • You can then select the Turn Off option. 

If you want to use the DualSense again after it has been turned off, then you need to press the PS button in order to power the gamepad back on. Afterwards, you should be able to use the PS5 controller again to control the Disney Plus App.

How to turn off the controller speaker in God of War Ragnarök 

When playing God of War Ragnarök on your PlayStation 4, PlayStation 4 Pro, PlayStation 5 or PlayStation 5 Digital Edition console, you may hear sound coming out of the controller’s speakers. You may find this to be too distracting and/or causing the battery life of your DualShock 4 or DualSense to drain faster than normal. 

If you want to turn off the controller sound in God of War Ragnarök, then you can check out this tutorial at Seeking Tech to see how you can properly do so. 

1. For the first step, turn on your game console and then boot up the game if you haven’t done so already. 

2. Next, you need to head over to the Settings menu. In order to do so from the start screen, you can simply select Settings from the list of available options. 

If you are currently inside of the actual game, then you need to press the Options button in order to pause the action and then bring up the Options menu. From there, you should be able to select Settings. 

3. From the Settings menu, you need to head over to Audio & Subtitles. 

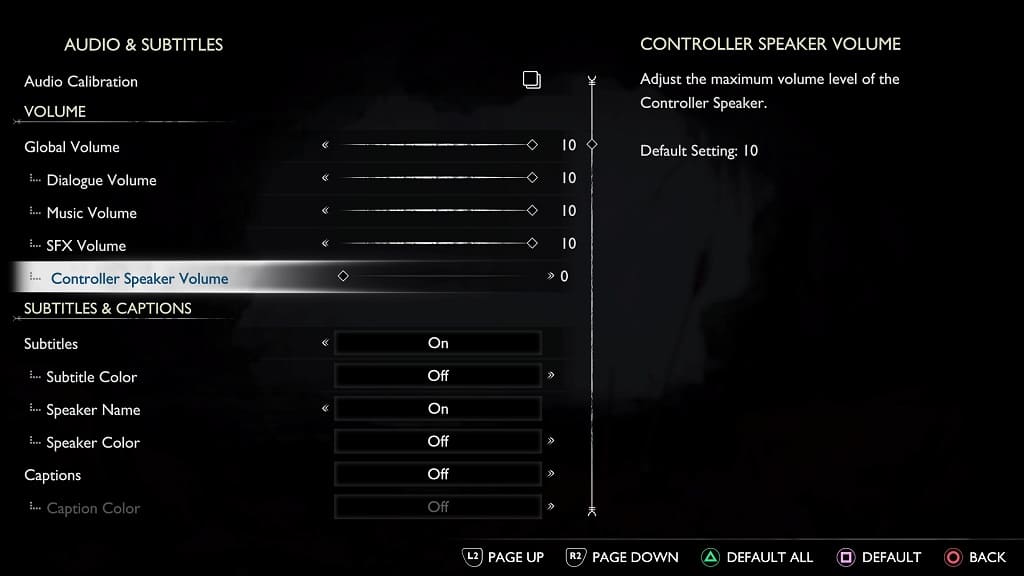
4. After getting to the Audio & Subtitles screen, you should find the Controller Speaker Volume slider located in the Volume section at the top. 

5. By default, the Controller Speaker Volume slider is set to a value of 10, which is the loudest for the built-in speaker of the DualShock 4 or DualSense.

In order to decrease the volume, you need to move the slider to the left. 

If you want to mute the controller sound altogether, you need to move this slider all the way to the left until you hit 0.

How to change audio language in God of War Ragnarök on PS5

God of War Ragnarök support multiple languages when it comes to spoken dialogue. Changing the audio language can be somewhat confusing, however. To find out how to do so on the PlayStation 5 and PlayStation 5 Digital Edition consoles, you can follow the steps laid out in this tutorial at Seeking Tech. 

Before we start, it should be noted that this guide is based on the digital version of the game that was bought from the U.S. PlayStation Store. 

1. If you are play God of War Ragnarök currently, then you need to close it.  

In order to do so, press and hold the PS button on the DualSense controller to open the home menu. From there, you need to move the cursor to the God of War Ragnarök icon and then press the Options button on the controller. 

In the pop-up window, you then need to select the Close Game option. 

2. Once the game has closed, move the cursor over to the God of War Ragnarök icon and then press the Options button on your DualSense again.  

3. In the pop-up menu, you then need to select Manage Game Content. 

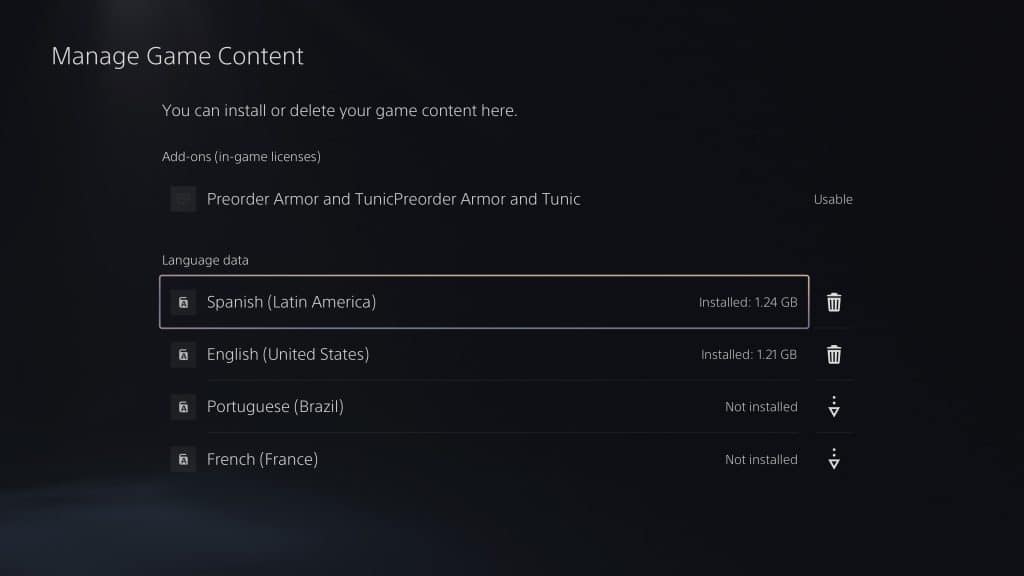
4. From the Manage Game Content for God of War Ragnarök, you should see the Language Data section. Here, you can select the language pack to download.  

In the U.S., the following languages are available to download: 

  • English (United States) 
  • Spanish (Latin America) 
  • Portuguese (Brazil) 
  • French (France) 

Keep in mind that the download and installation of these language packs can’t be completed unless the game is closed.  

5. Once you downloaded the audio language, boot God of War Ragnarök back up. 

6. In the start screen menu, you need to select Settings. 

7. From the Settings menu, select Language. 

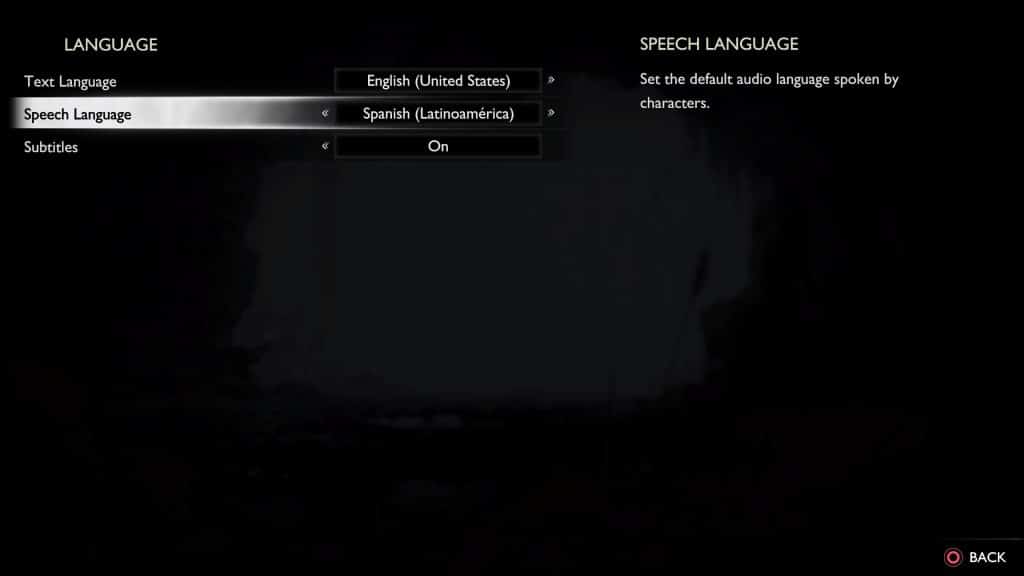
8. After getting to the Language menu, move the cursor over to Speech Language.  

9. You should be able to change the audio language with this setting.  

If the language you are trying to enable is greyed out, then you need to close the game and then make sure that you have the language pack downloaded and installed. 

10. In the same Language menu, you will also be able to change the text language, which does not require any additional downloads. You will be able to choose between the following: 

  • English (United States) 
  • Spanish (Latin America) 
  • Spanish (Spain) 
  • Portuguese (Brazil) 
  • Portuguese (Portugal)  
  • French (France) 
  • Italian  
  • Dutch 
  • Hungarian 
  • Polish 
  • Russian  
  • Turkish 
  • Thai 
  • Arabic 
  • Czech 
  • Croatian 
  • Traditional Chinese 
  • Simplified Chinese 
  • Korean 
  • Japanese 
  • German

How to enable and customize gyro aiming in God of War Ragnarök  

God of War Ragnarök supports gyro aiming as it uses the built-in accelerometer and gyroscope of the DualSense and DualShock 4. If you enable this feature, you will be able to use the motion of your controller to fine tune the aim with your weapon, giving you more accuracy.  

To see how you can turn on, as well as customize, gyro aiming in this PlayStation 4 and PlayStation 5 game, you can take a look at this tutorial from Seeking Tech.  

1. To start off, you need to head over to the Settings menu in God of War Ragnarök. 

In the start screen, all you have to do is select Settings. 

If you are actively playing the game, then you need to press the Options button during gameplay in order to open the Options menu. From there, you should be able to select Settings. 

2. Inside of the Settings menu, head over to Graphics & Camera. 

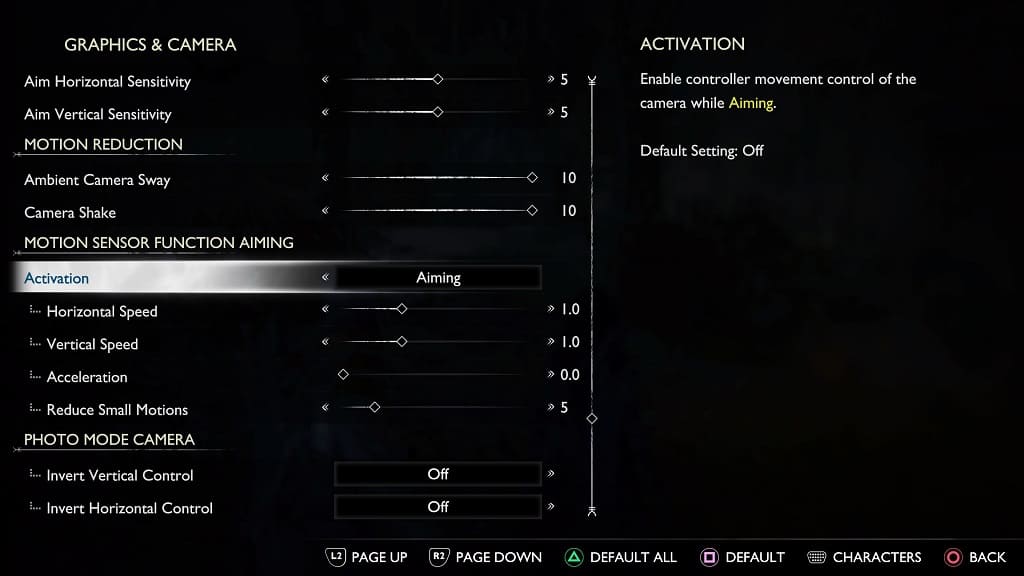
3. From the Graphics & Camera menu, scroll down until you reach the Motion Sensor Function Aiming section. 

4. Here, you need to set Activation to Aiming in order to use gyro aiming. 

5. Once you activated motion controls, you will be able to customize the following aspects: 

The Horizontal Speed slider will let you change the speed at which the aiming cursor will move on the horizontal axis. The default value is 1.0. You will be able to change it, in increments of 0.1, from a range of 0.1 to 3.0. 

The Vertical Speed slider will let you adjust the speed of the aim cursor on the vertical axis. This also has a default value of 1.0 as you will be able to adjust it, in increments of 0.1, from 0.1 at the minimum to 3.0 at the maximum. 

The Acceleration slider will let you determine the speed of the aiming cursor in relations to how fast you are moving your controller. So, if you move the controller at a slower rate, then the cursor will travel a shorter distance. If you move the controller at a faster rate, then the cursor will travel at longer distances. By default, this setting is disabled as it has a value of 0. You will be able to change it, in increments of 5, from 0 to 10. 

The Reduce Small Motions slider will let you adjust the amount of camera movement when you are using gyro aiming. This is used to prevent any accidental camera movement while aiming. The default value for this setting is 5 while you are able to adjust it, in increments of 1, from a minimum of 0 to a maximum of 30.

How to customize film grain and motion blur in PS5 version of God of War Ragnarök

The PlayStation 5 version of God of War Ragnarök features both film grain and motion blur. If you find that these visual effects to be too intense, then you are able to dial both down. You can even turn the two settings off completely if you like how they make the game look. 

To find out how to customize film grain and motion blur in this PS5 game, you can follow the steps laid out in this tutorial from Seeking Tech. 

1. To begin, you need to head over to the Settings menu of God of War Ragnarök. 

At the start screen, you can simply Settings from the list of available options to get there. 

If you are currently playing God of War Ragnarök, then you need to press the Options button (which is the small button with the three horizontal lines icon located at the top) on the DualSense controller in order to bring up the Options menu. From there, you need to select Settings from the left column. 

2. Once you arrived in the Settings menu, you need to select Graphics & Camera.  

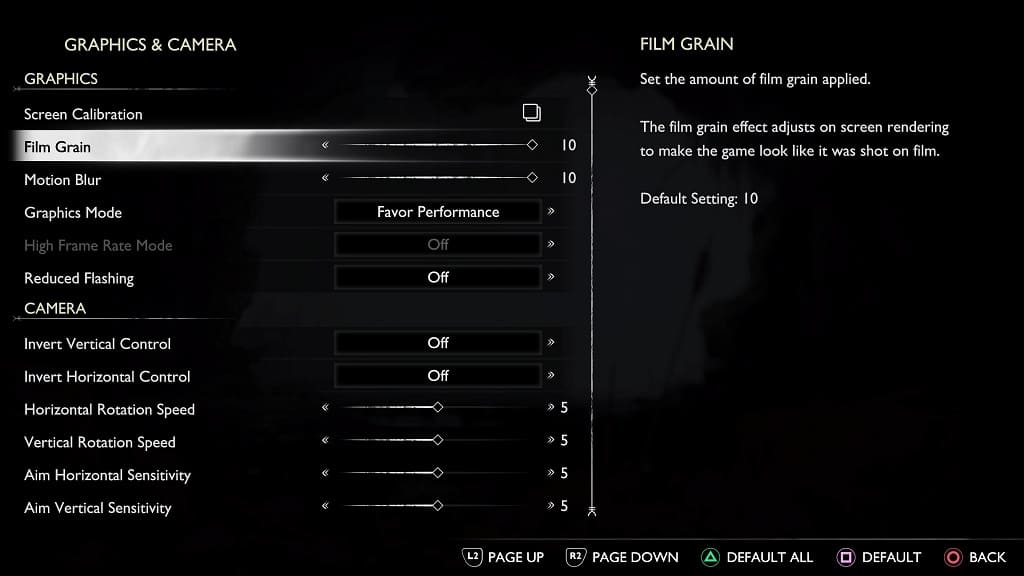
3. From the Graphics & Camera menu, make sure you are in the Graphics section, which should be at the top of the screen. 

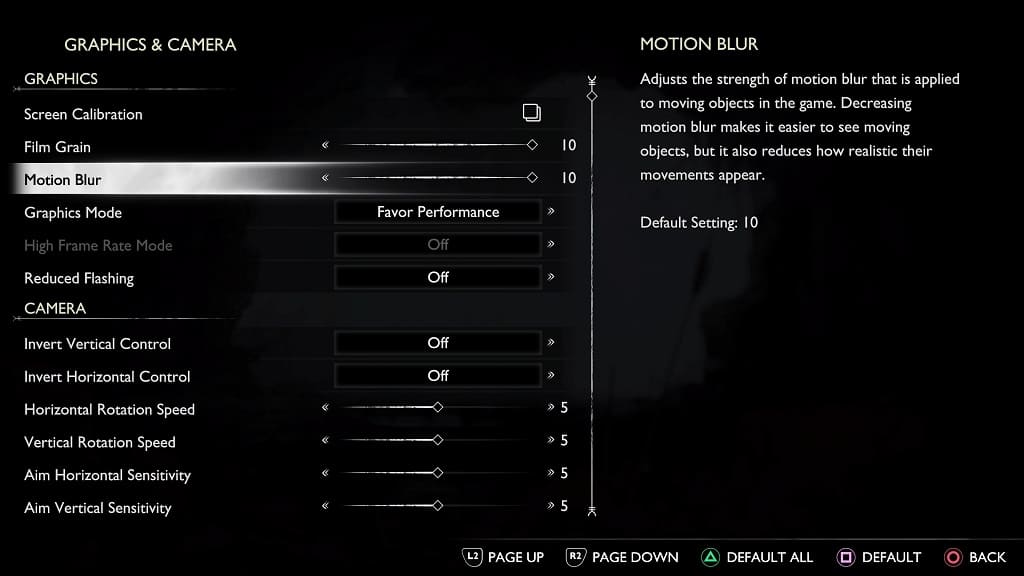
4. From there, you will be able to adjust the slide for Motion Blur and Film Grain to any of the following values: 

  • 9  
  • 10 

By default, both Motion Blur and Film Grain are set to 10. So, you need to lower the value in order to lessen these effects. We recommend lowering these settings and then test them out while playing God of War Ragnarök so that you can find a good balance between visibility and visual enhancements. 

If you don’t like the Motion Blur and/or Film Grain visual effects at all in this game, however, then you can simply set both values to 0 from this menu. 

For the uninformed, Film Grain makes the image quality noisier as the game tries to mimic the look of a movie. This could lead to less-than-sharp image.  

Motion Blur will add blur effects to moving objects, which can may some scenes hard to see. It is really noticeable when your spin the camera around the character.

How to turn off adaptive triggers and haptic feedback in One Piece Odyssey on PS5

The PlayStation 5 version of One Piece Odyssey supports adaptive triggers and haptic feedback. Adaptive triggers will tighten the resistance depending on certain actions while haptic feedback will provide contact sensitive vibrations.  

If you would rather disable these two features of the DualSense while you are playing this turn-based Japanese role-playing game, then you can take a look at this guide from Seeking Tech. 

Method #1

If you want to turn off adaptive triggers and/or haptic feedback for just One Piece Odyssey, then you need to take the following steps: 

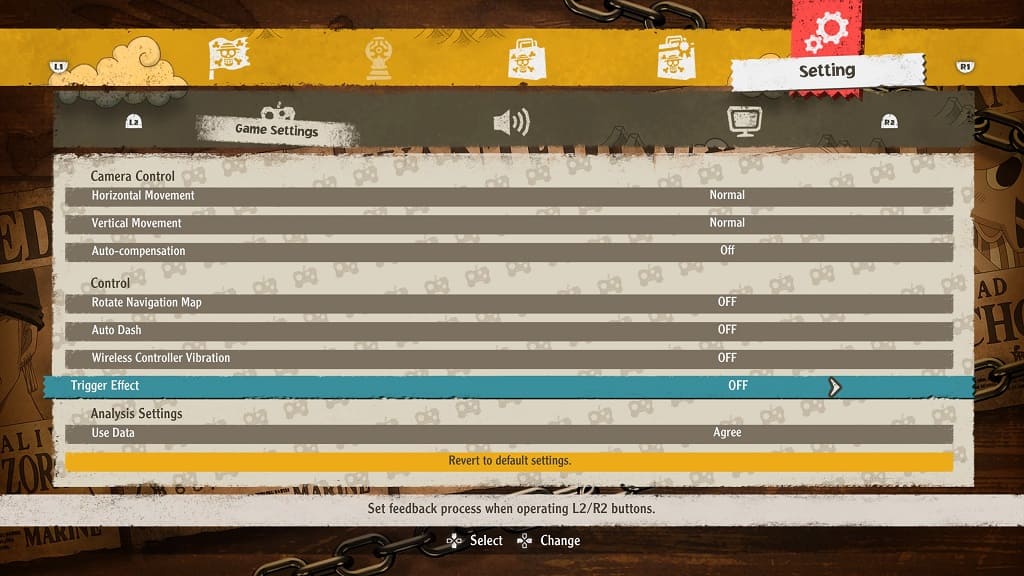
1. To start off, you need to head over to the Settings menu in the game.  

You can do so by pressing the R1 button until you get to Settings in the main menu.  

While you are playing game, you can also press the Options button to bring up the pause screen and then use the R1 button to switch tabs until your get to Settings.  

2. In the Settings menu, make sure you are in the Game Settings tab. You can use the L2 and R2 buttons to switch tabs.  

3. After getting to the Game Settings tab, scroll down to the Control section. 

4. From there, you should see the Wireless Controller Vibration and Trigger Effect settings. Make sure you set these to Off if you want to disable them. 

Method #2

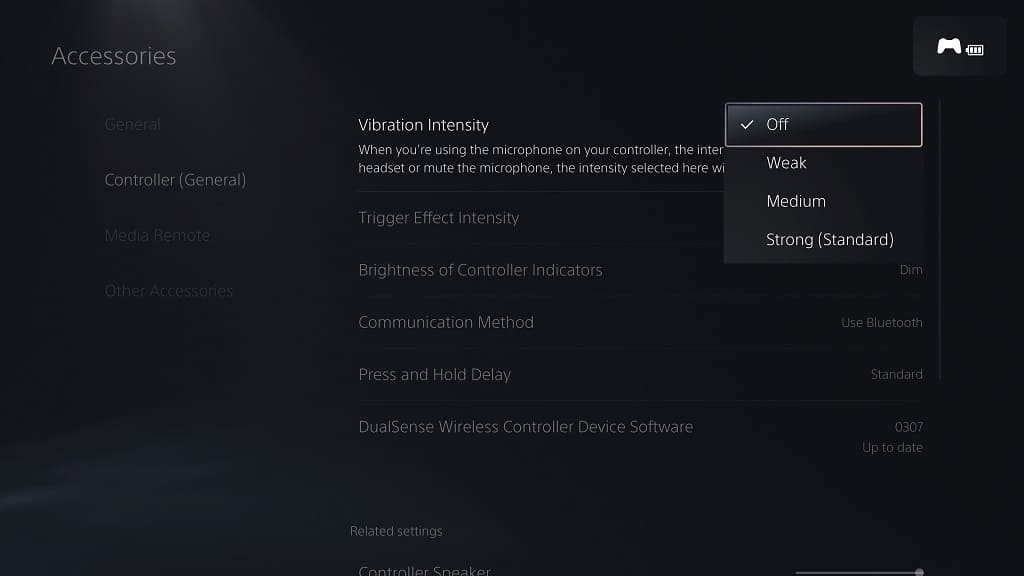
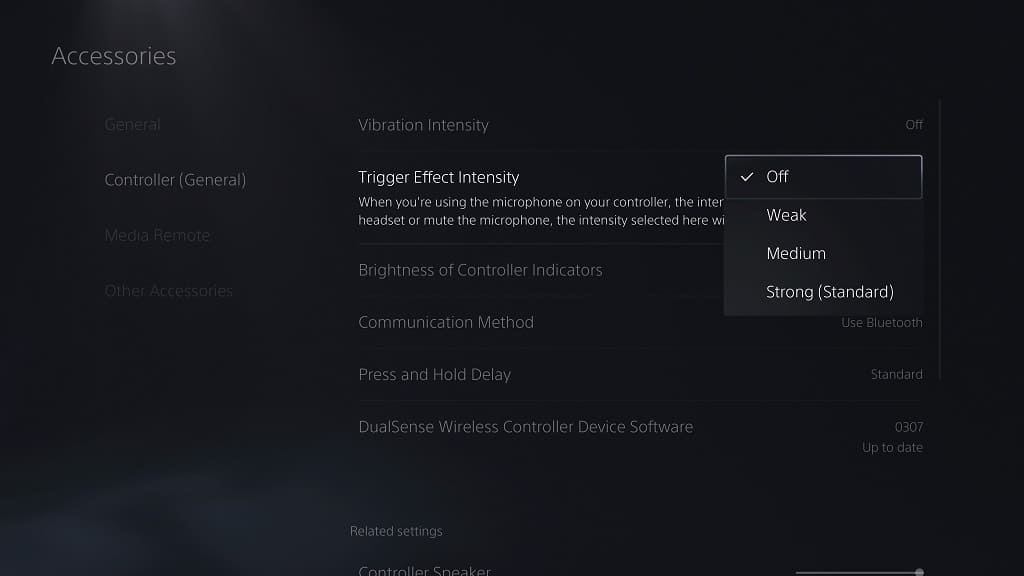
For the second method, you will be able to customize the intensity levels of adaptive triggers and haptic effects or turn both off complete on a system level by doing the following: 

1. To start off, head over to the home menu of your PlayStation 5 or PlayStation 5 Digital Edition. If you are currently playing One Piece Odyssey, then you can bring up the home screen by long pressing the PS button for 1 second. 

2. In home, you need go to the upper right corner and then select Settings. 

3. Inside of the Settings menu of your PS5, go down and then select Accessories. 

4. From the Accessories menu, select the Controller (General) option on the left column. 

5. On the right side of the same screen, you should see Vibration Intensity and Trigger Effect Intensity. You can change both of these settings to Strong, Medium, Weak or Off. 

6. Keep in mind that these system-level changes will be applied to not only One Piece Odyssey, but also all the other PS5 games as well.