How to turn off the PS5 without a screen

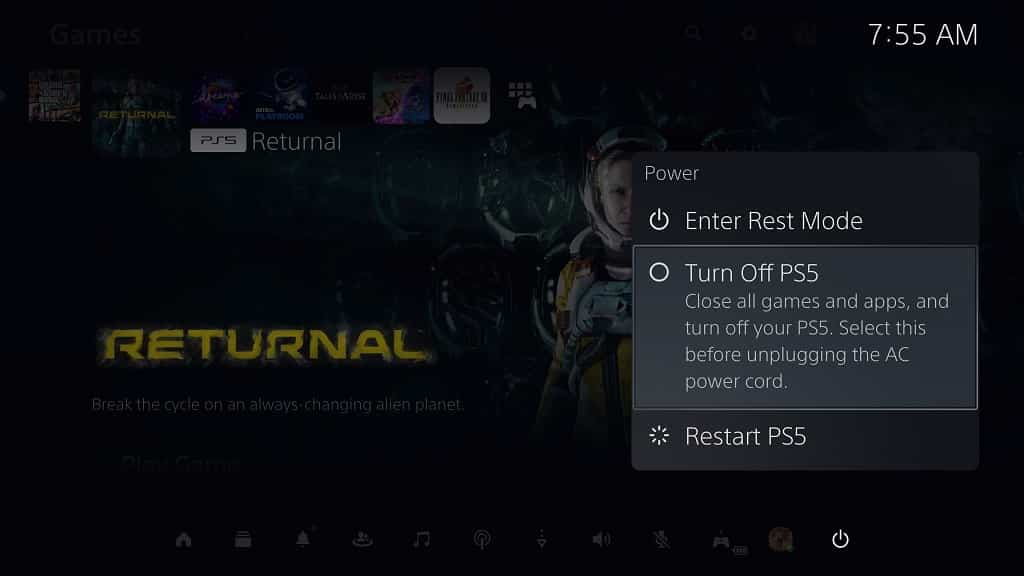
The most proper way to turn off your PlayStation 5 or PlayStation 5 Digital Edition game console is to first press the PS button in order to bring up Commander Center quick menu. From there, you need to select the power icon located on the right side of the bottom menu. In the pop-up Power menu, you then need to select the Turn Off PS5 option.

If your PS5 or PS5 Digital Edition console isn’t connected to a screen, or you are having problems trying to get a picture to show up, then there are still several ways that you can shut down your gaming system. To find out what these methods are, you can check out this tutorial from Seeking Tech.

Method #1

If you are currently nearby your PlayStation 5 or PlayStation 5 Digital Edition, then you can use the power button located directly on the console to turn off the console. In order to do so, you need to take the following steps:

1. First off, you need to locate the power button, which is placed on the front-side. It can be a little hard to see as it blends into the black color scheme.

If you have a regular PlayStation 5 system, which comes with a disc drive, then it is the bottom-most button if you have your console sitting vertically or the rightmost if you placed your console horizontally.

If you have the PlayStation 5 Digital Edition console, then the power button should be the only button located on the front-side.

2. Next, you need to press and hold the power button on your PS5 until you hear two beeps. By doing so, you will force your gaming console to turn off.

If you let go of the power button before you hear a second beep, then you will put the system in rest mode instead.

Method #2

For the second method, you can use the PlayStation Remote Play feature. If you have the PS Remote Play App on a smartphone, or mobile device, for example, then you can do the following:

1. Open the PS Remote Play App.

2. Sign into your PlayStation Network Account if you haven’t done so already.

3. Connect the application to your PlayStation 5 or PlayStation 5 Digital Edition console.

4. After the connection has been established, tap the PS logo icon, by doing so, you should be able to bring up the Command Center quick menu.

5. From the Command Center, navigate down to the bottom menu and then select the power icon that should be located all the way to the right side.

6. In the Power menu, you then need to select the Turn Off PS5 option.

7. Your PlayStation 5 or PlayStation 5 Digital Edition console should then shut down. This process will also disconnect the gaming system from the PS Remote Play App. After it disconnects, you can close the application on your smartphone or mobile device.
How to turn off the man or woman talking on PS5

When navigating the system menus of PlayStation 5 or PlayStation 5 Digital Edition console, you may hear a man’s or woman’s voice that is reading the texts that appear on the screen as well as explaining what action you can take.

If you find this to be annoying and, thus, would like to disable this accessibility feature, then you can take a look at this tutorial from Seeking Tech.

Why you hear a man or woman talking when you are using a PlayStation 5

The reason you hear a man or woman suddenly talking when you are using your PS5 or PS5 Digital Edition is due to the Screen Reader feature.

You or someone else who have accessed to your gaming system may have previously turned it on.

How to turn off the man’s or woman’s voice on PS5

If you want to stop the man or woman from talking when navigation through the system menus of your PlayStation 5, then you need to take the following steps:

1. To start off, make sure that your console is turned on.

2. Next, you need to get to the home screen. For the uninitiated, this is the main system menu where you can select which game to start.

If you are in another section at this moment, then you can press the PS button to bring up the Commander Center. From this quick menu, you can then select the house icon to head home.

Alternatively, you can also press and hold the PS button on your DualSense. After around 2 seconds, you should be brought back to the home screen.

3. In the home screen, press the triangle button on your controller to quickly navigate to the top right area. From there, select the gear icon, which should bring you to the Settings menu.

4. After getting to Settings, the first step you need to take is to head to Accessibility.

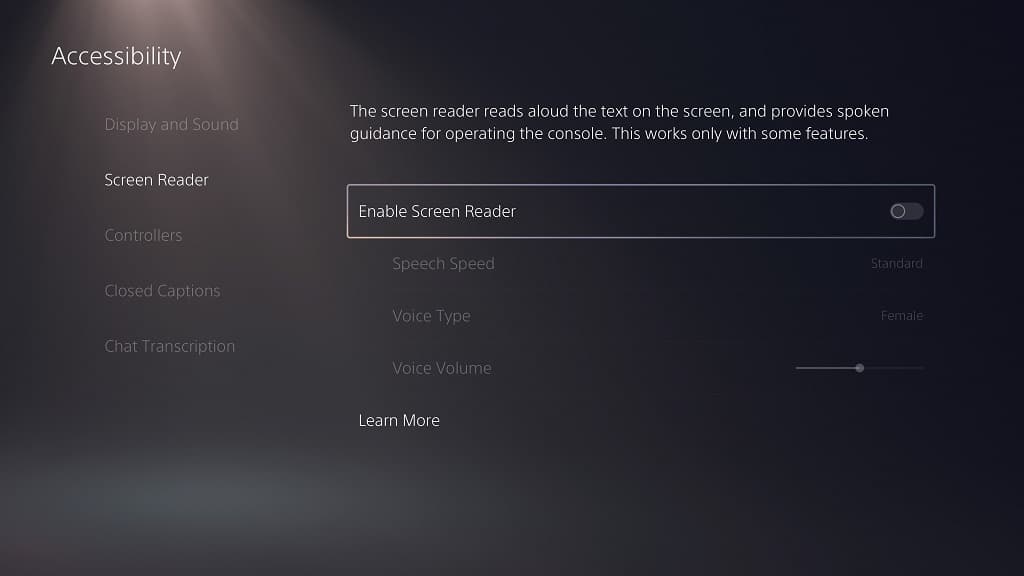
5. Inside of the Accessibility section, you need to select Screen Reader from the list of options available on the left column.

6. On the right side of the same screen, make sure that the Enable Screen Reader setting is disabled.

By turning off the Enable Screen Reader setting, you should no longer hear a man’s or woman’s voice when browsing through the system menus.

How to turn off zoom mode on PS5

With the PlayStation 5 and PlayStation 5 Digital Edition system, you can use the zoom mode to increase the text and image sizes that appear in the display area. If you would rather disable this feature, then you can take a look at this tutorial here at Seeking Tech to find out how to properly do so.

Method #1:

For the first method of disabling the zoom mode on your PS5 or PS5 Digital Edition console, you can try taking the following steps:

1. To start off, you need to press the PS button and square button on your DualSense game pad at the same time.

2. If done correctly, you should bring up the zoom overlay menu that says the following:

“Adjust the magnification and display area.”

3. With this zoom overlay menu on the screen, you can press the PS button and square button several times until the display area is brought back to the full screen.

Alternatively, you can press the circle button on the DualSense in order bring the display area back to the full screen.

Method #2:

If you want to completely disable the zoom mode on your PlayStation 5 and PlayStation 5 Digital Edition system, then you need to do the following:

1. To begin, make sure you are in the home screen (this is the main menu where you can select which game to start).

If you are in another area, then you can press and hold the PS button to bring up the home screen.

2. You then need to head over to the Settings menu on your PS5, which you can do by selecting the gear cog icon that appears on the upper right side of the home screen.

3. Inside of the Settings menu, you need to select Accessibility from the list of available options.

4. After arriving in the Accessibility menu, you first need to select the Display and Sound from the left column.

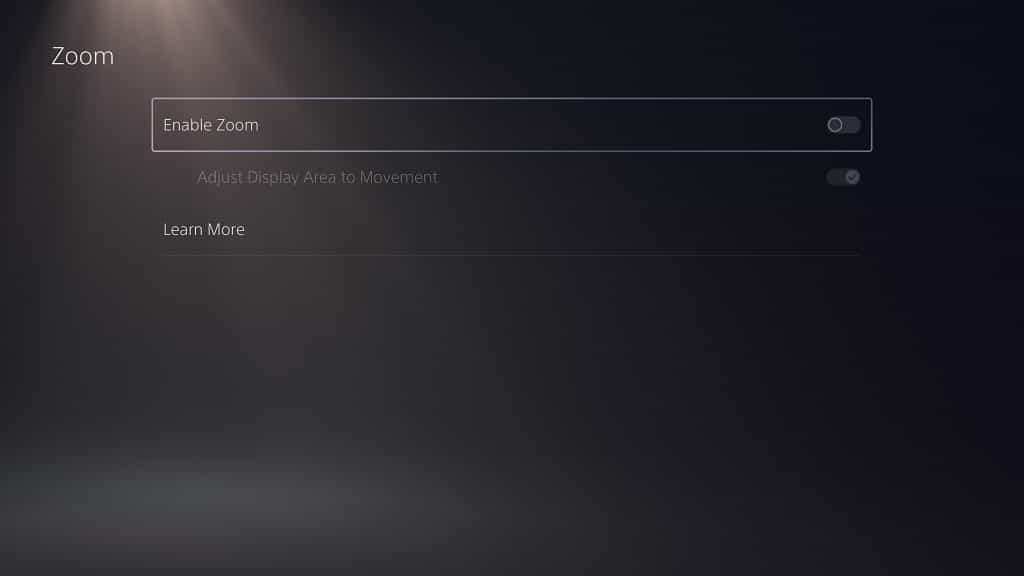
5. On the right side of the same screen, you then need to select Zoom

6. In the Zoom menu, you need to disable the Enable Zoom setting.

After disabling the Enable Zoom setting, the display area should be brought back to the full screen.

Furthermore, you can no longer enable the zoom overlay menu by pressing the PS button and square button at the same time. This should prevent you or someone else from accidentally zoom into the screen.

How to disable instant game response on PS5

If you want to disable the instant game response feature on your PlayStation 5 or PlayStation 5 Digital Edition system, then you can follow the steps in this tutorial at Seeking Tech.

What is instant game response on PS5?

By using instant game response, your television set will automatically switch over to its Game Mode or Game Optimizer Mode picture setting when it detects that you are playing a video game on your PlayStation 5 or PlayStation 5 Digital Edition console.

By using this mode, you should be able to play games with low input lag. On some television sets, this mode will also automatically enable the Variable Refresh Rate feature, which will make some PS5 games that have an unstable frame rate run smoother.

Instant game response is more commonly known as auto low latency mode.

Method #1:

One of the ways to turn off instant game response is by using the system menus on your television set. If you have a LG TV, for example, then you can try doing the following:

1. Press the gear icon on the remote controller.

2. Next, you need to select Picture.

3. From the Picture menu, you then need to select Additional Settings.

4. In the Additional Settings menu, you need to select Instant Game Response.

5. From the Instant Game Response menu, make sure you disable this feature on the HDMI port that is connect to your PlayStation 5 or PlayStation 5 Digital Edition system.

Depending on your LG model and/or firmware, the aforementioned menus may be placed at different locations.

Method #2:

You can also disable instant game response directly on your PS5 or PS5 Digital Edition system by doing the following:

1. First off, you need to be in the home screen. To get to this main system menu, you can press and hold the PS logo button on the DualSense game pad.

2. From the home screen, you then need to head into the Settings menu, which you can do by selecting the gear cog icon that can be found on the upper right corner of the screen.

3. In Settings, head over to Screen and Video.

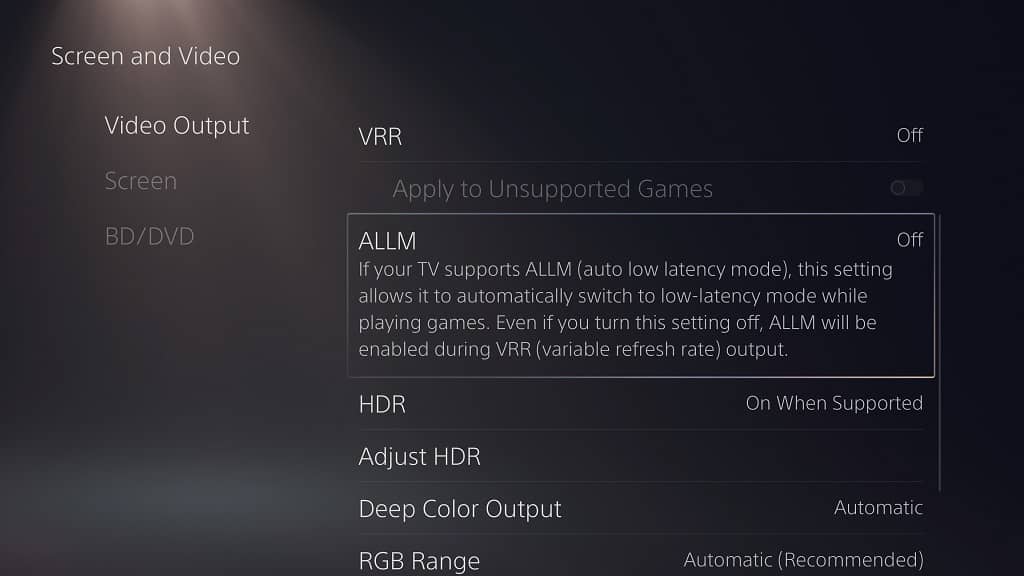
4. From the Screen and Video menu, you should first select the Video Output option located on the left side.

5. On the right side of the screen, select ALLM.

6. In the pop-up menu, you then need to set ALLM to Off.

How to view owned DLC on PS5

Finding the DLC that you purchased and/or downloaded from the PlayStation Store can be somewhat tricky on your PlayStation 5 or PlayStation 5 Digital Edition system.

To see how you can locate these downloadable add-ons, you can take a look at this tutorial from Seeking Tech.

How to view owned DLC from games that are installed on your PS5

If the game is installed on your PS5 or PS5 Digital Edition console, then you can view the DLC packs that you owned for it by taking the following steps:

1. To start off, make sure you turn on your PlayStation 5 if you haven’t done so already.

2. Next, you need to go to the home screen menu, which you can do by pressing and holding the PS button on your DualSense game pad.

3. In the home screen, make sure that you are in the Games section. You can switch between the Games and Media section with the L1 and R1 buttons on your controller.

4. In the Games section of the home screen, you need to hover over to the game in which you purchased DLC for.

If you can’t find the game in the home screen, then you need to select the Game Library card located all the way to the right. Inside the Game Library, make sure that you are in the Installed section (you can switch sections by using the L1 and R1 buttons). Afterwards, hover over to the game.

5. With the game highlighted, press the Options button (which is the small button with the three horizontal lines icon) on your DualSense.

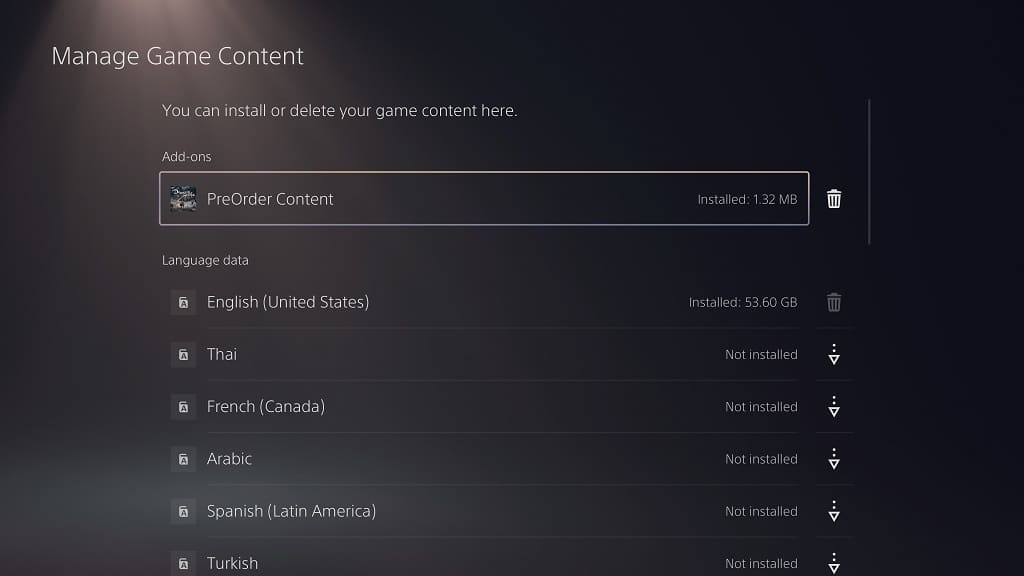
6. In the pop-up menu, you then need to select the Manage Game Content option.

7. You should be able to find all the owned downloadable content for the game in the Manage Game Content menu.

How to view owned DLC from games that aren’t installed on your PS5

Unfortunately, there is now easy way to view purchased DLC packs for a specific game if it isn’t installed on your PlayStation 5 or PlayStation 5 Digital Edition console. Instead, you can try looking at your transaction history by doing the following:

1. Turn on your PS5 and go to the home screen.

2. In the home screen, open the PlayStation Store App.

3. After getting to the PlayStation Store, select the three dots “More” icon, which should be located on the top right side of the screen.

4. From the pop-up menu, you then need to select Transaction History.

5. In the “Select an account” screen, you need to select the email that is tied to the DLC purchases you previously made. Once you made your selection, select the Continue option.

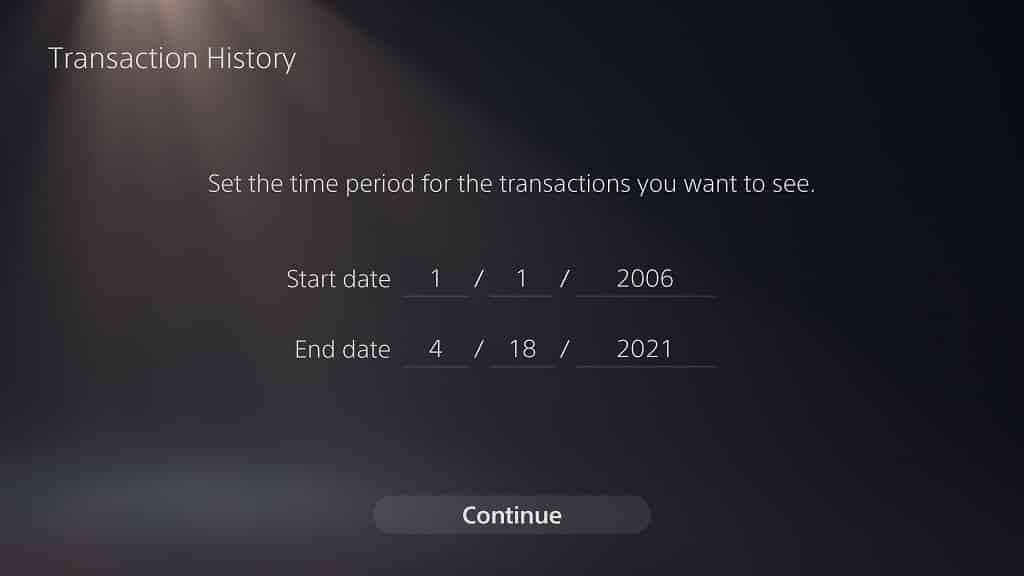
6. The next screen should say the following:

“Set the time period for the transactions you want to see.”

Here, you need to select the start date and end date for your transaction. Afterwards, you need to select Continue.

7. In the Transactions History menu, you should see a list of transactions you previously made. This list should include any DLC packs that you purchased and/or downloaded from the PlayStation Store.

How to properly eject USB storage from PS5

If you don’t properly eject the USB storage from your PlayStation 5 or PlayStation 5 Digital Edition, then you may end up potentially damaging the USB storage and/or game system.

To see how can correctly eject the USB storage drive, you can check out this tutorial from Seeking Tech.

How to properly eject the USB Extended Storage on PS5

In order to properly eject the USB Extended Storage from your PS5 or PS5 Digital Edition system, you need to take the following steps:

1. First off, make sure you close the game and/or application that you have currently opened or suspended.

2. Next, you need to go to the home screen.

To get there, you can press the PS button on the DualSense gamepad to bring up the quick menu, where you can then select the house icon. Alternatively, you can simply long press the PS button until the home screen shows up.

3. From the home screen, head over to the Settings menu, which you can do by selecting the gear icon found on the top right side.

4. Once you get to the Settings menu, you need to head over to the Storage section.

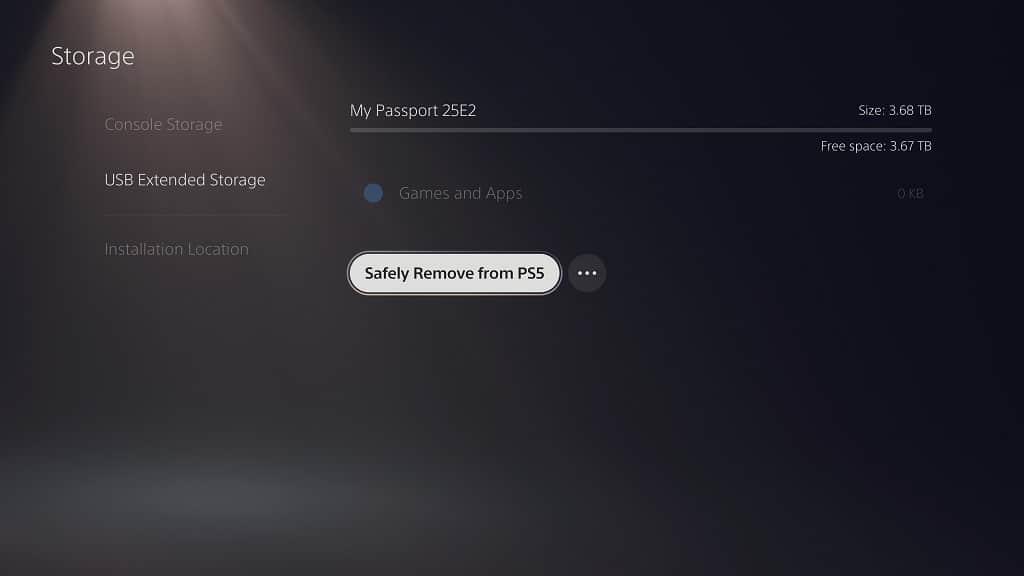
5. From the Storage section, you need to select USB Extended Storage from the left column.

6. On the right side of the same section, you then need to select the Safely Remove from PS5 option.

7. If you haven’t closed the game and/or app that you have currently opened or suspended, then you will see the following message:

“All games and apps in use will be closed. Do you want to continue?”

Select the Yes option.

8. Once the ejection process has been completed, you should see the following message:

“You’ve stopped using the USB extended storage drive. You can safely disconnect it now.”

Select the OK option.

9. You should now be able to disconnect the USB Extended Storage from the USB port of your PS5 without having to worry about any potential problems.

How to properly eject the USB storage that has not been formatted on PS5

If you have a USB storage device that has not been formatted as a USB Extended Storage for PlayStation 5, then you can try doing the following to safely eject it from the console:

1. To start off, make sure that you aren’t transferring any files into or away from the USB storage device. If you are, then make sure that the transfer process has been completed before moving on to the next step.

2. As an extra precaution, we also recommend that you close the game and/or app that you have currently opened or suspended.

3. Next, you need to turn off your PlayStation 5 or PlayStation 5 Digital Edition console.

In order to do so by using your DualSense controller, you need to first press the PS button. If done correctly, you should bring up the Commander Center quick menu, where you need to select the Power icon on the bottom right side. After opening the power menu, you then need to select the Turn Off PS5 option.

4. You should now be able to safely remove the non-formatted USB storage device from the USB port of your PlayStation 5.

How to view owned games on PS5

Finding a list of games that you owned can be somewhat cumbersome on your PlayStation 5 or PlayStation 5 Digital Edition console, especially if you aren’t familiar with navigating the system menus. You can follow the steps laid out in this tutorial at Seeking to see how you can view your purchased games.

1. To start off, make sure you power on your PS5 system if it isn’t been turned on already.

2. Next, you need to head over to the home screen, which is the main system where you can pick and choose which game to start playing.

If you are doing something else on the console at this moment, then you can press the PS button on your DualSense controller to open the Command Center quick menu and then select the house button located on the bottom left side of the screen to go home.

A simpler way to go back to the home screen is to press and hold the PS button on the controller.

3. From the home screen, make sure that you are in the Games tab. If you are in the Media tab instead, then you can switch over to Games by pressing the L1 button on the DualSense.

4. In the Games tab, select the Game Library card, which should be located all the way to the right.

5. Inside of the Game Library menu, press the R1 button on the controller to switch over to the Your Collection tab.

6. The Your Collection tab will show the following video games:

  • Purchased from the PlayStation Store
  • Played from the disc
  • Redeemed from the PlayStation Plus Essential monthly game service
  • Games played from the PlayStation Plus Extra, PlayStation Plus Deluxe and PlayStation Plus Premium subscription service

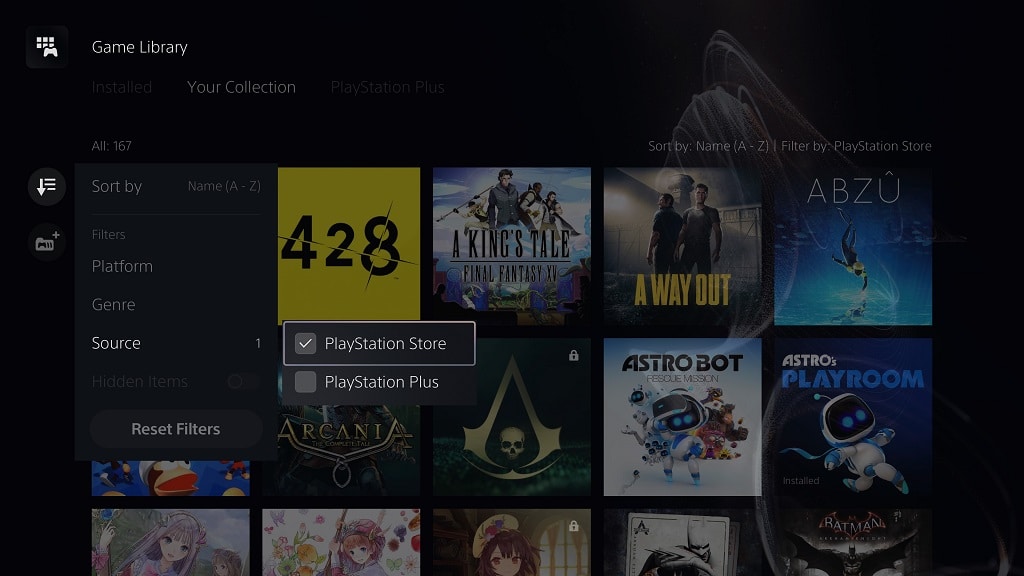
7. If you would like to filter the Your Collection list to only show games that you purchased from the PlayStation Store, then you need to first select the Sort and Filter option to the left of the list.

Afterwards, you need to select Source and then make sure that only the PlayStation Store box is checked.

By doing so, the Your Collection list will be filtered to only show games based on the following criteria:

  • Purchased from the PlayStation Store
  • Free-to-play games that were redeemed from the PlayStation Store
  • Games where you have downloaded DLC from the PlayStation Store

8. You can also use the Sort and Filter menu in order to sort the list based on the following:

  • Most Recent
  • Name (A to Z)
  • Name (Z to A)
  • Purchase Date (New to Old)
  • Purchase Date (Old to New)

Furthermore, you can also filter the list based on the PS3, PS4 and/or PS5 platforms in addition to game genre. If you hid any games from your Game Library, then you there is also an option in the Sort and Filter menu where you can choose to show these titles or not.

How to transfer screens and videos from PS5 to Android phone

You can transfer captured screenshots and videos from your PlayStation 5 or PlayStation 5 Digital Edition system to your Android smartphone.

To find out how to do so, you can follow this tutorial here at Seeking Tech.

1. To begin, use a USB cable to connect your Android phone to one of the USB ports on your PS5 or PS5 Digital Edition console.

2. On your phone, you then need to make sure you have the correct USB Preferences setting.

For this guide, we will be using the Google Pixel 6 phone, which is running on the Android 13 operating system. To change this setting, we did the following:

  • Open the Settings app on the phone.
  • From the Settings menu, tap the Connected Devices option.
  • After getting to the Connected Devices menu, tap USB. If you don’t see this option then make sure that your phone is connected to one of the USB ports on the PS5.
  • Once you get to the USB Preferences menu, make sure you select the File Transfer/Android Auto option underneath the “Use USB for” section.

3. On your PlayStation 5 or PlayStation 5 Digital Edition console, you need to head over to the home screen.

To go there, you can press the PS button on the DualSense controller and then select the house icon in the menu located at the bottom of the screen.

4. You should then go to Settings from the home menu, which you can do by selecting the gear icon that can be found on the top right corner.

5. Inside the Settings menu, you need to hade over to the Storage section.

6. In the Storage section, you first need to select the Console Storage option on the left column.

7. On the right side of the same section, you then need to select Media Gallery.

8. Once you get to the media gallery, you should see the captured screenshots and videos you have stored on the console storage.

Here, you can select a single screenshot or video. Alternatively, you can select the “Select Multiple” option on the right side if you want to transfer multiple media files at the same time.

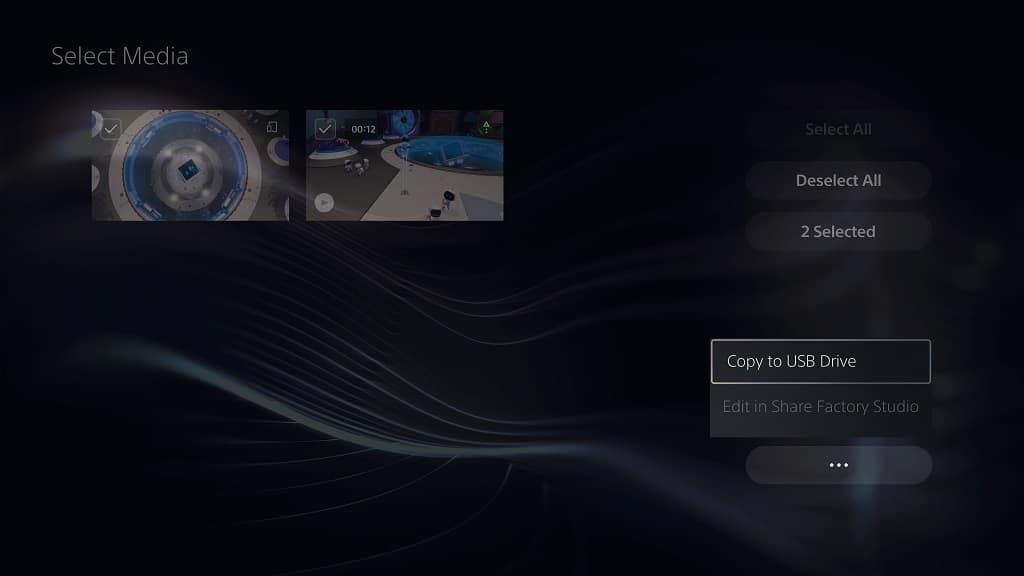
9. After selecting the media files that you want to transfer over to your Android phone, you then need to select the More/… option.

10. From the pop-up menu, you then need to select the Copy to USB Drive option.

11. You should then see a pop-up message. Here, you need to select the Copy option in order to start the transfer process.

How to change number of channels and speaker positions when using an AV amplifier on PS5

If you have an AV amplifier connected to your PlayStation 5 or PlayStation 5 Digital Edition console, then you can easily change the number of channels as well as adjust the speaker positionings from the system menus.

To find out how to do so, you can follow the steps laid out in this article from Seeking Tech.

How to change the number of channels for an AV amplifier on PS5

To change the number of channels you have on your AV amplifier on your PlayStation 5 or PlayStation 5 Digital Edition system, you need to take the following steps:

1. To start off, make sure that the AV amplifier is connected to your console if you haven’t done so already. You should also make sure that the speakers are properly set up as well.

2. Next, you should be in the home screen of your PS5. If you are somewhere else currently, then you can press and hold the PS button on the DualSense to quickly get back to the home screen.

3. From the home screen, you need to head over to the Settings menu, which you can do by selecting the gear icon located on the top right side.

4. Once you arrive in the Settings menu, you need to go to the Sound section.

5. In the Sound section, select Audio Output on the left column.

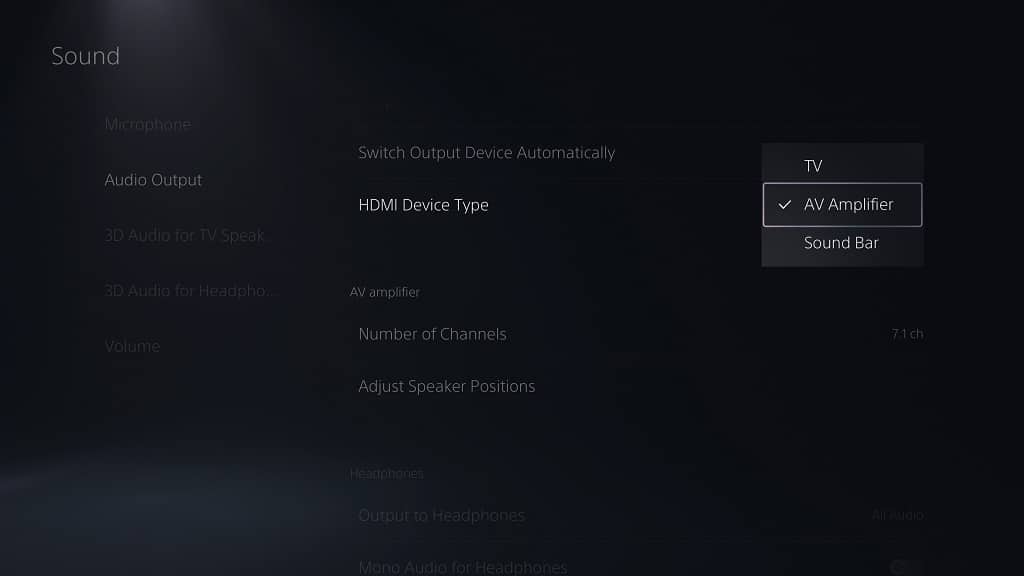
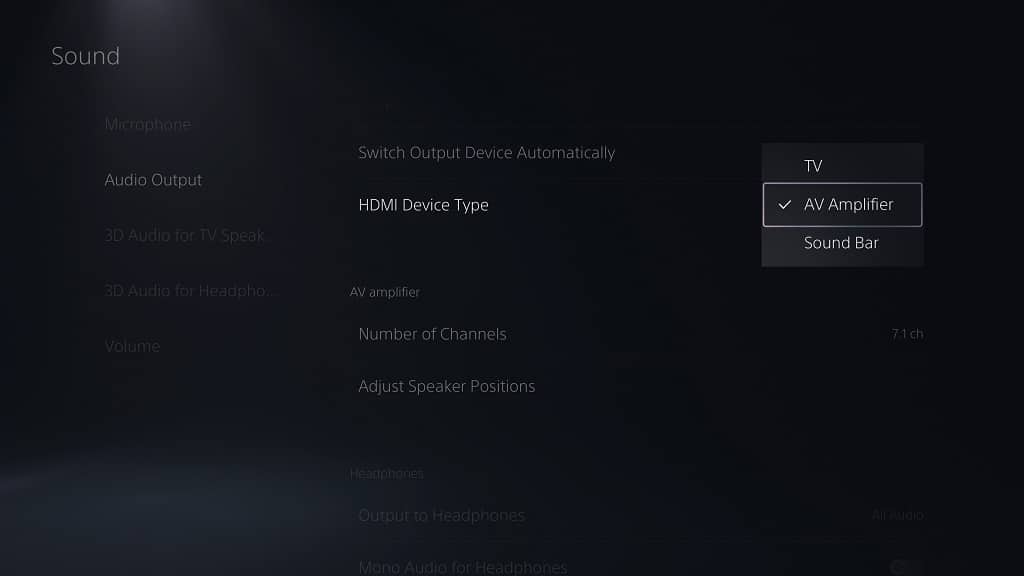
6. On the right side, make sure that the HDMI Device Type is set to AV Amplifier.

7. Afterwards, select the Number of Channels option.

8. In the pop-up menu, select the number of channels for your AV Amplifier. You should see the following options:

  • 2 ch
  • 5.1 ch
  • 7.1 ch

How to adjust the speaker positions when using an AV amplifier for PS5

In order to adjust the speaker positions when using an AV amplifier with your PS5 or PS5 Digital Edition console, you need to do the following:

1. Make sure that your AV amplifier is connected to the PS5 and then head to the Settings menu from the home menu on your PS5.

2. In Settings, you need to select Sound and then Audio Output.

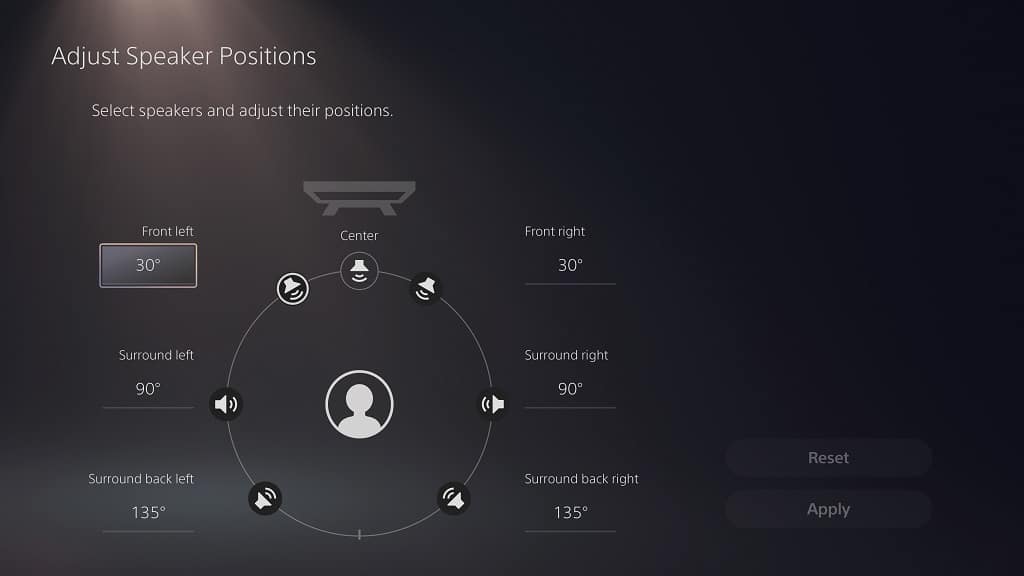
3. next, make sure that you set HDMI Device Type AV Amplifier and then the Adjust Speaker Positions.

4. In the Adjust Speaker Positions menu, you will be able the adjust the following angles:

2 ch AV Amplifier:

  • 5 degrees to 90 degrees for the front left speaker
  • 5 degrees to 90 degrees for the front right speaker

5.1 ch AV Amplifier:

  • 15 degrees to 45 degrees for the front left speaker
  • 15 degrees to 45 degrees for the front right speaker
  • 90 degrees to 150 degrees for the surround left speaker
  • 90 degrees to 150 degrees for the surround right speaker

7.1 ch AV Amplifier:

  • 15 degrees to 45 degrees for the front left speaker
  • 15 degrees to 45 degrees for the front right speaker
  • 80 degrees to 120 degrees for the surround left speaker
  • 80 degrees to 120 degrees for the surround right speaker
  • 120 degrees to 160 degrees for the surround back left speaker
  • 120 degrees to 160 degrees for the surround back right speaker

How to manually and automatically change the audio output device on PS5

If you have multiple audio listening devices connected to your PlayStation 5 or PlayStation 5 Digital Edition console, then you can take a look at this tutorial from Seeking Tech to see how you can manually and automatically switch the audio output source.

How to manually change the audio output device on PS5

In order to manually change the audio output device on your PS5 or PS5 Digital Edition system, you need to take the following steps:

1. Before anything else, make sure that the audio listening device you are trying to switch over to is already connected to your console.

2. Next, you need to go to the home screen menu of your PlayStation 5.

To get there quickly, you can long press the PS logo button located on the DualSense controller.

3. Now that you are in the home screen, navigate upwards and then to the right side. From there, you need to select the gear cog icon to get to Settings.

4. From the Settings menu, you then need to head over to Sound.

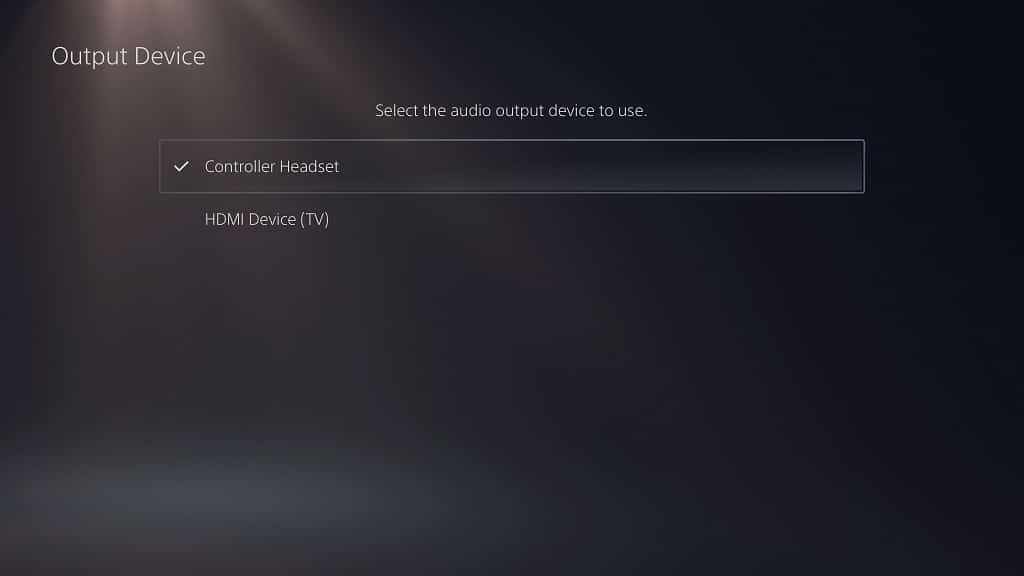
5. In the Sound section, you first need to select Audio Output on the left side and then Output Device on the right side.

6. After you get to the Output Device menu, you will be able to change the audio output device.

Keep in mind that only one output device can be selected when it comes to the PS5.

How to automatically change the audio output device on PS5

If you want the audio output to automatically switch to the listening device when it is connected to your PlayStation 5 or PlayStation 5 Digital Edition console, then you need to do the following:

1. From the home screen of your PS5, head into the Settings menu.

2. In Settings, make sure you select Sound.

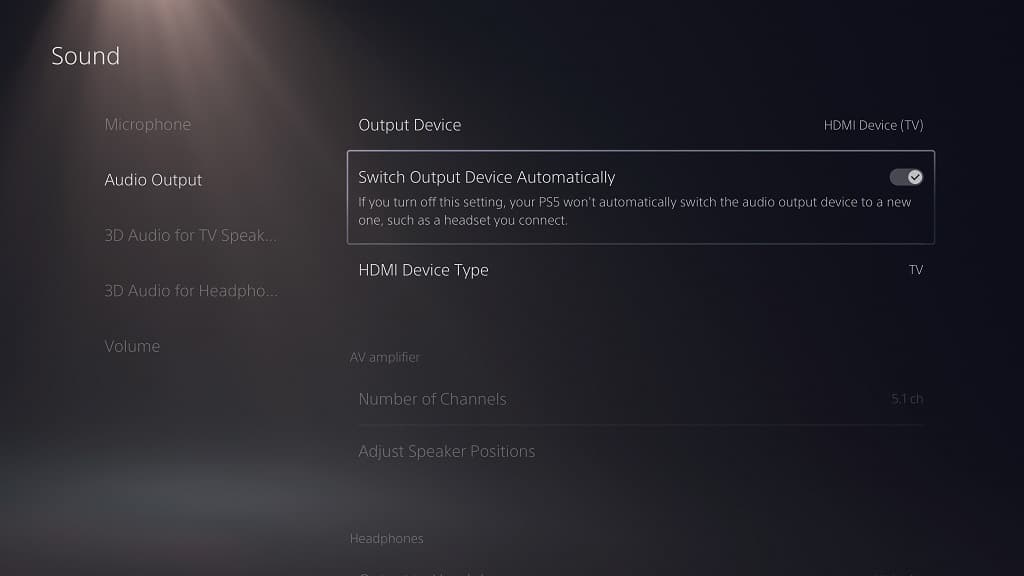
3. Inside the Sound menu, you need to select Audio Output from the left column.

4. On the right side of the same screen, make sure that the Switch Output Device Automatically setting is enabled.

By turning on this setting, your console should automatically switch over to the newest listening device when it is connected.

5. If you want to turn off this feature, then you need to go back to Settings > Sound > Audio Output. You then need to make sure that the Switch Output Device Automatically setting is disabled.