Sony LinkBuds S touch controls guide

You can use the touch controls of the Sony LinkBuds S to perform actions such as play/resume media playback, pause media playback, receive an incoming call, end an ongoing call, skip to the next track, skip to the previous track, enable Quick Attention mode, use voice assistance as well as switch between the Noise Cancellation and Ambient Sound modes.

You can check out this guide from Seeking Tech to see how you can properly use the touch control sensors for these wireless headphones.

How to play and pause media playback with the Sony LinkBuds S

In order to play audio or other types of media via the Sony LinkBuds S, you need to tap the right touch sensor.

To pause the audio or media playback, you need to tap the touch sensor located on the right ear bud.

How to skip to the next track with the LinkBuds S

If you want to skip to the next track on a playlist, then you need to double tap the right touch sensor.

How to skip to the previous track with the Sony LinkBuds S

If you want to go back to the beginning of the previous track of a playlist, then you need to triple tap the right touch sensor of the LinkBuds S.

How to switch between the LinkBuds S Noise Cancellation Mode and Ambient Sound Mode

With the Sony LinkBuds S, you can either use the Noise Cancellation Mode or Ambient Sound Mode.

To switch between the two modes, you need to tap the touch sensor located on the left ear bud.

How to turn off the LinkBuds S Quick Attention Mode

In order to enable the Quick Attention Mode of Sony LinkBuds S via touch controls, you need to tap and hold the left touch sensor.

How to receive an incoming call with the Sony LinkBuds S

If your Sony LinkBuds S is connected to a smartphone, then you can use the touch controls on the earphones to receive an incoming call.

In order to do so, you can double tap either the left touch sensor or right touch sensor.

How to end an ongoing call with the LinkBuds S

If you are done with a call, then you can end the session by double tapping either the left or right touch sensors of the Sony LinkBuds S.

How to activate Google or Siri voice assistance with the LinkBuds S

If you want to use the Google or Siri voice assistance feature via the Sony LinkBuds S, you need to tap and hold the touch sensor located on the right ear bud.

How to deactivate Google or Siri voice assistance with the Sony LinkBuds S

If you no longer want to use the Google or Siri voice assistance function, then you need to tap and hold the right touch sensor.

Keep in mind that you can customize touch controls of the wireless earphones via the official “Sony | Headphones Connect” app.

How to fix 2022 Roku Ultra (4802R) USB storage drive recognition issues

You can connect an USB storage device to your 2022 Roku Ultra, which has a model number of 4802R. However, the media player may not be able to recognize the connected USB device.

To see how you can potentially make your USB thumb drive, USB hard drive, USB solid state drive or another type of USB storage drive compatible with the 2022 version of the Roku Ultra, you can take a look at this article from Seeking Tech.

1. The first step you can take is to make sure that your USB storage device is using the correct file system.

In order to check, you will need to plug the drive into a computer or Mac. With it plugged in, right click on the drive’s icon and then select Properties if you are using a Windows PC or the “Get info” option if you are using a Mac.

Next, you should be able to see the file system of your USB drive. The 2022 Roku Ultra supports the following file system:

  • EXT2
  • EXT3
  • FAT16
  • HFS+
  • FAT32
  • NTFS

If your storage drive is using exFAT file system, then you need to change it on your PC or Mac. If you have any important files stored on the drive, then make sure you move these data somewhere else before changing the file system. Otherwise, they will be deleted.

2. You may get the following error message when trying to connect a USB storage drive to your 2022 Roku Ultra:

“The USB device requires more power. Use power adapter if available.”

If your storage drive comes with a power adapter, then make sure you plug it into a power outlet before you connect the drive to the media player.

If your storage drive doesn’t use a power adapter, then you need to make sure that it does to exceed the available current, which is 1170mA, of the 2022 Roku Ultra when it comes to the media player’s USB port.

3. If your USB drive don’t have a power adapter, you may still be able to use it for 2022 Roku Ultra via a powered USB hub.

The first method is to do the following:

  • Connect the USB hub to the 2022 Roku Ultra.
  • Turn on the USB hub.
  • Connect the USB storage device to the USB hub.

If the first method doesn’t work, then you can try the following method:

  • Connect the USB storage device to the USB hub.
  • Turn on the USB hub.
  • Wait for at least 10 seconds.
  • Connect the USB hub to the 2022 Roku Ultra.

4. If you are only using a non-powered USB hub that doesn’t include a power adapter, then you can try to connect USB storage device directly to the media player.

If that doesn’t work, then you can try remove the other devices that are connected to the USB hub to see if that will help.

5. If none of the aforementioned steps help when it comes to resolving the USD storage detection issues, then you may need to get a new USB drive that will be compatible with the 2022 version of the Roku Ultra.

How to properly clean the Sony LinkBuds S

The Sony LinkBuds S can get dirty easily, especially if you use it often. To see how you can properly clean these wireless headphones, as well as the included charging case, you can take a look at this guide from Seeking Tech.

What cleaning solution should you use for the Sony LinkBuds S?

When it comes to the type of cleaning solution you should use with the Sony LinkBuds S, we recommend getting a high-concentration isopropyl alcohol mixture as it will also act as a disinfectant. Furthermore, this mixture will also evaporate a lot quicker when compared to plain water, making it a lot less likely to cause any water damage.

If you are searching for a specific product, then we recommend picking up the MG Chemicals 99.9% Isopropyl Alcohol Electronics Cleaner Liquid Bottle, which you can find on Amazon with this link. (#CommissionsEarned).

What other cleaning tools do you need for Sony LinkBuds S?

Since the ear buds and charging case of the LinkBuds S are small, then we recommend that you use Q-tip cotton swabs as you will be able to get into the smaller nooks and crannies.

How to clean the Sony LinkBuds S

In order to clean the Sony LinkBuds S, we recommend that you take the following steps:

1. If you are currently using the Sony LinkBuds S, then make sure that you take if off of your ears.

2. You should then disconnect the wireless ear buds from the connected device.

3. Afterwards, make sure that you turn off the Sony LinkBuds S.

If you don’t know how to shut down the wireless earphones, then you can take a look at this tutorial.

4. If the charging case is connected to a power source, then you need to disconnect it from the USB power cable.

5. You should remove the ear buds from the charging case if you have them inside.

6. Once you are ready, gently twist off the ear bud tips from the left and right ear buds.

7. You should then apply the isopropyl alcohol to a Q-tip cotton swab.

Do not pour the solution directly on the ear buds or charging case as you could end up causing liquid damage.

We also recommend using multiple Q-tip cotton swabs, especially if your device is very dirty. Once a Q-tip starts to look dirty, then you can replace it with a new one.

8. Use the cotton swab to wipe off any ear wax, dirt and other types of residues on the ear buds and ear bud tips.

Pay special attention to the charging ports on the ear buds. If these are dirty, then you won’t be able to recharge your wireless ear buds.

9. Once you are done cleaning the ear buds and ear bud tips, gently twist the ear bud tips back into the ear buds.

10. Afterwards, you should place the ear buds with the IR sensors facing sideways or upwards. Otherwise, the sensors may accidentally detect that the buds are being worn and then turn them on.

11. Next, you can move on to cleaning the charging case.

Once again, make sure you pay special attention to the charging ports of the case. This is because that, if these are dirty, then you may not be able to recharge your wireless ear buds.

12. Once you are done cleaning the charging case, leave the lid open so that any excess solution will evaporate more easily.

13. Wait for the charging case and ear buds to fully dry out at room temperature.

14. Once the charging case and ear buds have dried, you can start using the ear buds normally again. You can also put the ear buds back to the charging case and recharge the charging case without any problems.

How to enable Acer Nitro XV282K VRR support for PS5

The 28″ Acer Nitro XV282K KVbmiipruzx is one of several select gaming monitors that currently supports the Variable Refresh Rate feature of the PlayStation 5 and PlayStation 5 Digital Edition systems.

To see how you can enable VRR with the XV282K KVbmiipruzx when playing PS5 games, you can check out this tutorial at Seeking Tech.

What are the benefits of using Acer Nitro XV282K VRR with PS5

By enabling Variable Refresh Rate support of the 28″ Acer Nitro XV282K KVbmiipruzx 4K UHD IPS Monitor on your PlayStation 5, you will be able to remove any stuttering and screen tearing from games that can’t to run at a consistent frame rate.

VRR currently only supports PlayStation 5 games as backwards compatible PlayStation 4 games running on a PS5 won’t work.

Furthermore, the PlayStation 5 game must run at a minimum of 48 frames per second for this feature to be effective.

How to enable Acer Nitro XV282K VRR support for PS5

To turn on the Variable Refresh Rate for the 28″ Acer Nitro XV282K KVbmiipruzx 4K UHD IPS Monitor, you need to take the following steps:

1. To start off, we recommend that you update the firmware of your Acer Nitro XV282K as it may help improve performance and fix any bugs.

You can find the update file and instructions for this computer screen on the official Acer website with the following link:

2. You should also keep your PlayStation 5 or PlayStation 5 Digital Edition system updated as well with the latest firmware.

3. If you haven’t done so already, connect your PS5 to the HDMI 2.1 port of the Acer Nitro XV282K KVbmiipruzx via a HDMI 2.1 cable.

4. Turn on the monitor and game system.

5. Make sure that your gaming monitor is displaying the input of your PlayStation 5. If not, then you need to switch over to it.

6. On the on-screen display menu of the XV282K KVbmiipruzx and then select the System option on the left column.

7. Next, you need to scroll down and then select HDMI 2.1.

8. Make sure that the HDMI 2.1 setting is set to On. Your Acer 4K monitor should now be ready for Variable Refresh Rate support.

9. From the home screen of your PS5, which is the main menu where you can select which game to play, head to Settings by selecting the gear icon located on the top right side of the screen.

10. After getting to the Settings menu of your PS5, you then need to select Screen and Video.

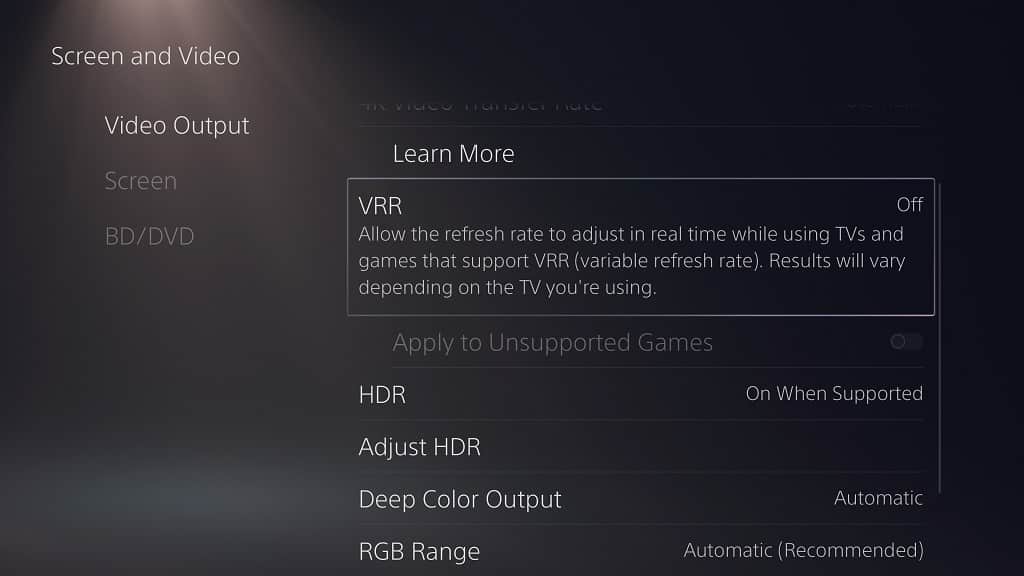
11. Inside the new Screen and Video menu, you then need to select Video Output on the left column side.

12. You should then find the VRR setting on the right side of the Screen and Video menu. By setting it to Automatic, you will enable Variable Refresh Rate for games that natively support this feature.

13. You can also turn on the “Apply to Unsupported Games” setting, which will enable VRR for PS5 videogames that currently don’t natively support it. Since it is not native, you may run into issues when trying to force VRR on unsupported games.

How to turn off the Sony LinkBuds S

The Sony LinkBuds S does not have a traditional button or touch input command that you can use in order to turn off the wireless earphones. Instead, there are three ways that you can completely power down this device. To find out what these methods are, you can take a look at this article from Seeking Tech.

Method #1: Using the “Sony | Headphones Connect” app

The first method can be done by using the “Sony | Headphones Connect” app by taking the following steps:

1. If you haven’t done so already, make sure you download and install the “Sony | Headphones Connect” application. You can search for it on the Google Play Store if you have an Android device or Apple App Store if you have an iOS device.

2. You should also link your LinkBuds S to the app if you haven’t done so already.

3. After linking your wireless ear buds, you should be in the dashboard of the app. Here you need to tap the power icon located on the top right side of the screen to manually turn off the Sony LinkBuds S.

Method #2: Using the Charging Case

You can also manually turn off the Sony LinkBuds S by using its charging case by doing the following:

1. Open the top lid of the LinkBuds S charging case.

2. Put the wireless ear buds into their designated positions in the case. The left ear bud should be placed to the left while the right ear bud should be placed to the right if you are looking at the charging case from the front.

For the uninformed, the buds should snap into place via built-in magnets when placed correctly.

3. With the ear buds placed correctly into the charging case, the LinkBuds S should be turned off.

You should also see the light indicator show a green or orange light for around 3 seconds. The display color depends on the remaining battery charge of the case.

4. Make sure you close the lid of the charging case once you are done turning off the Sony LinkBuds S.

If this method does not appear to be working, then it may be due to the charging case running out of battery charge. In this case, you can try plugging the case into a power source and then wait for a few minutes before trying to use it to turn off the ear buds.

Method #3: Waiting for Sony LinkBuds S to Automatically Turn Off

The last method is pretty simple as you can simply wait for the LinkBuds S to automatically turn off by itself.

In order to do, make sure you remove the ear phones from your ear as, otherwise, the wear detection feature will prevent the device from shutting down.

Next, you simply need to wait for around 15 minutes. If the earphones detect no activity for 15 minutes, then it should be able to shut down on its own.

Keep in mind that this method is not the most efficient, especially if you want to preserve battery life. Therefore, we recommend using either the “Sony | Headphones Connect” app or the charging case to manually turn off the Sony LinkBuds S.

How to reset and factory reset the Sony LinkBuds S

If you are having problems trying to get your Sony LinkBuds S to work properly, then you can try resetting or factory resetting the wireless earphones. To find out how you can do both of these actions, you can take a look at this tutorial at Seeking Tech.

How to reset the LinkBuds S

If you want to reset your Sony LinkBuds S, then you need to do the following:

1. To begin, make sure that the LinkBuds S charging case still has some battery life remaining as you need to use it to reset the earphones.

2. Next, open the lid of the charging case.

3. Put one of the ear buds into their designated position in the charging case. Make sure that the charging contact points are properly aligned.

4. Make sure that the lid of the case is still opened.

5. Press and hold the reset button of the charging case, which should be located on its back.

You should see an orange light flashing slowly at the front status indicator. It should take around 15 seconds for the flashing to start.

6. The orange light will flash for around 5 seconds. Afterwards, it will automatically start the reset process. Once the reset process is completed, you should see either a green light or an orange light depending on the remaining battery charge of the ear bud that has been placed inside the charging case.

At that point, you can finally let go of the reset button.

7. Repeat the same process for the other ear bud.

You can take a look at the official video guide for the reset procedure below:

How to factory reset the LinkBuds S

If you want to perform factory reset for your Sony LinkBuds S, then you need to take the following steps:

1. To start off, make sure that your Sony LinkBuds S charging case still has some battery life. If not then, you need to recharge it before continuing.

2. Open the lid of the charging case.

3. Put both ear buds into their designated positions in the charging case.

4. Leave the lid of the charging case opened.

5. Press and hold the reset button at the back of the charging case until use see the light indicator flashing blue two times before starting to flash an orange light afterwards. This process should take around 15 seconds.

6. Once you see the orange light flash, you can take your finger off of the reset button.

7. The factory resetting process should then start. Once it has been completed, the light indicator on the charging case should flash green 4 times.

After the factory reset has been completed, you need to delete the pairing information for the LinkBuds S on connected devices if you want to pair the ear buds to the same devices again.

You can take a look at the Sony’s video guide for the factory reset procedure below:

If you are having problems trying to factory reset your LinkBuds S using the aforementioned method, then you can use the Sony | Headphones Connect App. You can perform the same procedure by going to System and then Initialize Settings from the dashboard of the application.

eero 6, eero 6+, eero Pro 6 and eero Pro 6E LED light indicator guide

Your eero 6, eero 6+, eero Pro 6 or eero Pro 6E will show its current status by displaying a certain color or blinking pattern through its LED indicator. You can take a look at this guide at Seeking Tech to see what these lights stand for.

While this article is mainly designed for the newer eero 6, eero 6+, eero Pro 6 and eero Pro 6E, it should also be applicable to the older versions of the eero series of mesh routers as well.

What does it mean when your eero router is displaying no lights?

If your eero router isn’t displaying any lights, then it may be turned off.

In this case, you can check to see if the power cable is properly plugged in. Furthermore, you can also try plugging the device into a different power outlet as the current one you may be using could be damaged.

Keep in mind that the eero router has a white outer casing, which makes it hard to see a solid white indicator in a bright room. To get a better view, you can try putting your hand over the LED indicator of your eero 6, eero 6 Plus, eero Pro 6 or eero Pro 6E.

What does it mean when your eero router is displaying a blinking white light?

If you see that your eero router is showing a blinking white light, then it means that it is either starting up or trying to connect to the internet.

In both of these cases, you can just wait until it is done booting up and/or connecting to the internet. The router should then show a solid white light.

What does it mean when your eero router is displaying a solid white light?

When your eero is showing a solid white LED light, then it means that it is currently connected to the internet. Therefore, it should be working as intended.

What does it mean when your eero router is displaying a blinking blue light?

If you see that your eero router is displaying a blinking blue LED light, then it means that it is sending a Bluetooth signal.

If you are trying to connect your router to the eero app, then you need to make sure that you have Bluetooth connection turned on for your smartphone or mobile device.

What does it mean when your eero router is displaying a solid blue light?

Once your eero router is connected to the eero app, you should see the device show a solid blue light. This means that the eero application has been connected to the router and is in the process of setting up the device up for use.

What does it mean when your eero router is displaying a blinking green light?

If your eero blinking green during the setup process, then it indicates that it detects other eero routers nearby.

What does it mean when your eero router is displaying a blinking yellow light?

If you see that your router is blinking yellow, then it is a warning that means that you are using a damaged or unapproved USB-C power source.

To fix this issue, you can replace either the power cable, replace the power adapter or use another a different USB power source.

What does it mean when your eero router is displaying a solid red light?

If your eero 6, eero 6+, eero Pro 6 or eero Pro 6E LED light is showing a solid red color, then it means that it is not connected online at the moment.

What do the mismatching eero app and eero router colors indicate?

The LED color of your eero router may end up being different than the color used to highlight its icon on the official eero app. So, what do these mismatching color indicators mean? You can find out in this guide at Seeking Tech.

This guide is mainly based on the eero 6, eero 6+, eero Pro 6 and eero Pro 6E. With that said, it should also apply older versions of the eero router as well.

What does it mean when your eero LED is white and its icon has a green outline in the app?

If your eero LED is showing a solid white LED color while its icon has a green outline inside the eero app, then it means that your eero network is working as intended.

The white LED indicates that the eero router is currently functioning. The green outline in the app is a confirmation that the device is ready for use.

What does it mean when your eero LED is white and its icon has a yellow outline in the app?

If you see a white LED light coming from your eero router while its icon has a yellow outline in the app, then this indicate that your device is still going through the configuration or set up process.

This process is done by the device automatically. Therefore, all you have to do is to simply wait until the icon in the eero app turns from yellow to green.

What does it mean when your eero LED is blinking white and its icon is green in the app?

If your eero is blinking a white LED light but the app is showing that is green, then this means that the router is still in the process of booting up.

The boot up process will run on its own; therefore, you simply need to wait for a few minutes for the eero LED light to turn solid white.

What does it mean when your eero LED is red and its icon is green in the app?

If your eero router LED is red but the app show that its icon is green, then this means that your router is currently not connected properly to your mesh network. Eventually, the eero icon in the application should also turn red as well.

How to fix eero 6, eero 6+, eero Pro 6 or eero Pro 6E red LED light issues

If you see that the LED indicator of your eero 6, eero 6+, eero Pro 6 or eero Pro 6E is showing red, then there is an issue with your eero network. To see how you can potentially fix this problem, you can take a look at this troubleshooting guide at Seeking Tech.

Why your eero 6, eero 6+, eero Pro 6 or eero Pro 6E is showing a red light

If your eero Wi-Fi 6 router is showing a red LED, then it may indicate that your internet service is currently down. It may also indicate that something is not working with your eero.

How to fix red light issue with the eero 6, eero 6+, eero Pro 6 and eero Pro 6E

In order to fix the red LED light issue with your eero 6, eero 6+, eero Pro 6 or eero Pro 6E, we recommend that you try doing the following:

1. If the red light appears on all of eero routers connected to your home network, then the first step you can take is to make sure that your internet connection isn’t offline.

In order to do so, check to see if your modem is connected to your internet service provider. You should also check to see if your eero routers are properly connected.

2. If you are sure that your entire home network is properly connected, then the next step you can take is to power cycle your modem as well as your eero routers.

In order to do so, unplug the power cables for these devices. Afterwards, wait 30 seconds and then re-plug the power cables back in. Give your modem and router a few minutes to reestablish the internet connection and then check to see if your eeros are still displaying a red light.

3. There is also a possibility that your internet service provider could be suffering from an outage. In this case, you can try contacting your ISP directly to find out if there is a problem on their end.

4. If only one of your eero routers is showing a red light, then you need to make sure that you place the node properly.

When it comes to placement, avoid blocking the communications between your router to the other networking devices. Heavy metals, as well as thick walls or floors, will make the signal weaker.

Wireless devices, such as a microwave, will interfere with the Wi-Fi communication as well.

You should also avoid putting your eero on the ground or in an enclosed space.

5. If you are connecting your eero routers to a modem/router hybrid device, then it may be causing the red LED lights to appear.

To fix this problem, you need to set the modem/router hybrid device to bridge mode. You need to check the user manual of the hybrid device to see how you can use this specific mode.

6. One last potential fix you can try is to delete and then re-add the problematic eero from your network. In order to do so, you need to take the following steps:

  • Open the official eero app on your smartphone or mobile device.
  • Select the eero router that you want to delete.
  • You then need to select the Advanced option.
  • Afterwards, select the “Remove eero” option.
  • Select the “Remove from Network” option to remove the router from the network.
  • From the front page of the eero app, you then need to tap the blue plus icon.
  • Next, you need to tap the “Add or Replace eero Devices” option.
  • Select “Add eero Device.”
  • Follow the on-screen instructions to re-add your eero router to your home network.

If your eero is still showing a red light after trying all of the above potential solutions, then we recommend contacting the support team at eero for additional help.

How to install and format the Nextorage PS5 SSD

Nextorage has released a M.2 solid state drive, with built-in heat sink, that is compatible with the PlayStation 5 and PlayStation 5 Digital Edition systems. You can check out this tutorial from Seeking Tech to see how you can install and format this SSD for your Sony game console.

Before we start, it should be noted that this guide is going to be based on the following internal storage drives:

  • 1 TB Nextorage PCIe Gen 4.0 NVMe M.2 2280 PS5 SSD with Heatsink (NEM-PA1TB/N SYM)
  • 2 TB Nextorage PCIe Gen 4.0 NVMe M.2 2280 PS5 SSD with Heatsink (NEM-PA2TB/N SYM)

How to insert the Nextorage PS5 SSD

You can take the following steps in order to insert the Nextorage PS5 SSD:

1. If you have any important files currently stored on your Nextorage SSD, then we recommend that you transfer it over to another storage before doing anything else.

This is because you will need to format the drive before you can use it on your PS5 or PS5 Digital Edition console. The formatting process will delete all data you have on the Nextorage SSD.

2. Once you are ready, start by turning off your game console.

3. With the system powered down, remove the stand, cables as well as other accessories you have connected.

4. Next, you need to lay your console down, preferably over a soft surface like a bed or sofa, with the side that has the PS logo facing down.

5. The back side of the PS5 system, which has the HDMI and power ports should be facing you.

6. From your point of view, position your right hand on the bottom right corner of the outer case and then your left hand on the top left corner of the outer case.

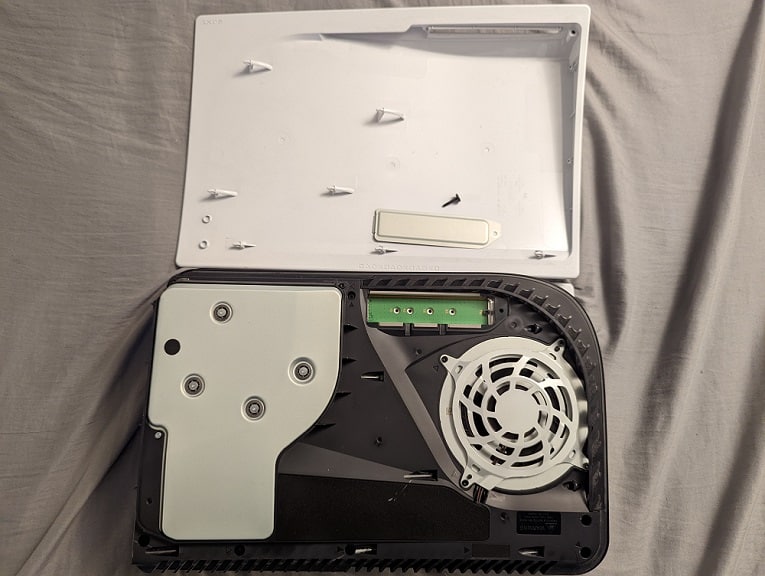
7. With your right hand, lift the bottom right corner of the outer case up and then slide it to the left. You may have to use a little force. Make sure you keep your left hand on the top left corner of the outer cover as it may otherwise fly straight off, potentially hurting others or causing damage to other objects.

8. With the outer case removed, you should see a rectangular metal cover for the M.2 docking bay of your PlayStation 5 or PlayStation 5 Digital Edition system. Here, you need a cross-head screwdriver to remove the screw and then the metal cover.

9. Now that docking bay is fully accessible, you need to use the cross-head screwdriver to remove the screw and space inside of it.

10. Take the spacer you removed in the previous step and place it into the hole that has been marked with “80.”

11. Afterwards, insert the Nextorage SSD into the M.2 slot starting from a diagonally upwards position.

12. After inserting the storage drive, gently push the other end of it down and then screw it in place in the “80” hole.

13. Once you are done with the installation, you can screw back in the metal cover of the M.2 docking back and then slide the outer case back into place (starting from the left side).

14. Re-attach the stand, cables and any other accessories you previously removed.

How to format the Nextorage PS5 SSD

After inserting the Nextorage PS5 SSD, you can format it for use with your PlayStation 5 or PlayStation 5 Digital Edition by doing the following:

1. Turn on your game system.

2. You should eventually arrive at the M.2 SSD Storage notification screen. Here, you need to press the PS button on the DualSense controller to be able to use it.

3. After gaining control, you need to select Format M.2 SSD.

4. Wait until the formatting process is completed.

5. Once the formatting has completed, you should see the sequential reading speed of your 1 TB or 2 TB Nextorage PCIe Gen 4.0 NVMe M.2 2280 PS5 SSD.

6. Afterwards, select OK to continue to the home screen.

Where to find Nextorage PS5 SSD in the system menus

After formatting the Nextorage PS5 SSD, you can find it in the system menus by taking the following steps:

1. Inside the home screen menu, select the gear symbol located on the top right side to enter into Settings.

2. In Settings, you need to go to Storage.

3. From the Storage menu, you then need to select M.2 SSD Storage from the left column.

4. On the right side, you should find your Nextorage PS5 SSD.

5. With the Storage menu, you can also reformat your Nextorage PS5 SSD, delete game data and move game data between different storage options.