What’s the difference between PlayStation Store Gift Cards and PlayStation Plus Wallet Funds?

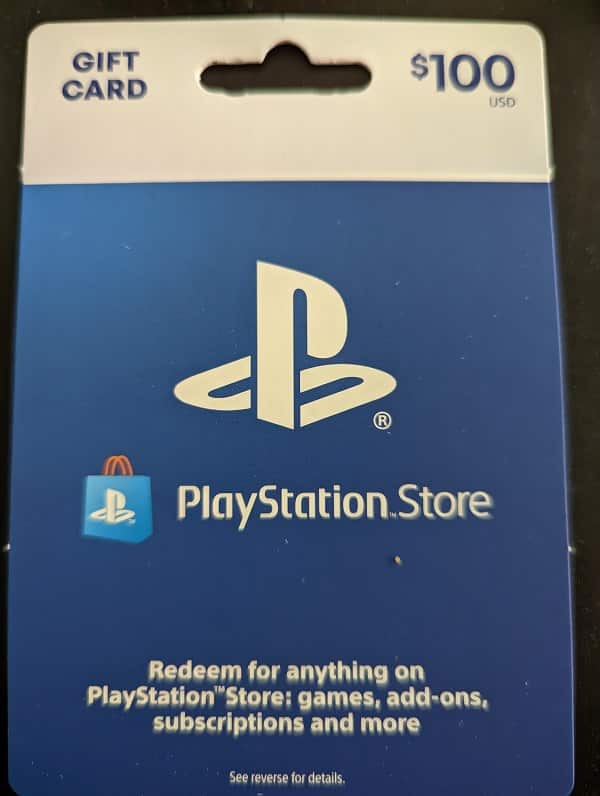
If you are looking to add more funds to your PSN wallet, or gift the funds to another person, then you have two options when shopping at a third-party retailer: PlayStation Store Gift Cards and PlayStation Plus Wallet Funds. 

So, what are the main differences between these two currency cards? You can find out in this comparison guide from Seeking Tech. 

Quick Summary 

The only major difference between the PlayStation Store Gift Cards and PlayStation Plus Wallet Funds is that they offer different denominations. 

The PlayStation Store Gift Cards are designed for general usage. Therefore, you can purchase them at $10, $25, $50, $75 or $100. 

The PlayStation Plus Wallet Funds are made for the new PlayStation Plus tiers as they should cover the subscription in addition to any applicable sales tax. Thus, you can get these funds at $30, $55, $70 and $110. 

When redeemed, both the PlayStation Store Gift Cards and PlayStation Plus Wallet Funds will be added to the digital wallet of your PSN account. You can then be able to spend it on subscriptions, games, DLC and/or microtransactions.  

PlayStation Store Gift Cards vs. PlayStation Plus Wallet Funds comparison chart  

You can take a look at our comparison table for the PlayStation Store Gift Cards and PlayStation Plus Wallet Funds below. 

PlayStation Store Gift CardsPlayStation Plus Wallet Funds
Denominations $10 

$25 

$50 

$75 

$100 
$30 

$55 

$70 

$110 
Branding White color scheme with PlayStation Plus and PlayStation Store logosYellow color scheme with PlayStation Plus logo
Availability Physical cards

Digital voucher codes
Physical cards

Digital voucher codes
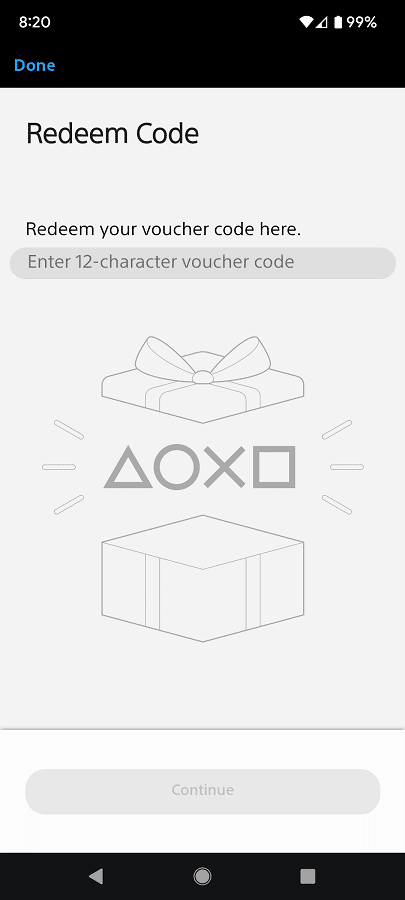
Redemption Options PlayStation Store App on console 

PlayStation App on smartphone 

PlayStation Store website 
PlayStation Store App on console 

PlayStation App on smartphone 

PlayStation Store website
PricingCheck price on Amazon.(#CommissionsEarned)Check price on Amazon.(#CommissionsEarned)

Denominations 

The two cards offer different denominations.  

The PlayStation Store Gift Cards offer funds based on general purchases that you can make on the digital storefront of your PlayStation gaming console.  

On the other hand, the denominations of PlayStation Plus Wallet Funds are based on the fees of the different PlayStation Plus tiers with tax included. For instance, you should be able the $70 PlayStation Plus Wallet Funds should cover 1 year of PlayStation Plus Essential and sales tax in the U.S region. The $110 card should be able to over 1 year of PlayStation Plus Extra with sales tax. 

To learn more about the different PS Plus tiers that are available, you can take a look at this versus article.

You can find the currently available denominations for both types below: 

PlayStation Store Gift Card: 

  • $10 
  • $25 
  • $50 
  • $75 
  • $100 

PlayStation Plus Wallet Funds: 

  • $30 
  • $55 
  • $70 
  • $110 

Branding 

The PlayStation Store Gift Cards feature a white color scheme to go along with the PlayStation Plus and PlayStation Store logos. 

The PlayStation Plus Wallet Funds feature a yellow color scheme. These cards will only show the PlayStation Plus logo. 

Availability 

You can find the physical versions of PlayStation Store Gift Cards and PlayStation Plus Wallet Funds at major retailers.  

Alternatively, you can also buy these cards as digital voucher codes at major online retailers. The codes should then be sent to you shortly after you made your purchase. 

Redemption Options 

These cards are redeemed in the same way as you can use the following options: 

  • PlayStation Store App on your console 
  • PlayStation App on your smartphone 
  • PlayStation Store website 

After redemption, the amount of funds from your card will be added directly to the digital wallet of your PlayStation Network account. You can then use the funds to pay for PlayStation Plus, other subscriptions, digital games, downloadable content and/or microtransactions.  

How to fix God of War Ragnarok HDR issues

When playing God of War Ragnarok with HDR enabled, you may notice that some scenes are overly dark while others may be a little too bright. The colors may also seem off as they may appear to be a little washed out.

To see how you can fix these visual issues on the PlayStation 5, PlayStation 5 Digital Edition, PlayStation 4 and PlayStation 4 Pro, you can check out this troubleshooting article from Seeking Tech.

1. The first step you can take is to make sure that you have HDR properly set up for your screen and console.

For the TV or monitor, try to search the Settings menu to see if there is an option to enable or disable HDR. If there is, then make sure you enable this feature.

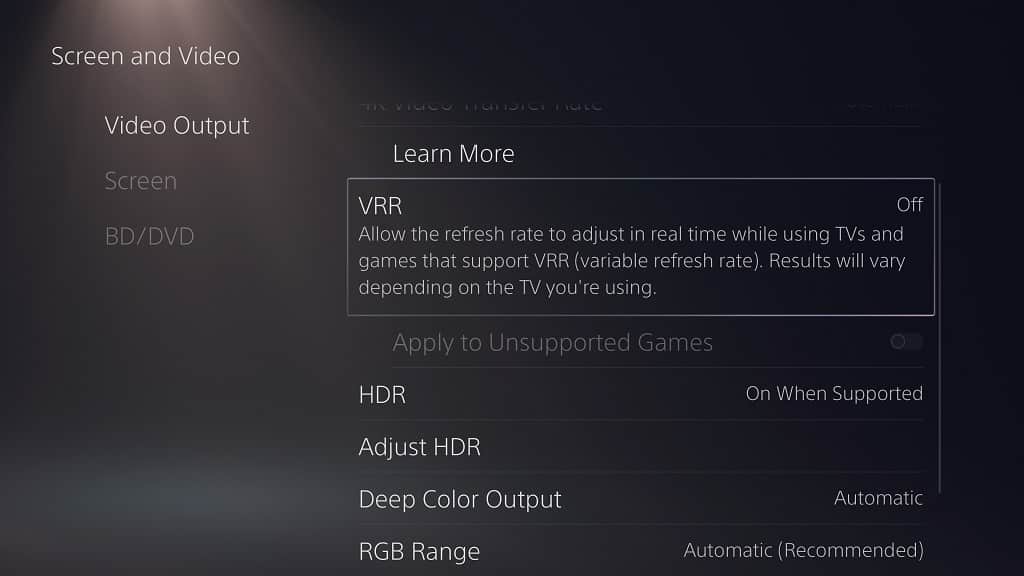
You should then do the same for the game console. On the PS5 and PS5 Digital Edition system, you need to go to Settings > Screen and Video > Video Output. From this menu, you need to make sure you do the following:

  • Set HDR to On When Supported.
  • Set Deep Color Output to Automatic.
  • Set RGB to Automatic (Recommended).

For the PS4 and PS4 Pro, you need to head over to Settings > Sound and Screen > Video Output Settings. You then need to do the following:

  • Set RGB Range to Automatic (Recommended).
  • Set HDR to On When Supported.
  • Set Deep Color Output to Automatic.

2. You should also make sure that you properly calibrated the HDR brightness output of your game console.

For the PlayStation 5 and PlayStation 5 Digital Edition, you need to go to Settings > Screen and Video > Video Output and then select Adjust HDR. You then need to follow the on-screen instructions.

For the PlayStation 4 and PlayStation 4 Pro, you should head over to Settings > Sound and Screen > Video Output Settings and then select Adjust HDR. Afterwards, follow the on-screen steps.

3. If the HDR for God of War Ragnarok is still not working correctly, then you can try adjusting the aforementioned RGB settings on your console.

You can change it to Limited or Full and then test to see if you can get a better HDR picture.

4. Of course, you can also change the in-game brightness settings. In order to do so, you need to press the options button on your controller while playing the game.

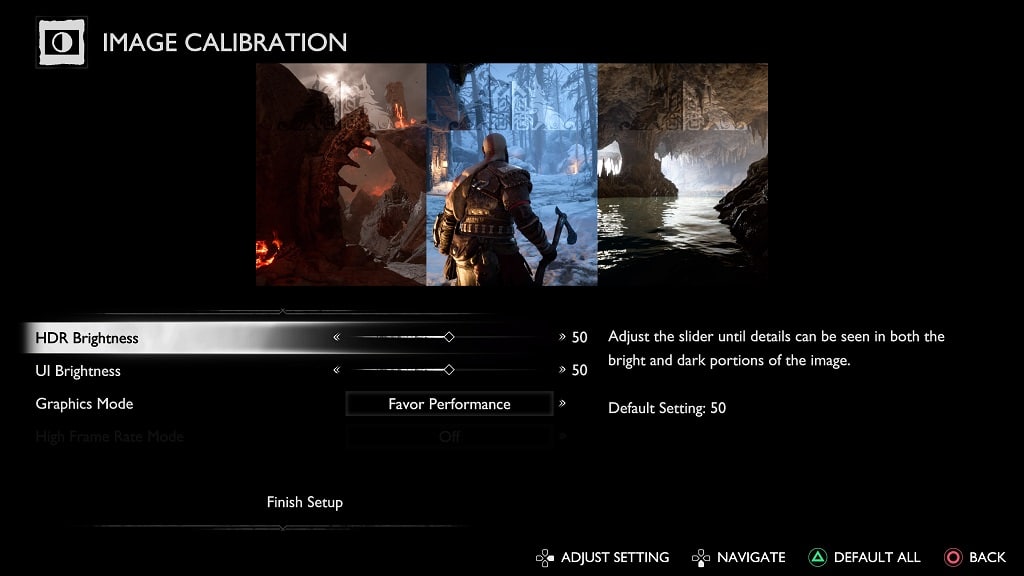
From the Options menu, you then need to go to Settings > Graphics & Camera > Screen Calibration. In the Image Calibration menu, you can adjust the slider for the HDR Brightness setting.

It is important to note that some television sets and monitors made not have good HDR performance. Therefore, you may have to use the aforementioned HDR Brightness setting frequently if some scenes appear to be overly bright or overly dark.

5. If you still can’t get HDR to display properly in God of War Ragnarok then we recommend that you play the game is SDR mode by disabling the HDR setting on your console.

How to fix God of War Ragnarok input lag issues

When playing God of War Ragnarok on your PlayStation 4, PlayStation 4 Pro, PlayStation 5 or PlayStation 5 Digital Edition system, you may notice some input lag. To see how you can potentially improve the latency, you can take a look at this article from Seeking Tech.

1. The first step you can take is to make sure that your console is directly connected to your television set or monitor.

If you use any splitter or HDMI pass-through devices in-between, then these may cause the extra delay between your button presses and the corresponding actions that appear on the screen.

2. We also recommend that you take a look at the Settings menu of your TV.

Most modern screens come with a Game Mode, Game Optimizer Mode or similarly named picture setting that will let you play videogames with low input lag.

So, if your TV has this mode available, you need to enable it if you haven’t done so already.

3. You should be able to reduce input lag by increasing the frame rate of God of War Ragnarok.

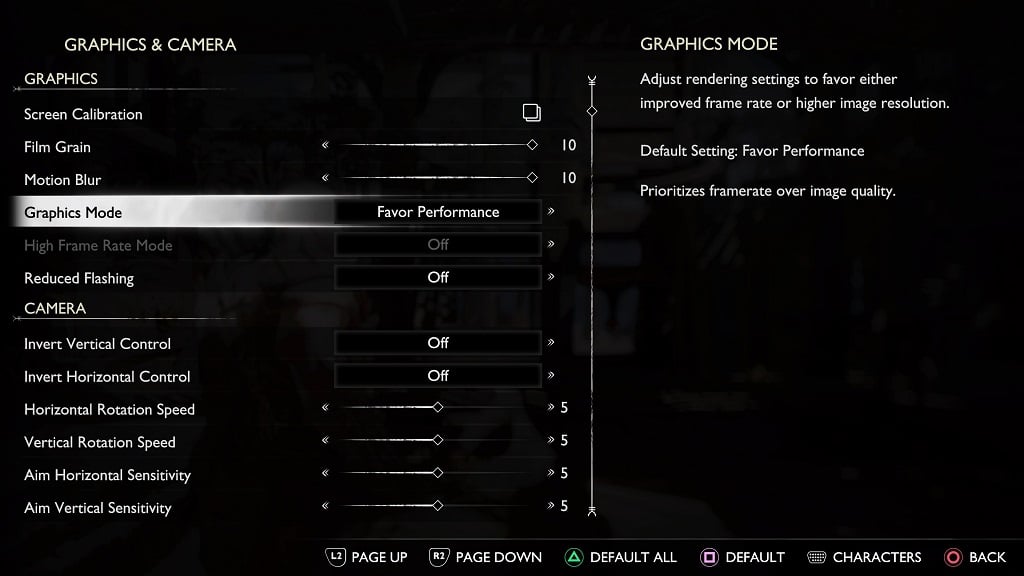
Therefore, we recommend playing the game in performance mode. In order to enable this mode, you can try taking the following steps:

  • While playing God of War Ragnarok, press the Options button on the controller.
  • After opening the Options menu, you need to go into Settings.
  • In the Settings menu, select Graphics & Camera.
  • Once you are in the Graphics & Camera, highlight Graphics Mode.
  • Finally, you need to select Favor Performance.

Keep in mind that, if you are playing God of War Ragnarok on a standard PlayStation 4, then you won’t be able to switch to a performance mode.

4. You can also try playing the game in high frame rate mode in order to further reduce its input delay. In order to do so, you need the PlayStation 5 version of Ragnarok as well as a TV or monitor that supports 120 Hz refresh rate with Variable Refresh Rate support.

If you meet these requirements, then you can take the following steps:

  • Go to the Settings menu of your PS5 console.
  • Inside of Settings, select Screen and Video.
  • From the Screen and Video menu, select Video Output from the options available on the left column.
  • On the right side of the screen, set VRR to Automatic.
  • You then need to set 120 Hz Output to Automatic.
  • Open God of War Ragnarok.
  • While playing the game, press the Options button on your controller.
  • Select Settings from the Options menu.
  • You then need to select Graphics & Camera from the Settings menu.
  • In the Graphics & Camera menu, make sure that you set the Graphics Mode setting to Favor Performance.
  • Next, you need to highlight the High Frame Rate Mode setting and then change it to HFR + VRR so that you can play the game at up to 120 frames per second with Variable Refresh Rate enabled.

5. If you are still getting noticeable input lag, then you can try playing the game on a different TV or monitor to see if you can get better results.

How to turn off God of War Ragnarok compass and other HUD elements

When playing God of War Ragnarok on the PlayStation 4, PlayStation 4 Pro, PlayStation 5 or PlayStation 5 Digital Edition, you may notice that the game has a rather busy looking head-up display. If you are using an OLED monitor or television set for this game, then these may cause image retention and/or screen burn in problems.

To see how you can disable the compass and other HUD elements in God of War Ragnarok, you can follow this step-by-step guide from Seeking Tech.

1. While you are playing the game, press the Options button on your controller.

On the PS5’s DualSense controller, this button is labeled with the three horizontal lines. With the PS4’s DualShock 4, this button is underneath the Options text.

2. You should now be in the Options menu. From there, you need to select Settings.

3. After getting to Settings, you need to select Gameplay.

4. From the Gameplay menu, scroll down until you see the HUD section.

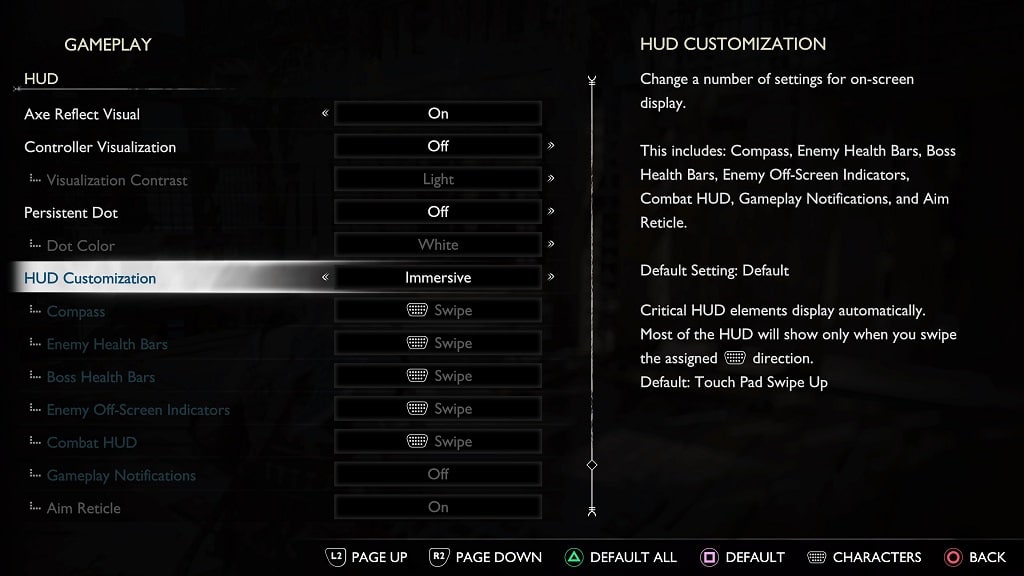
5. In the HUD section, highlight HUD Customization.

6. HUD Customization should currently be set to Default.

Here, you can use the analog stick or directional pad to change this setting. We recommend switching it over to Immersive, which will allow you to manually enable and disable the head-up display by swiping the touch pad on the controller.

With that said, you can also select the Hidden option if you want to turn off the HUD completely.

Furthermore, you can also set to HUD Customization to Custom. By doing so, you will be able to set the following HUD elements to On, Swipe or Off:

  • Compass
  • Enemy Health Bars
  • Boss Health bars
  • Enemy Off-Screen Indicators
  • Combat HUD
  • Gameplay Notification
  • Aim Reticle

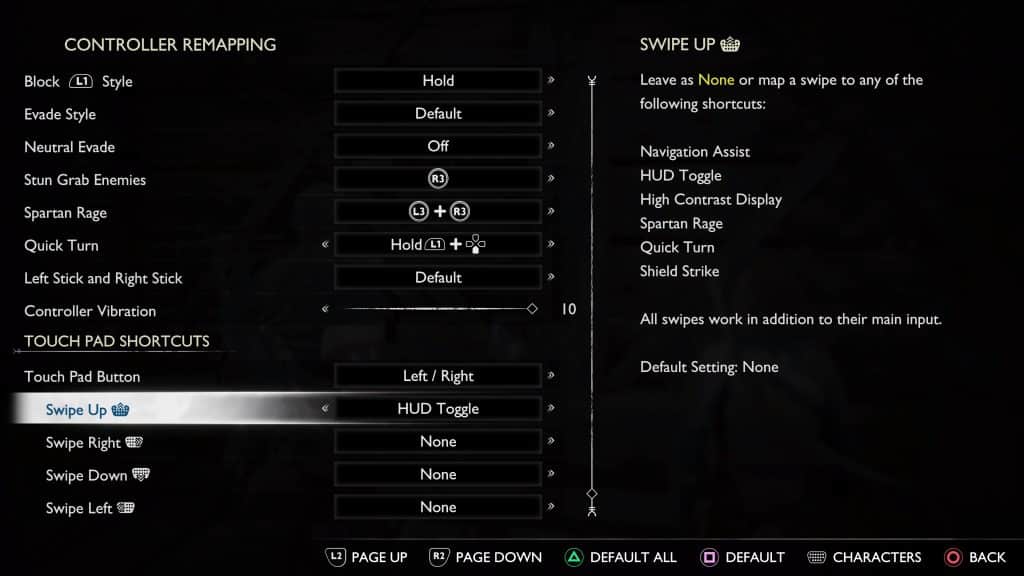
By default, you need to swipe upwards on the touch pad of the DualSense or DualShock 4 to enable and disable the head-up display.

If you want to change the swiping gesture to another direction, then you need to do the following:

1. Go back to the Settings menu by pressing the Options button and then selecting Settings.

2. Next, you need to select Controller Remapping.

3. After you arrived at the Controller Remapping menu, scroll down to the Touch Pad Shortcuts section.

4. You can then set the following options to HUD:

  • Swipe Up
  • Swipe Right
  • Swipe Down
  • Swipe Left

Keep in mind that you can set the enable/disable HUD function to multiple swiping gestures at the same time.

By customizing when the HUD will be shown instead having it always on, you should be able to prevent any image retention and screen burn in problems when playing God of War Ragnarok.

How to fix input lag when playing backwards compatible PS4 games on PS5

When playing a backwards compatible PlayStation 4 game on your PlayStation 5 or PlayStation 5 Digital Edition console, you may experience noticeable input lag. To see how you can potentially make your game more responsive, you can take a look at this troubleshooting article from Seeking Tech.

1. The first step we recommend taking is to make sure that the PS4 game you are playing doesn’t have any issues when running on the PS5.

You can check out the Backwards-Compatible website to see if your game is among those that are experiencing problems when being played on a PlayStation 5 system.

2. If the PS4 game appears to be fully backwards compatible, then you can try to see if there are any graphical settings you can change from the in-game menus.

In general, the performance or frame rate priority mode should feature lower latency. You can also try lowering the resolution or graphical fidelity, if these options are available, to see if doing so will improve the input response.

3. You should also make sure that you are using the game mode or game optimizer mode on your television set. These picture settings are designed for videogames as they will lower the input delay.

4. Furthermore, make sure that you aren’t using any HDMI splitters or HDMI pass-through devices as these may introduce latency. Instead, connect your PS5 or PS5 Digital Edition console directly to your television screen or computer monitor.

5. If your console is connected to a TV or monitor that supports Variable Refresh Rate, then we recommend enabling it as this feature may help fix some of the input lag problems you may be experiencing.

To enable this feature, make sure you do the following:

  • Go to Settings on your PS5.
  • From the first page of Settings, select Screen and Video.
  • In the Screen and Video sub-menu, select Video Output on the left column and then make sure that the VRR setting is set to Automatic on the right side. You may also want to enable the “Apply to Unsupported Games” setting as well.
  • On your television set or monitor, make sure you enable Variable Refresh Rate. For some screens, you turn this feature on automatically when using the game mode display setting.

6. You can also try plugging your DualSense or DualShock 4 to the USB port of your PlayStation 5 and then use it as a wired controller. In order to do so, you can take the following steps:

  • Plug your controller into your PS5.
  • Go to Settings.
  • In Settings, select Accessories.
  • From the Accessories sub-menu, select Controller (General) on the left column and then Communication Method on the right side.
  • In the Communication Method screen, select the Use USB Cable option.

6. Make sure that the PlayStation 4 game you are playing has been updated to the latest patch release, which may help improve input latency.

7. It is also a good idea to update the system software of your PlayStation 5 or PlayStation 5 Digital Edition console.

What’s the difference between PS Plus Collection, Monthly Games, Game Catalog and Classics Catalog?

The PlayStation Plus subscription will give you full access to games. So, what are the main differences between the PlayStation Plus Collection, Monthly Games, Game Catalog and Classics Catalog categories?

You can find out in this comparison guide at Seeking Tech.

PS Plus Collection vs. Monthly Games vs. Game Catalog vs. Classics Catalog Comparison Chart

You can take a look at our comparison table between the PlayStation Plus Collection, Monthly Games, Game Catalog and Classics Catalog categories below.

PS Plus CollectionMonthly GamesGame CatalogClassics Catalog
PlayStation Plus TiersPlayStation Plus Essential (PS5 owners only)

PlayStation Plus Extra (PS5 owners only)

PlayStation Plus Deluxe (PS5 owners only)

PlayStation Plus Premium (PS5 owners only)
PlayStation Plus Essential

PlayStation Plus Extra

PlayStation Plus Deluxe

PlayStation Plus Premium
PlayStation Plus Extra

PlayStation Plus Deluxe

PlayStation Plus Premium
PlayStation Plus Deluxe (no PS3 streaming)

PlayStation Plus Premium (with PS3 streaming)
Number of Included Games192+ per month400+300+
Lineup RefreshesNoneMonthly on the first TuesdayMonthly at the middle of the monthMonthly at the middle of the month
Access RemovalUnsubscribe to PS PlusUnsubscribe to PS PlusUnsubscribe to PS Plus or game is removed from lineupUnsubscribe to PS Plus or game is removed from lineup
DRMNoneNoneNeed to sign into PSN at least once every 7 daysNeed to sign into PSN at least once every 7 days

PlayStation Plus Tiers

The PlayStation Plus Collection is included with all available tiers of the subscription service. With that said, its games can only be access if you have a PlayStation 5 or PlayStation 5 Digital Edition system.

All four PlayStation Plus plans also comes with Monthly Games.

With the Game Catalog, you will need the more expensive Extra, Deluxe or Premium plans.

The Classics Catalog is limited to the Deluxe and Premium tiers. With both plans, you can play PS1, PS2, PSP and remastered games. The PlayStation Plus Premium is the only tier that supports PS3 games from this category.

You can find a breakdown of which category is included with the four available PS Plus tiers below:

PS Plus Collection:

  • PlayStation Plus Essential (PS5 owners only)
  • PlayStation Plus Extra (PS5 owners only)
  • PlayStation Plus Deluxe (PS5 owners only)
  • PlayStation Plus Premium (PS5 owners only)

Monthly Games:

  • PlayStation Plus Essential
  • PlayStation Plus Extra
  • PlayStation Plus Deluxe
  • PlayStation Plus Premium

Game Catalog:

  • PlayStation Plus Extra
  • PlayStation Plus Deluxe
  • PlayStation Plus Premium

Classics Catalog:

  • PlayStation Plus Deluxe (no PS3 streaming)
  • PlayStation Plus Premium (with PS3 streaming)

Number of Included Games

In terms of the number of included games, the PlayStation Plus collection originally started with 20 PlayStation 4 games. However, Persona 5 was recently removed, which dwindle the list to 19 titles.

For the Monthly Games category, you will currently get at least 2 games a month.

As for the Game Catalog, you should get at least 400 PS4 and PS5 games in major regions.

When it comes to the Classics Catalog, you can get at least 300 games in major regions if you have PlayStation Plus Premium. If you have PlayStation Plus Deluxe instead, then that number is reduced drastically due to the lack of being able to stream PS3 games.

Lineup Refreshes

When it comes to refreshes to the lineup, the PS Plus Collection has remained static since it was first launched aside from the removal of Persona 5.

In the Monthly Games category, you will get a refresh on the first Tuesday of every month. The games from the previous month will be removed while at least two games will be added as replacements.

As for the Game Catalog and Classic Catalog, you will get monthly refreshes that will occur in the middle of the month. The number of new games being added to these categories will vary.

Access Removal

With the PlayStation Plus Collection and Monthly Games, you can play games that were added to your library as long as you stay subscribed to one of the PlayStation Plus tiers.

As for the Game Catalog and Classics Catalog, you will lose access to games that are removed from the lineup even if you stay subscribed.

DRM

In terms of Digital Rights Management, the PlayStation Plus Collection and Monthly Games do not require an online check-in.

For the Game Catalog or Classics Catalog, you need to log into the PlayStation Network account that is paying for your PlayStation Plus Extra, PlayStation Plus Deluxe or PlayStation Plus Premium plan in order to avoid losing access to the games from these categories.

How to turn off PS Plus Essential, Extra, Deluxe and Premium auto-renewal on PS4

Sony recently changed to PlayStation Plus service into multiple tiers. For some regions, including the United States, you can pick between Essential, Extra or Premium. In other regions, you can choose between Essential, Extra or Deluxe.

Furthermore, the company also changed how auto-renewal works. To see how you can disable this feature on your PlayStation 4 or PlayStation 4 Pro console, you can take a look at this tutorial from Seeking Tech.

What happens when you let your PS Plus Essential, Extra, Deluxe or Premium auto-renew?

If you leave auto-renew on for your PlayStation Plus Essential, Extra, Deluxe or Premium, then you will automatically be billed once your current plan expires.

If you don’t have enough money in your PlayStation Network wallet, then Sony will try to charge your debit card, credit card or another payment method that you previously added to your account.

Unfortunately, the new changes implemented to the PlayStation Plus service do not make it clear how you can turn off auto-renewal.

How to disable PS Plus Essential, Extra, Deluxe and Premium auto-renewal on PS4

In order to stop your PlayStation Plus Essential, Extra, Deluxe or Premium from getting auto-renewed, you need to take the following steps on your PS4 or PS4 Pro console:

1. If you haven’t done so already, turn on your PlayStation 4.

2. Next, make sure you are signed into the same PlayStation Network account that you used to previously purchased your PlayStation Plus subscription.

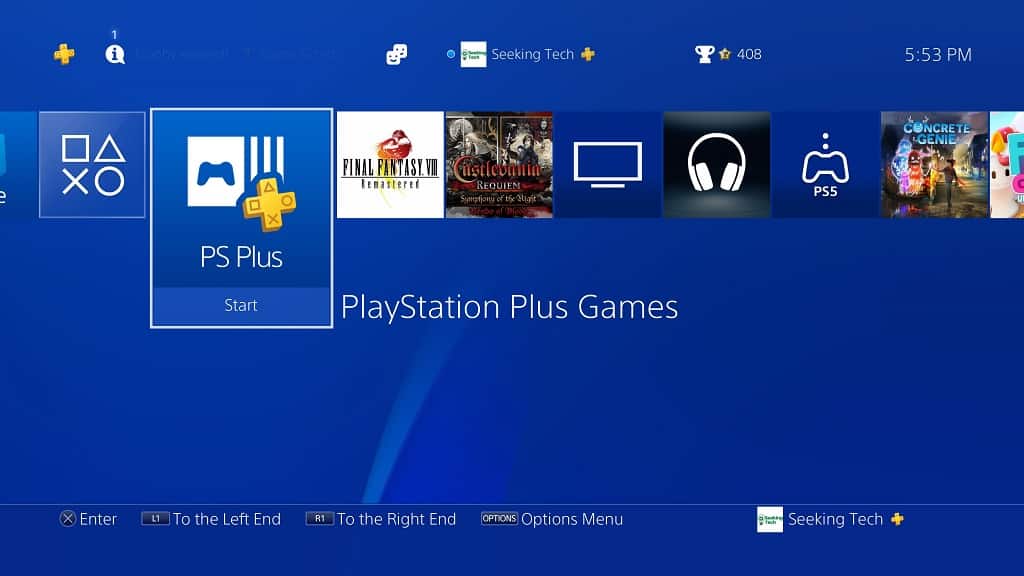
3. You should then go to the home screen menu.

If you are currently playing a game or using an app, then you can go to the home screen by pressing the PS button on your DualShock 4.

4. After getting to the home screen, select the PlayStation Plus Games app.

Alternatively, you can navigate upwards and then select the PlayStation Plus icon.

5. Inside of the PlayStation Plus App, select the More option. You can find it by navigating upwards and then moving to the right.

6. In the drop-down menu, you need to select Manage Subscription from the list of options.

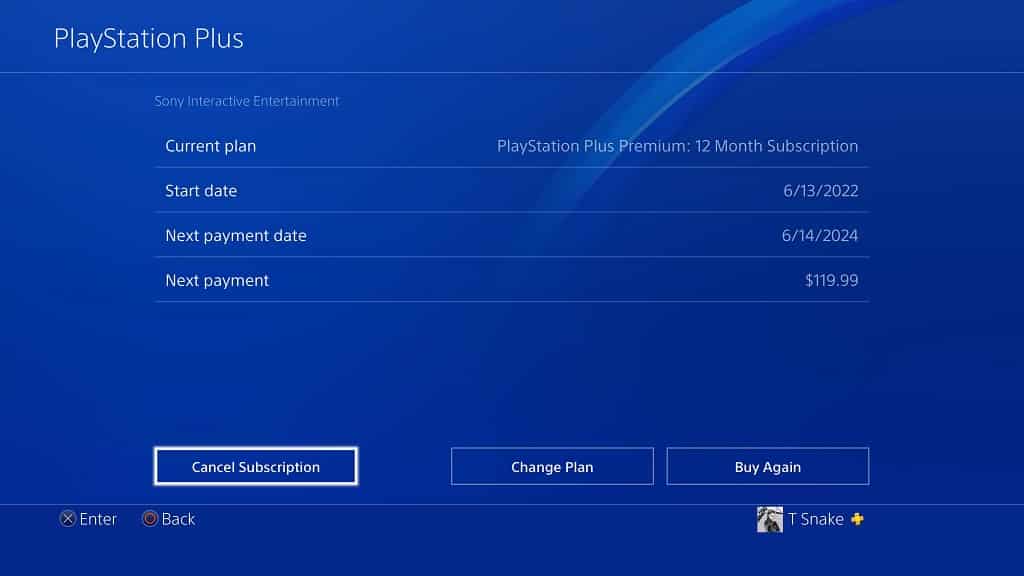
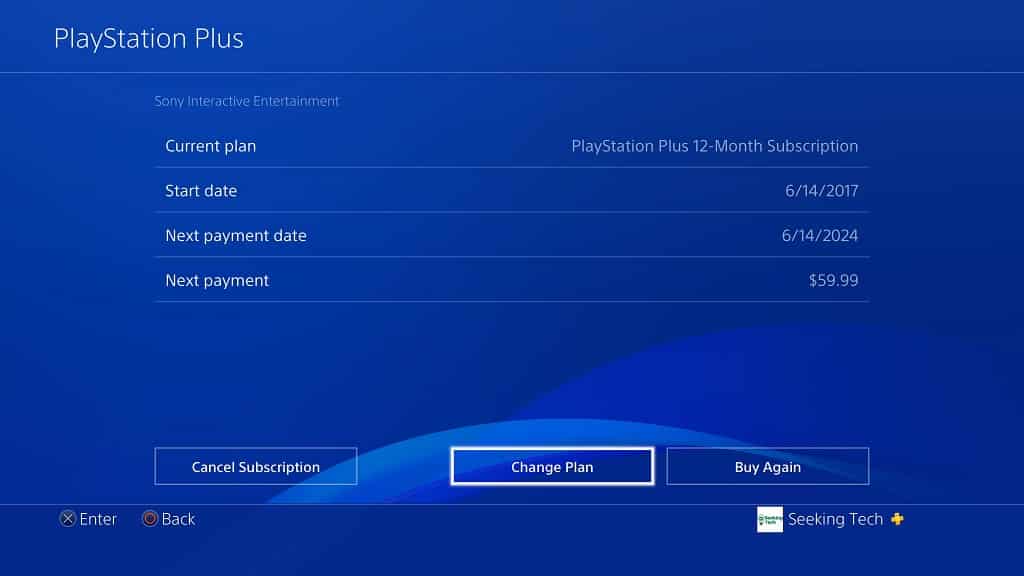
7. You should now be in the PlayStation Plus screen, which will show the following information about your subscription:

  • Current Plan
  • Start Date
  • Next Payment Date
  • Next Payment

Here, you need to select the Cancel Subscription option.

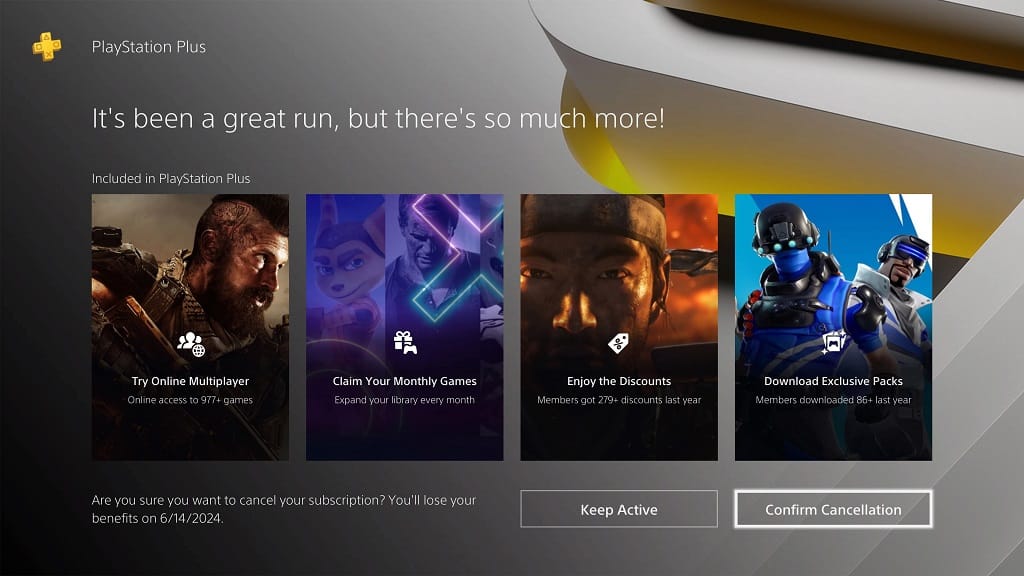
5. In the next screen, you will see a message saying the following:

“It’s been a great run, but there’s so much more!”

Here, you need to select Confirm Cancellation.

When you cancel you PlayStation Plus subscription, you won’t get a refund. Instead, you will still get the benefits of your tier for the remainder of the length of time you previously paid for.

Once your original subscription period ends, you will lose the benefits. Since you cancel the plan beforehand, however, then the plan won’t be automatically renewed.

How to change graphical settings for PS1/PSP games on the PS4 and PS5 consoles

Emulated PS1 and PSP video games were recently added to the PlayStation 4, PlayStation 4 Pro, PlayStation 5 and PlayStation 5 Digital Edition consoles. These classic releases come with multiple graphical settings.

To see how you can customize the filters and aspect ratios for the PS1 and PSP games running on the modern PlayStation systems, you can take a look at this tutorial from Seeking Tech.

How to change filters for PS1 and PSP games on PS4 and PS5 consoles

In order to change filters for the PS1 and PSP games running on the PlayStation 4 or PlayStation 5, you need to take the following steps:

1. To start off, make sure that you are currently playing a PS1 or PSP emulated game on your PlayStation 4, PlayStation 4 Pro, PlayStation 5 or PlayStation 5 Digital Edition console.

2. While playing a classic game, press the Options button on your DualShock 4 or DualSense to bring up the emulation menu.

3. Inside of the emulation menu, scroll down and then select Settings.

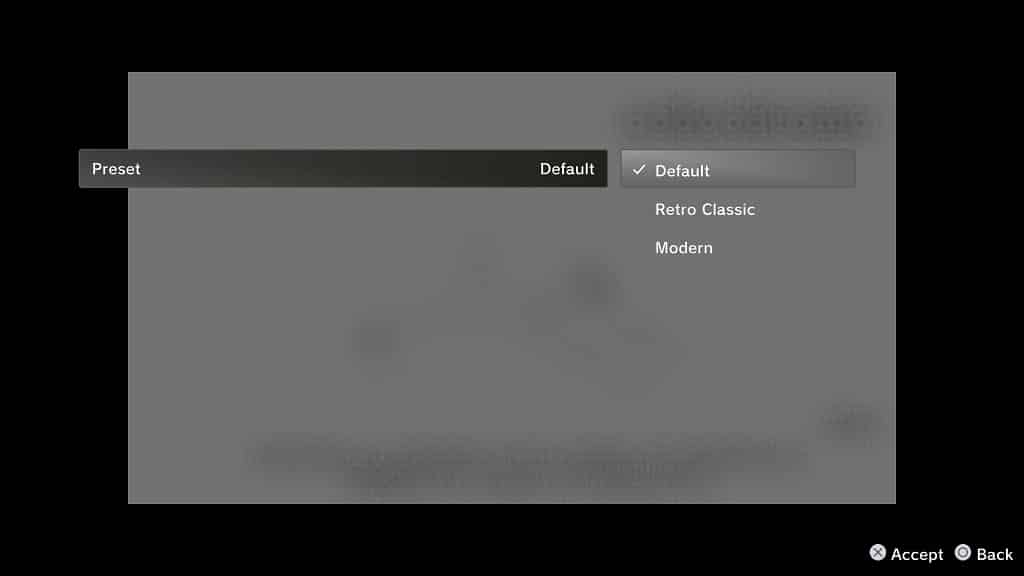
4. After getting to the Settings menu, select Preset.

5. In the next screen, press the X button to bring up a list of Preset settings.

6. When it comes to filters, you can choose between Default, Retro Classic or Modern.

Retro Classic is designed to mimic the visual effects of CRT television sets while Modern will give the game a similar look to what you may expect from newer games when it comes to color.

7. After making your choice of filter, you can press the Options button to return to the game and see the change implemented.

How to change the aspect ratio for PS1 and PSP games on PS4 and PS5 consoles

To change the aspect ratio for the emulated PS1 and PSP games running on the PS4 and PS5 consoles, you need to do the following:

1. While playing the classic game, press the Options button on your controller to bring up the emulation menu.

2. From the emulation menu, select Settings.

3. In the Settings menu, scroll down and then select Video.

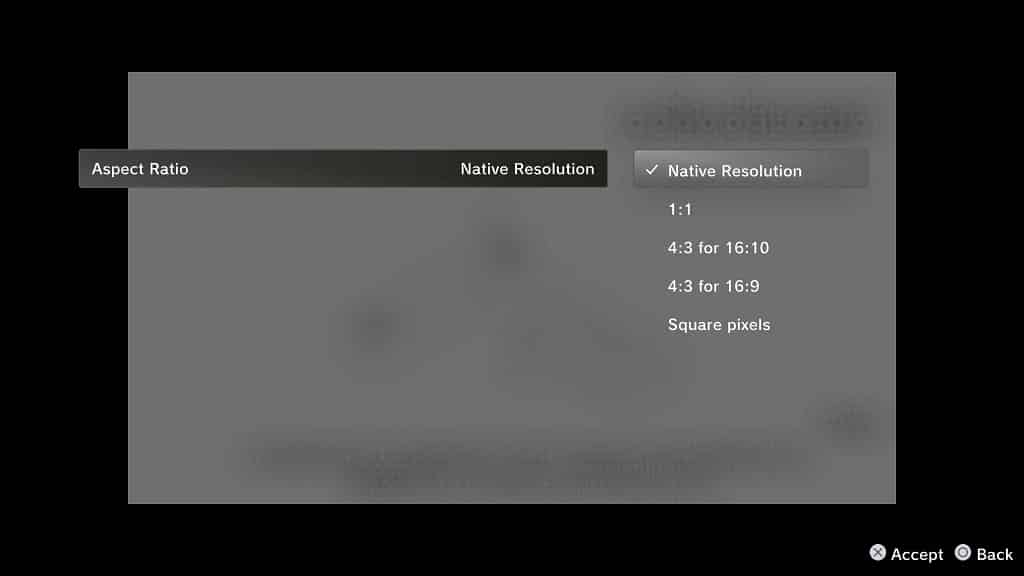
4. Next, you need to select Aspect Ratio.

5. Press the X button on the controller to bring up a list of aspect ratio options.

6. You can choose between the following:

  • Native Resolution
  • 1:1
  • 4:3 for 16:10
  • 4:3 for 16:9
  • Square Pixels
  • Wide Zoom (Stretched)

The Native Resolution option will display the game at its original resolution, which means that the display area will be extremely small if you are using a 4K television set.

The 4:3 for 16:9 option is the most accurate if you have a normal 4K television set. The 4:3 for 16:10 option is for slightly wider screens.

If you don’t want any black bars, then we you might want to consider using the Wide Zoom (Stretched) option.

Both the 1:1 and Square Pixels options makes the display area look squish. Therefore, we recommend using the 4:3 for 16:9 option instead.

7. Once you are done making your selection, you can press the Options button to return to the game and view the new aspect ratio.

How to rewind and quick save PS1/PSP games on the PS4 and PS5 consoles

With the PlayStation Plus service being expanded to PlayStation Plus Essential, PlayStation Plus Extra, PlayStation Plus Deluxe and PlayStation Plus Premium, emulated PS1 and PSP games are now playable on modern PlayStation consoles.

These classic titles come with rewind and quick save features. To see how you can properly use both of these functions when playing emulated PS1 and PSP games on your PlayStation 4, PlayStation 4 Pro, PlayStation 5 or PlayStation 5 Digital Edition system, you can take a look at this guide at Seeking Tech.

How to rewind PS1 and PSP games when playing on PS4 and PS5

In order to rewind an emulated PS1 or PSP game when playing on your PlayStation 4 or PlayStation 5 console, you need to take the following steps:

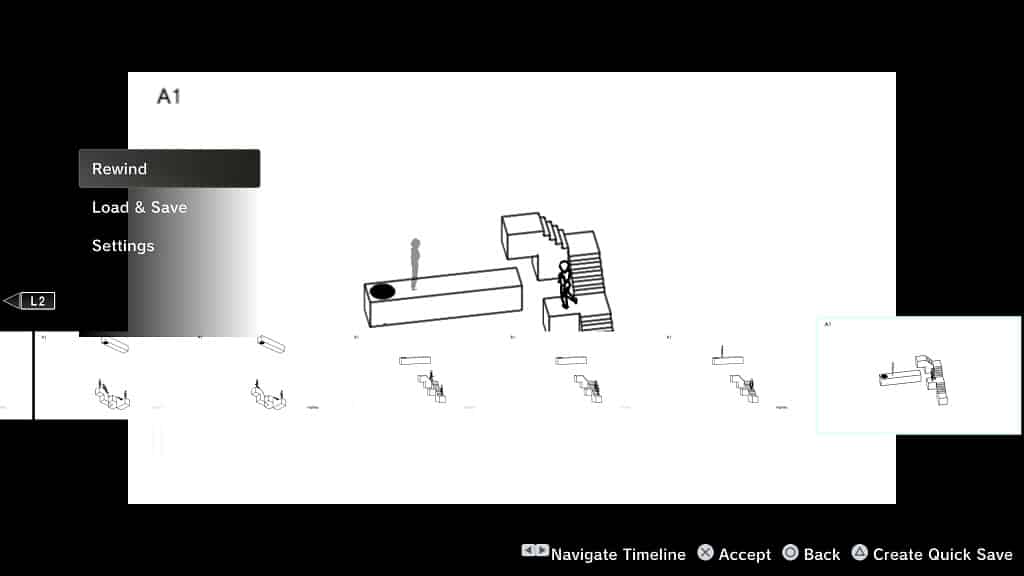
1. When playing an emulated PS1 or PSP game, press the Options button on your DualShock 4 or DualSense controller.

2. If done correctly, you should open up the rewind menu.

3. In the rewind menu, you can navigate by using moving the left analog stick of your controller to the left or right. You can use also the left and right directional pad, as well as the L2 and R2 buttons, to navigate the timeline.

4. Once you get to your preferred time period that you want to rewind back to, press the X button to accept your choice.

5. You should now be bought back to an earlier section of the game you are currently playing.

6. If you want to go further back, then you need to press the Options button again to open the Rewind menu.

Keep in mind that you can’t go forward to any point in the timeline.

How to quick save PS1 and PSP games when playing on PS4 and PS5

In order to use the quick save feature when playing emulated PS1 or PSP games on your PlayStation 4 or PlayStation 5, you need to do the following:

1. Press the Options button on the DualShock 4 or DualSense when playing the game.

2. Next, you can navigate the timeline to highlight where you want to create the quick save file.

3. With the time period highlighted, press the triangle button.

4. In the next screen, select a save slot.

If you are overwriting an old save, then you will get a message asking if you really want to overwrite your save. Press the X button to confirm the overwrite.

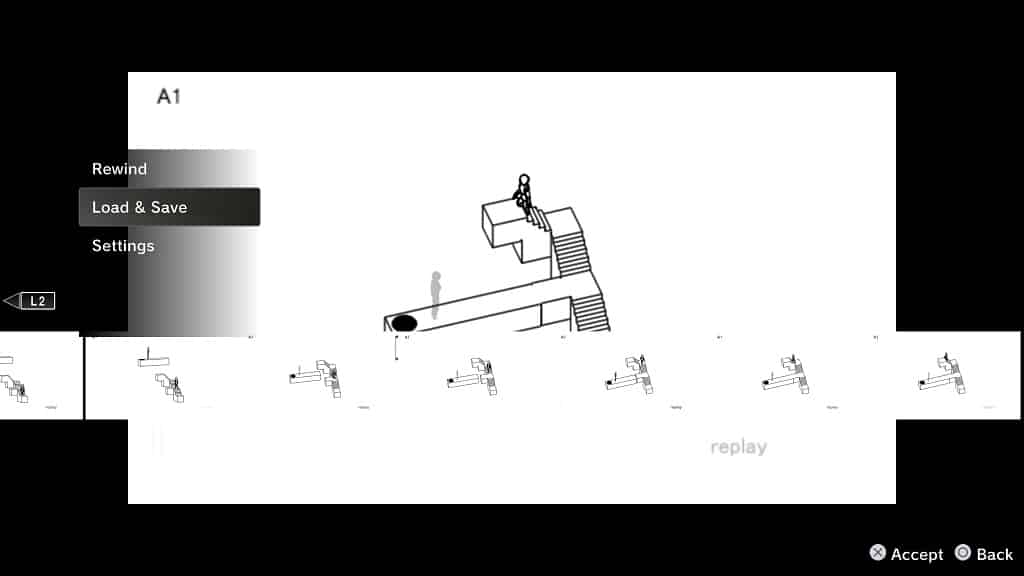
5. You can also create a save without using the timeline by moving down to the Load & Save section in the rewind menu and then pressing the X button. In the Load & Save menu, you need to select the Save option and then pick your save slot.

How to load a quick save for PS1 and PSP games when playing on PS4 and PS5

If you want to load a quick save that you previously created from an emulated PS1 or PSP game on your PlayStation 4 or PlayStation 5 system, then you need to take the following steps:

1. When you are playing the emulated PS1 or PSP game, press the Options button on your controller.

2. Next, scroll down and then select the Load & Save option.

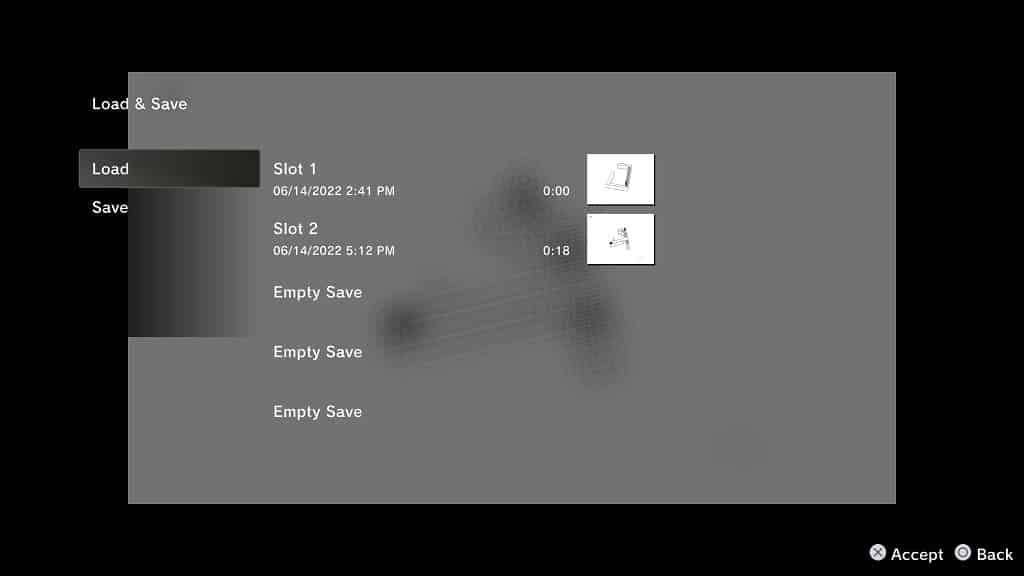
3. In the Load & Save menu, select Load.

4. Next, you can select the save file that you want to load into.

5. In the Load Save pop-up notification, press the X button to confirm the quick save file that you want to load into.

How to upgrade to PlayStation Plus Extra, Deluxe or Premium on PS4

The PlayStation Plus service has been revamped into multiple tiers as the original Plus subscription is now called Essential.

In regions that support game streaming, you are able to upgrade to the Extra or Premium tiers. For regions that don’t support playing games over cloud storage, you can upgrade to the Extra or Deluxe tiers instead.

To find out how you can upgrade from PlayStation Plus Essential to PlayStation Plus Extra, Deluxe or Premium tier on your PlayStation 4 or PlayStation 4 Pro game console, you can take a look at this tutorial from Seeking Tech.

How to access the PS Plus App on PS4 or PS4 Pro

In order to access the PlayStation Plus App on your PlayStation 4 or PlayStation 4 Pro console, you need to take the following steps:

1. Turn on your PS4 if you haven’t done so already.

2. Make sure that your console is connected to the Internet.

3. You should also make sure that you are signed into the PlayStation Network account that is tied to your current PlayStation Plus subscription.

4. In the system menu, you should see the new PS Plus App appear. Select its icon to go to the PlayStation Plus section.

How to upgrade your PlayStation Plus subscription to Extra, Deluxe or Premium on PS4

After opening the PS Plus App on your PlayStation 4 or PlayStation 4 Pro system, you need to take the following steps to upgrade your subscription:

1. From the front page of the PS Plus App, select the More option, which you can do by navigate all the way up and then to the right.

2. In the small pop-up menu, select Manage Subscription.

3. In the PlayStation Plus screen, you will see the following information:

  • Current Plan
  • Start Date
  • Next Payment Date
  • Next Payment

In this menu, you need to select the Change Plan option.

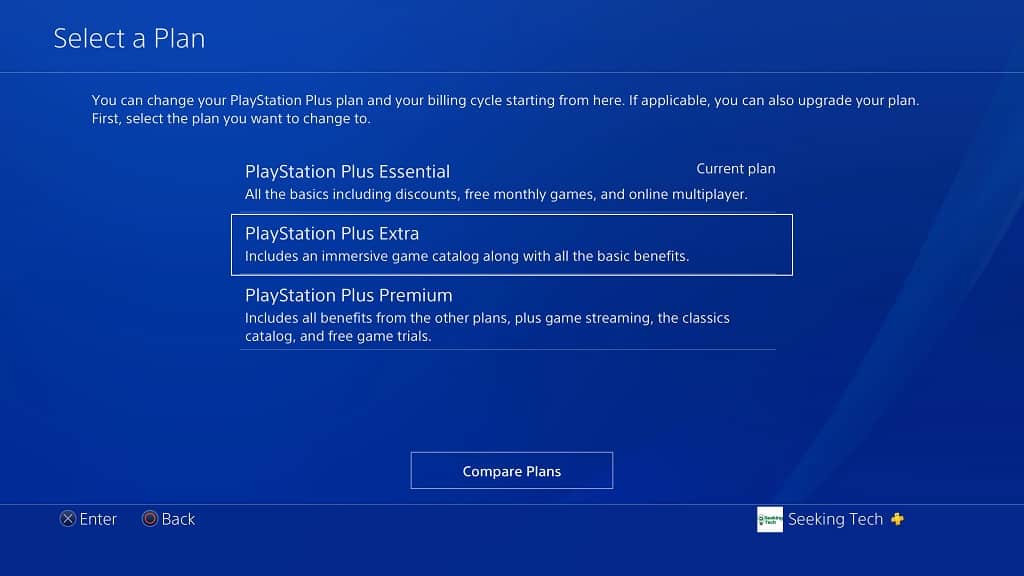
4. You should now arrive at the Select a Plan menu. Here, you can select the PlayStation Plus plan that you are want to upgrade to.

If you want to compare the different tiers, then you can select the Compare Plans option.

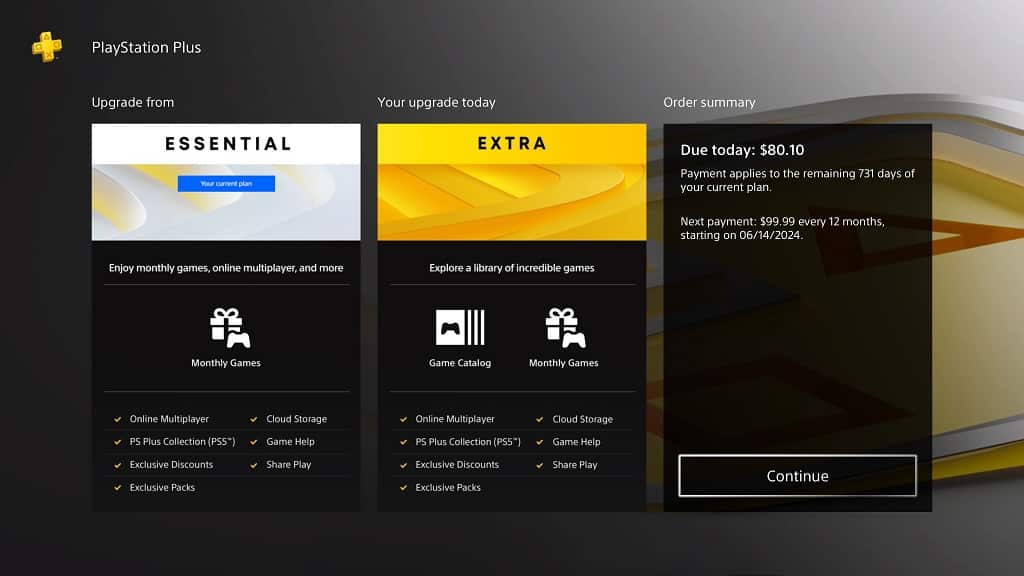
5. In the next screen, you will see how much you need to pay in order to upgrade your current plan to the new tier. You will also see the next payment amount once your current subscription expires.

Select the card underneath the “Upgrade your PS Plus payment plan today” heading to continue to the next step.

6. On the new screen, you will get a summary detailing your current PlayStation Plus tier, the PlayStation Plus tier you are planning to upgrade to, the amount of money due for the upgrade as well as the next payment amount and date.

Here, you need to select the Continue option in order to start the checkout process.

7. After you are done purchasing the upgrade, you should be able to start taking advantage of the benefits offered by the more expensive tier.