Sony WF-1000XM5 touch controls guide

In order to operate the Sony WF-1000XM5, you can use the touch sensors of the left and right earbuds. You can check out this controls guide from Seeking Tech to see how you can use some of the features of this listening device.

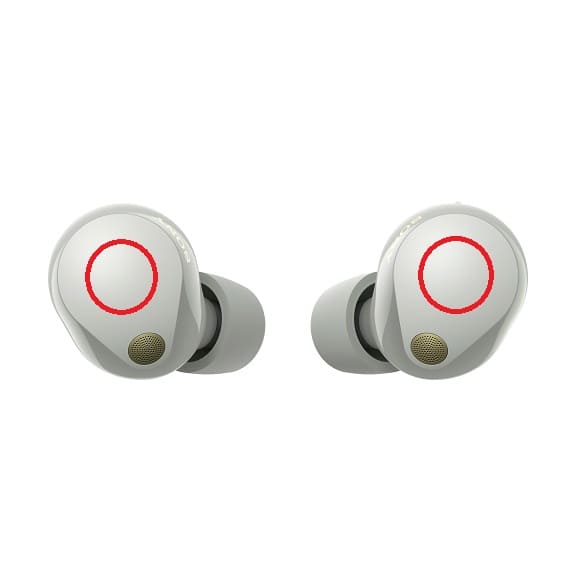
WF-1000XM5 Touch Sensor Locations

The touch sensors should be located in the middle areas of the left and right earbuds.
How to switch between noise cancellation and ambient sound mode

If you want to switch from noise cancellation to ambient sound mode or vice versa, you need to use your index finger to tap touch sensor on the left earbud once.

How to activate quick access

Quick access is a shortcut feature that you can set up by using the Sony | Headphones Connect app. This will allow you to play content from any corresponding media application.

If you haven’t done so already, open the Sony | Headphones Connect app and then link your WF-1000XM5 earphones. Afterwards, you should be able to find the Quick Access function, assign your desired action and then set touch controls to activate function to either a double or triple tap.

To activate quick access, you need to double or triple tap the touch sensor located on the left earbud.

How to lower the volume

To use your Sony WF-1000XM5 to lower the volume of the sound output, you need to quickly tap the touch sensor of the left earbud four times.

How to activate quick attention mode

Quick attention mode will lower the music, ringtone and/or call sounds being output by the earbuds. This will make it easier to hear the ambient sounds.

To enable this mode, you need to tap and hold the left earbud sensor.

How to play or pause music

In order to play or pause music while wearing your WF-1000XM5, you need to tap the touch sensor on the right earbud once.

How to skip to the beginning of the next track

If you want to skip to the start of the next track, you have to double tap the right earbud.

How to skip to the beginning of the previous track

To skip to the start of a previous track, you need to triple tap the touch sensor of the right earbud. This must be done at the beginning of the current track.

How to rewind to the beginning of the current track

To rewind to the beginning of the current track, you need to tap the right earbud’s touch sensor three times. This must be done while the current track is still playing.

How to receive or end a call

To receive an incoming call with the WF-1000XM5, you need to double tap the touch sensor of either the left or right earbud.

How to increase the volume

In order to increase the sound output volume, you have to quickly tap the right earbud’s touch sensor four times.

How to enable Siri or Google Assistant

If you want to activate the Siri or Google Assistant feature, you need to press and hold the touch sensor located on the right ear bud.

What to do if the LinkBuds S is not working

With the Sony LinkBuds S, you are able to listen to music and other types of audio through wireless ear buds.

If these ear phones do not seem to be working as advertised, then you can check out this troubleshooting article from Seeking Tech to see how you can potentially fix your problem.

1. First off, make sure that you don’t get your LinkBuds S too wet. Liquid could cause sound distorting as well as other issues for these ear buds. Not to mention that the charging case does not offer any water protection at all.

Therefore, we recommend that you make sure that your ear buds are completely dry before trying to use them.

To find out more information about how you can properly dry, as well as prevent the LinkBuds S from getting wet, you can take a look at this post.

2. You should also make sure that the internal batteries of your ear buds are charged. These ear phones can take up to 2 hours to be fully charged.

You can take a look at this guide if you are having problems trying to recharge the LinkBuds S.

3. Before you can connect the wireless ear phones to another device, you need to go through the Bluetooth pairing process.

While the LinkBuds S uses Bluetooth 5.2, it should also support the older versions of the connection. Furthermore, these ear buds will work with the A2DP, AVRCP, HFP and HSP profiles.

4. If you are able to pair and connect your ear phones properly but are experiencing issues when it comes to audio quality, then you can check out this article.

If the audio keeps skipping and/or dropping out, then we recommend taking a look at this guide to see how you can get rid of these issues.

5. A common way to fix most of the LinkBuds S problems is by doing the following:

  • Remove the ear buds from your ears if you haven’t done so already.
  • Next, you need to place the ear buds into the designated areas from within the charging case. Make sure that the contact points are aligned correctly.
  • Afterwards, close the top of the case.
  • Open the lid of charging case and then take out the ear buds.

By doing these actions, you will be able to refresh the Bluetooth connection of your ear buds.

6. Other common fixes are resetting and factory resetting the Sony LinkBuds S.

With a factory reset, for example, you will be removing any of the customized settings that may have been causing issues with the ear phones not working properly.

Keep in mind that, by restoring the LinkBuds S to its factory default setting, the original pairing information won’t work. To connect to the same device again, you need to delete or forget the previous pairing data and then pair the ear buds again.

You can follow the steps from this tutorial to see how you are able to reset and factory reset these ear phones.

7. If you still can’t get your LinkBuds S to work properly, then you should consider contacting Sony in order to get more help.

How to fix LinkBuds S call audio issues

The Sony LinkBuds S can be used for calls on your smartphone. You can also use these ear buds for video calls.

If you have having issues with low volume or muted audio during calls, then you can take a look at this troubleshooting article from Seeking Tech.

1. To start off, make sure that both the ear phones and the connected device are both turned on and connected to each other.

If you have problems turning on the LinkBuds S, you can check out this guide. For Bluetooth connection issues, you can check out this post.

2. You can also try restarting your phone or other calling device to see if doing so will fix your call audio problems.

3. If you can hear the other person but the volume is too low, then you can try using the volume buttons to make it louder.

4. If you are using an app, then you can try to increase the volume level if you are able to do so from within the application.

5. Make sure that you are wearing the ear buds correctly as you should put them as deep in your ear canals as possible without feeling uncomfortable. Otherwise, the sound output may be partially blocked off.

6. You can also try changing the ear bud tips to make sure that you can get clearer sound output during calls. Keep in mind that the sizes of the left and right ear bud tips to not have to be the same as they only need to feel comfortable in your ear canals.

7. If you are using a video calling app, then you can try searching the settings menu in the application for an option to change speaker and/or microphone setting to Headset (LinkBuds S Hands-Free).

8. Taking off the ear phones, placing them back into charging case and then closing the charging case lid may help fix the call audio problems.

Once you do all of the above, you can take the ear phones back out again and then reconnect it to the other device. Afterwards, you can try testing the call audio volume.

9. Resetting the Sony LinkBuds S may clear up any bugs that may have been causing the call audio to be low or completely muted.

If a regular reset does not seem to be working, then you can try a factory reset. By doing so, the ear phones will be returned to their original factory default settings.

You can check out this tutorial to learn about how you can reset/factory reset these ear buds.

How to fix LinkBuds S audio skips and dropouts

When using your Sony LinkBuds S, the audio may skip or completely dropout. If you are encountering these problems, then you can take a look at this troubleshooting article from Seeking Tech.

1. The sound skipping may be related to a weak Bluetooth signal.

The first step you can try is to make sure you aren’t cover the ear buds with any stickers or clothing as you may end up blocking the Bluetooth antennas.

2 Furthermore, you can try moving the connected device closer to your ear phones as you may be able to get a stronger and more stable wireless connection.

3. Avoid any objects that are in between the ear phones and the connected devices. These may include walls, metals as well as your own body.

4. If you are in an area with a lot of wireless devices, then it may be causing the Bluetooth connection to weaken, which will lead to audio skips and dropouts.

5. You can also try to change the sound quality mode.

In order to do so, make sure you download and install the “Sony | Headphones Connect” app. Afterwards, open the application and then connection your LinkBuds S. Finally, make sure that the sound quality mode is set to Priority on Stable Connection.

6. While you are using the “Sony | Headphones Connect” app, you should also make sure that you disable the Service Link feature as it could be the reason why you are experiencing audio dropouts.

7. If you have multiple apps open on your phone, tablet or computer, then these may be taking up a lot of hardware resources. As a result, there could have been a bottleneck that may be causing audio to not playback smoothly.

In this case, you can either closing the apps or fully restart the connected device.

8. Restarting the connected device will also help refresh its Bluetooth connection as well as close any lingering processes that may have been needlessly take up hardware resources and/or causing conflicts.

9. You can also try putting the ear buds back into the LinkBuds S charging case and closing the top lid. Afterwards, take them back out again to re-establish the Bluetooth connection to see if you are still getting any sound skipping and/or dropouts.

10. If you are using Adaptive Sound Control, then the audio may seemingly skip. According to Sony, this is perfectly normally, as the feature will temporarily pause the audio in order to adjust the noise cancellation function automatically.

If this feature bothers your listening experience, then you can disable it from the “Sony | Headphones Connect” app.

11. The audio skipping could also mean that something could be wrong with the software of your ear phones.

In you believe that this is the case, then you can first try to reset the LinkBuds S. If a regular reset isn’t helpful, then you can try doing a factory reset, which will revert the ear buds back to their default factory settings.

How to fix LinkBuds S Bluetooth connection issues

The Sony LinkBuds S uses Bluetooth in order to connect to other devices wirelessly. If you are having problems connecting, or keeping the connection stable, then you can take a look at this troubleshooting article from Seeking Tech.

1. The first step you can take is to make sure that you have the Bluetooth connection enabled for the device you are trying to connect with your LinkBuds S.

2. If the Bluetooth connection was turned on for the other device, then you can try restarting the other device.

A reset will help refresh the Bluetooth connection in addition to closing any apps and clearing processes that may have been causing conflicts.

3. There is a possibility that the ear phones may have been connected to a different device. For the uninformed, the Sony LinkBuds S will connect to the last Bluetooth device it was previously connected to.

If it is connected to a different device, then you need to disable the Bluetooth connection from the different device in order to connect the ear buds to a new device.

4. You should also try moving the LinkBuds S, as the device that you are trying to connect the ear phones to, closer together in order to get a stronger wireless connection.

5. When repositioning, avoid any physical objects, such as walls and metals, that may block the direct line of sight in between the ear phones and the other device.

6. Bluetooth and other wireless devices may also cause interference. Therefore, you may want to turn off the other wireless devices or move to a different room.

7. If the device you are trying to connect your Sony LinkBuds S has been put in to sleep mode or rest mode, then its Bluetooth connection may be turned off.

In this case, you can simply wake the device in order to re-connect your ear buds.

8. Check to see if your ear phones are actually turned on.

If you have having problems trying to power on the LinkBuds S, then we recommend that you take a look at this post.

9. Before you can connect your ear buds, you first need to pair it with the device.

If you can’t seem to get the pairing process working correctly, then you can check out this troubleshooting article.

10. You can also try putting the ear phones back into the charging case. Make sure that the are properly inserted into their designated positions. Afterwards, close the lid of the case.

You can then open the lid of the charging case and take out the ear phones to see if you can re-establish the Bluetooth connection.

11. Resetting or factory resetting the Sony LinkBuds S may also help fix the Bluetooth issues. For the latter option, you will be restoring your ear buds to the factory default settings.

To learn more about how you can reset and factory reset this product, you can check out this link.

If you still can’t get a stable Bluetooth connection after trying all of the aforementioned potential solutions, then you can try contacting Sony to get additional support.

How to fix LinkBuds S pairing issues

Before being able to connect the Sony LinkBuds S to another device, you first need to pair the two together. If you are having problems with the pairing process, then you can take a look at this troubleshooting article at Seeking Tech.

1. To start off, make sure you have the Bluetooth connection turned on for the other device.

For the uninformed, the wireless ear phones of the LinkBuds S use Bluetooth version 5.2. It also supports the following Bluetooth profiles:

  • A2DP
  • AVRCP
  • HFP
  • HSP

2. You should also make sure that the ear phones and the other devices aren’t too far away from each other. According to Sony, the distance should be no more than 3 feet (or 1 meter).

3. Make sure that there aren’t any other wireless devices nearby as these may interfere with the pairing process.

If there are, then you can try either turning off the other devices or moving to another area.

4. You should also make sure that there aren’t any physical objects that are in between the direct line of sight of the ear phones and the device you are trying to pair them to.

5. Keep in mind that the ear phones will automatically be put in to pairing mode when you take them out of the charging case for the first time or after you factory reset them.

In you want to send the ear buds into pairing mode for a subsequent device, then you need to put them back into their designated positions in the charging case. Afterwards, you need to press and hold the pairing button on the case for at least 5 seconds to go into pairing mode.

6. If you still can’t pair the Sony LinkBuds S, then you can try to make sure that the ear buds are properly fitted in to their positions in the charging case.

7. If you try to pair the ear phones to the same device as before, then it may not work.

In this case, you need to delete or forget the original pairing information before starting the new pairing process.

8. You can also try restarting the other device as doing so will refresh its Bluetooth connection as well as potentially clear up any apps or processes that may have been conflicting with the pairing procedure.

9. Furthermore, you can try plugging the charging case into a power source to make sure that your ear phones have enough battery life to go through with being paired to a device.

10. Resetting the ear buds may also help fix your problems.

If a normal reset does not seem to be working, then you may also consider doing a factory reset, which will restore the ear phones to its original factory default settings.

You can take a look at this previous article to see how you can reset and factory reset your LinkBuds S.

If none of the aforementioned steps help with fixing the pairing errors, then we suggest contacting Sony to get additional help.

How to fix distorted and low-quality sound issues with Sony LinkBuds S

When using your Sony LinkBuds S to listen to audio, you may experience distorted sound output. The audio quality may also be lower than what you expected.

To see how you can fix these sound output issues, you can take a look at this troubleshooting article from Seeking Tech.

1. The first step we recommend taking is to make sure that the ear tips and ear buds are clean.

If these parts appear to be dirty, then we recommend that you check out this tutorial to see how you can properly clean the LinkBuds S.

2. While the ear phones are protected against light water splashes, more significant exposures to liquid may end up distorting the sound output. So, if the device gets wet, we recommend that you avoid using it until it is completely dry again.

To find out more about how you can deal with liquid damage for the Sony LinkBuds S, you can check out this guide.

3. Next, you need to make sure that you are wearing the ear phones properly. You need to put the ear bud tips as deep as possible into your ear canal without feeling any discomfort.

4. You can also try changing the ear bud tips to see if you can get rid of the distortion and/or getting better sound output quality.

Keep in mind that the left or right ear bud tips do not need to be the same size. You just have to make sure they are as comfortable as possible to wear on your left and right ears.

5. If you only get poor sound quality right after you connect your ear phones to a computer, laptop, smartphone, tablet or another device, then it may due to the connected device prioritizing a stable connection instead of sound output quality.

In this case, you can simply wait for a few seconds to see if the audio quality improves on its own.

6. If the sound output is still not optimal, then you can try switching the Bluetooth connection to A2DP on the device that is connected to your LinkBuds S.

In order to do so, you need to look at the usual manual of the connected device.

7. The media you are playing may exhibit distorting and/or bad sound output if the volume gets too loud. Therefore, you can try turning down the volume to see if doing so will fix your issue.

8. The media you are playing could also have distorted and/or low-quality audio. In this case, you can try playing a different type of media to see if you can get better sound output.

9. If you are near a device that is emitting ultrasonic sound waves, then it may cause sound distortion on your LinkBuds S.

In this case, you can either move away from the ultrasonic device or disable the Noise Cancellation/ Ambient Sound Mode feature by using the official “Sony | Headphones Connect” app.

If none of the aforementioned steps help with fixing the sound output of your ear phones, then we recommend contacting Sony for additional help.

What to do if there is no sound coming out of the Sony LinkBuds S

If you don’t hear any sound coming out of one, or both, ear phones of the Sony LinkBuds S, then you can take a look at this troubleshooting article from Seeking Tech to see what steps you can take to fix this issue.

1. To start off, make sure that the ear phones are actually powered on.

If you have having issues trying to turn on the LinkBuds S, then you can take a look at this guide.

2. You can also try disconnecting and then reconnecting the Bluetooth connection.

3. Furthermore, you can try forgetting the Bluetooth pairing and then pair the ear phones back to the same device again.

4. On the other device, make sure that you didn’t accidentally stop, pause or mute the audio or video.

5. If you are using an audio or video playing app, then you can try restarting it.

6. You can also try restarting the other device.

7. If you are using a laptop or desktop computer with multiple audio output options, then make sure that you set the sound output to the LinkBuds S.

8. Keep in mind that the audio will be paused when you set the ear phones to Speak-to-Chat mode. This mode can accidentally be turned on.

In order to disable Speak-to-Chat, you need to do so by using the official “Sony | Headphones Connect” mobile application.

9. If you are using the Service Link feature, then only the right ear bud of the LinkBuds S will be working.

You can use the “Sony | Headphones Connect” app to disable Service Link.

10. If you are using Amazon Alexa or Google Assistant, then only the right ear bud can be used by default.

You can change this setting in the Playback Control section in the “Sony | Headphones Connect” app.

11. If you are using HFP (Hands-Free Profile) or HSP (Headset Profile) when connecting to the other device, then only one of the ear phones may end up outputting sound.

In this case, try to look in the settings of the smartphone app or computer program you are using to see if you can make both ear phones output sound.

12. There is a possibility that the ear buds are clogged up.

To see how you can safely clean the Sony LinkBuds S, you can check out this guide.

13. Resetting the ear phones may be able to get them to output sound again.

If a standard reset does not work, then you can try restoring the factory default settings.

How to fix Sony LinkBuds S battery drain issues

For every full charge, the ear phones of the Sony LinkBuds S have a battery life up to 9 hours. If the charge is draining a lot faster than what you are expecting, then you can check out this troubleshooting guide at Seeking Tech.

1. The LDAC codec uses a lot more battery charge when compared to the AAC and SBC codecs.

If you are using LDAC, the maximum battery life is expected to be only 4.5 hours. With AAC and SBC, you can get up to 9 hours before needing to recharge the ear buds.

In order to switch the codec being used by your Sony LinkBuds S, you can do so by using the “Sony | Headphones Connect” mobile application.

2. Using the noise cancellation feature will also reduce the battery life of these wireless ear buds.

If you are using noise cancellation with LDAC, then the maximum battery life drops to just 3.5 hours.

For the AAC and SBC codecs, the maximum battery life drops all the way down to 6 hours.

3. Ambient Sound Mode will also cause the battery to drain significantly.

For LDAC, the maximum battery life will only be 3.5 hours when using this mode.

For AAC and SBC, the length of usage tops out at 6 hours.

4. Using the ear phones for calls will also significantly drain the batteries of the Sony LinkBuds S.

If you are only using the ear buds for calls, then you will only get a maximum of 3.5 hours per full charge.

5. The following features, when enabled, will also take a good chunk of batter charge for the Sony LinkBuds S:

  • DSEE Extreme
  • Equalizer
  • Service Link
  • Speak-to-Chat
  • Voice Assistant (including Amazon Alexa and Google Assistant)

Thankfully, you can disable these features from the “Sony | Headphones Connect” app.

6. If you aren’t using the LinkBuds S, then make sure you turn it off immediately.

To find out how you can properly turn off these ear phones, you can take a look at this tutorial.

7. When you aren’t using the ear buds, then you should also put it back in the charging case so that both will be recharged by the next time you need to use them.

You should also make sure that you keep the top of the charging case closed so that you don’t waste any battery life.

How to fix Google Pixel Buds A-Series pairing issues

Before you need to connect your Google Pixel Buds A-Series to another device, you first need to go through the pairing process.

If you are having a hard time trying to pair these wireless ear buds, then you can take a look this troubleshooting guide to see how you can potentially fix this issue.

1. The first step we recommend taking is to charge your Google Pixel Buds A-Series in order to make sure that it has plenty of battery life for the pairing process.

If you are encountering problems trying to recharge this device, then you can check out this article.

2. Next, you should restart the device that you are trying to pair with your Google Pixel Buds A-Series.

3. After restarting the other device, make sure you enable its Bluetooth connection.

4. If the device also offers a location feature, then you should turn that on as well.

5. Furthermore, make sure that the other device is in the Bluetooth menu where it shows a list of devices that can be paired.

6. You then need to put your Google Pixel Buds A-Series in pairing mode by taking the following steps:

  • Open the charging case of your Google Pixel Buds A-Series.
  • If you haven’t done so already, place the left and right ear buds into their designated positions in the case. If place correctly, both buds should snap into place.
  • Press and hold the button located on the back of the charging case until you see a pulsating white light appear on the front of the case.
  • You should now be able to see the Google Pixel Buds A-Series appear on the Bluetooth menu of the other device.
  • Tap on the icon on the Bluetooth menu and you should see the option to pair your Pixel Buds A-Series.

7. If your ear buds still aren’t paired to the other device, then you can try resetting the buds by doing the following:

  • To begin, make sure you plug the Google Pixel Buds A-Series into a power source by using a USB cable.
  • Open the charging case and make sure you place the buds in their designated positions.
  • Press and hold the button on the back of the case for at least 30 seconds.
  • The status indicator on the case should blink white and orange during the reset process.
  • Once the status indicator only blinks, you can try to pair it to the other device again.

10. If you already have a Google Pixel Buds A-Series paired on the other device, then you can try deleting or forgetting it. Afterwards, you can try pairing your ear buds to see if you are able to do so.

11. We also recommend that you update the driver or firmware of the other device to see if a new release help improve the Bluetooth pairing process.

12. Moreover, you may want to consider factory resetting the other device. In order to do so, please refer to the instruction manual for the other device.

13. You can also factory reset the Google Pixel Buds A-Series by following the steps laid out in this tutorial.

If none of the aforementioned potential solutions help, then you can contact Google for additional support.