How to enable Hisense U7G and U8G VRR support for PS5

The Hisense U7G and U8G ULED Premium Quantum Dot QLED Series Android 4K Smart TVs are compatible with the Variable Refresh Rate feature of the PlayStation 5 and PlayStation 5 Digital Edition game consoles. By using VRR you will be able to remove any stutters and screen tearing from games that aren’t able to run at a locked frame rate.

To find out how you can use this feature for your Hisense ULED television, you can take a look at this tutorial at Seeking Tech.

To start off, it should be noted that this guide will be covering the following television models:

  • 55″ Hisense U7G ULED TV (55U7G)
  • 65″ Hisense U7G ULED TV (65U7G)
  • 75″ Hisense U7G ULED TV (75U7G)
  • 55″ Hisense U8G ULED TV (55U8G)
  • 65″ Hisense U8G ULED TV (65U8G)

1. If you haven’t done so already, make sure your U7G or U8G has been updated to the latest firmware. A new update may improve the performance and/or compatibility of using the Variable Refresh Rate on your television set for playing videogames from your PS5 console.

2. VRR was added to the PlayStation 5 and PlayStation 5 Digital Edition game consoles through a firmware update. Therefore, we recommend that you keep your system up-to-date as well.

3. Once you have both devices updated, use a HDMI 2.1 cable to connect your PS5 console to a HDMI 2.1 port of your Hisense U7G or U8G.

For the uninformed, your PS5 console should come with a HDMI 2.1 cable packed into the box.

If you are looking for a HDMI 2.1 cable, then you can take a look at this guide.

4. Turn on your game system and TV.

5. If your U7G or U8G is displaying another input source, then you need to switch over to the input source that is displaying your PS5.

6. Next, you need to press the menu button on the remote control of your Hisense television.

7. In the Menu of your television, select HDMI Format.

8. Make sure that the HDMI Format setting is set to Enhanced.

9. Go back to the TV menu and then select Picture.

10. From the Picture menu, select Advanced Settings.

11. In the Advanced Settings menu, make sure you set Instant Game Response to Auto.

12. In the same Advanced Settings menu, you should also make sure that FreeSync has been turned on as well.

13. On your PS5, go to the home screen, which is the main menu where you can pick which game or media app to open.

14. From the home screen, head to Settings by select the gear cog icon located on the top right side of the menu.

15. Inside of Settings, select Screen and Video.

16. From the Screen and Video submenu, find and select Video Output on the left column.

17. On the right side in the same submenu, make sure you set VRR to Automatic to enable Variable Refresh Rate for supported games.
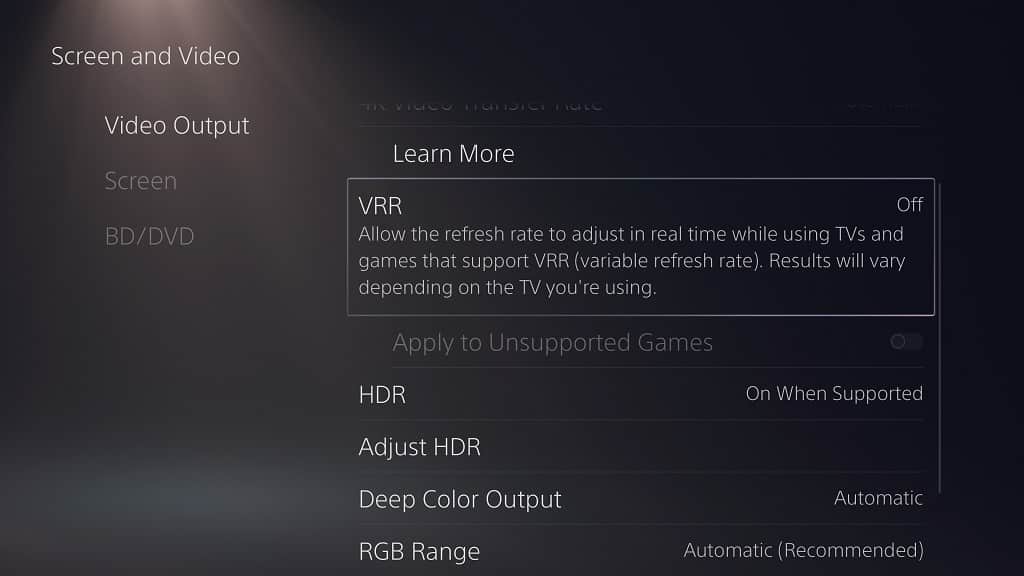
18. Right underneath the VRR setting, you can also turn on Apply to Unsupported Games to enable the VRR feature for games that do not natively use it.

How to fix picture issues with the Hisense U6G, U7G and U8G

When using the Hisense U6G, U7G or U8G, you may experience screen issues such as having no picture, black picture, white picture, distorted picture, blurriness, flickering, random cut outs, tinted picture and/or wavy picture.

To see how you can fix these problems with the new Hisense televisions, you can take a look at this troubleshooting guide from Seeking Tech.

To begin, it should be noted that this article is based on the following TV models from the U6G, U7G and U8G series:

  • 50″ U6G (50U6G)
  • 55″ U6G (55U6G)
  • 65″ U6G (65U6G)
  • 75″ U6G (75U6G)
  • 55″ U7G (55U7G)
  • 65″ U7G (65U7G)
  • 75″ U7G (75U7G)
  • 55″ U8G (55U8G)
  • 65″ U8G (65U8G)

1. The first step you can take is to try to switch to a different channel or input source.

If another channel or input is working correctly, then you can try disconnecting and then reconnecting the antenna, HDMI and/or other inputs.

If you are experiencing issues with your television channels, then you can try readjusting the antenna position to see if the blurriness, flickering and/or random cut offs will still appear.

2. You should also make sure that the game system, set top box, media player and/or other devices connected to your Hisense television set is working normally and have the correct display settings.

3. If you are not getting any pictures at all, then you can try unplugging your Hisense U6G, U7G or U8G from the power outlet and then wait for 60 seconds.

Afterwards, you can plug it back into the power outlet and then try to turn it on to see if the screen will show any pictures.

If you aren’t getting any pictures, then you can try plugging your TV into another power outlet.

4. If you are only getting a black or white screen, then you can try adjusting the color saturation of your television.

To do so, press the home button on your TV remove and then select the gear icon. You then need to do to Picture > Calibration settings > Color Tuner.

Make sure that saturation is set to at least 50.

5. The sharpness features could also be causing picture blurriness, flickering and/or randomly cut-offs with your Hisense television.

To adjust the sharpness setting, press the home button on the remote and then select the gear icon.

Afterwards, head over to Picture > Sharpness. You can then decrease or increase the sharpness setting to see if that will improve the picture quality.

6. If your TV screen appears to be tinted in pink, purple, red or other colors, then you need to adjust the white balance.

To find this setting, press the home button and then select the gear icon.

You then need to go to Settings > Picture > Calibration Settings > White Balance. Next, decrease or increase the white balance to remove the tinted picture from the television screen.

7. Other electronics, such as smartphones, may cause display issues if they are placed close to your U6G, U7G or U8G.

So, if you are getting picture quality issues, try to make sure that there aren’t any electronic devices that may cause distortions to your television screen.

How to fix Hisense U6G, U7G and U8G speaker audio issues

If you have a Hisense U6G, U7G or U8G, then the television speaker may sound distorted or randomly cuts out. The TV volume may also sound too low or be completely muted even if the screen is showing a picture.

In order to fix the sound quality issues with these TV sets, you can take a look at this troubleshooting guide at Seeking Tech.

Before we begin, it should be noted that this article is based on the following screen sizes from the Hisense U6G, U7G and U8G television series:

  • 50″ U6G (50U6G)
  • 55″ U6G (55U6G)
  • 65″ U6G (65U6G)
  • 75″ U6G (75U6G)
  • 55″ U7G (55U7G)
  • 65″ U7G (65U7G)
  • 75″ U7G (75U7G)
  • 55″ U8G (55U8G)
  • 65″ U8G (65U8G)

1. If you are getting audio issues while watching an over-the-air or cable channel, then you can disconnect and then reconnect the cable from the ANT/Cable tuner.

2. If you are using an antenna to get a signal for your television channels, then you can also try repositioning the antenna to see if you can get a stronger signal strength to see if you can get better audio.

3. If you are connecting another device through the composite input or HDMI input, then you can try disconnecting and then re-connecting the cables.

4. You can also try adjust the sound settings of the devices you have connected to your U6G, U7G or U8G.

5. Of course, you should make sure that you didn’t accidentally turn down the volume or mute the devices you have connected to your Hisense television.

6. Moreover, you can try to unplug the TV set from the power outlet, wait 30 seconds, re-plug it back into the power outlet and then turn it back on again.

7. If none of the aforementioned potential solutions work when it comes to fixing the sound quality of your TV speaker, then you might want to try changing the sound mode by taking the following steps:

  • Press the home button on your Hisense TV remote.
  • Select the gear icon in the menu.
  • Select Sound.
  • Select Sound Mode.
  • Select a preset.

8. You can also try enabling or disabling sound settings. In order to do so, press the home button on the remote, select the gear icon and then select Sound.

In the Sound menu, you will get the following customization options:

  • Audio Output
  • WiSA Speaker
  • eARC
  • TV Speaker
  • TruBass HDX
  • TruSurround: X
  • Dialog Clarity
  • TruVolume HD
  • Dolby Atmos

Keep in mind that you won’t be able to turn on the TV speakers if you are using eARC or enabled Bluetooth audio output through the Audio Output settings. So, make sure to turn these off in order to turn on the TV speakers of your Hisense television.

9. Furthermore, you can try adjusting the various sound parameters of your U6G, U7G or U8G.

To do so, press the home button on your remote, select the gear icon, select Sound and then select Advanced Settings.

You can then adjust the following:

  • Balance
  • Volume Level
  • Auto Volume Control
  • Digital Audio Out
  • Digital Audio Delay
  • Lip Sync
  • Equalizer
  • Preferred Audio Language
  • Headphone Mode
  • Headphone Volume

10. You can also reset the sound settings of your Hisense television to its original factory defaults, which may help resolve your sound issues.

To do so, press the home button on the Hisense remote, select the gear icon, select Sound and then select Reset.

11. Keep in mind that the U6G, U7G and U8G does not support the DTS CD bitstreams. As a result, playing back audio from that particular format may cause issues.

How to prevent and fix overheating issues with the Hisense U6G, U7G and U8G

Your Hisense U6G, U7G or U8G television set may feel hot when touched. You may also occasionally hear clicking or popping noises from your TV.

To see how you can prevent and fix these potential overheating issues, you can take a look at this troubleshooting guide at Seeking Tech.

Before we begin, it should be noted that this article should cover the following screen sizes from the U6G, U7G and U8G series:

  • 50″ U6G (50U6G)
  • 55″ U6G (55U6G)
  • 65″ U6G (65U6G)
  • 75″ U6G (75U6G)
  • 55″ U7G (55U7G)
  • 65″ U7G (65U7G)
  • 75″ U7G (75U7G)
  • 55″ U8G (55U8G)
  • 65″ U8G (65U8G)

Why does the Hisense U6G, U7G and U8G feel hot when touch?

In order to output sound and a picture, your Hisense U6G, U7G or U8G will need to use electricity. Like all electronics, the energy being utilized will generate heat.

Normally, the heat is dissipate from the U6G, U7G or U8G through the vents. If you use your TV for an extended length of time, however, then the heat dissipation system will get a little overwhelmed. As a result, your television set will feel hot when touched.

With that said, feeling hot to touch is completely normal as, according to Hisense, the heat won’t have a negative impact to the functionality and performance of your U6G, U7G or U8G.

Why do your Hisense U6G, U7G and U8G TV make clicking or popping noises?

When you are using your U6G, U7G or U8G, you may hear the TV making a clicking or popping noise. This happens when your television set heats up or cools down, causing the plastic on the television set to expand when heating up or contract when cooling down.

According to Hisense, these noises are perfectly normally and won’t hinder your TV’s functionality or performance.

How to prevent your U6G, U7G and U8G from getting hot

In order to prevent your Hisense U6G, U7G or U8G from getting hot, then you can try taking the following precautions:

1. First off, make sure that the room temperature is not too hot when you are using your Hisense television.

2. Furthermore, you should avoid placing the TV set near any heat source such as a space heater.

3. You should also avoid using the television in a high humidity environment.

4. Moreover, you shouldn’t place the U6G, U7G or U8G anywhere where it will have direct contact with sunlight.

5. Last but not least, you need to make sure you don’t cover the vents of your Hisense TV as these are needed to blow the hot air out of your set.

How to cool down a hot U6G, U7G and U8G

If you feel that your Hisense U6G, U7G or U8G is getting a little too hot, then you should be able to cool it down by doing the following:

1. Turn off the TV.

2. Unplug the power cable from the power outlet.

3. You may also want to consider cleaning any noticeable dust that may be blocking the vents. In order to do so, we recommend using a dry, lint-free cloth.

4. After unplugging the television set, and potentially cleaning it, we recommend waiting for the TV to cool down.

5. After waiting for the TV to reach a cooler temperature, you should be able to re-plug the power cable and then turn your U6G, U7G or U8G back on again.

Hisense U6G, U7G, U8G and U9DG wall mount specs

Hisense has several new television models released in 2021 with the U6G, U7G, U8G and U9DG. You can follow this guide to see what are the most suitable options when it comes to mounting these new TVs on a wall in your home.

Mounting Specs

You can take a look at the mounting specifications for the currently available screen sizes of the U6G, U7G, U8G and U9DG below:

50” Hisense U6G 4K ULED Hisense Android Smart TV (50U6G)

  • Dimensions without Stand: 43.8” x 25.4” x 3.1”
  • Weight without Stand: 27.8 lbs.
  • Mount VESA: 300 mm x 200 mm
  • Mount Screw Type: M6

55” Hisense U6G 4K ULED Hisense Android Smart TV (55U6G)

  • Dimensions without Stand: 48.3” x 28.0” x 3.1″
  • Weight without Stand: 32.4 lbs.
  • Mount VESA: 300 mm x 200 mm
  • Mount Screw Type: M6

65” Hisense U6G 4K ULED Hisense Android Smart TV (65U6G)

  • Dimensions without Stand: 57.0” x 32.9” x 3.1″
  • Weight without Stand: 65.0 lbs.
  • Mount VESA: 300 mm x 200 mm
  • Mount Screw Type: M6

75” Hisense U6G 4K ULED Hisense Android Smart TV (75U6G)

  • Dimensions without Stand: 66.0” x 37.8” x 3.3″
  • Weight without Stand: 63.5 lbs.
  • Mount VESA: 600 mm x 300 mm
  • Mount Screw Type: M6

55” Hisense U7G 4K ULED Hisense Android Smart TV (55U7G)

  • Dimensions without Stand: 48.3” x 28.2” x 3.5″
  • Weight without Stand: 32.4 lbs.
  • Mount VESA: 300 mm x 200 mm
  • Mount Screw Type: M6

65” Hisense U7G 4K ULED Hisense Android Smart TV (65U7G)

  • Dimensions without Stand: 57.0” x 33.1” x 3.5″
  • Weight without Stand: 66.0 lbs.
  • Mount VESA: 300 mm x 200 mm
  • Mount Screw Type: M6

75” Hisense U7G 4K ULED Hisense Android Smart TV (75U7G)

  • Dimensions without Stand: 66.0” x 38” x 3.3″
  • Weight without Stand: 76.3 lbs.
  • Mount VESA: 600 mm x 300 mm
  • Mount Screw Type: M6

55” Hisense U8G 4K ULED Hisense Android Smart TV (55U8G)

  • Dimensions without Stand: 48.5” x 28.2” x 3.9″
  • Weight without Stand: 38.1 lbs.
  • Mount VESA: 400 mm x 300 mm
  • Mount Screw Type: M6

65” Hisense U8G 4K ULED Hisense Android Smart TV (65U8G)

  • Dimensions without Stand: 57.1” x 33.1” x 4.1″
  • Weight without Stand: 53.4 lbs.
  • Mount VESA: 400 mm x 400 mm
  • Mount Screw Type: M6

75” Hisense U9DG 4K ULED Hisense Android Smart TV (75U9DG)

  • Dimensions without Stand: 66.0” x 39.0” x 3.4″
  • Weight without Stand: 90.6 lbs.
  • Mount VESA: 600 mm x 400 mm
  • Mount Screw Type: M8

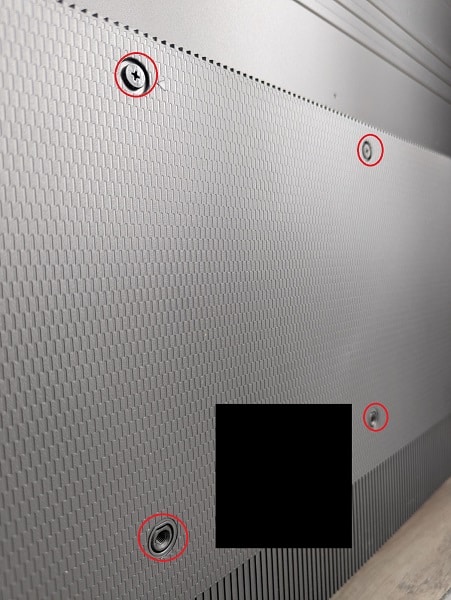
For the uninformed, the Mount VESA is a measurement featuring the horizontal and vertical distances of the four mounting screw holes located on the back of the Hisense U6G, U7G, U8G and U9DG.

VESA Mounting Pattern (example from different TV).

Compatible fixed mount

If you are looking for a mount to simply keep your U6G, U7G, U8G or U9DG in a fixed position, then we recommend getting the MI-305B Low-Profile TV Wall Mount from Mount-It.

With this mounting bracket, your Hisense television will be sitting at just 1” away from the wall. As a result, your TV will barely stick out. A slide-in security bar is also included to prevent your television from being stolen (you do need a padlock, which is not included, however).

The MI-305B has a VESA mount range of 100 mm x 100 mm to 750 mm x 450 mm. It should be able to hold weights of up to 175 pounds. Therefore, it should be compatible with all the screen sizes of the U6G, U7G, U8G and U9DG.

This Mount-It product can be installed on a brick wall, concrete wall in addition to wall with studs that are 8″, 16” or 24” apart. You can also adjust the height of your 2021 Hisense TV after installing the mount of the wall.

If you are interested, you can purchase our recommend fixed mount for the U6G, U7G, U8G and U9DG on Amazon with the following link:

Compatible tilt mount

Tilting you U6G, U7G, U8G or U9DG will help eliminate screen glares and give you better viewing angles. If you are interested in getting this feature, then we recommend taking a look at the EGLT3 Tilting TV Wall Mount from ECHOGEAR.

When used with this mount, your 2021 Hisense television set will be sitting at 2.3” away from the wall. This will give you space to tilt your screen at a maximum of 10 degrees.

The EGLT3 has a weight capacity limit of 135 pounds in addition to supporting a VESA mounting range of 200 mm x 100 mm to 600 mm x 400 mm. Therefore, this product should work with every screen size from the U6G, U7G, U8G and U9DG series.

The EGLT3 can be put on concrete walls, walls with studs that are spaced 16” apart and walls with studs that are spaced 24” apart. If your Hisense TV ends up looking off balanced, you can re-level it post-installation.

You can purchase our recommend tilt mount for the U6G, U7G, U8G and U9DG, if you are interested, on Amazon via the following link:

Compatible full motion mount

If you want to watch your U6G, U7G, U8G or U9DG from many different viewing arrangements, then you should consider getting a swiveling mount. If you are interested, then we recommend checking out the VLF728-B2 Premium Full Motion TV Wall Mount from Sanus.

With this product, you will be able to extend your 2021 Hisense television set from 2.15” to 28” away from the wall. The long extension will let you swivel your screen up to 57 degrees to the left or up to 57 degrees to the right.

With this Sanus Systems mount, you can also tilt your display at a maximum of 15 degrees downwards as well as a maximum of 5 degrees upwards. Furthermore, you can even roll your TV at up to 5 degrees.

The VLF728-B2 supports up to 125 pounds in addition to a VESA Mount range of 200 mm x 200 mm to 600 mm x 400 mm. So, it should be compatible with all screen size options of the U6G, U7G, U8G and U9DG.

The Sanus VLF728-B2 can be installed on a concrete wall or a wall with wood studs that are at least 16” apart.

If you are interested, you can purchase our recommend swiveling mount on Amazon with the following link: