How to play audio files from USB storage on JBL PartyBox On-The-Go

The JBL PartyBox On-The-Go is capable of playing music and other audio files from a USB storage device. To see how you can use this feature, you can check out this guide at Seeking Tech.

JBL PartyBox On-The-Go USB Minimum Requirements

In order to use a USB storage device with the JBL PartyBox On-The-Go, you need to meet the following minimum requirements:

  • USB Connector: USB Type-A
  • USB Interface: USB 2.0 or later
  • USB Format: FAT16 or FAT32

Supported Audio Formats for JBL PartyBox On-The-Go USB Audio Playback

The PartyBox On-The-Go speaker is compatible with the following audio formats for playback when using the USB connection:

  • WAVE Extension, PCM Codec, 44.1 KHz to 192 KHz Sample Rate and less than 5 Mbps Bitrate
  • WAVE Extension, LPCM Codec, 44.1 KHz to 192 KHz Sample Rate and less than 5 Mbps Bitrate
  • WAVE Extension, IMA_ADPCM Codec, 44.1 KHz to 192 KHz Sample Rate and less than 5 Mbps Bitrate
  • WAVE Extension, MPEG Codec, 44.1 KHz to 192 KHz Sample Rate and less than 5 Mbps Bitrate
  • WAVE Extension, MULAW Codec, 44.1 KHz to 192 KHz Sample Rate and less than 5 Mbps Bitrate
  • MP3 Extension, MPGE1 layer1/2/3 Codec, 32 KHz to 48 KHz Sample Rate and 32 Kbps to 320 Kbps Bitrate
  • MP3 Extension, MPGE2 layer1/2/3 Codec, 16 KHz to 24 KHz Sample Rate and 8 Kbps to 160 Kbps Bitrate
  • MP3 Extension, MPGE2.5 layer3 Codec, 8 KHz to 12 KHz Sample Rate and 8 Kbps to 160 Kbps Bitrate
  • WMA Extension, up to 320 Kbps Sample Rate and 8 Kbps to 48 Kbps Bitrate

How to connect USB storage device to JBL PartyBox On-The-Go

In order to connect a USB storage drive to the JBL PartyBox On-The-Go, open the cover located on the back of the speaker.

Here, you should find the USB Type-A port that you need to use in order to plug in your USB storage device.

How the JBL PartyBox On-The-Go will play USB audio files

After plugging in your USB storage device, the JBL PartyBox On-The-Go will scan for audio files.

The speaker will start to play compatible audio files, in alphabetical order, from the root folder first and then up to 8 levels of subfolders.

So, if the PartyBox On-The-Go can’t find your audio file, first make sure that the file is in a compatible format. You can then try moving the audio file to the root folder to see if the speaker is able to detect it.

How to control the JBL PartyBox On-The-Go will play USB audio files

To control the JBL PartyBox On-The-Go when it is playing an audio file thorough a USB storage device, you have the following options:

  • Press the Play button once to play an audio file from the USB connection.
  • When an audio file is playing, press the Play button once to pause the to pause the audio.
  • When an audio file is playing, press the Play button twice in quick succession to skip to the next audio file.
  • When an audio file is playing, press the Play button three times in quick succession to skip to the previous audio file.
  • When an audio file is playing, use the + button to increase the volume as well as the – button to decrease the volume.
  • When an audio file is playing, press and hold the + and – buttons at the same time to mute. You can also press these buttons at the same time to unmute the speaker.

Can you play audio from USB, Bluetooth and AUX connections at the same time with PartyBox On-The-Go?

The JBL PartyBox On-The-Go can only playback audio from one source at a time.

The USB storage device is top priority. This means that the speaker will switch to playing audio files from the USB connection every time you plug a compatible device into its USB port.

The second top priority is Bluetooth. So, if you plug a USB storage device into the PartyBox On-The-Go while it is playing audio from a Bluetooth connection, then the speaker will automatically switch to the audio from the USB device.

Audio coming from AUX input is the lowest priority. This means that the JBL PartyBox On-The-Go will only play audio files over the AUX connection if the speaker isn’t connected to a Bluetooth or USB connection.

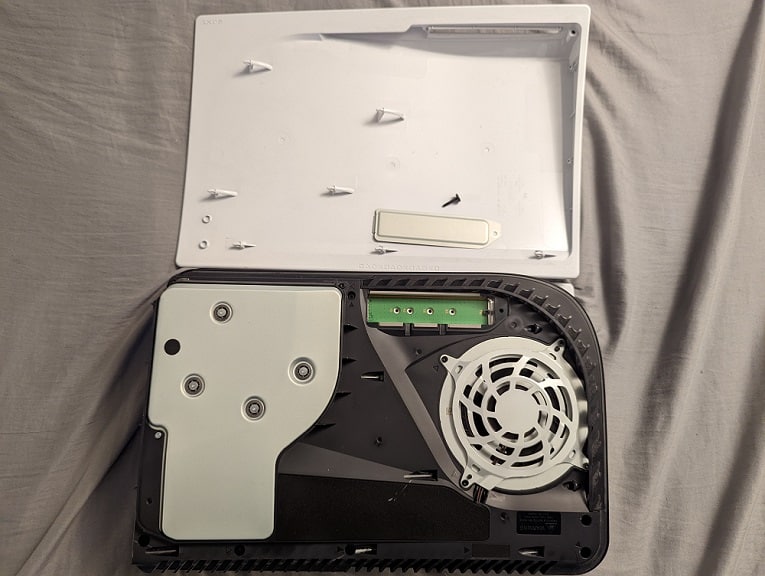
How to install the Thermal Grizzly NVMe M.2 SSD Cooler for PS5

The Thermal Grizzly NVMe M.2 SSD Cooler can be used as a heatsink for a PlayStation 5 compatible M.2 solid state drive.

To see how you can properly install this product, along with a SSD, for your PS5 or PS5 Digital Edition system, you can take a look at this tutorial at Seeking Tech.

How to install the Thermal Grizzly NVMe M.2 SSD Cooler on PS5-compatible M.2 SSD

In order to install the Thermal Grizzly heat sink on to your PlayStation 5 compatible M.2 solid state drive, you need to take the following steps:

1. Start by peeling the protective film from the 0.5 mm pad and then placing it on the bottom housing of the heatsink. Make sure that the pad is aligned with the housing and isn’t blocking the screw hole opening.

2. Next, you need to remove the protective film from the top side of the 0.5 mm pad.

3. Afterwards, carefully slide in the PS5-compatible M.2 SSD into the bottom housing and then make sure that it is aligned perfectly with the heat sink.

4. You then need to remove the protective film from the bottom of the 1.0 mm pad and then place it on top of the M.2 solid state drive in the bottom housing.

5. Remove the protective film from the top side of the 1.0 mm pad.

6. Finally, snap on the top housing of the Thermal Grizzly NVMe M.2 SSD Cooler to complete the installation.

How to insert the Thermal Grizzly NVMe M.2 SSD Cooler to the PlayStation 5

Once you installed the PS5-compatible M.2 SSD onto the Thermal Grizzly NVMe M.2 SSD Cooler, you can insert it to your game console by taking the following steps:

1. Turn off your PlayStation 5 console.

2. Remove the stand, cables and other accessories you have attached to your PS5.

3. Place your game console in a position where the PS logo is facing downwards and the back side (which has the HDMI port) is facing you.

4. From your vantage point, place your left hand on the top left side of the top outer case.

5. You then need to place your right hand on the bottom right corner of the top outer case.

6. Lift the bottom right corner of the top outer case by using your right hand and the slide the rest of the case to the left.

7. With the top outer case removed, you should see a metal cover shielding the M.2 docking bay of your PlayStation 5.

Use a crosshead screwdriver to remove the screw and then remove the metal cover.

8. Inside the bay, you will find another screw. Use a crosshead screwdriver again to remove the screw and the spacer.

9. Place the spacer you removed in Step #8 into the “80” hole of the docking bay.

10. Next, you need to insert the Thermal Grizzly NVMe M.2 SSD Cooler into the M.2 slot of the PS5 system starting from a diagonally upwards position.

11. You then need to use a screwdriver and the screw you previously removed in Step #8 to fasten the other end of the Thermal Grizzly NVMe M.2 SSD Cooler down into the “80” hole.

12. Afterwards, reattach the metal cover of the docking bay.

13. Finally, slide back in the top outer cover on the PS5 starting from the left side.

With the Thermal Grizzly NVMe M.2 SSD Cooler installed on your PlayStation 5, turn on your game console. You should see a screen where you can format the M.2 solid state drive for use with the PS5.

How to fix Google Pixel Buds A-Series audio quality issues

When using your Google Pixel Buds A-Series, you may notice that the sound coming out of the earbuds is not sounding quite right. You can check out this troubleshooting guide at Seeking Tech to see how you can fix these audio quality issues.

1. The first step we recommend taking is to see try to play another media file as your problems may be related to the content that is playing.

2. You can also try using another pair of earbuds, headphones or the paired device’s speaker to see if the sound quality issue is isolated to your Pixel Buds A-Series.

3. If you believe that your audio issues are limited to your Google Pixel Buds A-Series, then you can make sure that your earbuds are charged.

4. You should also make sure that the aren’t any issues with the Bluetooth connection between the Google Pixel Buds A-Series and the paired device.

5. Furthermore, your earbuds may end up performing worse due to excess heat.

To find out how to prevent and fix heating issues with this product, you can take a look at this guide.

6. You can also try disabling the Bluetooth connection and the paired device and then turn it back on again.

7. Moreover, you can try resetting the paired device and then connect it again to your earbuds.

8. On the paired device, you can try forgetting the Bluetooth connection for the Pixel Buds A-Series and then set up a new pairing.

9. Make sure that both the earbuds and the paired devices are updated to the latest available firmware as well.

10. You can also switch out the ear tip size for the other two sizes that came with your Pixel Buds A-Series to see if the audio quality will improve.

11. Of course, you should also make sure that your earbuds are clean.

You can check out the official Google video on YouTube below to see how you can properly clean out your Pixel Buds.

12. You can also enable or disable several audio features on your device.

If you have a Google Pixel 6 or Google Pixel 6 Pro, for example, you can open the Settings app and then go to “Connected devices.” In the “Connected devices” menu, tap the gear icon next to your Pixel Buds A-Series.

In the “Device details” menu of the Pixel Buds A-Serie, you can toggle the “HD audio: AAC” on and off to see which will sound better.

In the same “Device details” menu, you can also tap Sound. After getting to the Sound menu, you can toggle the “Bass boost” and “Adaptive Sound” settings on and off to see what you prefer.

How to fix Google Pixel Buds A-Series connection issues

When using the Google Pixel Buds A-Series, you may experience problems with trying to connect to your other device. Your earbuds may also get randomly disconnected. You can take a look at this troubleshooting guide at Seeking Tech to see how you can resolve these Bluetooth connection issues.

1. To start off, make sure that your earbuds are charged.

To recharge the Google Pixel Buds A-Series, put them inside your charging case. We recommend waiting at least 15 minutes for your earbuds to charge.

You might also want to plug in the charging case to a power source if it is running out of battery life as well.

2. If your earbuds are charged and you are still experiencing connection issues, then you can try to turn off and then turn back on the Bluetooth connection on the device you are trying to connect your earbuds with (this may be a smartphone, tablet or other compatible products).

On the Pixel 6 or Pixel 6 Pro, for example, you can swipe downwards from the top of the screen to open Quick Settings. Here, you need to tap the Bluetooth setting to disable it and tap the Bluetooth setting again to re-enable it.

3. You can also upgrade the firmware versions for both your earbuds as well as the paired device. To find out how to update your Pixel Buds A-Series, you can take a look at this tutorial.

4. If you are using Wi-Fi and mobile data at the same time, then you may experience connection issues with your earbuds when you switch to Wi-Fi to mobile or vice versa.

To fix this, you can try disabling Wi-Fi from the paired device.

5. The connection of your Google Pixel Buds A-Series may also be hindered with other wireless devices.

Therefore, we recommend keeping your distance away from any microwave ovens, wireless speakers, Wi-Fi routers and other devices that use wireless communications.

6. You can also try forgetting your Google Pixel Buds A-Series from the Bluetooth menu of your paired device.

Afterwards, you can try pairing your earbuds once again to see if doing so will resolve the connection issues.

7. If none of the aforementioned potential solutions work, then one last step you can take is to reset your Pixel Buds A-Series. This process will delete everything, including firmware updates in addition to your pairing and other custom settings, with the exception of its original settings.

To see how you can factory reset your Google Pixel Buds A-Series, you can take a look at this step-by-step tutorial.

How to enable and disable PS5 Boost Mode

The PlayStation 5 and PlayStation 5 Digital Edition come with a Boost Mode, which is also known as Game Boost. To see how you can potentially enable and disable this feature, you can take a look at this article from Seeking Tech.

What is the PS5 Boost Mode?

The Boost Mode, or Game Boost Mode, of the PS5 is designed to enhance backwards compatible PlayStation 4 games by using the extra processing power of the newer console.

If a PS4 videogame has a target frame rate, such as 30 frames per second or 60 frames per second, then Game Boost will most likely make sure that it hits 30 fps or 60 fps more often than not.

If a PS4 game has a dynamic resolution scaling, then this enhancing mode will make sure that the game will display at its maximum display resolution more often than not.

How to turn on Boost Mode on PS5

Unlike the PlayStation 4 Pro where you have the option to enabled or disabled Boost Mode, the enhancement mode is automatically enabled on the PlayStation 5 and PlayStation 5 Digital Edition.

For the vast majority of PS4 games running on the new consoles, you will get a frame rate boost, resolution boost or both.

Keep in mind that there are some PlayStation 4 software titles that have multiple visual modes, with one most likely catering to better graphics and the other for better frame rate performance. To maximize frame rates, you need to select the frame rate mode from the in-game menu. To get the sharpest image quality, you need to select the resolution priority mode.

There are also some PlayStation 4 games that have been updated with a PS5-exclusive boost mode where you will get both frame rate and resolution enhancements. These games include Days Gone, Ghost of Tsushima, God of War, Ratchet and Clank as well as The Last of Us Part II.

There are also other PS4 titles where you can upgrade, either for free or by paying a fee, to the PS5 version.

How to turn off Boost Mode on PS5

Since Boost Mode is automatically enabled on the PlayStation 5 and PlayStation 5 Digital Edition system, there isn’t way you can turn off this feature.

If you have the disc version of the PS4 game that don’t have any visual customization mode until it was update via a patch, then you can try playing the game on your PlayStation 5 console offline. While the unpatched game will still most likely get a boost, it won’t be able to take advantage of any frame rate or resolution modes that were added to the patched version.

Otherwise, if you don’t want to play a boosted version of a PlayStation 4 game, you will either need to play the game on a PS4 console or a PS4 Pro console with Boost Mode disabled.

How to fix Google Pixel Buds A-Series charging issues

When trying to charge your Google Pixel Buds A-Series, you may notice that your earbuds and/or charging case are not recharged at all. You can check out this troubleshooting guide at Seeking Tech to see how you can potentially fix your issues.

How to charge the Google Pixel Buds A-Series

Before we begin, we should explain how recharging the Google Pixel Buds A-Series battery works.

To recharge the ear buds, you need to put them in the charging case and then close the top. However, the charging case will also need to have its batteries recharged as well.

To recharge the Google Pixel Buds A-Series charging case, you need to use an USB-A to USB-C cable (one of which is included with this product). You have to plug the smaller USB-C end of the cable to the case and the bigger USB-A end to a power adapter or other devices that can be used as a power source.

How to fix the charging issues with your Google Pixel Buds A-Series

In order to fix the charging issues with your Google Pixel Buds A-Series, you can try the following:

1. To begin, we recommend checking to see if there are any damages or obstructions on your earbuds, charging case and USB-A to USB-C cable.

2. If all of the aforementioned parts look normal, then the next step is to see if your charging case can be recharged with the USB-A to USB-C cable.

3. If the case is still not recharging, you can try another USB-A to USB-C cable.

4. You can also try cleaning the earbuds and charging case. You can find an official video on how to do so below:

5. Furthermore, you should make sure that the earbuds are properly inserted into the correct compartments of the charging case.

The earbuds and the case come with magnets that will snap the earbuds in place if it inserted correctly. You should also be able to easily close the top of the case if the earbuds were properly seated.

6. If you are sure that everything is working correctly, the next step you can take is to put your earbuds into the charging case, close the top of the case and then plug the case into a power source. Afterwards, wait for at least 30 minutes to see if your earbuds and case are recharging.

7. If your earbuds or charging case aren’t still charging after waiting for 30 minutes, the last step you can take is to factory reset the Google Pixel Buds A-Series. This process is designed to return your device to its factory settings as it will remove all your customized settings in addition to any firmware updates.

In order to factory reset this product, you can take a look at this tutorial.

What’s the difference between the PS5 console storage, M.2 SSD and external SSD?

Although you can use an external solid state drive with your PlayStation 5 or PlayStation 5 Digital Edition, it is limited in features when compared to the other SSD types that the game console supports.

You can take a look at this comparison guide at Seeking Tech to see what are the main differences between the console storage, M.2 SSD and external SSD.

Quick Summary

The internal console storage of the PlayStation 5 offers the most features as you can store and play both PS4 and PS5 games. Furthermore, it is also the only storage option that can store system data, save files as well as screenshots and videos captured when playing games.

With a PS5-compatible M.2 solid state drive, you can also store and play both PS4 and PS5 videogames although the save files, screenshots and recorded videos will be stored on the internal console storage instead.

For an external solid state drive, you can also store PS4 and PS5 games. However, only PS4 games can be played directly from the external storage. Furthermore, the save files, screenshots and video clips will be saved on the internal console storage.

So, if you are looking to expand the storage capacity of your PlayStation 5 or PlayStation 5 Digital Editon system, then we recommend getting a M.2 solid state drive as you will be able to play PS4 and PS5 games directly off of it.

If you are only planning to use an expansion drive for PS4 games, then you can get an external SSD instead.

PS5 Internal Console Storage vs. M.2 SSD vs. External SSD

You can take a look at our comparison table for the internal PS5 console SSD, M.2 SSD and External SSD below.

PS5 Internal Console StoragePS5-Compatible M.2 SSDPS5-Compatible External SSD
ConnectivitySoldered on to the motherboardM.2 slot of PS5USB port of PS5
Sequential Reading Speed5,500 MB per second5,500 MB per secondUp to 2,000 MB per second
Storage Space825 GB250 GB to 4 TB250 GB to 8 TB
Storage ContentPS4 games

PS5 games

System files

Save files

Saved screenshots

Saved videos
PS4 games

PS5 games
PS4 games

PS5 games
Playable GamesPS4 games

PS5 games
PS4 games

PS5 games
PS4 games

Connectivity

When it comes to the console storage, the default internal solid state drive of the PS5 is completely soldered on to the motherboard of the game console. As a result, it can’t be removed.

For the M.2 solid state drive, you need to use the M.2 slot of the game console, which you can find by removing the outer case. For this storage option, you will also need a heatsink that will fit inside of the docking bay of your PS5 or PS5 Digital Edition.

An external solid state drive can be connected to the PlayStation 5 system through the USB port.

Sequential Reading Speed

The External SSD option has the disadvantage when it comes to reading speed.

The console storage, as well as a PS5-compatible M.2 solid state drive, have read speeds of 5,500 MB per second.

In comparison, the fastest external solid state drives usually top out at around 2,000 MB per second. Not to mention that the reading speed of the external drive could also be slowed down due to other bottlenecks on the PS5.

Storage Space

You can take a look at the storage capacity ranges for all three PS5-compatible solid state drive types below:

  • Internal Console Storage: 825 GB
  • M.2 SSD: 250 GB to 4 TB
  • External SSD: 250 GB to 8 TB

Storage Content

The internal console storage, external solid state drive and M.2 solid state drive can store both PlayStation 4 games and PlayStation 5 games.

The console storage is the only drive that can also store the system data, save files and the media gallery.

Playable Games

You can play both PlayStation 4 and PlayStation 5 games directly off of the internal console storage and M.2 solid state drive.

With an external solid state drive, you can only play PlayStation 4 games. To play a PlayStation 5 game you have stored on the external SSD, you will need to transfer the game data over to either the internal console storage or the M.2 SSD.

How to install and format the T-Force CARDEA A440 for PS5

The TEAMGROUP T-Force CARDEA A440 is a M.2 solid state drive that is compatible with the PlayStation 5 and PlayStation 5 Digital Edition systems.

To see how you can install and format this storage drive so that you can store and play PS5 games directly off of it, you can take a look at this tutorial from Seeking Tech.

Before we begin, it should be noted that this guide will be based on the following solid state drives:

  • 1 TB TEAMGROUP T-Force CARDEA A440 M.2 SSD with Graphene & Aluminum Heatsink (TM8FPZ001T0C327)
  • 2 TB TEAMGROUP T-Force CARDEA A440 M.2 SSD with Graphene & Aluminum Heatsink (TM8FPZ002T0C327)

Both of these products use the PCI-Express Gen4x4 interface and have a sequential reading speed of up to 7000 MB per second, which meets the requirements of the PS5 and PS5 Digital Edition.

These M.2 SSDs also come with graphene and aluminum heatsinks. The graphene heatsink should fit easily into the docking bay of the PlayStation 5 console. With the aluminum heatsink, you will need to keep the metal cover off of the PS5’s docking bay in order to fit the storage drive.

How to insert the T-Force CARDEA A440 to PS5

In order to insert the T-Force CARDEA A440 to your PlayStation 5 and PlayStation 5 Digital Edition system, you need to take the following steps:

1. If you previously used your T-Force CARDEA A440 to store files, then we recommend that your move any important data you have on the solid state drive before starting. This is because you will need to format the SSD for PlayStation 5, which will erase all the current data stored on it.

2. You should also make sure that you either have the graphene heatsink or aluminum heatsink installed on your A440.

To see how you can install these, you can take a look at the instructional video from the TEAMGROUP YouTube channel below:

3. Once you are ready, turn off your console and then remove the cables, stand as well as any other accessories you have attached to it.

4. Next, you need to lay your console down so that the side with the PS logo is at the bottom.

5. You then need to make sure that the backside of your PS5 is facing towards you.

6. From your perspective, you then need to put you left hand on the top left corner of the outer case and then your right hand on the bottom right corner of the outer case.

7. Lift the bottom right corner of the outer case to unlock it and then slide the case off to the left.

8. With the outer case removed, you should see the metal cover of the M.2 docking bay. Use a crosshead screwdriver to remove the screw holding the metal cover in place and then remove the metal cover.

9. With the docking bay opened, you need to use a crosshead screwdriver again to remove the screw and spacer inside.

10. Take the spacer you removed in the previous step and put it in the “80” hole.

11. Now you need to insert your T-Force CARDEA A440 into the M.2 SSD slot in the docking bay starting from a diagonally upwards position.

12. After inserting the storage drive, use a crosshead screwdriver and the screw you previously removed in Step #9 to fasten the other end of the SSD down to the “80” hole.

13. If you installed the graphene heatsink to your T-Force CARDEA A440, then you also need to screw back in the metal cover of the docking bay.

If you installed the aluminum heatsink to your T-Force CARDEA A440, then you need to leave the metal cover off.

14. Finally, slide the outer case of your PlayStation 5 back in starting from the left.

How to format the T-Force CARDEA A440 to PS5

After inserting the T-Force CARDEA A440 into the M.2 slot of your PlayStation 5 or PlayStation 5 Digital Edition system, you then need to format the drive by taking the following steps:

1. Reattach the stand, cables and other accessories you previously removed from the system if you haven’t done so already.

2. Turn on your game console.

3. During the boot up process, you will eventually arrive to the M.2 SSD Storage screen.

4. Plug in your DualSense controller via the USB port of your PS5 system.

5. Press the PS button on the gamepad.

6. Now that you have control, select the Format M.2 SSD option.

7. Once the formatting process has been completed, you will see a sequential reading speed test result page. Here, you need to select the OK option to go to the home screen.

Where to find T-Force CARDEA A440 in the PS5 menus

After formatting your T-Force CARDEA A440, you will be able to find the storage drive in the system menus of your PlayStation 5 by taking the following steps:

1. From the home screen menu, select the gear icon that appear on the top right side.

2. After getting to the Settings menu, you need to select Storage.

3. In the Storage menu, you first need select M.2 SSD Storage from the left column.

4. On the right side of the same Storage menu, you should see the information for your T-Force CARDEA A440.

5. You can also use the Storage menu to transfer games between the T-Force CARDEA A440 and the internal SSD storage. Furthermore, you can also reformat the M.2 SSD as well as change the default location when it comes to installing a new game.

How to find your lost Google Pixel Buds A-Series

The Google Pixel Buds A-Series can be easily lost. Fortunately, this product does come with several built-in features that will help you locate your missing earbuds. To find out how to do so, you can follow this step-by-step guide at Seeking Tech.

How to find the last known location of your lost Google Pixel Buds A-Series

If your Google Pixel Buds A-Series is not connected to your smartphone or device, then you can use the Find My Device feature to find the approximate last known location of your earbuds when it was connected to your phone or device.

In order to use Find My Device, you can take the following steps:

1. First off, the smartphone or device connected to the Pixel Buds A-Series must be running Android 6 or later.

2. Furthermore, you must have previously enabled the Location feature on the connected phone or device.

3. If you met the aforementioned prerequisites, the next step you should take is to open the Settings app of your Android phone or device.

4. After getting to Settings, tap “Connected devices.”

5. In the “Connected devices” menu, tap the gear icon next to your Pixel Buds.

6. Inside the “Device details” menu of your Google Pixel Buds A-Series, tap “Find Device.”

7. In the “Find device” menu, select “Last known location.”

8. For the next screen, you should see an approximate location of when your earbuds were connected to your device.

How to find the lost Google Pixel Buds A-Series that is still connected

If your lost Google Pixel Buds A-Series is still connected to your phone or device, then you should be able to make both the left earbud and right earbud ring to make them easier to located.

In order to do so, you need to do the following:

1. Open the Settings app on your connected Android phone or device.

2. Inside of the Settings app, select “Connected devices.”

3. After arriving at the “Connected devices” menu, select the gear wheel icon next to your Pixel Buds.

4. You should now be in the “Device details” menu of your Google Pixel Buds A-Series. Here, you need to select “Find device.”

5. Now that you are in the “Find device” menu, you can select the Ring Left option to make the left earbud of your ring. You can also select the Ring Right option to make the right earbud ring.

6. After selecting either option, the selected earphone should ring for around 20 seconds as it will gradually get louder.

7. After finding your earphone, you can stop the ringing by taping the side with the G logo.

How to update the Google Pixel Buds A-Series firmware

The firmware for Google Pixel Buds A-Series can be updated, which may help improve the audio quality, battery life and connection performance. A new version may also fix bugs and glitched.

To find out how to update to the latest firmware for these wireless earphones, you can check out this step-by-step guide at Seeking Tech.

1. Before we begin, you will need to pair and connect your Pixel Buds A-Series to a smartphone that is running the Android 6.0 operating system or newer.

For this guide, we will be using the Google Pixel 6 with the Android 12 operation system.

2. You also need to download the Pixel Buds app from the Google Play Store.

To do so, tap the Play Store icon from the home screen. In the Play Store menu, tap the search bar and then input Pixel Buds. On the Google Pixel Buds product page, tap Install.

If you have Android 10 or newer, then the Google Pixel Buds app should already be installed on your smartphone when you first paired your earphones.

3. With the Google Pixel Buds app, your earbuds should automatically update to the latest firmware when there is a new one available.

The buds will download the firmware in the background while they are connected to your phone.

They will then install the new update once you put them back into the charging case.

4. In addition to the automatic updates, you can also manually update the firmware of the Google Pixel Buds A-Series by taking the following steps:

  • Open Google Pixel Buds app.
  • In the “Device details” menu, tap “More settings.”
  • Inside the “More settings” menu, tap “Firmware update.”
  • After getting to the “Firmware update,” you will see the “Update available” option if there is a new firmware available. Tap it to being the update process.
  • In the same “Firmware update” menu, you will also see whether or not “Automatic updates” have been available in addition to being able to view the current firmware version of the left earbud, right earbud and charging case.