How to use the DualSense Edge as a wired controller for PS5

Using the DualSesne Edge as a wired controller for your PlayStation 5 or PlayStation 5 Digital Edition console has several benefits.

For one, you don’t have to worry about having to recharge the internal battery of the gamepad as it takes power directly from the system instead. Furthermore, you may end up getting lower input lag when compared to using the same controller wirelessly over Bluetooth, which may lead to extra delay.

To see how you can set up the DualSense Edge as a wired controller for the PS5, you can follow the steps laid out in this guide from Seeking Tech.

1. If you haven’t done so already, make sure you pair the Edge with your PlayStation 5 or PlayStation 5 Digital Edition console.

2. Next, you need to use a USB Type-C to USB Type-A cable to connect your controller to the gaming system.

We highly recommend using the one that came with the DualSense Edge as it is very long, measuring at 2.8 meters (or nearly 9.2 feet), which should give you plenty of room if you need the extra space. Not to mention that it is braided, which makes it more durable.

With that said, other USB Type-C to USB Type-A cables, including the one that came with your PlayStation 5 or PlayStation 5 Digital Edition console, should work as well.
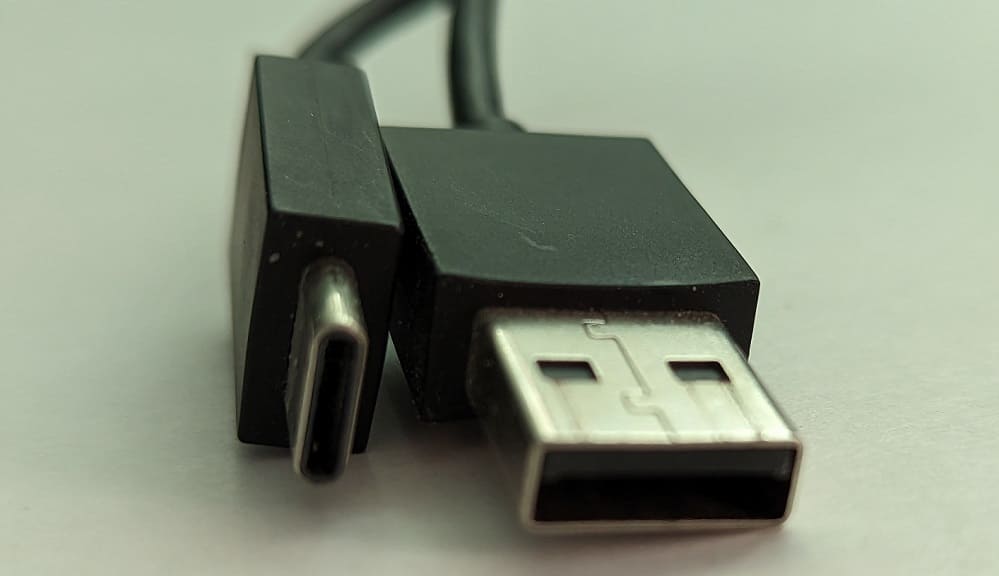
3. With the USB cable, plug the smaller USB Type-C end to the USB Type-C port of the DualSense Edge.
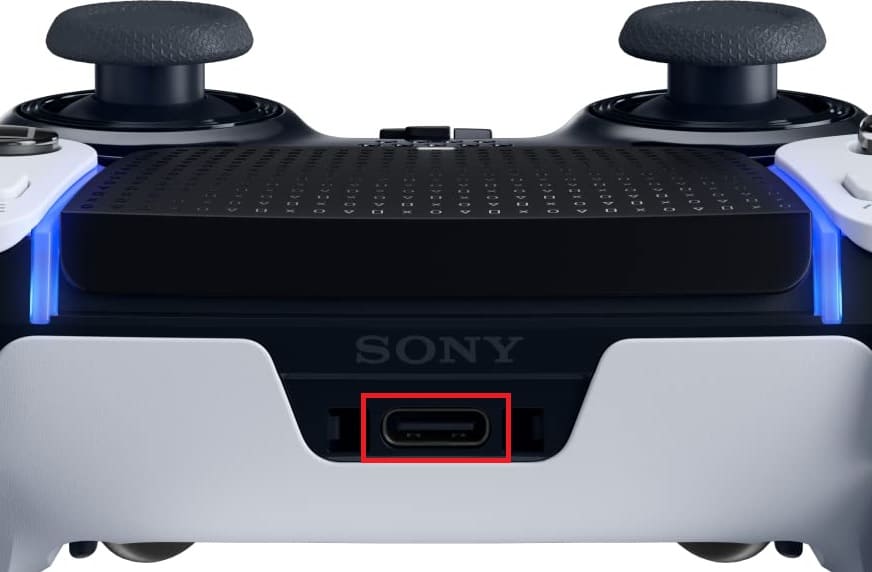
You can also add the connector housing accessory, which came with the controller, in order to make sure that the gamepad stays connected to the cable.
4. Next, connect the bigger USB Type-A end to one of the USB Type-A ports on your PlayStation 5 console.

5. Now turn on your PlayStation 5 and then head over to the home screen, which is where you can select which game or app to open.

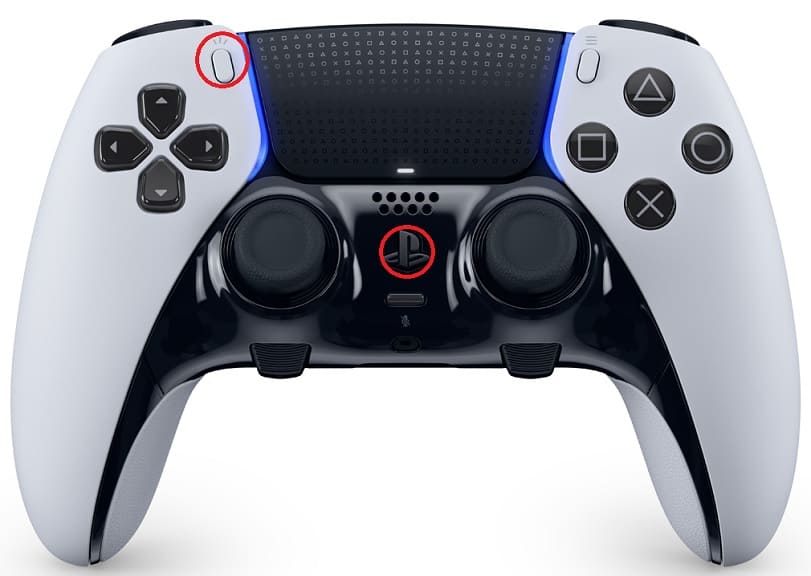
If you are in another place at this moment, then you can get home quickly by pressing and holding the PS button on the DualSense Edge.

6. From the home screen, head over to Settings, which you can do by selecting the gear icon that should be located on the top right corner.

7. In Settings, head over to Accessories.

8. On the left column of the Accessories menu, you need to select Controller (General).

9. On the right side on the same screen, you then need to select Communication Method.

10. After getting to the Communication Method menu, make sure that Use USB Cable is selected.
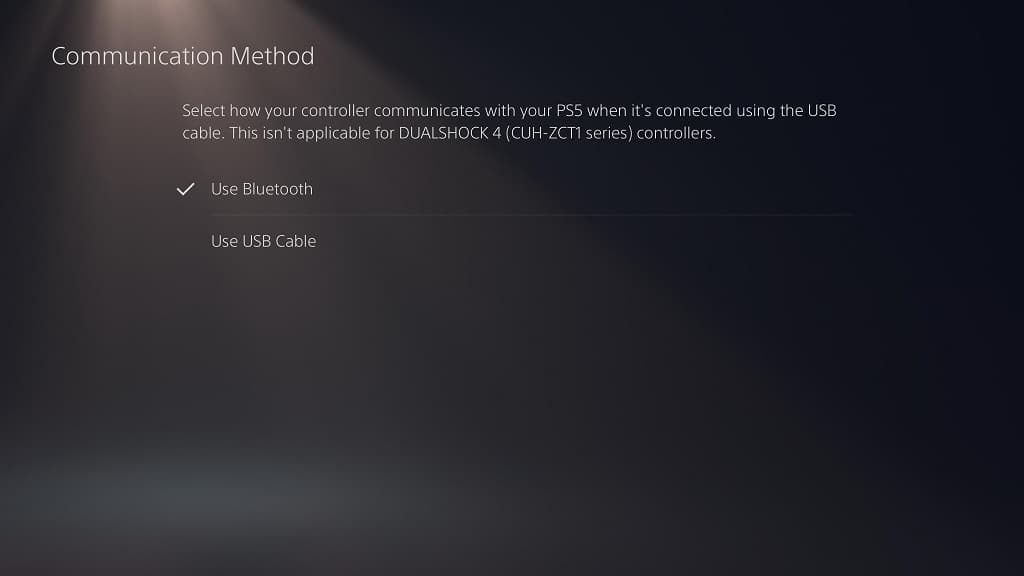
You should now be able to use the DualSense Edge as a wired controller. Make sure that the gamepad stays connected to your console via the USB connection; otherwise, the communication method will default back to wireless Bluetooth.

How to pair the DualSense Edge to the PS5

If you got the new DualSense Edge premium controller for your PlayStation 5 or PlayStation 5 Digital Edition console, then you need to pair the gamepad first before you can use it. To find out how to do so, you can take a look at this tutorial from Seeking Tech.

How to pair DualSense Edge to PS5 by using USB

The fastest way to pair the DualSense Edge to your PlayStation 5 or PlayStation 5 Digital Edition console is by using the wired method. In order to do so, you need to take the following steps:

1. For the first step, make sure you turn on your gaming system if you haven’t done so already.

You can do so by pressing the PS button on another controller you have already paired to your PS5. Alternatively, you can press the power button located directly on the system.

2. With the system turned on, connect the DualSense Edge to one of the USB Type-A ports of your console. For the uninformed, the PS5 features one USB Type-A port on the front side and two more USB Type-A ports on the back.

You need to use the USB Type-C to USB Type-A cable type. The premium braided one that came with the DualSense Edge controller, as well as the one that you get with your PlayStation 5 console, should both work.

Connect the smaller USB Type-C end to the top of the DualSense Edge and the bigger USB Type-A end of the cable to one of the available USB Type-A ports of your PS5.

3. After connecting the controller via USB, press the PS button on the Edge in order to turn it on and pair it with your console.

4. You should now be able to use the DualSense Edge on your PS5. If you want to, you can unplug the USB cable to use the gamepad as a wireless controller.

How to wirelessly pair DualSense Edge to PS5

If you can’t find a USB Type-C to USB Type-A cable, then you can try to wirelessly pair the DualSense Edge to your PlayStation 5 by doing the following:

1. To start off, make sure you turn off the DualSense Edge if you haven’t done so already. It shouldn’t be displaying or flashing any lights.

In order to turn off your controller, you can try pressing and hold the PS button until you no longer see any lights.

2. Next, you need to use another gamepad to turn on your PlayStation 5 and then head over to the console’s Settings menu.

From there, you need to select Settings > Accessories > General > Bluetooth Accessories.

3. On the DualSense Edge, press and hold both the PS button and Create button at the same time.

4. The DualSense Edge Wireless should show up in the Accessories Found section of the Bluetooth Accessories menu. Select it by using the other controller.

5. You should then see the following notification:

  • “Do you want to register this Bluetooth accessory?”

Here, you need to select Yes with the other controller in order to pair the DualSense Edge to your PS5.

6. To start using the DualSense Edge on your PS5 once it has been paired, press the PS button on it.

How to exit Disney Plus App on PS5

The PlayStation 5 and PlayStation 5 Digital Edition console is a multimedia machine as you can use it to stream videos, using apps such as Disney Plus, as well as play videogames. When using the Disney streaming application, you may notice that there isn’t an easy to exit out of it to go back to the operating system of the PS5.

To see how you can exit out of the Disney Plus PS5 App, you can take a look at this tutorial at Seeking Tech.

Method #1

If you want to keep using your gaming system after exiting out of the Disney App, then the fastest way to do so is to press and hold the PS button on the DualSense controller. After around 1 second, you should be bought back to the home screen of your console.

Method #2

For the second method, you can quick press the PS button on the game pad to bring up the Control Center menu. From there, select the home icon to go back to the home screen of the PS5’s OS.

For the first two methods, the Disney App will remain suspended until you open it again. Therefore, you will be able to return to the same screen where you left off.

If you want to close the video application completely, then you need to do the following:

  • Move the cursor over to the Disney+ icon in the Media section of the home screen.
  • With the icon for the streaming application highlighted, press the Options button on the controller.
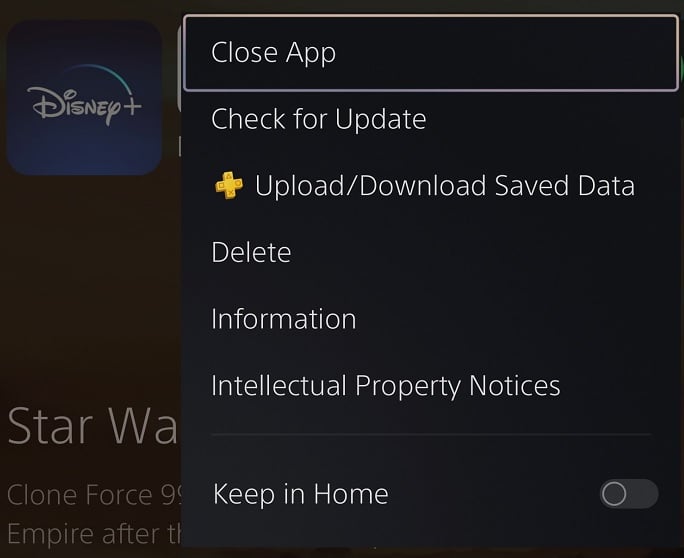
  • Finally, select the Close App option in the pop-up menu for the Disney Plus App.

Method #3

You can also exit out of this streaming application by restarting your console.

In order to do so, quick press the PS button to open the Control Center menu. From there, select the Power option from the bottom menu. In the pop-up window, you then need to select the Restart PS5 option.

Method #4

You can also simply turn off your PS5 and then turn it back on again.

To shut down your console, open the aforementioned Control Center menu by quick pressing the PS button. Next, you need to select the Power option at the bottom right side. In the pop-up menu, select Turn Off PS5.

Once your console has turned off, you can turn it back on again.

How to fix the ‘PlayStation Plus subscription needs to be upgraded’ error on PS5

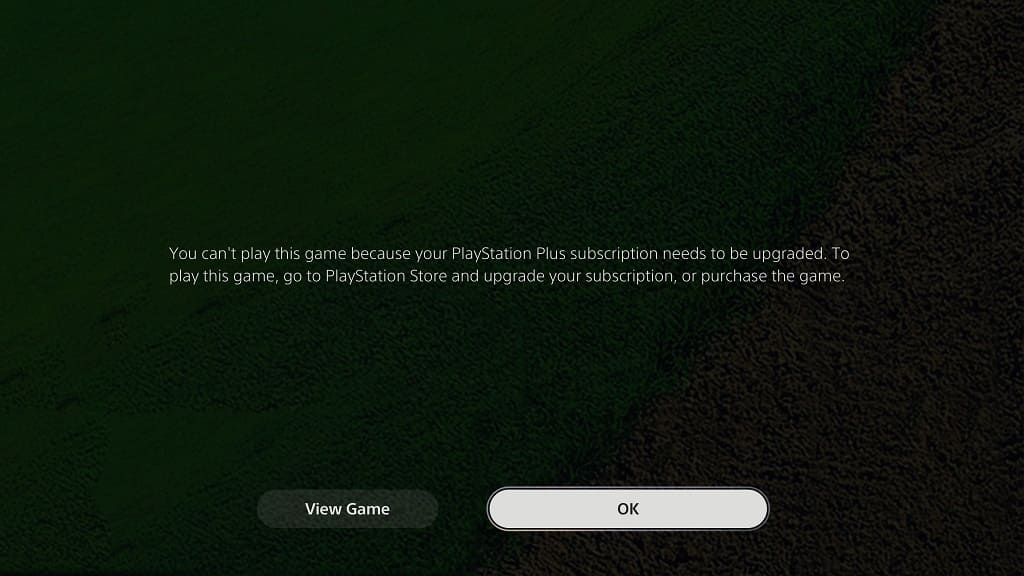
When trying to play a game you downloaded from the PlayStation Plus service, you may end up seeing the following message:

“You can’t play this game because your PlayStation Plus subscription needs to be upgraded. To play this game, go to PlayStation Store and upgrade your description, or purchase the game.”

To see how you can potentially fix this error, you can take a look at this troubleshooting article from Seeking Tech.

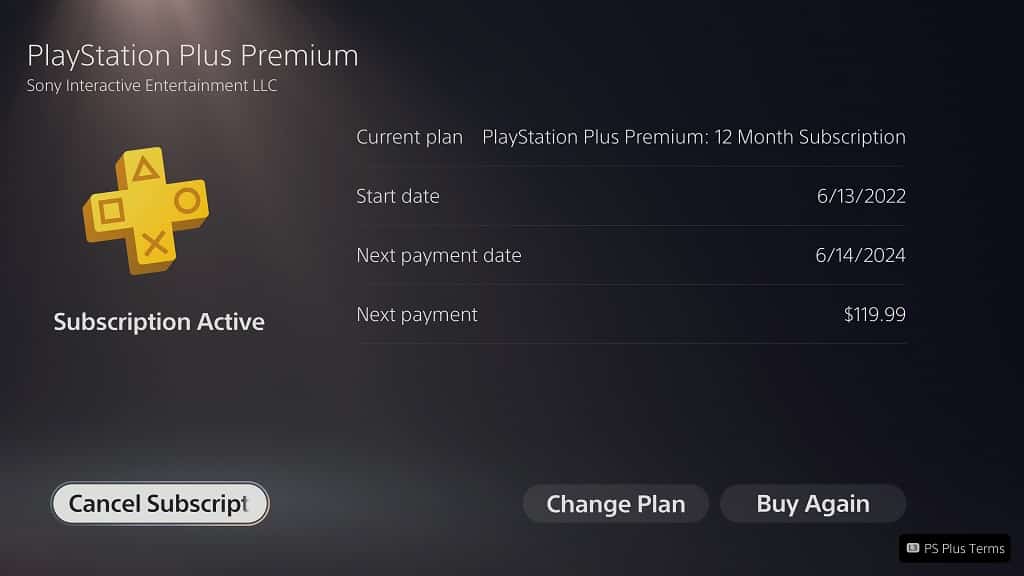
1. For the first step, we recommend that you check our PlayStation Plus status. If your subscription has expired or downgraded, then you will no longer have access to playing the game unless you re-sub to the correct tier.

In order to check your PlayStation Plus status, go to the PlayStation Store App on your PlayStation 5 and then select the three dots icon on the top right corner. You then need to select Subscriptions, followed by PlayStation Plus.

2. It is important to note that access rule to the PlayStation Plus game you downloaded is different depending on which catalog you redeemed it from. The service features the Monthly Games Catalog, PlayStation Plus Collection, Game Catalog and Classics Catalog.

To see what the differences are, you can check out this versus article.

3. If you are sure that you are still subscribed to the correct PlayStation Plus plan, then you can try deleting and re-downloading the game.

This fix worked for us when we saw the “PlayStation Plus subscription needs to be upgraded” error message after trying to play Hot Shots Golf 2, which we downloaded from the Classics Catalog through our PlayStation Plus Premium plan.

4. You should also make sure that you are using the PlayStation Network account that is paying for PlayStation Plus when you try to play the game.

If you are using a different account, then you can take a look at this instructional guide to see how you can share PS Plus benefits across multiple accounts on the same console.

5. Restoring the game licenses on your PSN account may also help.

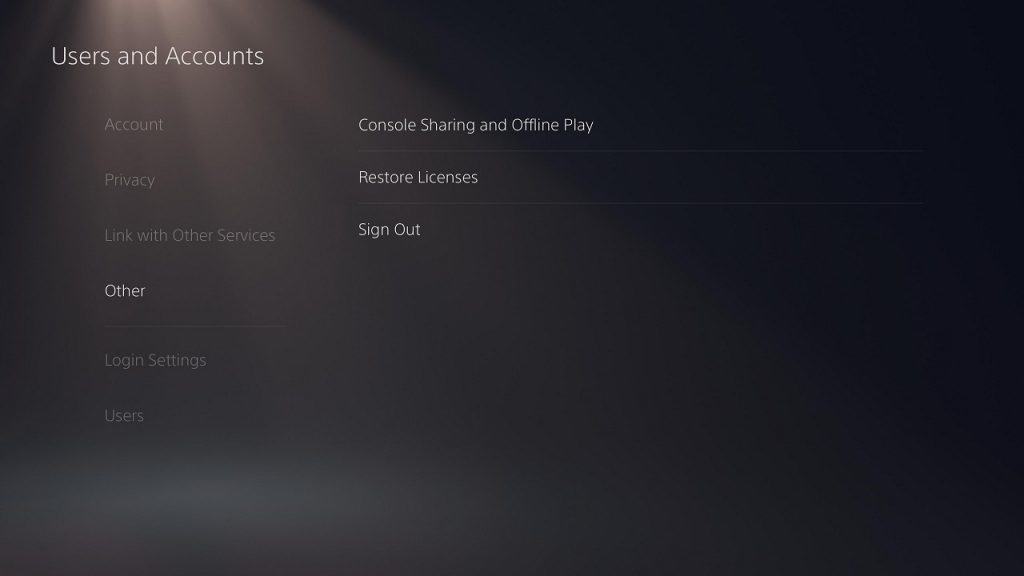
In order to do so, head over to the Settings menu and then select Users and Accounts > Other > Restore Licenses > Restore.

6. You can also try doing a database rebuild by taking the following steps:

  • Turn off your PlayStation 5.
  • Hold the power button on the PS5 console until you hear a second beep.
  • You should then be asked to connect your controller to the console via a USB cable and then press the PS button.
  • After doing so, you should be in the Safe Mode menu. Here, you need to select Clear Cache and Rebuild Database.
  • Finally, select Rebuild Database.

7. If you still can’t get the error message to go away, then we recommend that you contact the PlayStation support team to see if you can get them to sort it out for you.

From our experience, the licenses for PlayStation Plus games have been a little but glitchy since the new plans were added; therefore, you may need to get a representative from PlayStation to restore your access.

What to do if there is no surround sound playback in the Disney Plus PS5 App

The Disney Plus streaming application supports surround sound playback on the PlayStation 5 and PlayStation 5 Digital Edition consoles. If this feature does not appear to be working, then you can check out this article from Seeking Tech.

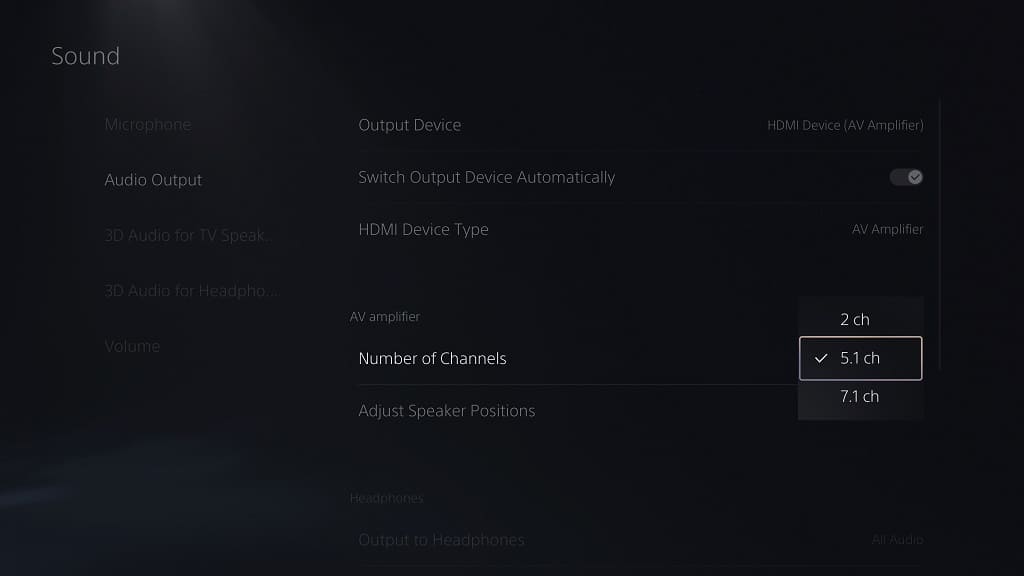
1. Before we start with the troubleshooting, it is very important to note that the Disney+ PS5 App is only able to output 5.1 surround sound.

7.1 surround sound is not supported.

2. For the first step, we recommend making sure you have your surround sound speakers set up properly on your PlayStation 5 console. You can do so by taking the following steps:

  • Press and hold the PS button to open the home menu of your console.
  • Select the gear icon located on the upper right corner of the home menu to head into Settings.
  • In Settings, scroll down and then select Sound from the list.
  • You should then select Audio Output from the Sound menu.
  • On the right side of the same screen, you may need to use the Output Device, HDMI Device Type, Number of Channels, Adjust Speaker Positions and/or Audio Format (Priority) Settings depending on your surround sound setup.

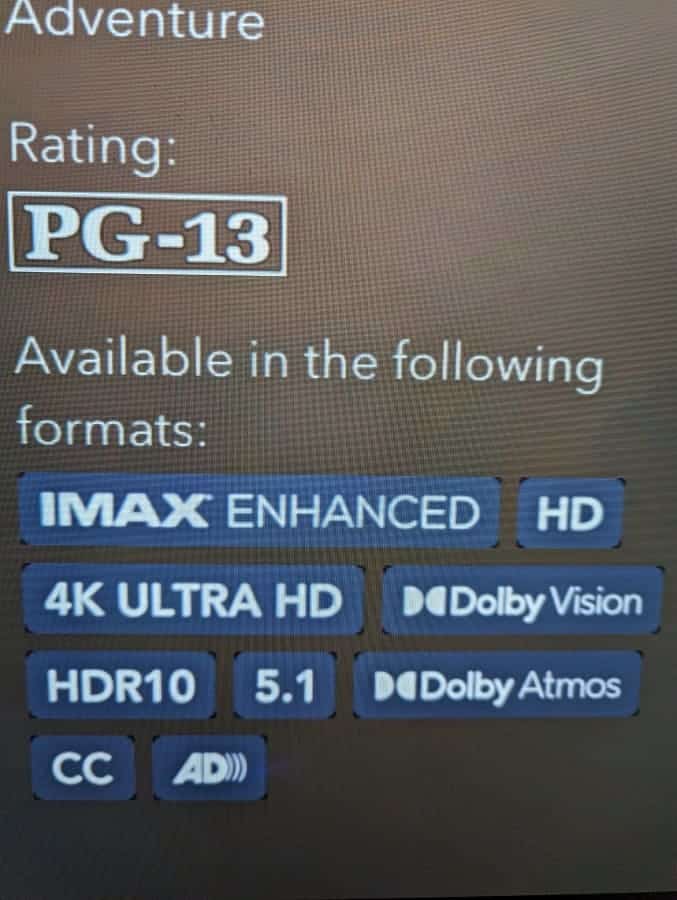
3. If you are sure that you have surround sound set up correctly, then you should make sure that the DIsney Plus video you are trying to watch actually supports that particular format.

To see how you can identify which movie or series utilizes 5.1 surround sound output, we recommend follow these steps.

4. You can also try exiting out of the video and then start to play it again as it may be helpful, especially if you made any changes to the sound output settings with the video playing or paused.

In order to do so, press the circle button on the controller to go back to the previous screen. You can then select the same video again to play it.

5. Closing and then re-opening the video streaming application may also help as well.

To do so, you need to take the following steps:

  • Press and hold the PS button to move to the home screen of your PS5.
  • From there, move the cursor over to the Disney+ icon.
  • With the icon highlighted, press the Options button on the controller. This button has the three horizontal lines on top.
  • In the pop-up menu, you need to select Close App.
  • Once the streaming application has closed, open it again and then try to play the same video to see if you are able to get surround sound output.

How to fix Forspoken input lag issues on PS5

When taking control of Frey in the PlayStation 5 version of Forspoken, you may notice that there is a bit of delay between your inputs and the correspond action that appear on the screen.

To see how you can reduce the input lag for this action role-playing game, you can take a look at this tutorial from Seeking Tech.

1. For the first step, we recommend that you play this RPG in performance mode as the higher frame rate should make the controls feel more responsive.

If you television set or monitor supports 120 Hz and/or Variable Refresh Rate, then you should have them enabled as well.

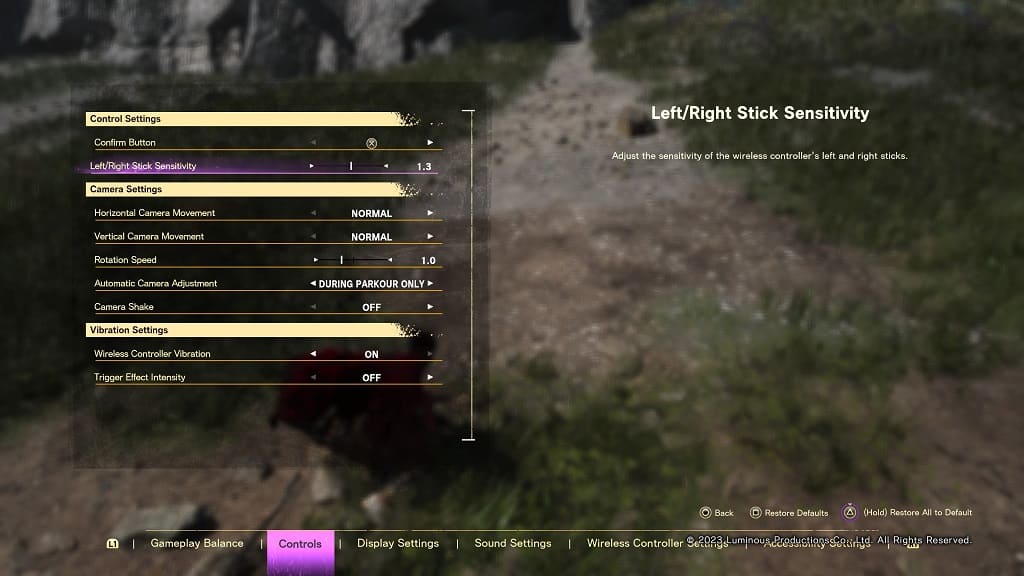
2. If moving Frey and/or the camera around felt too sluggish, then you can try increasing the analog stick sensitivity by doing the following:

  • First off, you need to head over to the Settings menu from inside Forspoken. You can do so by picking the Settings option from the start screen or pause screen.
  • Inside of Settings, press the R1 button to switch over to Controls.
  • After getting to the Control tab, move the cursor over to Left/Right Stick Sensitivity.
  • You will be able to adjust the slider, in increments of 0.1, anywhere from a range of 0.5 to 2.0.

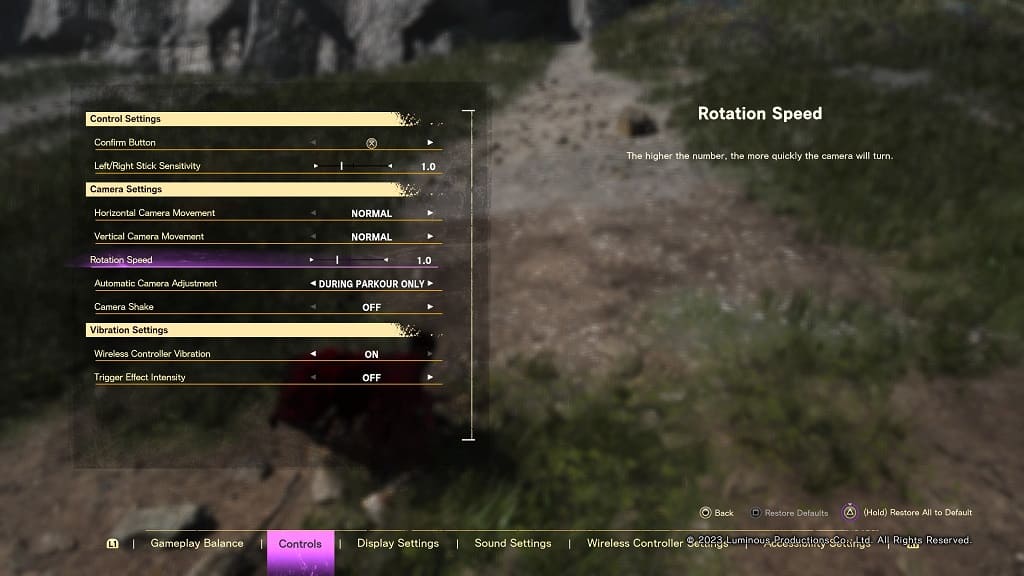
3. You can also try adjusting the rotating speed of the in-game camera. To do so, head back to the Settings menu of Forspoken and then switch over to the Controls tab.

From there, move the cursor down to Rotation Speed. You can then move the slider, in increments of 0.1, from a range of 0.5 to 2.0.

4. If you think that the adaptive triggers feel a little laggy, then you can turn off this feature.

5. If the game is responding slowly when you are opening a spell menu, then you can set this action to activate with a button press instead of a button hold.

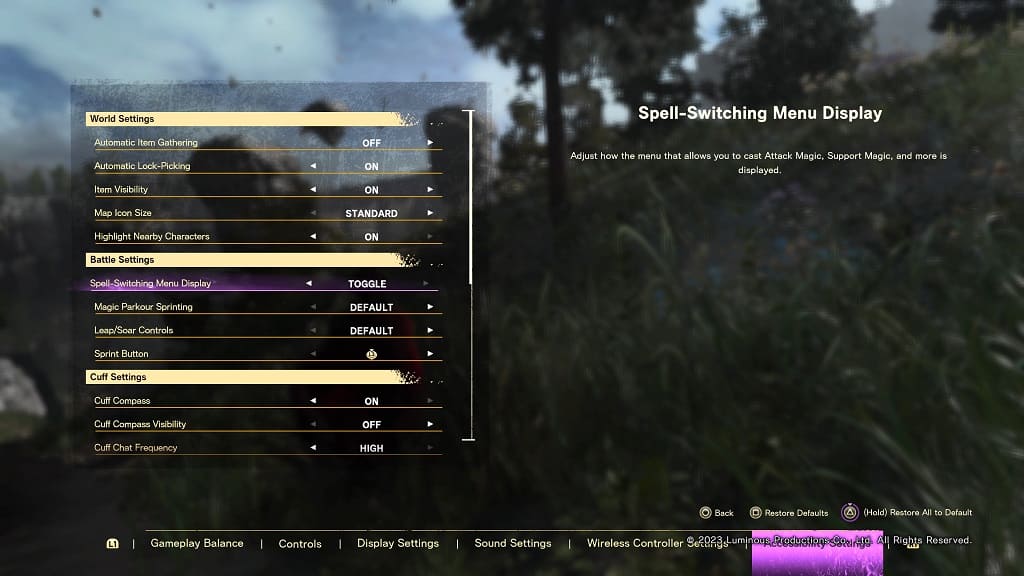
In order to do so, go back to the Settings menu of the game. From there, press R1 until you get to the Accessibility Settings tab. Afterwards, move the cursor to Spell-Switching Menu Display in the Battle Setting section. Finally, you need to change Spell-Switching Menu Display from Hold, which is the default option, to Toggle.

6. Of course, you should also make sure you have the latest version of Forspoken installed on your PlayStation 5 as the new patch may fix some of the input lag problems with the game.

How to fix Forspoken frame rate issues on PS5

When playing Forspoken on your PlayStation 5, you may notice that the game will slowdown and/or becoming choppy at certain points. To see how you potentially get this game to run smoother, you can take a look at this troubleshooting article from Seeking Tech.

1. For the first step, you can try playing the game at a higher frame rate. In order to do so, you need to take the following steps:

  • Open Forspoken and then head into its Settings menu from the start or pause screen.
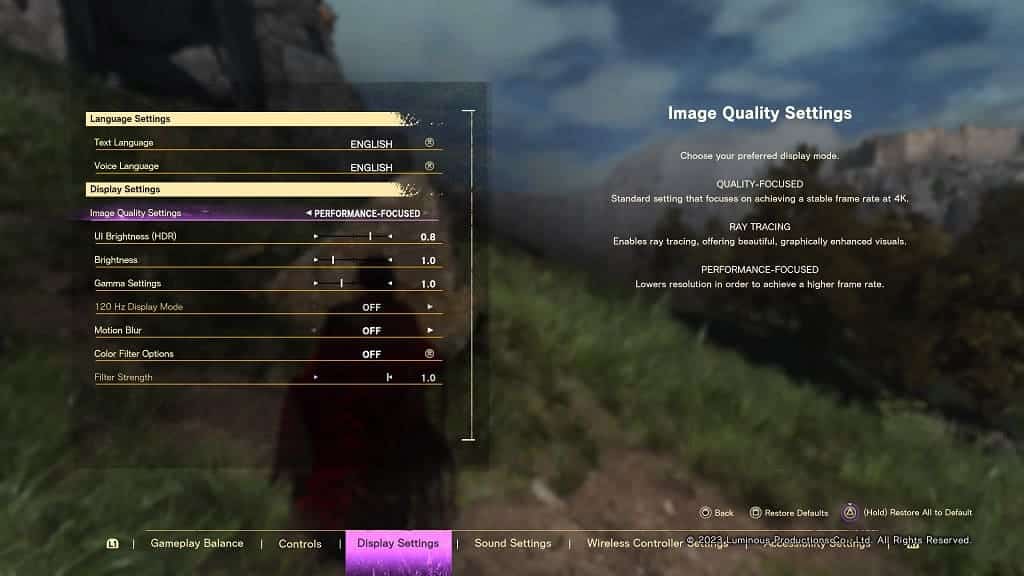
  • In Settings, press the R1 buttons several times to switch over to Display Settings.
  • Move the cursor to highlight Image Quality Settings.
  • Change Image Quality Settings to Performance-Focused.

2. If you have a television screen or monitor with a 120 Hz refresh rate, then you can also try using the various 120 Hz Display Modes.

You can find this graphics setting in the aforementioned Settings > Display Settings menu.

3. If your screen supports variable refresh rate, then we highly recommend that you use it as well since doing so will help smooth out the frame rate when the action RPG drops to as low as 48 fps.

In order to do so, make sure you turn on VRR on the settings of your screen. On your PlayStation 5 console, you then need to do the following:

  • In you are playing Forspoken at this moment, press and hold the PS button to open the home menu of the PS5.
  • From there, select the gear icon located on the upper right corner to go into Settings.
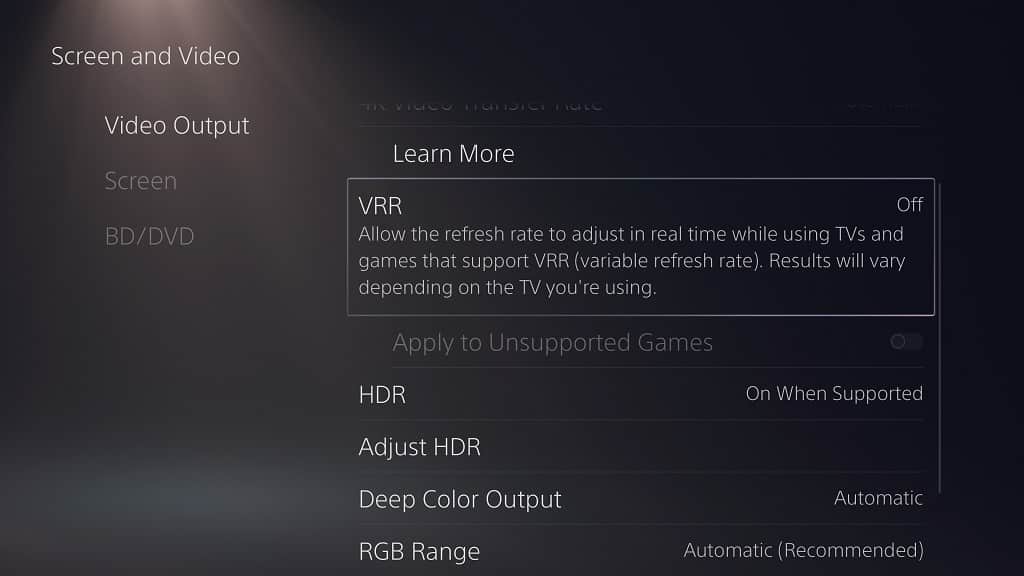
  • Inside Settings, you first need to head into Screen and Video.
  • You then need to select Video Output on the left column.
  • On the right side of the same screen, make sure you set VRR to Automatic.

4. Restarting your console may also help alleviate the frame rate issues of Forspoken, especially if you have been playing for many consecutive hours and/or have been using Rest Mode instead of completely turning off the PS5.

To restart, make sure you save your progress in the action role-playing game. Afterwards, press the PS button to bring up the Control Center quick menu, where you can select the Power option located on the bottom right side. In the pop-up menu, you need to select the Enter Rest Mode option.

5. Make sure you keep the game updated as a new patch may improve the performance of the game.

In order to manually update, move the cursor over to the Forspoken icon in the home screen of your PS5. Afterwards, press the Options button on the DualSense and then select the Check for Update option.

6. Updating the system software of your PlayStation 5 may also improve the performance of the console as a whole.

You can manually update the firmware by going to console’s Settings menu and then selecting System > System Software > System Software Update and Settings > Update System Software > Update Using Internet.

How to make things easier to see in Forspoken

When playing Forspoken on the PC or PS5, you may notice that it is kind of difficult trying to spot enemies and items in the open world. Furthermore, you may also find that the subtitle text size to be too small to read.

To see how you can make it easier to see in this action role-playing game, you can take a look at this tutorial from Seeking Tech.

1. The first step you can take is to adjust the HDR settings if you are using this display format.

2. If you have HDR set up correctly, then you can try reducing the camera shake effect, which prevents the in-game camera from constantly shaking when you are fighting against enemies.

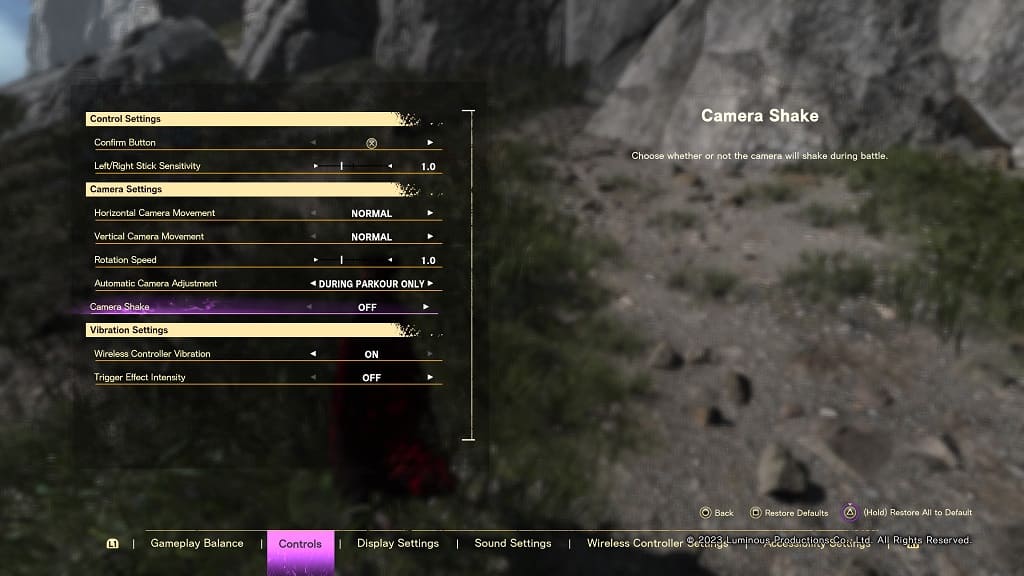
In order to do so, open the Settings menu in Forspoken and then switch over to the Controls section. From there, make sure you set the Camera Shake setting to Off.

3. You can also try changing the Image Quality Setting by going to Settings > Display Settings.

The Quality-Focused option provide the sharpest image while Ray Tracing will change the lighting in the game. Performance-Focused offers a lower resolution but makes up for it with a higher frame rate.

Try to play around with these visual modes to see which one of them makes it easier on your eyes.

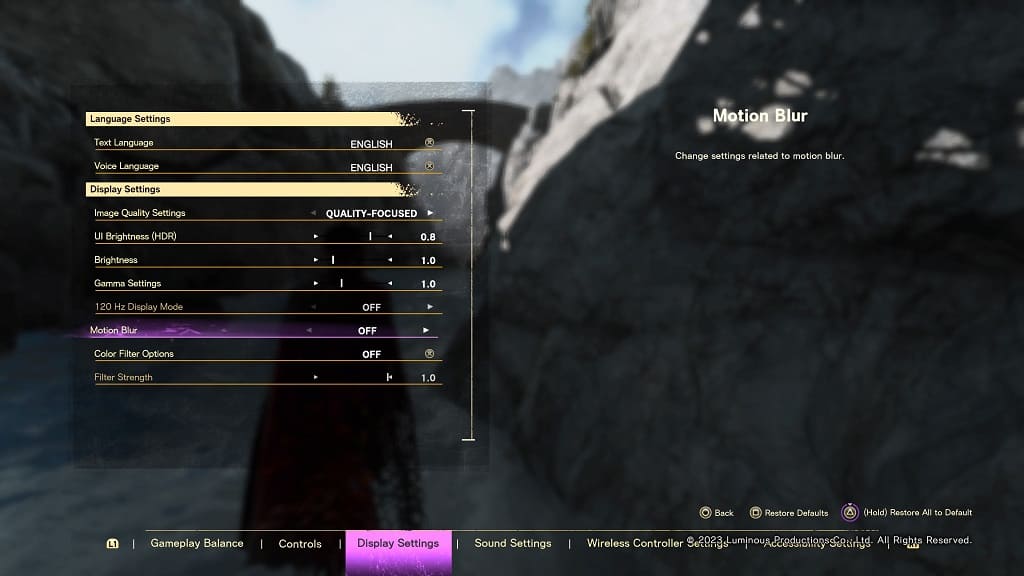
4. Furthermore, you can try disabling motion blur effect as well. In order to do so, you can follow these directions.

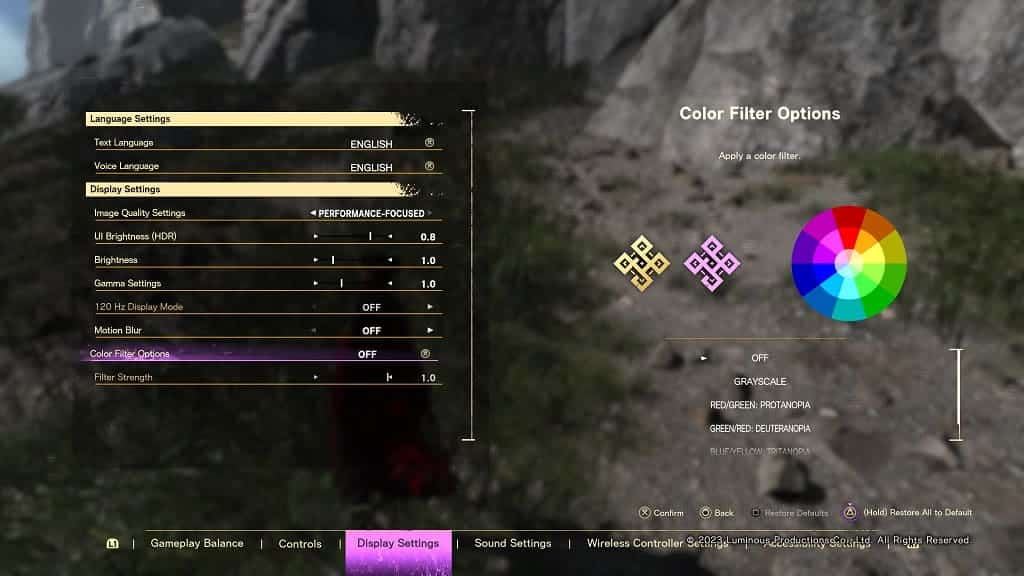
5. If you have some kind of visual impairment, then you can use the Color Filter Options.

In order to access it, go to Settings > Display Settings. From there, you can pick between different filter as well as filter strength.

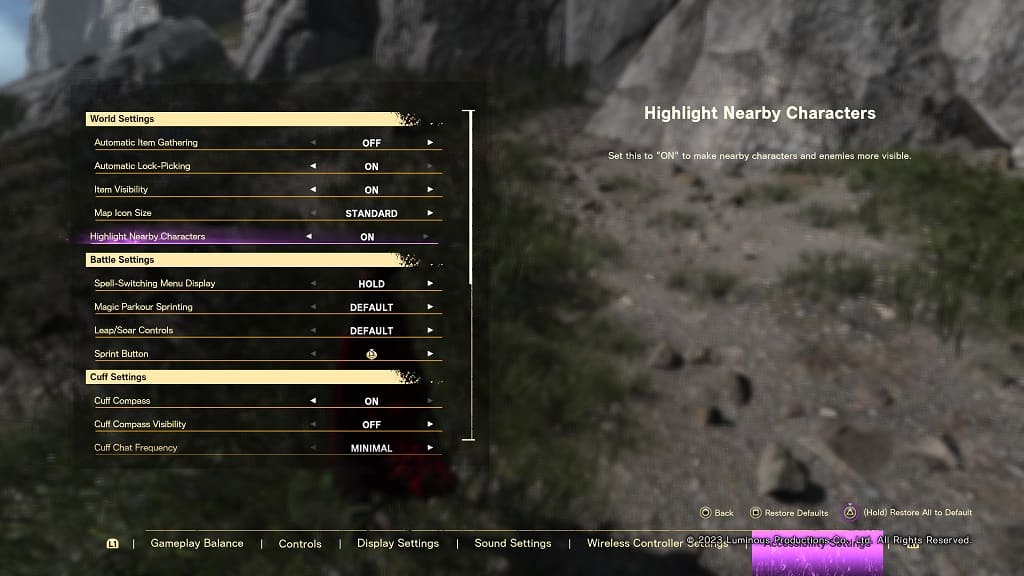
6. There are also options where you can highlight items and characters, including enemies, in Forspoken.

To enable both of these features, head over to Settings > Accessibility Settings. In the World Settings section of this menu, you can set Item Visibility and Highlight Nearby Characters to On.

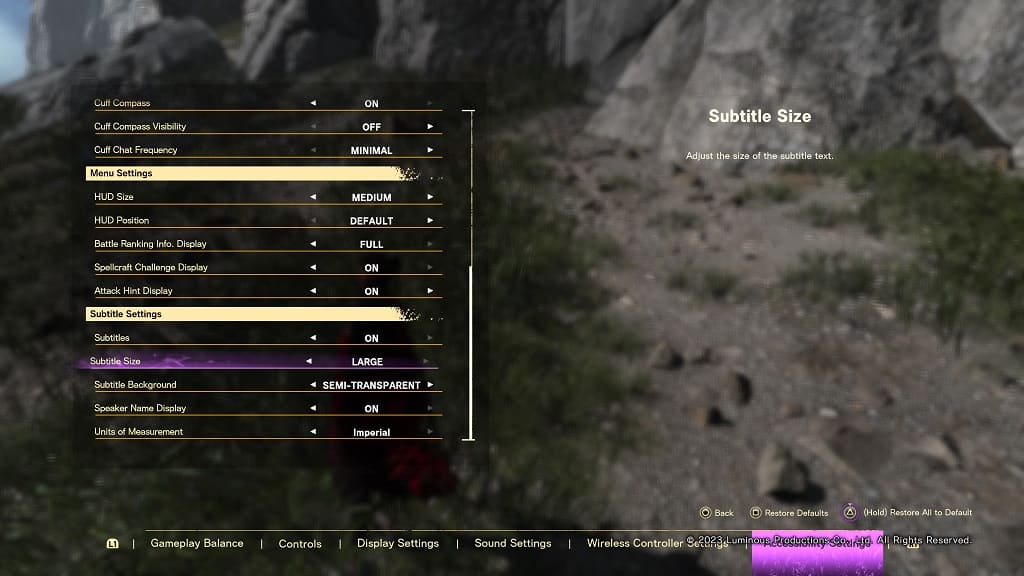
7. If you find that the subtitle text size to be too small and, therefore difficult to read, then you need to go back to the Settings > Accessibility Settings.

From there, you need to go to the Subtitle Setting section. Afterwards, set Subtitle Size to Large. You can also change the Subtitle Background to make the text easier on your eyes.

How to reduce or turn off motion blur in Forspoken

When playing Forspoken on PC, PlayStation 5 or PlayStation 5 Digital Edition, you may notice that there is an excessive amount of motion blur. While this will help make the game appear to run smoother, it may also cause the game to look a lot blurrier.

To see how you can reduce, as well as completely turn off, this visual effect, you can take a look at this tutorial from Seeking Tech.

How to reduce motion blur in Forspoken

In order to reduce the motion blur in Forspoken, we suggest increasing the frame rate for the game. By making the game run smoother, the action shouldn’t look as blurry.

In order to increase the frame rate on the PS5, for example, you need to take the following steps:

1. Open Forspoken and then head into its Settings menu.

You can do so by selecting the Settings option from either the start menu or pause menu.

2. Inside of Settings, press the R1 button twice in order to move over to the Display Settings tab.

3. From there, you need to move the cursor down to Image Quality Settings.

4. Finally, change this setting to Performance-Focused, which should help increase the frame rate for Forspoken at the expense of resolution and visual fidelity.

5. Finally, exit out of the Settings menu. Any changes you made will now be saved, which is indicated by the animated circle that should appear at the bottom right corner of the screen.

How to completely disable motion blur in Forspoken

You can also completely turn off motion blur in Forspoken by doing the following:

1. Start up the action RPG on your PC or PS5 if you haven’t done so already.

2. Next, you need to head over to the game’s Settings menu.

3. From there, move over to Display Settings. If you are using a controller then you can press the R1 button until you get there.

4. Next, you need to move the cursor down to the Motino Blur setting.

5. To disable this visual effect, set the Motion Blur setting to Off.

6. Back out of the Settings menu and any changes you made should be saved.

7. Start playing Forspoken. You should no longer see any motion blur if you turned it off from the Settings menu.

How to disable Cuff voice chatter in Forspoken

In the PC and PlayStation 5 action role-playing game, Forspoken, you will go on a long journey with a companion bracelet named Cuff, who is capable of talking. You may find the frequent chatter between Frey and Cuff to be annoying, however, especially when their dialogues repeat over and over again.

To see how you can lower the frequency of these exchanges, you can take a look at this guide from Seeking Tech.

1. If you haven’t done so already, turn on your PC or PlayStation 5 and then boot into Forspoken.

2. In the start screen of Forspoken, you need to select Settings.

If you are actively playing the action role-playing game at this moment, then you need to pause it and then select Settings.

3. Inside of Settings, you need to move to the Accessibility Settings tab. If you are using a controller, then you can press the R1 or RB button to switch tabs until you get to the desired location.

4. Inside of the Accessibility Settings tab, move down to the Cuff Settings section.

5. From there, move the cursor over to Cuff Chat Frequency.

6. You can then change this setting to any of the following:

  • The Minimal option will disable all dialogue between Cuff and Frey with the exception of important conversations that are tied to the story of the game.
  • The Low option will make the general chatter for the two characters less frequent.
  • The Default option means that you will hear talks between Cuff and Frey at a normal rate.
  • The High option will increase the frequency of the general dialogue between these two characters.

7. Once you are done making the change, back out to the previous screen. If you are playing the game on PS5 or using the DualSense, then you can press the circle button in order to go back.

8. On the bottom right corner of the screen, you should see an animated circle.

9. When the animated circle disappears, it should indicate that the changes you made in the Cuff Chat Frequency setting is now applied in the game.

So, if you lower the frequency, then you shouldn’t hear Cuff converse with Frey as much as before when you resume playing the action RPG again.