How to fix PS5 M.2 SSD crashing, frame rate and slow loading issues

If you have a M.2 solid state drive installed on your PlayStation 5 or PlayStation 5 Digital Edition system, then you may encounter the following issues:

  • Bad frame rate performance
  • Slower loading times
  • Game crashing
  • Console freezing

To see how you can potentially fix these problems with your M.2 expansion storage drive, you can take a look at this troubleshooting article at Seeking Tech.

1. The first step we recommend taking is to check the advertised sequential reading speed of the M.2 solid state drive you have installed on your PS5 or PS5 Digital Edition console.

Sony recommends that the reading speed should be 5,500 MB per second at the minimum.

While you can use a M.2 SSD with slower reading speed, it may cause issues with some games.

2. You should also make sure that the expansion solid state drive has a heat sink installed on it as well.

Otherwise, the M.2 storage drive will get too hot, eventually slowing down its performance and may even cause your PlayStation 5 system to shut down.

To find out more about overheating issues in regards to using a M.2 SSD for your PS5, you can take a look at this article.

3. If you are currently downloading a file, then you can either cancel the download or wait for it to complete before trying to playing a game directly off of the M.2 SSD Storage.

4. If a game file is currently installing, then you should wait until the installation is complete.

5. It is a good idea that you update the firmware of your PlayStation 5 system as well if you haven’t done so already.

6. Furthermore, you should also make sure that you have the latest patch installed for all the games you have on your M.2 SSD Storage.

7. Clearing the cache and rebuilding the database for your game console may also help.

In order to perform these two actions, you need to go to the Safe Mode menu by taking the following steps:

  • Turn off you PS5 or PS5 Digital Edition if you haven’t done so already.
  • Press and hold the power button located on the system until you hear two beeps. Afterwards, you can let go of the power button.
  • Follow the instructions on screen by plugging your DualSense controller into the USB port and then pressing the PS button.
  • Select “5. Clear Cache and Rebuild Database” from the Safe Mode menu.
  • 8. You can also try reformatting the M.2 solid state drive by doing the following:
  • Head to the Settings menu on your PlayStation 5.
  • Select Storage.
  • From the Storage menu, select M.2 SSD Storage.
  • You then need to select Reformat on the right side in the same screen.

9. If reformatting your M.2 solid state drive did not fix your problems, then you might want to try a different PS5-comaptible M.2 SSD.

10. You can also just transfer the game over to the Console Storage and then play it from the built-in solid state drive of your PlayStation 5 or PlayStation 5 Digital Edition console.

How to install and format the ADATA Premium SSD for PS5

ADATA has released a new M.2 solid state drive that is advertised to be fully compatible with the PlayStation 5 and PlayStation 5 Digital Edition.

To find out how you can install this SSD, you can take a look this tutorial from Seeking Tech.

How to insert the ADATA Premium SSD for PS5

To properly insert the ADATA Premium SSD for PS5, you need to take the following steps:

Before we begin, it is important to note that this guide will be based on the following products:

  • 1TB ADATA Premium PCIe Gen4 M.2 2280 SSD for PS5 (APSFG-1T-CSUS)
  • 2TB ADATA Premium PCIe Gen4 M.2 2280 SSD for PS5 (APSFG-2T-CSUS)

1. To start off make sure you apply the included heatspreader to the ADATA Premium solid state drive if oyu haven’t done so already. Otherwise, you will risk overheating your SSD and game system.

2. If you use the Premium SSD before, then we recommend transferring any important files you have stored on it. Otherwise, these files will be deleted when you format the drive for use with the PS5.

3. Once you are ready, unplug the HDMI cable, power cable, USB cable and other accessories you have attached to your PlayStation 5 or PlayStation 5 console.

4. If you have the stand installed, then make sure you remove it from the system as well.

5. After detaching everything from the console, lay it down so that the PS logo on the outer cover is facing downwards.

6. You should also make sure that the back of the system, which has the HDMI port, is facing towards you.

7. From your point of view, place your right hand on the bottom right corner of the outer case and then your left hand on the top left corner of the outer case.

8. Lift the outer cover up using your right hand from the bottom right corner and then slide it to the left in order to remove it.

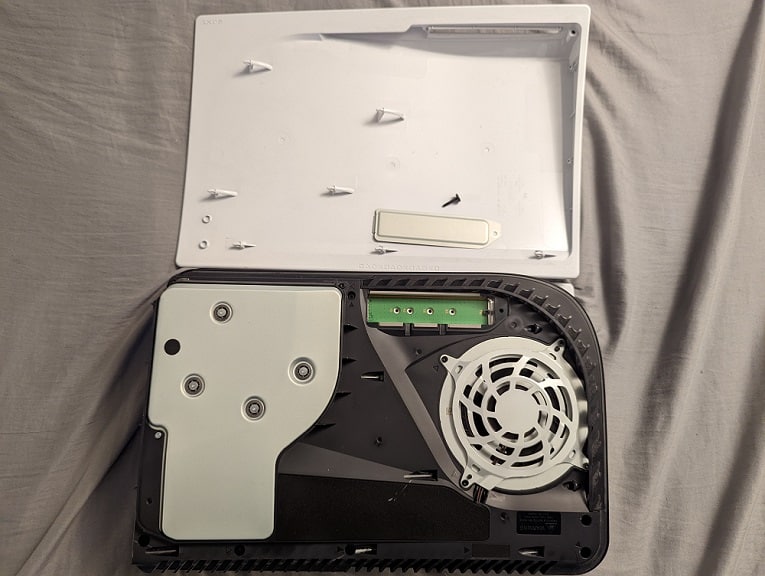
9. With the cover remove, find the M.2 docking bay, which should have a rectangular metal cover.

10. Use a crosshead screwdriver to remove the screw holding the metal cover in place.

11. You then need to remove the metal cover to gain access to the M.2 docking bay of your PlayStation 5 or PlayStation 5 Digital Edition.

12. In the docking bay, remove the screw and spacer inside of it.

13. Next, place the previously removed spacer into the “80” slot in the docking bay.

14. Insert your 1TB ADATA Premium SSD for PS5 or 2TB ADATA Premium SSD for PS5 into the M.2 slot of your system from a diagonally upwards position.

15. With the solid state drive inserted, tilt the other end down to the motherboard of the system.

16. Use the screw you previously removed in Step #12 to fastened the SSD in place.

17. Put the metal cover of the docking bay back and then use the screw you removed from Step #10 to secure it.

18. Put the outer cover back on by sliding it from the left to the right.

How to format the ADATA Premium SSD for PS5

In order to format the ADATA Premium SSD for PS5, you need to do the following:

1. If you haven’t done so already, reattach your PlayStation 5 or PlayStation 5 Digital Edition system to the HDMI cable, power cable, stand and other accessories that you previously removed.

2. With everything reattached, turn on your console.

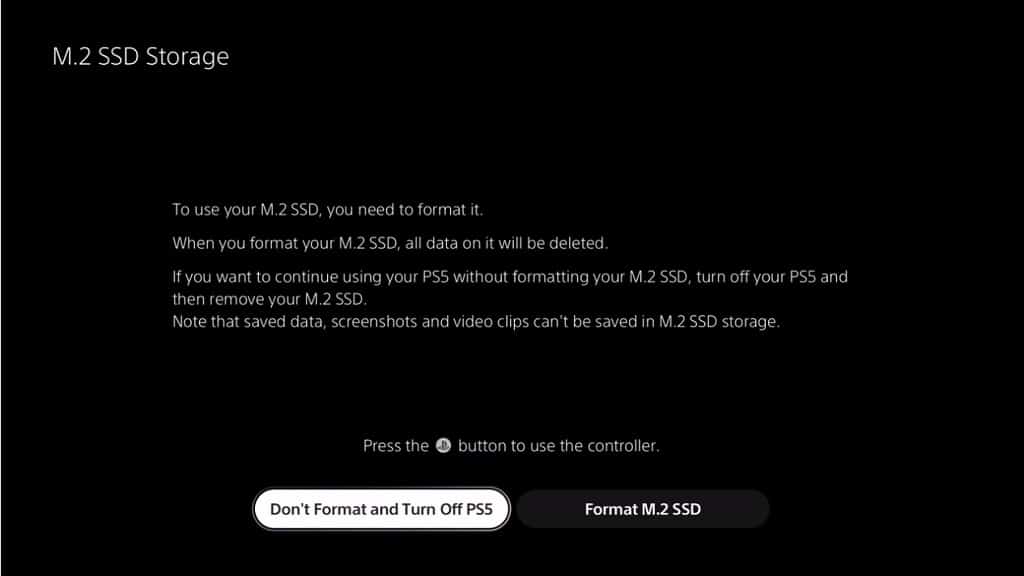
3. During the boot up process, you should see a message about M.2 SSD Storage.

4. In this screen, press the PS button on your DualSense to be able to use it.

5. Once you gain control, select the Format M.2 SSD option.

6. After the formatting process has completed, you should see the tested sequential read speed of your 1TB ADATA Premium SSD for PS5 or 2TB ADATA Premium SSD for PS5.

7. Select OK to complete the formatting process and head to the home screen.

Where to find ADATA Premium SSD for PS5 in the system menus

To find where you have direct access to your ADATA Premium SSD for PS5 in the system menus, you need to take the following steps:

1. From the home screen, select the gear cog icon located on the top right corner of the menu to go into Settings.

2. In Settings, select Storage from the list.

3. After getting to the Storage menu, select M.2 SSD Storage on the left column.

4. On the right side in the same Storage menu, you should see your 1TB ADATA Premium SSD for PS5 or 2TB ADATA Premium SSD for PS5.

5. You can use this same Storage menu to transfer games between the internal SSD and the ADATA Premium SSD or versa. You can also delete data, reformat the storage drive and change the default game installation location.

What to do when your PS5 can’t format the M.2 SSD

When trying to install your M.2 solid state drive on your PlayStation 5 or PlayStation 5 Digital Edition, you may get an error message saying that the expansion drive can’t be formatted.

To see how you can potentially fix this formatting issue, you can take a look at this troubleshooting article at Seeking Tech.

1. The first step we recommend taking is to remove the M.2 SSD from your PS5 system and then res-insert it again. Afterwards, try to format it again.

2. If you are still getting an error when formatting, then we recommend removing the drive from your system again. This time, insert the SSD into the M.2 slot of a computer.

On the computer, make sure that the storage drive doesn’t have any password or other security setup. If it does, then you need to try to disable it.

3. While you have the SSD inserted in a PC, you should also check if there is a new firmware update available for the storage drive.

4. Furthermore, you can also try formatting the drive from the computer.

After removing the password protection, updating the firmware and/or formatting the M.2 SSD, you should then re-insert the storage drive into the PlayStation 5 and then try to format it.

5. If you are still getting a formatting error, then make sure you have the latest firmware downloaded for your PS5 or PS5 Digital Edition.

To update, you need to take the following steps:

  • Turn on your PlayStation 5 console if you haven’t done already.
  • After getting to the home screen menu, which is where you get to select which game to play, select the gear icon on the top right side of the screen in order to go to Settings.
  • In the Settings menu, head over to System.
  • After getting to the System menu, you first need to select System Software from the left column.
  • From the right side of the same screen, you then have to select System Software Update and Settings.
  • In the next screen, you need to select Update System Software.
  • Afterwards, you either select to update over the Internet or update by using an USB storage device.

6. You can also try clearing the cache and rebuilding the database of your PlayStation 5 or PlayStation 5 Digital Edition by doing the following:

  • Turn off your PS5 console completely if you haven’t done so already.
  • With the console turned off, press and hold the power button located directly on the system until you hear two beeps. After the second beep you can let go of the power button as the PS5 should boot into the Safe Mode menu.
  • Inside the Safe Mode, you first need to connect the DualSense controller to the PS5 with an USB cable.
  • You then need to press the PS button on the DualSense to be able to use the controller.
  • After you gain control, select “5. Clear Cache and Rebuild Database” from the Safe Mode menu.
  • You can then select either “1. Clear System Software Cache” or “Rebuild Database.”

7. If none of the aforementioned potential solutions fix the formatting issues, then you might want to try using a different PS5-compatible SSD to see if the new drive is able to format.

If the formatting issues occurred across multiple drives, then you might want to contact Sony as there may be an issue with your PlayStation 5 or PlayStation 5 Digital Edition.

What to do when your PS5 can’t detect the M.2 SSD

The PlayStation 5 and PlayStation 5 Digital Edition supports expanded storage through the M.2 slot.

If your gaming console isn’t detecting your solid state drive, then you can take a look at this troubleshooting guide at Seeking Tech.

1. The first step we recommend taking is to make sure that your M.2 SSD is compatible with the PS5.

For the uniformed,you need the following requirements:

  • PCI-Express Gen4x4 interface with a Socket 3 (Key M) connector.
  • In terms of the physical size of the SSD, the PlayStation 5 supports 2230, 2242, 2260, 2280 or 22110.
  • Moreover, the storage capacity should be within a range of 250 GB through 4 TB.
  • A heat sink is required as well.
  • Last but not least, the sequential reading speed should be at least 5,500 MB per second.

2. If your SSD met all of the PS5 requirements but is still up showing up in the menus, then the next step you can take is to update the firmware of your console.

In order to do so, you can try taking the following steps:

  • Turn on your system if you haven’t done already.
  • On the home screen, select the gear cog icon on the top right side of the screen.
  • In Settings, go to System.
  • On the left side of the System menu, select System Software.
  • On the right side of the same screen, select System Software Update and Settings.
  • In the next menu, select Update System Software.
  • Next, you can use either to update over the Internet or by using an USB storage device.

3. If updating the firmware of the game system did not work with getting the M.2 SSD detected, then you can try updating the firmware of the solid state drive.

To do so, you can do the following:

  • Remove the M.2SSD from the game console.
  • Afterwards, you need to insert your M.2 storage drive to a computer with a compatible M.2 slot.
  • With the SSD inserted into your PC, you then need to follow the instructions provided by the manufacturer of the storage drive in order to be able to update its firmware.

4. After updating the firmware version of your M.2 solid state drive, you may also want to reformat the drive while it is still inserted into your computer.

5. Once you are done updating and formatting the solid state drive on the computer, then you can try reinserting the M.2 SSD into your ps5.

To do so, make sure you inserted the storage drive from a diagonally upwards position at a 30-degree angle. If aligned correctly, you shouldn’t have to force the SSD in the m.2 slot.

You can check out the official video from PlayStation to see how you can do so below:

How to fix PS5 M.2 SSD slow reading speed

After your PlayStation 5 or PlayStation 5 Digital Edition has formatted the M.2 solid state drive, you will see the sequential reading speed of the expansion storage.

If the read speed is slower than expected, then you can take a look at this troubleshooting article at Seeking Tech to see what you can do.

1. The first step we recommend taking is to make sure that the sequential read speed is above the minimum requirement of 5,500 MB per second.

As long as the read speed is more than 5,500 mb per second, then you most likely have nothing to worry about when it comes to performance as the PS5 is unlikely to take advantage of the excess speed.

2. If the sequential reading speed is below 5,500 MB per second, then we recommend that you try reformatting the M.2 solid state drive.

In order to do so, you need to take the following steps:

  • Turn on your ps5 if you haven’t done so already.
  • On the home screen, select the gear icon located on the top right side to get to the Settings menu.
  • From the first page of Settings, select Storage.
  • Inside the Storage menu, select M.2 SSD Storage from the left column.
  • On the right side of the same menu, select the Reformat option.
  • After the M.2 drive has been reformatted, you should see its sequential reading speed.

3. If reformatting the expansion solid state drive of your PlayStation 5 does not work, then you can try updating the firmware of the drive.

To do so, you need to do the following:

  • Remove the M.2 SSD from the PS5 or PS6 Digital Edition console and then insert it to a computer with compatible M.2 slot.
  • Next, you need to follow the instructions from the manufacturer of your solid state drive in order to update its firmware.
  • After updating the firmware of your M.2 storage drive, remove it from your PC and then insert it back into your PlayStation 5 console
  • Afterwards, format the drive for PS5 to see if the sequential read speed is faster after you update the firmware of the SSD.

4. You can also make sure that the solid state drive isn’t running too hot as a high temperature can reduce its read speed.

To see what you can do when the PS5-compatible SSD is overheating, you can take a look at this guide.

5. If you are still experiencing issues with the slower than expected read speed, then you might want to consider getting another M.2 solid state drive that is compatible with the PlayStation 5.

If you are looking for a specific product recommendation, then you might want to consider picking up the WD_BLACK 1TB SN850 NVMe Internal Gaming Solid State Drive with Heatsink, which you can find on Amazon with this link. (#CommissionsEarned).

How to install and format the Kingston FURY Renegade SSD to PS5

The Kingston FURY Renegade solid state drive is compatible with the PlayStation 5 as it offers a PCIe 4.0 NVMe interface, sequential reading speed of up to 7,300 MB per second in addition to a low-profile graphene aluminum heat spreader that fits into the docking bay of the game console.

You can take a look at this step-by-step guide to see how you can install this M.2 SSD to your PS5 or PS5 Digital Edition system.

Compatible Kingston FURY Renegade Capacities

All available capacity options of the FURY Renegade will work with the PlayStation 5. Of course, the bigger sizes provide more storage for your games.

You can find the PS5 compatible capacities, as well as the associated mode numbers, of the product below:

  • 500 GB Kingston FURY Renegade PCIe 4.0 NVMe M.2 SSD (SFYRD/500G)
  • 1 TB Kingston FURY Renegade PCIe 4.0 NVMe M.2 SSD (SFYRD/1000G)
  • 2 TB Kingston FURY Renegade PCIe 4.0 NVMe M.2 SSD (SFYRD/2000G)
  • 4 TB Kingston FURY Renegade PCIe 4.0 NVMe M.2 SSD (SFYRD/4000G)

Updating to the latest PS5 firmware

If you haven’t updated the firmware of your PlayStation 5 in a long time, then the Kingston FURY Renegade may not work even if you correctly inserted in the M.2 SSD expansion bay.

So, if you haven’t done so already, make sure you update to the latest available firmware of your system.

How to insert Kingston FURY Renegade SSD to PS5

With your game console updated to the latest firmware version, you can now start the process of inserting the FURY Renegade.

To insert, you need to take the following steps:

1. If you haven’t done so already, you need to shut down your PlayStation 5 as you will need to unplug and open it.

2. After turning off your system, the next step is to disconnect the power cord, HDMI cable as well as other cables and accessories you have plugged into your PS5.

3. If you have the stand attached as well, then you also need to remove it to continue.

4. With nothing attached to the system, lay it down so that the side with big PS logo is underneath. You should probably find a soft surface (for this process, we used a bed).

5. Next, position the system so that its back side, where the HDMI and power ports are located, is facing you.

6. Now, from your vantage point, put your right hand on the bottom right corner of the outer case and you left hand on the upper left corner of the outer case.

7. Lift up the bottom right corner of the outer case and then gently slide the outer case off to the left side with your left hand.

8. With the outer case removed, you should see a rectangular metal plate covering the m2 expansion bay.

9. Use a cross-head screwdriver to remove the screw holding the metal plate in place and then remove plate to access M.2 expansion bay.

10. Inside of the bay, you need to remove the screw and spacer.

11. Place the spacer you removed from the previous step into the “80” hole in the bay.

12. Next, insert your Kingston FURY Renegade into the M.2 slot on your PS5 from a diagonally upwards position.

13. With your SSD inserted, press down on the other end of the drive and then use the screw you previously removed from the bay to secure the drive into the “80” hole.

With the Kingston FURY Renegade inserted and secured into place, screw back in the metal cover you previously removed for the M.2 SSD bay.

14. You then need to slide the outer cover back into place starting from the left side.

How to format Kingston FURY Renegade for PS5

With the FURY Renegade inserted, you can now format the solid state drive for use with your PlayStation 5.

To do so, you need to do the following:

1. Reattach the HDMI cable, power cord as well as any other cables and accessories into your system.

2. Turn on your PS5.

3. Before getting to the home screen, you should see a M.2 SSD Storage notification.

4. To format, first press the PS button on your DualSense to use it.

5. Next, you need to select Format M.2 SSD.

6. After the formatting is done, you will see a speed test of the sequential read speed for the Kingston FURY Renegade.

7. Select OK to complete the formatting in order to boot to the home screen.

Where to find Kingston FURY Renegade in the PS5 menus

To find the location of your newly installed Kingston FURY Renegade within the menus of your PlayStation 5 system, you can take the following steps:

1. In the home screen, go to Settings, which you can find on the upper right corner.

2. After getting to Settings, you then need to select Storage from the list of available options.

3. Inside of the Storage menu, select M.2 SSD Storage from the left side.

4. On the right side, you should see information on your Kingston FURY Renegade.

5. You can also use this same menu to move games between the FURY Renegade and the internal SSD storage, reformat the FURY Renegade as well as change the default location for installing a game.

How to install and format the Corsair MP600 PRO LPX to PS5

The Corsair MP600 PRO LPX is a PlayStation 5 compatible M.2 solid state drive.

You can check out this tutorial at Seeking Tech to see how you can install the SSD to your game console.

Before we start, it should be noted that this guide will be based on the following capacities:

  • 500GB Corsair MP600 PRO LPX PCIe Gen4 x4 NVMe M.2 SSD (CSSD-F0500GBMP600PLP)
  • 1TB Corsair MP600 PRO LPX PCIe Gen4 x4 NVMe M.2 SSD (CSSD-F1000GBMP600PLP)
  • 2TB Corsair MP600 PRO LPX PCIe Gen4 x4 NVMe M.2 SSD (CSSD-F2000GBMP600PLP)
  • 4TB Corsair MP600 PRO LPX PCIe Gen4 x4 NVMe M.2 SSD (CSSD-F4000GBMP600PLP)

If you haven’t done so already, you can purchase the PS5-compatible SSD on Amazon with this link. (#CommissionsEarned).

How to install Corsair MP600 PRO LPX to PS5

To properly insert the MP600 PRO LPX to your PlayStation 5, you can try taking the following steps:

1. If you have any important data stored on Corsair MP600 PRO LPX, then make sure you move the files to another storage. This is because you will need to eventually format the drive, which will delete all the existing data on it.

2. If you haven’t done so already, completely turn off your PlayStation 5 or PlayStation 5 Digital Edition system.

3. Unplug the HDMI cable, power cable, USB cable as well as any other cables or accessories you have attached to the system.

4. If you have a stand installed, then you need to remove it as well.

5. Next, you need to lay down your PlayStation 5, preferably on a soft surface.

The side with the PS logo should be facing downwards while the back of the system (where the HDMI and power ports are located) should be facing towards you.

6. From your vantage point, hold the top left corner of the outer cover of the PS5 with your left hand as well as the bottom right corner of the outer cover with your right hand.

7. With your right hand, lift the bottom right corner of the outer cover upwards and then pull it towards to left to dislodge it.

8. Use your left hand to slide the outer cover off to the left.

9. With the outer cover off, you should see the metal cover of the M.2 docking bay for your PlayStation 5.

10. Use a crosshead screwdriver to remove the screw holding the M.2 docking bay metal cover.

11. Once you get inside the docking bay, use the crosshead screwdriver to remove the screw and spacer.

12. Place the spacer you previously removed into the “80” hole.

13. Next, you can insert the Corsair MP600 PRO LPX from a diagonally upwards position.

14. Use the screw you remove from Step 11 to screw the MP600 PRO LPX into the “80” hole.

15. Put back the docking bay M.2 metal cover and then screw it in place.

16. Slide back the outer cover of the PlayStation 5 from left to right.

How to format Corsair MP600 PRO LPX for PS5

After inserting the Corsair MP600 PRO LPX, you can format the solid state drive for the PlayStation 5 by doing the following:

1. Reconnect the stand and cables to the PS5 system if you haven’t done so already.

2. Turn on your PlayStation 5.

3. You should see a message about the M.2 SSD Storage.

4. Press the PS button on your DualSense controller.

5. Afterwards, select Format M.2 SSD.

6. Once the formatting has been completed, you should see the speed test result of the sequential read speed for your Corsair MP600 PRO LPX.

7. Select OK to get to the home screen.

How to find Corsair MP600 PRO LPX in the PS5 menus

To find the location of your Corsair MP600 PRO LPX on the PlayStation 5 menus, you need to do the following:

1. Go to Settings, which you can find on the upper right side of the home screen.

2. From Settings, select Storage from the list of available options.

3. In the Storage menu, select M.2 SSD Storage on the left column.

4. On the right side from the same menu, you should see information for the Corsair MP600 PRO LPX.

5. In this same screen, you also reformat the SSD, change the default game installation location as well as move games in between different storage options.

How to install and format the Mushkin Gamma Gen 4.0 to PS5

The Mushkin Gamma Gen 4.0 is compatible with the PlayStation 5 and PlayStation 5 Digital Edition as you can use this solid state drive to store and play PS5 games.

You can check out this step-by-step guide at Seeking Tech to see how you can install and format the Gamma Gen 4.0 for use with Sony’s game console.

Supported Solid State Drives

This tutorial will cover the following capacities:

  • 1 TB Mushkin Gamma Gen 4.0 (Model Number: MKNSSDGA1TB-D8)
  • 2 TB Mushkin Gamma Gen 4.0 (Model Number: MKNSSDGA2TB-D8)
  • 4 TB Mushkin Gamma Gen 4.0 (Model Number: MKNSSDGA5TB-D8)

Compatible Heatsink

You will also need a PS5-compatible heatsink. If you are looking for one, then we recommend picking up the be quiet! MC1 M.2 SSD Cooler, which you can find on Amazon with this link. (#CommissionsEarned).

You can check out this video guide to see how you can install the MC1 M.2 SSD Cooler to the Mushkin Gamma Gen 4.0.

Moving important data off of Mushkin Gamma Gen 4.0

If you used your Mushkin Gamma Gen 4.0 solid state drive before with another device, then we recommend moving any important files you have stored on it to another storage drive. This is because formatting the SSD for PS5 will delete all the previous data store on it.

Updating PS5 firmware

If you haven’t done so already, you should also make sure you also update the firmware of your PlayStation 5 or PlayStation 5 Digital Edition. This is because M.2 solid state drive support was only added in a recent firmware update.

How to insert Mushkin Gamma Gen 4.0 to PS5

After updating your PlayStation 5 system to its latest firmware, you can insert the Gamma Gen 4.0 to the game console.

In order to do so, you can take the following steps:

1. Turn off your PS5 or PS5 Digital Edition console.

2. Unplug the power cable, HDMI cable as well as other cables you have connected to your console.

3. You should also remove the stand if you have it attached.

4. You can then lay your game console down so that the PS logo is facing downwards.

5. You should also position the console so that the backside, which is where the HDMI port and power port are located, is facing you.

6. From your vantage point, put your right hand on the bottom right corner of the outer cover and your left hand on the top left corner of the outer cover.

7. Lift the bottom right corner of the outer cover with your right hand.

8. Using your left hand, slide the outer cover off to the left.

9. With the cover off, you should see the M.2 docking bay, which has a metal cover keeping it close.

10. Use a cross-head screwdriver to unscrew the screw holding the M.2 metal cover in place.

11. Remove the metal cover to gain access to the M.2 docking bay.

12. Inside the bay, use the cross-head screwdriver to unscrew the screw inside it.

13. You should also remove the spacer from the docking bay.

14. Place the spacer you removed from Step #13 into the 80 hole in the docking bay.

15. Insert the Mushkin Gamma Gen 4.0, which should have the heatsink already installed, into the M.2 slot of your PS5 system from a diagonally upwards position.

16. Hold down on the end of the SSD that is sticking upwards and then use the screw you previously removed from Step #12 to secure the Gamma Gen 4.0 into place.

17. Put back the M.2 dock metal cover and then screw it back into place.

18. Slide the outer cover back into place to complete this process.

How to format Mushkin Gamma Gen 4.0 for PS5

After inserting the Mushkin Gamma Gen 4.0 into your PlayStation 5 or PlayStation 5 Digital Edition, you then need to format the drive.

In order to do so, you need to do the following:

1. Reattach the stand to your PS5 system.

2. Reconnect the HDMI cable, power cable and any other cables you previously have connected to your PlayStation 5.

3. Turn on your game console.

4. During the startup process, you should eventually get the M.2 SSD Storage notification screen.

5. Here, you need to press the PS button to turn on your controller.

6. Next, you have to select the Format M.2 SSD option.

7. After the formatting of the drive has been completed, you should see the sequential read speed test of the Mushkin Gamma Gen 4.0 running on your PS5 system.

8. Select the OK option to complete the formatting process and head to the Home Screen.

Where to find Mushkin Gamma Gen 4.0 in the PS5 menus

To find where your newly formatted Mushkin Gamma Gen 4.0 is located in the PlayStation 5 menus, you can do the following:

1. From the Home Screen, navigate to the upper right corner of the screen and then select Settings.

2. In the Settings menu, scroll down and then select Storage.

3. After getting to the Storage menu, you need select M.2 SSD Storage on the left column.

4. On the right side in the same menu, you should be able to see the Mushkin Gamma Gen 4.0 SSD.

You can also use the Storage menu to move games in between different storage options, reformat the Gamma Gen 4.0 and change the default storage location for games.

What’s the difference between the Samsung 980 Pro and 980 Pro with Heatsink?

Samsung recently released a new version of the 980 Pro solid state drive with a heatsink included. So, how does it compare to the standalone 980 Pro?

You can find out in this comparison guide between these M.2 2280 SSDs.

Quick Summary

Unlike the standalone solid state drive, the Samsung 980 Pro Solid State Drive with Heatsink comes with the cooler already included. This heatsink is fully compatible with the PlayStation 5 console.

While the standalone 980 Pro is also compatible with the PS5 in terms of meeting the speed specification requirements, you still need to get a heatsink that is small enough to fit into the M.2 SSD docking bay of the game console.

The 980 Pro and 980 Pro with Heatsink are identical when it comes to speed performance, endurance, reliability and warranty coverage.

980 Pro vs. 980 Pro Heatsink Comparison Chart

You can take a look at Seeking Tech’s comparison table for the 980 Pro and 980 Pro with Heatsink below.

Samsung 980 Pro Solid State DriveSamsung 980 Pro Solid State Drive with Heatsink
Capacity Options250 GB

500 GB

1 TB

2 TB
1 TB

2 TB
Model Numbers250 GB: MZ-V8P250B

500 GB: MZ-V8P500B

1 TB: MZ-V8P1T0B

2 TB: MZ-V8P2T0B
1 TB: MZ-V8P1T0CW

2 TB: MZ-V8P2T0CW
Form FactorM.2 2280M.2 2280
HeatsinkNot includedIncluded
PS5 CompatibilityRequires PS5-comaptible heatsinkYes
Dimensions80.15 mm x 22.15 mm x 2.38 mm80 mm x 24 mm x 8.6 mm
InterfacesPCIe Gen 4.0 x 4 and NVMe 1.3c interfacesPCIe Gen 4.0 x 4 and NVMe 1.3c interfaces
NAND TechnologySamsung V-NAND 3bit MLCSamsung V-NAND 3bit MLC
Flash ControllerSamsung ElpisSamsung Elpis
DRAM Cache Memory250 GB 980 Pro: 512 MB LPDDR4

500 GB 980 Pro: 512 MB LPDDR4

1 TB 980 Pro: 1 GB LPDDR4

2 TB 980 Pro: 2 GB LPDDR4
1 TB 980 Pro with Heatsink: 1 GB LPDDR4

2 TB 980 Pro with Heatsink: 2 GB LPDDR4
SecurityAES 256-bit Full Disk Encryption

Encrypted Drive (IEEE1667)

TCG/Opal V2.0
AES 256-bit Full Disk Encryption

Encrypted Drive (IEEE1667)

TCG/Opal V2.0
Maximum Sequential Read Speed over PCIe 4.0250 GB 980 Pro: Up to 6400 MB per second

500 GB 980 Pro: Up to 6900 MB per second

1 TB 980 Pro: Up to 7000 MB per second

2 TB 980 Pro: Up to 7000 MB per second
1 TB 980 Pro with Heatsink: Up to 7000 MB per second

2 TB 980 Pro with Heatsink: Up to 7000 MB per second
Maximum Sequential Write Speed over PCIe 4.0250 GB 980 Pro: Up to 2700 MB per second

500 GB 980 Pro: Up to 5000 MB per second

1 TB 980 Pro: Up to 5000 MB per second

2 TB 980 Pro: Up to 5100 MB per second
1 TB 980 Pro with Heatsink: Up to 5000 MB per second

2 TB 980 Pro with Heatsink: Up to 5100 MB per second
Maximum Sequential Read Speed over PCIe 3.0250 GB 980 Pro: Up to 3500 MB per second

500 GB 980 Pro: Up to 3500 MB per second

1 TB 980 Pro: Up to 3500 MB per second

2 TB 980 Pro: Up to 3500 MB per second
1 TB 980 Pro with Heatsink: Up to 3500 MB per second

2 TB 980 Pro with Heatsink: Up to 3500 MB per second
Maximum Sequential Write Speed over PCIe 3.0250 GB 980 Pro: Up to 2700 MB per second

500 GB 980 Pro: Up to 3400 MB per second

1 TB 980 Pro: Up to 3450 MB per second

2 TB 980 Pro: Up to 3470 MB per second
1 TB 980 Pro with Heatsink: Up to 3450 MB per second

2 TB 980 Pro with Heatsink: Up to 3470 MB per second
Maximum Random Read Speed over PCIe 4.0250 GB 980 Pro: Up to 500,000 IOPS

500 GB 980 Pro: Up to 800,000 IOPS

1 TB 980 Pro: Up to 1,000,000 IOPS

2 TB 980 Pro: Up to 1,000,000 IOPS
1 TB 980 Pro with Heatsink: Up to 1,000,000 IOPS

2 TB 980 Pro with Heatsink: Up to 1,000,000 IOPS
Maximum Random Write Speed over PCIe 4.0250 GB 980 Pro: Up to 600,000 IOPS

500 GB 980 Pro: Up to 1,000,000 IOPS

1 TB 980 Pro: Up to 1,000,000 IOPS

2 TB 980 Pro: Up to 1,000,000 IOPS
1 TB 980 Pro with Heatsink: Up to 1,000,000 IOPS

2 TB 980 Pro with Heatsink: Up to 1,000,000 IOPS
Maximum Random Read Speed over PCIe 3.0250 GB 980 Pro: Up to 560,000 IOPS

500 GB 980 Pro: Up to 690,000 IOPS

1 TB 980 Pro: Up to 690,000 IOPS

2 TB 980 Pro: Up to 680,000 IOPS
1 TB 980 Pro with Heatsink: Up to 690,000 IOPS

2 TB 980 Pro with Heatsink: Up to 680,000 IOPS
Maximum Random Write Speed over PCIe 3.0250 GB 980 Pro: Up to 620,000 IOPS

500 GB 980 Pro: Up to 620,000 IOPS

1 TB 980 Pro: Up to 660,000 IOPS

2 TB 980 Pro: Up to 630,000 IOPS
1 TB 980 Pro with Heatsink: Up to 660,000 IOPS

2 TB 980 Pro with Heatsink: Up to 630,000 IOPS
Endurance250 GB 980 Pro: 150 TBW

500 GB 980 Pro: 300 TBW

1 TB 980 Pro: 600 TBW

2 TB 980 Pro: 1200 TBW
1 TB 980 Pro with Heatsink: 600 TBW

2 TB 980 Pro with Heatsink: 1200 TBW
Reliability1,500,000 hours MTBF1,500,000 hours MTBF
Warranty5-year limited warranty5-year limited warranty
PricingCheck price on Amazon.(#CommissionsEarned)Check price on Amazon.(#CommissionsEarned)

Capacity Options

Samsung only added the heatsink with the 1 TB and 2 TB versions of the 980 Pro.

You can check out a breakdown of the available capacities below:

980 Pro:

  • 250 GB
  • 500 GB
  • 1 TB
  • 2 TB

980 Pro with Heatsink:

  • 1 TB
  • 2 TB

Model Numbers

You can also find the model numbers attached to each capacity below:

980 Pro:

  • 250 GB: MZ-V8P250B
  • 500 GB: MZ-V8P500B
  • 1 TB: MZ-V8P1T0B
  • 2 TB: MZ-V8P2T0B

980 Pro with Heatsink:

  • 1 TB: MZ-V8P1T0CW
  • 2 TB: MZ-V8P2T0CW

Form Factor

Both of these SSDs use the M.2 2280 form factor.

Heatsink

The original 980 Pro does not come with a heatsink included. Therefore, you will need to get your own cooler if you don’t want your SSD to overheat.

The heatsink that comes bundled with the newer versions uses Samsung’s nickel-coated high-end controller to cool the storage drive.

PS5 Compatibility

Right out of the box, the 980 Pro with Heatsink should be fully compatible with the PlayStation 5 as you can store and play games directly off of this M.2 SSD.

With the standalone 980 Pro, you will need to get a heatsink that will fit within the dimensions of the PS5’s M.2 SSD docking bay.

Dimensions

You can check out the dimensions for both storage products below:

  • 980 Pro: 80.15 mm x 22.15 mm x 2.38 mm
  • 980 Pro with Heatsink: 80 mm x 24 mm x 8.6 mm

Interfaces

The two versions of the 980 Pro use the same PCIe Gen 4.0 x 4 and NVMe 1.3c interfaces.

NAND Technology

As for NAND, these internal SSDs are equipped with Samsung V-NAND 3bit MLC.

Flash Controller

The Samsung Elpis is used as the flash controller for both 980 Pro storage products.

DRAM Cache Memory

When you compare the same capacity, the 980 Pro and 980 Pro with Heatsink come with the same amount DRAM cache memory.

You can find the DRAM breakdown by capacity below:

  • 250 GB 980 Pro: 512 MB LPDDR4
  • 500 GB 980 Pro: 512 MB LPDDR4
  • 1 TB 980 Pro: 1 GB LPDDR4
  • 2 TB 980 Pro: 2 GB LPDDR4
  • 1 TB 980 Pro with Heatsink: 1 GB LPDDR4
  • 2 TB 980 Pro with Heatsink: 2 GB LPDDR4

Security

The 980 and 980 Pro offer the following security features:

  • AES 256-bit Full Disk Encryption
  • Encrypted Drive (IEEE1667)
  • TCG/Opal V2.0

Speed

The speed between the standalone 980 Pro and 980 Pro with Heatsink should be identical when you compare the same capacities between these two products.

You can find the sequential and random speed specifications below:

Maximum Sequential Read Speed over PCIe 4.0

  • 250 GB 980 Pro: Up to 6400 MB per second
  • 500 GB 980 Pro: Up to 6900 MB per second
  • 1 TB 980 Pro: Up to 7000 MB per second
  • 2 TB 980 Pro: Up to 7000 MB per second
  • 1 TB 980 Pro with Heatsink: Up to 7000 MB per second
  • 2 TB 980 Pro with Heatsink: Up to 7000 MB per second

Maximum Sequential Write Speed over PCIe 4.0

  • 250 GB 980 Pro: Up to 2700 MB per second
  • 500 GB 980 Pro: Up to 5000 MB per second
  • 1 TB 980 Pro: Up to 5000 MB per second
  • 2 TB 980 Pro: Up to 5100 MB per second
  • 1 TB 980 Pro with Heatsink: Up to 5000 MB per second
  • 2 TB 980 Pro with Heatsink: Up to 5100 MB per second

Maximum Sequential Read Speed over PCIe 3.0

  • 250 GB 980 Pro: Up to 3500 MB per second
  • 500 GB 980 Pro: Up to 3500 MB per second
  • 1 TB 980 Pro: Up to 3500 MB per second
  • 2 TB 980 Pro: Up to 3500 MB per second
  • 1 TB 980 Pro with Heatsink: Up to 3500 MB per second
  • 2 TB 980 Pro with Heatsink: Up to 3500 MB per second

Maximum Sequential Write Speed over PCIe 3.0

  • 250 GB 980 Pro: Up to 2700 MB per second
  • 500 GB 980 Pro: Up to 3400 MB per second
  • 1 TB 980 Pro: Up to 3450 MB per second
  • 2 TB 980 Pro: Up to 3470 MB per second
  • 1 TB 980 Pro with Heatsink: Up to 3450 MB per second
  • 2 TB 980 Pro with Heatsink: Up to 3470 MB per second

Maximum Random Read Speed over PCIe 4.0

  • 250 GB 980 Pro: Up to 500,000 IOPS
  • 500 GB 980 Pro: Up to 800,000 IOPS
  • 1 TB 980 Pro: Up to 1,000,000 IOPS
  • 2 TB 980 Pro: Up to 1,000,000 IOPS
  • 1 TB 980 Pro with Heatsink: Up to 1,000,000 IOPS
  • 2 TB 980 Pro with Heatsink: Up to 1,000,000 IOPS

Maximum Random Write Speed over PCIe 4.0

  • 250 GB 980 Pro: Up to 600,000 IOPS
  • 500 GB 980 Pro: Up to 1,000,000 IOPS
  • 1 TB 980 Pro: Up to 1,000,000 IOPS
  • 2 TB 980 Pro: Up to 1,000,000 IOPS
  • 1 TB 980 Pro with Heatsink: Up to 1,000,000 IOPS
  • 2 TB 980 Pro with Heatsink: Up to 1,000,000 IOPS

Maximum Random Read Speed over PCIe 3.0

  • 250 GB 980 Pro: Up to 560,000 IOPS
  • 500 GB 980 Pro: Up to 690,000 IOPS
  • 1 TB 980 Pro: Up to 690,000 IOPS
  • 2 TB 980 Pro: Up to 680,000 IOPS
  • 1 TB 980 Pro with Heatsink: Up to 690,000 IOPS
  • 2 TB 980 Pro with Heatsink: Up to 680,000 IOPS

Maximum Random Write Speed over PCIe 3.0

  • 250 GB 980 Pro: Up to 620,000 IOPS
  • 500 GB 980 Pro: Up to 620,000 IOPS
  • 1 TB 980 Pro: Up to 660,000 IOPS
  • 2 TB 980 Pro: Up to 630,000 IOPS
  • 1 TB 980 Pro with Heatsink: Up to 660,000 IOPS
  • 2 TB 980 Pro with Heatsink: Up to 630,000 IOPS

Endurance

The endurance between the two 980 Pro SSDs should also be identical when comparing the same capacities.

You can check out the TBW specs below:

  • 250 GB 980 Pro: 150 TBW
  • 500 GB 980 Pro: 300 TBW
  • 1 TB 980 Pro: 600 TBW
  • 2 TB 980 Pro: 1200 TBW
  • 1 TB 980 Pro with Heatsink: 600 TBW
  • 2 TB 980 Pro with Heatsink: 1200 TBW

Reliability

The 980 Pro and 980 Pro with Heatsink versions have the same Mean Times Between Failures rating of 1,500,000 hours.

Warranty

A 5-year limited warranty is included with both the Samsung 980 Pro Solid State Drive as well as the Samsung 980 Pro Solid State Drive with Heatsink.

Resources:

What’s the difference between the ADATA SE800 and Samsung T7?

If you are searching for a fast external solid state drive, then you may have found the SE800 and T7.

You can check out this comparison guide to see what the major differences are between these ADATA and Samsung portable storage products.

Quick Summary

The Samsung T7 Portable Solid State Drive is slightly faster than the ADATA SE800 External Solid State Drive at maximum sequential reading. However, the two SSDs are identical when it comes to maximum sequential writing and interface speed.

In terms of portability, the SE800 weighs less in addition to being shorter in length and width. On the other hand, the T7 is slimmer.

The two products have the same warranty coverage length at three years.

SE800 vs. T7 Comparison Chart

You can take a look at Seeking Tech’s comparison table for the SE800 and T7 below.

ADATA SE800 External Solid State DriveSamsung T7 Portable Solid State Drive
Capacity Options512 GB

1 TB
500 GB

1 TB

2 TB
What’s in the BoxADATA SE800 External Solid State Drive

USB 3.2 Type-C to USB Type-C cable

USB 3.2 Type-C to USB Type-A cable

Quick Start Guide
Samsung T7 Portable Solid State Drive

USB Type-C to USB Type-A cable

USB Type-C to USB Type-C cable

Quick Start Guide and Warranty Statement
Weight40 grams58 grams
Dimensions72.7 mm x 44 mm x 12.2 mm85 mm x 57 mm x 8 mm
Compatible DevicesPC

Mac

PlayStation 4

PlayStation 4 Pro

PlayStation 5

Xbox One

Xbox One S

Xbox One X

Xbox Series S

Xbox Series X
PC

Mac

PlayStation 4

PlayStation 4 Pro

PlayStation 5

Xbox One

Xbox One S

Xbox One X

Xbox Series S

Xbox Series X
Interface SpeedUSB 3.2 Gen 2 (up to 10 Gbps)USB 3.1 Gen 2 (up to 10 Gbps)
Maximum Sequential Read Speed512 GB ADATA SE800: Up to 1000 MB per second

1 TB ADATA SE800: Up to 1000 MB per second
500 GB Samsung T7 Portable: Up to 1050 MB per second

1 TB Samsung T7 Portable: Up to 1050 MB per second

2 TB Samsung T7 Portable: Up to 1050 MB per second
Maximum Sequential Write Speed512 GB ADATA SE800: Up to 1000 MB per second

1 TB ADATA SE800: Up to 1000 MB per second
500 GB Samsung T7 Portable: Up to 1000 MB per second

1 TB Samsung T7 Portable: Up to 1000 MB per second

2 TB Samsung T7 Portable: Up to 1000 MB per second
Warranty3-year limited warranty3-year limited warranty
PricingCheck price on Amazon.(#CommissionsEarned)Check price on Amazon.(#CommissionsEarned)

Capacity Options

When it comes to capacities, the Samsung T7 is the only one out of the two SSDs to off a 2 TB version.

You can find the available capacity options for each of these products below:

ADATA SE800:

  • 512 GB
  • 1 TB

Samsung T7:

  • 500 GB
  • 1 TB
  • 2 TB

What’s in the Box

Both the SE800 and T7 include cables that will let connect to compatible devices that use the USB Type-A port as well as the USB Type-C port.

You can find the lists of content included inside each new retail box of the two products below:

ADATA SE800:

  • ADATA SE800 External Solid State Drive
  • USB 3.2 Type-C to USB Type-C cable
  • USB 3.2 Type-C to USB Type-A cable
  • Quick Start Guide

Samsung T7:

  • Samsung T7 Portable Solid State Drive
  • USB Type-C to USB Type-A cable
  • USB Type-C to USB Type-C cable
  • Quick Start Guide and Warranty Statement

Weight

The SE800 weighs less than the T7.

You can find the weight specifications for the external storage drives below:

  • SE800: 40 grams
  • T7: 58 grams

Dimensions

When it comes to physical size, the SE800 is shorter than the T7 in length and width. On the other hand, the T7 is thinner than the SE800.

You can find the measurements, which are displayed as Length x Width x Depth, below:

  • SE800: 72.7 mm x 44.0 mm x 12.2 mm
  • T7: 85 mm x 57 mm x 8 mm

Compatible Devices

The ADATA SE800 External Solid State Drive and Samsung T7 Portable Solid State Drive should be compatible with the following:

  • PC
  • Mac
  • PlayStation 4
  • PlayStation 4 Pro
  • PlayStation 5
  • Xbox One
  • Xbox One S
  • Xbox One X
  • Xbox Series S
  • Xbox Series X

When using either of these solid state drives on the PlayStation 5, you can store native PS5 videogames and backwards compatible PS4 videogames. You can also play backwards compatible PS4 directly from the SE800 and T7.

When you use these SSDs with the Xbox Series S or Xbox Series X, you can store native Xbox Series S and Xbox Series X videogames in addition to backwards compatible Xbox, Xbox 360 and Xbox One videogames. Moreover, you can play the backwards compatible Xbox, Xbox 360 and Xbox One games directly off of the SE800 and T7.

Interface Speed

As for the interface, the SE800 uses USB 3.2 Gen 2 while the T7 uses USB 3.1 Gen 2. These two interfaces should provide up to 10 Gbps in transfer speed.

Maximum Sequential Read Speed

The T7 is 50 MB per second faster, or 5% faster, than the SE800 when it comes to maximum sequential reading.

You can find the maximum sequential read speed for each capacity below:

  • 512 GB ADATA SE800: Up to 1000 MB per second
  • 1 TB ADATA SE800: Up to 1000 MB per second
  • 500 GB Samsung T7 Portable: Up to 1050 MB per second
  • 1 TB Samsung T7 Portable: Up to 1050 MB per second
  • 2 TB Samsung T7 Portable: Up to 1050 MB per second

Maximum Sequential Write Speed

The SE800 and T7 should have the same maximum sequential writing speeds.

You can take a look at the max write speed for each capacity of the SSDs below:

  • 512 GB ADATA SE800: Up to 1000 MB per second
  • 1 TB ADATA SE800: Up to 1000 MB per second
  • 500 GB Samsung T7 Portable: Up to 1000 MB per second
  • 1 TB Samsung T7 Portable: Up to 1000 MB per second
  • 2 TB Samsung T7 Portable: Up to 1000 MB per second

Warranty

The ADATA SE800 External Solid State Drive and Samsung T7 Portable Solid State Drive each comes with a 3-year limited warranty.

Resources: