How to change the PlayStation VR 2 Sense Controller haptic feedback intensity

Just like the DualSense and DualSense Edge, the PlayStation VR 2 Sense Controller features haptic feedback. To see how you can change the intensity level for both the left and right virtual reality motion controllers, you can follow the steps laid out in this tutorial at Seeking Tech.

1. The PlayStation VR 2 Sense Controllers uses the same haptic feedback settings as the DualSense game pads. So, in order to change the rumble strength, your first step is to head over to the Settings menu of your PlayStation 5 or PlayStation 5 Digital Edition console.

You can do so by selecting the gear cog icon found on the upper right corner of the home screen.

If you are playing a game, using an app or in another menu, then you can go back to the home screen quickly by pressing and holding the PS button. You can also press the PS button and then select the home icon.

2. Inside of Settings, you need to go to Accessories.

3. From the Accessories menu, you first need to select Controller (General) from the left column.

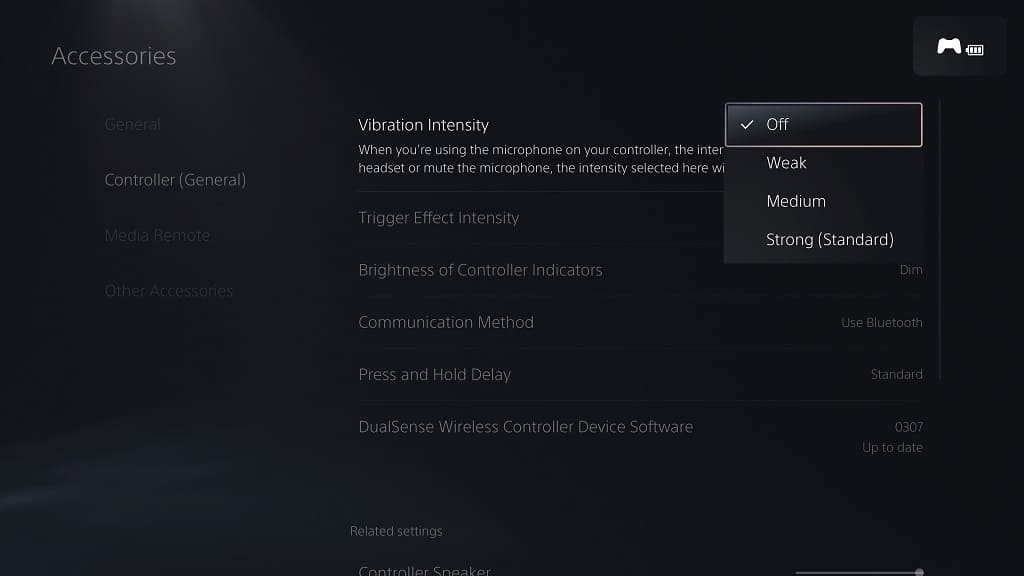
4. On the right side of the same screen, you then need to select Vibration Intensity.

5. In the pop-up window, you will be able to select the following options:

  • The Off option will completely turn off rumble for the left and right PSVR 2 Sense Controllers.
  • The Weak option will turn the vibration down to the lowest setting possible without turning the feature completely off.
  • The Medium option is weaker than the default rumble but should still be noticeable.
  • The Strong (Standard) option is the default force feedback strength.
6. After making your choice, the changes should be applied to both the left and right PlayStation VR 2 Sense Controllers.

Keep in mind that these changes will apply to all PlayStation VR 2 games that use the DualSense. Of course, it will also be applied to regular PlayStation 5 games that use the DualSense as well.

So, if you want to change the vibration intensity level again, then you need to go back to the Settings > Accessories > Controller (General) > Vibration Intensity menu.

What to do if ‘Output 120 Hz Video to VR Headset’ is greyed out on PS5

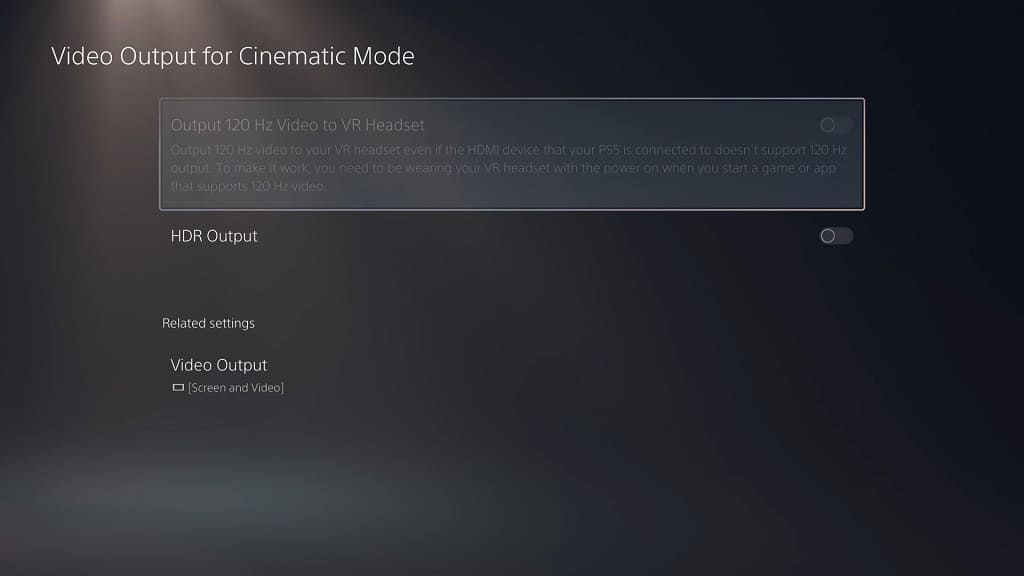
You are able to watch videos and play games at 120 frames per second with the PlayStation VR 2 headset on the PlayStation 5 and PlayStation 5 Digital Edition console. When you try to enable this feature from the menus, you may see that it is currently greyed out.

If you can’t select this setting, then you can take a look at this troubleshooting guide to see how you can enable it.

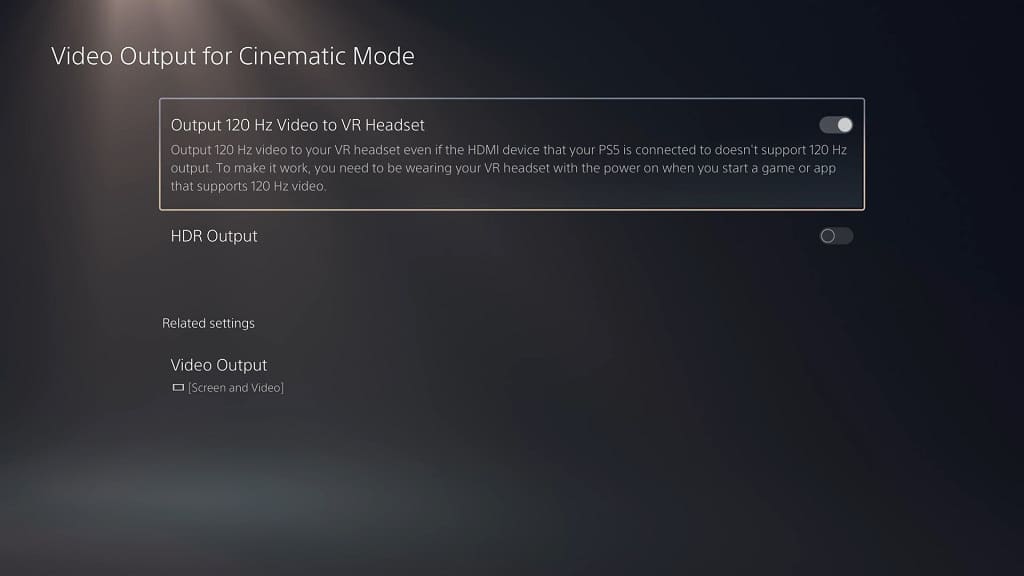
1. The reason why the “Output 120 Hz Video to VR Headset” setting is greyed out in the Video Output Cinematic Mode menu is most likely due to the “120 Hz Output” setting being set to Automatic in the Video Output menu.

So, for the first step, you need to head over to the first page of the Settings menu of your PS5.

2. From the front page of Settings, you need to go to Screen and Video.

3. Inside the Screen and Video menu, you need to select Video Output on the left column.

4. On the right side of the same screen, you should then select 120 Hz Output.

5. In the small pop-up window, select Off.

6. Go back to the first page of the Settings menu.

7. This time, you need to select Accessories from the Settings screen.

8. After getting to the Accessories menu, select PlayStation VR2 from the left column.

9. On the right side of the same screen, you then need to select Video Output from the Cinematic Mode section.

10. In the Video Output Cinematic Mode menu, the “Output 120 Hz Video to VR Headset” should no longer be greyed out. Select it in order to turn this feature on.

11. You should also make sure that you read the description to see how you can use this feature once you turn it on. You can find the details below:

“Output 120 Hz video to your VR headset even if the HDMI device that your PS5 is connected to doesn’t support 120 Hz output. To make it work, you need to be wearing your VR headset with the power on when you start a game or app that supports 120 Hz video.”

12. After you enable the “Output 120 Hz Video to VR Headset”, go back to the front page of Settings and then select Screen and Video.

13. Next, you need to select Video Output on the left side.

14. On the right side, you should then select 120 Hz Output.

15. Select Automatic from the small window menu. By doing so, you should be able to watch and play at up to 120 frames per second on both the PlayStation VR headset as well as the HDMI screen that is connected to your PlayStation 5.

The “Output 120 Hz Video to VR Headset” setting being greyed out is likely a bug that should eventually be fixed through an upcoming firmware update for the PS5 and PS5 Digital Edition consoles. For now, you need to follow the aforementioned steps if you can’t select it from the Video Output Cinematic Mode menu.

How to add PlayStation VR 2 support to Gran Turismo 7

Gran Turismo 7 is one of the major standout games available for the PlayStation VR 2. To see how you can play this racing game in virtual reality, you can take a look at this tutorial from Seeking Tech.

1. For the uninformed, only the PlayStation 5 version of Gran Turismo 7 supports PS VR2. So, for the first step, we recommend that you check to see if you have the correct version of the game installed on your PS5 or PS5 Digital Edition console.

To check, open the home screen and then move the cursor over to the Gran Turismo 7 icon. You should see the white “PS5” logo to the right of the icon.

If you only have the PS4 version installed, then you will need to upgrade to the PS5 version of GT7 if you want to play the game in virtual reality.

If you only own the PlayStation 4 version, then you will need to pay an upgrade fee to get the PlayStation 5 version. In the United States region, this fee is $10. If you bought the PS5 version previously, then you don’t need to pay for anything as you can simply download it from the PlayStation Store.

2. Once you are sure that you have the PS5 version of the game, press the Options button (which is the button with the three horizontal lines) on the DualSense with the cursor on the game’s icon from the home screen.

If Gran Turismo 7 isn’t on your home screen, then you need to select Game Library. Open the game from there in order to bring the icon to the home menu. You can then return to the home screen by pressing and holding the PS button on the DualSense.

3. If done correctly, you should open a small pop-up window. Here, you should select the Check for Update option to see if there is a new patch to download.

4. Wait for the game to download and install the update.

5. Keep in mind that PlayStation VR2 support was added to the 1.29 patch of Gran Turismo 7.

To see what version of the game you have installed on your PS5, move the cursor over to the game’s icon in the home screen menu of the console. Afterwards, press the Options button to open a small window menu, where you can then select Information.

You should then be able to find the version of the racing game that is currently installed on your system. If it is 1.29 or later, then you should be able to play Gran Turismo 7 in virtual reality by using the PlayStation VR 2 headset.

6. Once you downloaded the patch, put up the PS VR2 headset and then open the game. You should then be able to play in virtual reality when you start a race. Furthermore, you will be able to view cars up close by going over to the VR Showroom mode in the Garage.

How to prevent PlayStation VR 2 motion sickness and nausea

When playing with the PlayStation VR 2 headset on your PlayStation 5 or PlayStation 5 Digital Edition, you may start to feel a little uncomfortable, which could eventually lead to motion sickness and/or nausea.

To see how you can overcome these issues when using this virtual reality headset, then you can take a look at this guide from Seeking Tech to see what you can do.

1. If you have never used a VR headset before PS VR 2, or haven’t played in virtual reality for a long time, then we suggest that you gradually build up your tolerance. This process is known as getting your “VR legs.”

In order to do so, you should play a PlayStation VR 2 game up until you start to feel a little uncomfortable. At that point, we suggest that you stop playing the game immediately and then remove the headset until your body recovers.

Once your body feels normal again, you can try playing the same virtual reality game until it starts to feel uncomfortable. Repeat this process as much as possible and you should eventually notice that you will be able to gradually play a longer session without experiencing motion sickness.

Keep in mind that getting your VR legs can take days or weeks. During this process, we recommend that you should play VR when you have nothing else to do for the rest of the day in case you get really sick and need to lay down for hours at a time.

2. Some games are more intense than others when it comes to motion. So, if you are playing a game with a lot of camera movements, then we suggest that you stop doing so temporarily if you are new to virtual reality gaming or haven’t been playing in VR for a long time.

Instead, you can try playing a game where you don’t have to turn your head and/or move around often. Once you can comfortably play these less intensive titles, then you can try playing the more intense ones.

3. Some games come with accessibility settings that you can use in order to avoid motion sickness.

One of which is snap turning (also known as blink turning or click turning), which temporarily turns the screen black when you turn in a virtual reality game. Some games may also add blinders (or vignettes), which decreases the field of view. Furthermore, you may also add a dot to the middle of the screen to help your eyes stay focused.

We suggest playing around with these accessibility settings in the in-game menu so that you can avoid getting sick.

4. You should feel less nausea for PlayStation VR 2 when compared to the original PlayStation VR as the newer release features better tracking as well as a sharper image quality.

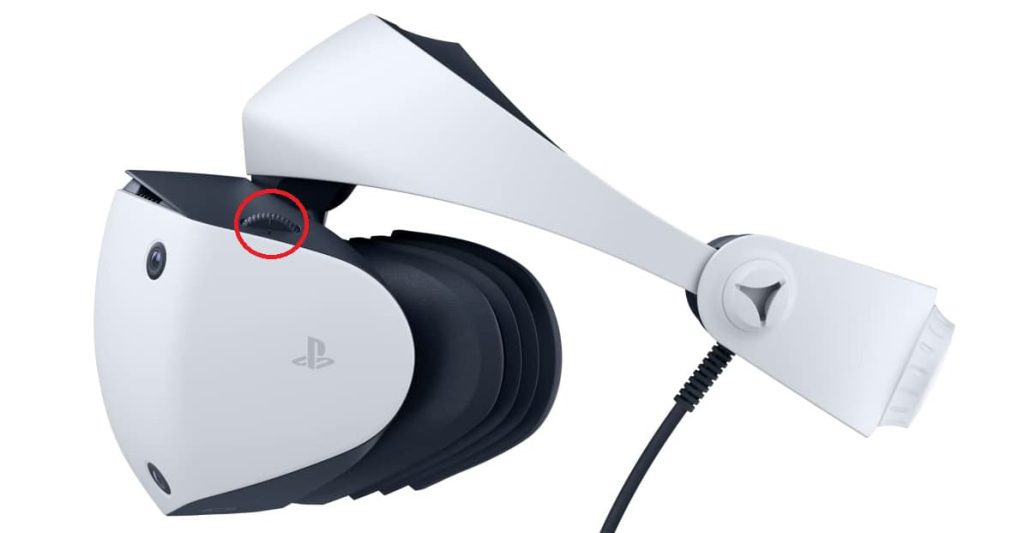
If you are getting a blurry image, however, then you can use the Lens Distance Adjustment Dial located on the top of the PS VR2 headset in order to get more picture clarity.

You can also try re-adjusting the eye tracking to see if you can get a sharper image in the areas where you are directly looking.

5. We found that chewing on ginger or chewing gum will help get your brain situated in the real world, which should lead to less motion sickness and nausea while playing in the PlayStation VR 2 headset.

We have great success when using the Sea-Band Anti-Nausea Ginger Gum, which you can find on Amazon with this link. (#CommissionsEarned).

6. Having a fan blow on you while you are playing in virtual reality should also get your brain anchored to the real world as well.

7. Make sure you take frequent breaks if you are playing long sessions with the PS VR 2.

What makes this headset great is that it is easy to remove and put back on. Therefore, you can easily jump back into the game after a short break.

8. Of course, you should stay well-hydrated, especially if you are playing a PlayStation VR2 game that features a lot of movement. Every time you take a short break, we also recommend that you take a couple sips of water if you are feeling a little thirsty before you continue playing in virtual reality on your PlayStation 5 or PlayStation 5 Digital Edition console.

How to tell if a PlayStation VR 2 game supports sitting, standing and room scale play styles

You can use the PlayStation VR 2 sitting down, standing up and moving around freely within a small space. Not all of the games support all three of these positions, however. To see the supported play styles for each individual PSVR2 title, you can take a look at this tutorial from Seeking Tech.

1. To start off, you need to turn on your PlayStation 5 or PlayStation 5 Digital Edition console. You do not need to connect your PlayStation VR 2 headset.

2. Next, sign into a PlayStation Network account and then head to the home screen menu.

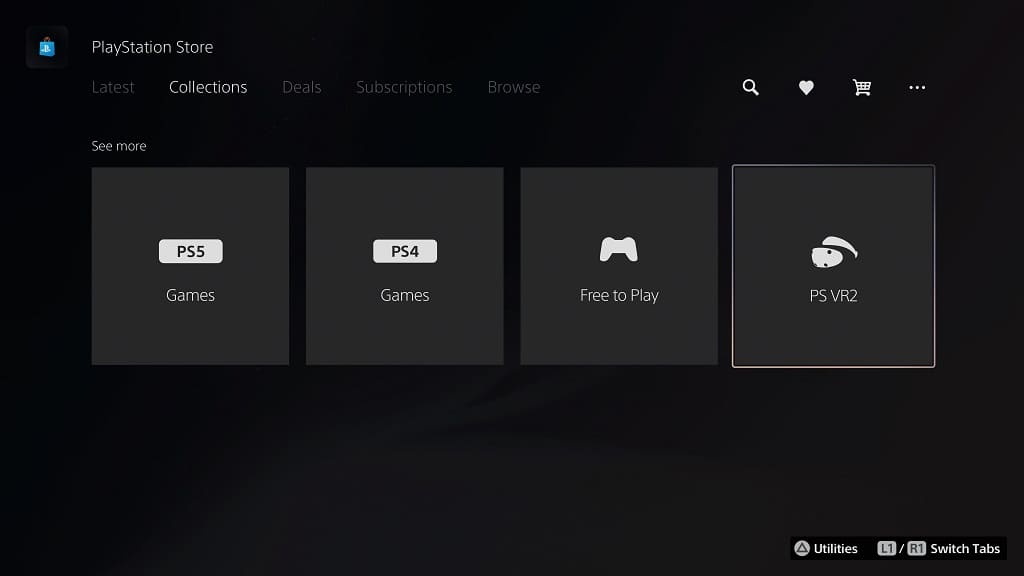
3. In the home screen menu, select the blue shopping bag icon in order to open the PlayStation Store.

4. Once you opened the PlayStation Store, make sure that you are in the Latest, Collections or Deals tab. You can change tabs by using the L1 and R1 buttons.

5. Once you get to the Latest, Collections or Deals tab, scroll down and then select PSVR 2 from the See More section.

6. In the PlayStation VR 2 menu, you should see a list of games. Here, you need to select a game that you are interested in checking out.

To see how you can sort the listing from the PlayStation VR 2 menu, you can check out this previous tutorial.

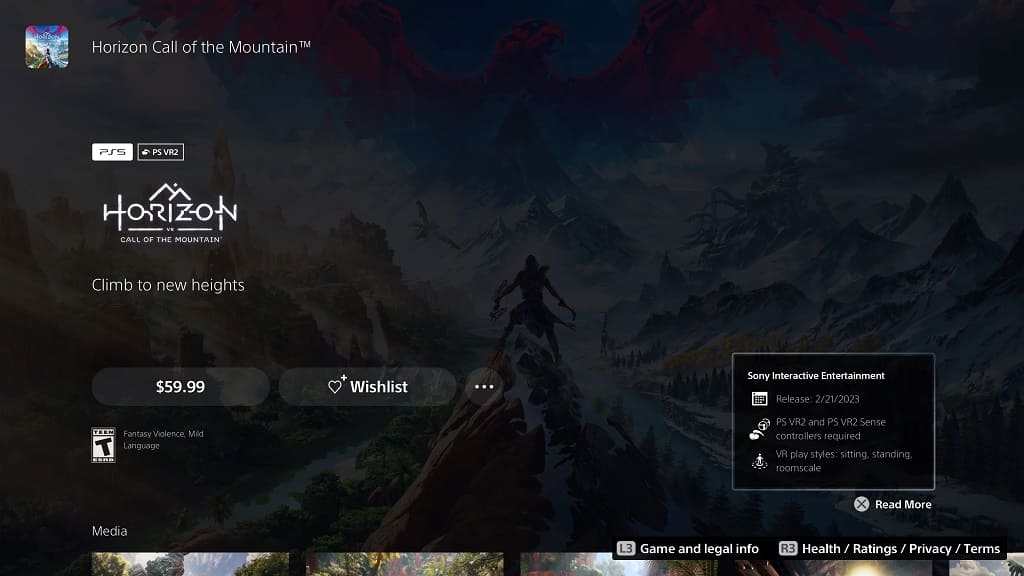
7. On the product page for the PSVR 2 game, you need to head over to the Compatibility Notices menu, which you can do by either selecting the box located on the right side at the top of the screen or the middle box from the Game and Legal Info section located at the bottom.

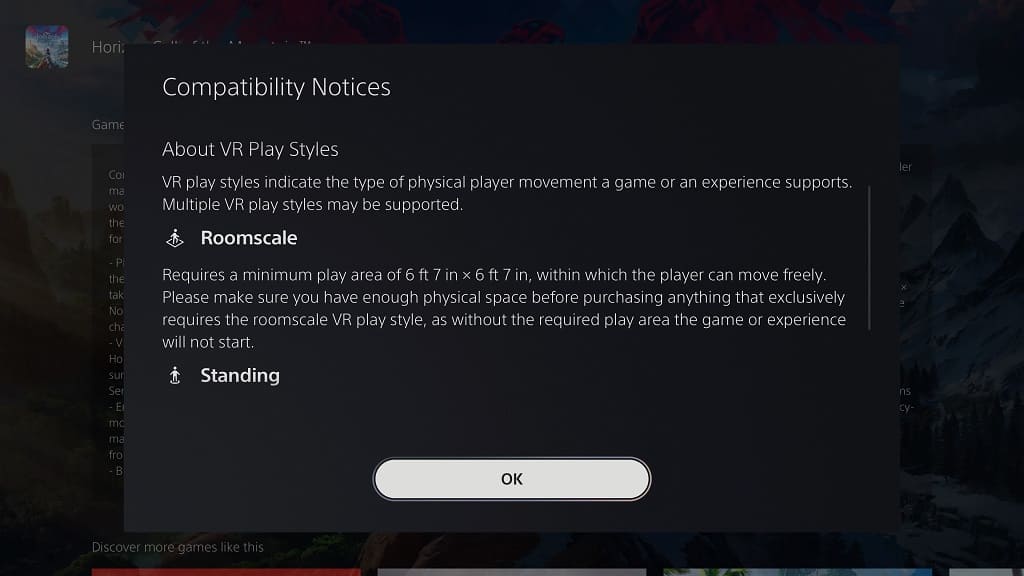
8. In the Compatibility Notices menu for the game, you will find a list of supported features. At the bottom of this screen, you should see a section about VR Play Styles, which refers to the positions you can take when playing this particular title.

The Roomscale VR Play Style will let you move around the room. Sony recommends that you have a minimum play area of 6 ft 7 in × 6 ft 7 in (or 2 m × 2 m).

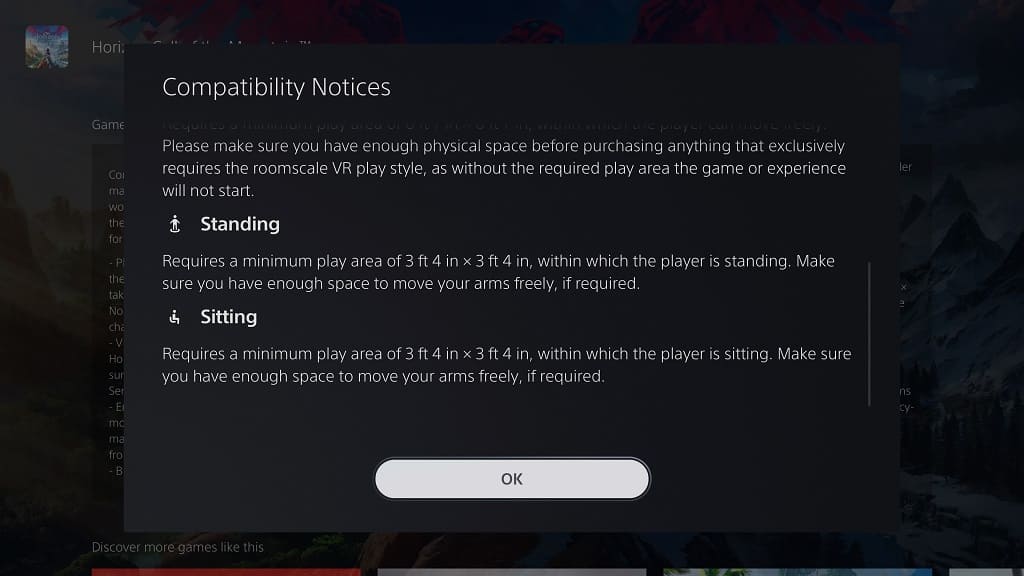
With the Sitting VR Play Style, you can play this game while sitting down. Even with no movement, Sony suggest that you leave a minimum play area of 3 ft 4 in × 3 ft 4 in (or 1 m x 1 m) so that you can move your arms around without hitting anything.

For the Standing VR Play Style, you can play the game while standing up. For this position, Sony also recommends that you leave a play area of at least 3 ft 4 in × 3 ft 4 in (or 1 m x 1 m).

Some games may work better in one position when compared to others; therefore, you should play around with the different play styles to see which one is best suited for your virtual reality experience.