How to prevent and fix overheating issues with Xperia PRO-I

When using your Xperia PRO-I, you may notice that your Sony phone is getting a little too hot.

You can take a look at this troubleshooting guide at Seeking Tech to see how you can prevent, as well as fix, overheating issues with this smartphone.

How to prevent Xperia PRO-I overheating issues

In order to prevent your Sony Xperia PRO-I from getting too hot, you can take the following precautionary steps:

1. First off, you should be using your phone within the recommended operating temperature range of -10°C to +35°C (or +14°F to +95°F).

2. If you are recharging your phone, make sure that you charge the battery with a temperature range of +5°C to +35°C (or +41°F to +95°F).

3. When recharging, make sure you are doing so in a well-ventilated area.

4. Do not place your phone near fire or other heating source such as a stove or heater.

5. Avoid putting your phone on the car dashboard during a hot day.

6. You should also avoid direct sunlight with your Xperia PRO-I.

7. When recharging your phone, make sure you use the USB cable that came with it.

8. Try not to use your phone at the same time as it is recharging.

9. Do not cover your phone with your body, blanket or other objects for an extended amount of time.

10. Try not to keep many apps open when you are using your phone.

11. Uninstall any apps you aren’t using.

11. Make sure you occasionally restart your phone to clear out the hardware resources of the Xperia PRO-I.

How to fix overheating issues with Xperia PRO-I

In order to fix an overheated Xperia PRO-I, you can take the following steps:

1. If you are recharging your phone, make sure you unplug the charging cable, let it cool down before recharging it again.

As we stated above, you should recharge your phone in a well-ventilated environment away from any heat sources and direct sunlight.

2. If you are using your Xperia PRO-I and recharging it at the same time, we recommend putting your phone to sleep and wait for it to charge before using it again.

3. Close all the apps you have currently opened.

4. If you are downloading, uploading or streaming, then we recommend cancelling or pausing these processes until your phone cools off.

5. Turn off Bluetooth, Wi-Fi and Location services if your phone isn’t using any of these connections.

6. Lower the brightness of your screen.

7. You can also try turning on Stamina Mode for your Xperia PRO-I. This mode is designed to extend your battery life which, in turn, should also cool off your smartphone in the process.

To enable this mode, you need to go to Settings > Battery > Stamina Mode and then tap the “Turn on now” option.

8. If you don’t plan on using your phone for a little while, then the best way to cool off your overheated Xperia PRO-I is to completely turn it off.

You can then move it to a cooler environment and then let it cool down to a more appropriate temperature before you turn it back on again.

How to fix 2nd Gen Pixel Stand slow charging speed for Pixel 6 and Pixel 6 Pro

The second-generation Google Pixel Stand is designed to quickly recharge the Google Pixel 6 smartphone series. This accessory is capable of recharging the Pixel 6 at up to 21 W and the Pixel 6 Pro at up to 23 W.

If you are experiencing slower than expected speeds when recharging the new Pixel phones with the Google Pixel Stand 2, then you can check out this troubleshooting guide at Seeking Tech.

1. The first step we recommend taking, if you haven’t done so already, is to update your Google Pixel 6 or Google Pixel 6 Pro. In order to take full advantage of the charging speed of the 2nd Gen Google Pixel Stand, your smartphone needs to be running SQ1D.211205.016.A1 or later.

To update your phone, you can take the following steps:

  • Go to the Settings app on your Pixel 6 or Pixel 6 Pro.
  • Inside of Settings, tap System.
  • In System, tap the “System update” option.
  • The next screen will show whether or not there is a new firmware available.

2. You should also make sure that you have set up the 2nd Gen Google Pixel Stand support for your phone.

3. Furthermore, you should make sure that you set the charging mode to Max.

To find out how to do so, you can take a look at this tutorial.

4. You may also want to disable Adaptive Charging, which is a feature that slows down to recharging speed in order to extend the lifespan of the Pixel 6’s and Pixel 6 Pro’s internal battery.

In order to disable Adaptive Charging, you need to do the following:

  • Go to Settings.
  • In the Settings menu, go to Battery.
  • Inside of the Battery menu, go to “Adaptive preferences.”
  • After getting to the “Adaptive preferences” menu, make sure that the Adaptive Charging setting is disabled.

5. Moreover, you want to make sure that you position your phone correctly onto the 2nd Gen Pixel Stand. You need to center it as much as possible.

6. Avoid having any objects in between the phone and the wireless charger as these may slow down or completely prevent your battery from being recharged.

7. You should also be using the same USB cable and power adapter that came with the wireless charging stand.

8. If you are still experiencing issues with slow recharge speeds, then it may be due to the case you are using.

The Google Pixel Stand 2 should work flawlessly with the official Pixel 6 and Pixel 6 cases in addition to most “Made for Google” third-party cases.

The materials and thickness (this wireless charger can support up to 3 mm thickness) could hinder the recharge rate on your phone’s battery.

9. Make sure you are recharging your phone within the recommend operating temperature range of 32° to 95° F (or 0° to 35° C). If the stand or phone gets too hot, then the recharging process could slow down.

You can take a look at this guide to see how you can prevent the stand from overheating.

10. The 2nd Gen Pixel Stand and your Pixel 6 or Pixel 6 Pro phone should be clean as well. You can find out cleaning guide for these products below:

How to fix Forza Horizon 5 crashing and freezing issues on Xbox Series X|S

When play Forza Horizon 5 on your Xbox Series X or Xbox Series S console, you may experiencing crashing or freezing.

To see how you can resolve these issues, you can take a look at this troubleshooting guide at Seeking Tech.

1. If your game is currently frozen, try to close it by taking the following steps:

  • Press the Xbox button on your gamepad to open the Guide menu of your Xbox Series console.
  • With the Guide menu opened, scroll down to the Forza Horizon 5 icon.
  • With the Forza Horizon 5 icon highlighted, press the Menu button on your gamepad.
  • In the small Forza Horizon 5 menu, select Quit.

2. If your Xbox Series X or Xbox Series S console is completely frozen and won’t respond to any button presses from your gamepad, then you need to force your system to shut down.

In order to do so, press and hold the Xbox power button located on your console for at least 10 seconds.

3. After closing the game or console, try to play Forza Horizon 5 again to see if the crashes or freezes are still occurring.

4. If you are still experiencing issues, then the next step is to clear the cache of your Xbox Series X or Xbox Series X system.

To perform this task, you first need to turn off your system. You can press and hold the Xbox button on your gamepad to bring up the Power Options menu where you can choose the “Turn off console” option.

If your system is not responding to your controller, then you can for a shut down by pressing and holding the Xbox power button on your console for at least 10 seconds.

After turning your system off, you need to unplug it from the power outlet.

After unplugging your Xbox Series X or Xbox Series S, wait for at least 2 minutes. This will clear the cache of temporary files, which may be causing Forza Horizon 5 to crash.

After waiting at least 2 minutes, you can plug your console back in again, turn it back on and try playing the game.

5. If you are using a Fanatec wheel, then we recommend not using it for now as it could be the cause of the crashes.

We suggest waiting until there is a new patch available for Forza Horizon 5, firmware available for your wheel or firmware available for your Xbox Series console before using your Fanatec wheel to play to play this game again.

6. You should also avoid suspending your game via Quick Resume. In order to do so, you can take a look at this guide.

7. If you haven’t done so already, make sure that Forza Horizon 5 has been update to its latest software version.

To check if there is a new patch available, you can take the following steps:

  • Turn on your Xbox Series X or Xbox Series S system and make sure it is connected to the internet.
  • If you don’t see Forza Horizon 5 auto-updating, you can press the Xbox button to bring up the Guide menu.
  • In the Guide menu, select “My games & apps.”
  • In the “My games & apps” section, select “See all.”
  • In the next screen, scroll over to the Forza Horizon 5 icon.
  • With Forza Horizon 5 highlighted, press the Menu button on your gamepad to open a small menu.
  • Inside the small menu, select the “Manage game and add-ons” option.
  • In the “Manage – Forza Horizon 5” screen, select Updates.
  • The “Forza Horizon 5 – Updates” menu will show whether or not a new title update is available for the game.

8. You should also keep your Xbox Series X or Xbox Series S console updated to the latest firmware by doing the following:

  • Turn on your console and make sure that it is connected online.
  • If you don’t get a prompt about updating to the latest firmware of your system, open the Guide menu by pressing the Xbox button.
  • Next, press the RB button on your gamepad a few times to switch over to the “Profile & system” section.
  • Afterwards, select Settings.
  • Inside of Settings, make sure you select System from the list of options shown in the left column.
  • On the right side of the same screen after selecting System, you then need to select Updates.
  • Inside the “System – Updates” menu, you will see whether or not there is a new firmware available to download.

9. Furthermore, you can also try deleting and then re-installing the game by taking the following steps:

  • Go to the Settings menu on your Xbox Series X or Xbox Series S console.
  • In Settings, select System on the left column and then “Storage devices” on the right side on the same screen.
  • After getting to the “Manage – Storage devices” menu, select the “Internal storage” option on the right side.
  • In the pop-up menu, select “Uninstall content.”
  • In the “Free up space” menu, select Forza Horizon 5 on the left and then “Remove selected” on the right side of the same screen.
  • Select Uninstall.
  • After deleting the game, you can re-install it again by inserting your game disc or downloading the game from its product page on the Store.

10. If Forza Horizon 5 is still crashing and/or freezing, then we recommend that you try playing another game. If you are seeing the same issues with the other game, then your problems may be related to the hardware of your Xbox Series X or Xbox Series S.

In that case, you may want to contact Microsoft about getting your system repaired.

How to change the default charging mode for 2nd Gen Google Pixel Stand

With the second-generation Google Pixel Stand, you are able to change the speed in terms of recharging your Google Pixel.

You can check out this step-by-step tutorial at Seeking Tech to see how you can adjust the charging modes of this device.

What are the 2nd Gen Google Pixel Stand charging modes?

The new Pixel Stand features three charging modes.

The default mode right out of the box is Optimized, which is a balance between the recharge speed and fan noise level.

The Max mode provide the fastest recharging speed possible at the expense of higher fan noise levels.

The Quiet mode slows down the charging speed in order to lower the fan noise as much as possible.

How to change the 2nd Gen Google Pixel Stand default charging mode

In order to change the default charging mode of your 2nd Gen Google Pixel Stand, you need to take the following steps:

1. Before you begin, make sure you have a smartphone that is compatible with the charging mode features of the new Pixel Stand.

The following should fully support the wireless charger:

  • Google Pixel 3
  • Google Pixel 3a
  • Google Pixel 3 XL
  • Google Pixel 3a XL
  • Google Pixel 4
  • Google Pixel 4a
  • Google Pixel 4 XL
  • Google Pixel 4a (5G)
  • Google Pixel 5
  • Google Pixel 5a
  • Google Pixel 6
  • Google Pixel 6 Pro

2. If you haven’t done so already, make sure that you set up Pixel Stand app for your Pixel phone.

When you put your phone on the wireless charging stand for the first time, you should get the “Do more while charging” message. Here you need to tap Next and then follow the on-screen instructions.

If you don’t see this message, go to Settings > Connected devices and then tap the Settings options next to Pixel Stand. Afterwards, complete the on-screens instructions.

3. With the Pixel Stand app installed on your Google Pixel smartphone, you then need to open the Settings app.

If you can’t find Settings on your home screen, swipe upwards from an empty space to open up a menu that shows all the installed applications on your mobile device.

5. After getting to the Settings app, you need to tap “Connected devices” from the list of available options.

6. You should see “Pixel Stand Gen 2” in the “Connected devices” section under the “Previously connected devices” menu.

If you don’t see it, you need to tap the “See all” option. In the next screen, you should find “Pixel Stand Gen 2” under the “Other devices” section.

7. Tap the gear wheel icon next to “Pixel Stand Gen 2.”

8. In the “Device Details” menu of “Pixel Stand Gen 2,” you then need to tap “Charging mode.”

9. In the new menu, you can select any of the Optimized, Max or Quiet options.

How to temporarily change the 2nd Gen Google Pixel Stand default charging mode

In order to temporarily change the charging mode of the second-generation Pixel Stand, you can do the following:

1. Place your Google Pixel smartphone on the Pixel Stand.

2. You then need to tap the screen of your charging phone to open the Pixel Stand Control Screen.

3. Inside the Pixel Stand Control Screen, you can change the charging mode.

Keep in mind that this charging mode change is only temporary. Therefore, the next time you recharge your phone by using the 2nd Gen Google Pixel Stand, the mode will revert to the default mode. For a permanent change, please refer to the first section in this article.

How to prevent and fix overheating issues with 2nd Gen Pixel Stand

When recharging your phone or device on the second-generation Google Pixel Stand, you may notice that the wireless charger is getting warmer than usual.

You can take a look at this troubleshooting guide at Seeking Tech to see how you can prevent and fix overheating issues with this device.

How to prevent the 2nd Gen Google Pixel Stand from overheating

In order to prevent the new Pixel Stand from overheating, you can take the following precautionary steps:

1. Make sure that you are using the 2nd Gen Pixel Stand within the recommended operating ambient temperature range of 32° to 95° F (or 0° to 35° C).

2. When the new Pixel Stand is not plugged into a power source, you also need to store it within the recommended non-operating temperature range of -4° and 113° F (-20° and 45° C).

Any temperatures above 113° F (or 45° C) may end up causing the battery of the wireless charger to overheat. In the worst-case scenarios, the device might become a fire hazard or even explode.

3. Avoid using the accessory in a very humid environment.

4. Since the 2nd Gen Google Pixel Stand is not waterproofed, avoid submerging it underwater or exposing it to any large amount of water.

Exposure to any liquid could short-circuit this device and cause overheating.

5. This product is designed to work optimally within an altitude of up to 9,842 feet (or 3,000 meters).

6. Do not cover the wireless charger while it is recharging your phone or device.

7. You should also keep the device away from any direct contact with sunlight.

8. Avoid putting the Pixel Stand near any heat sources such as a car dashboard or heating vent.

What happens if the 2nd Gen Google Pixel Stand overheats

If the second-generation Pixel Stand managed to overheat, then it may take longer than usual to recharge a device as the wireless charger attempts to regulate its own temperature.

In extreme cases, the stand won’t recharge your device at all until it cools down.

How to fix an overheated 2nd Gen Google Pixel Stand

In order to fix an overheated 2nd Gen Google Pixel Stand, you can take the following steps:

1. If you are charging a device on the Pixel Stand, then you need to remove it from the wireless charger.

2. Next, you need to unplug the wireless charger from its power source.

3. Move the Pixel Stand into a room that has an ambient temperature range of 32° to 95° F (or 0° to 35° C).

4. Wait until the wireless charging stand to cool down.

5. After the 2nd Gen Google Pixel Stand has cooled, you can try plugging it back into a power source and use it to recharge your device again.

What’s the difference between the 1st and 2nd Gen Google Pixel Stands?

In 2021, Google released a new Pixel Stand. So, how does the second-generation wireless charger compare to the original?

You can find out in this comparison between the 1st and 2nd Gen Google Pixel Stands.

Quick Summary

When compared to the original, the 2nd Gen Pixel Stand is shorter in terms or length and width but is taller in height. The new version also offers faster charging and stronger cooling.

Aside from the aforementioned differences, the two generations are identical when it comes to device compatibility and supported Pixel phone features.

So, if your Pixel phone or Qi compatible device support faster charging, then you might want to get 2nd Gen Pixel Stand. If you don’t slower charging speed, then the 1st Gen Google Pixel Stand is the more affordable option.

1st Pixel Stand vs. 2nd Gen Pixel Stand Comparison Chart

You can check out Seeking Tech’s comparison table for the first- and second-generation Pixel Stands below.

1st Gen Google Pixel Stand2nd Gen Google Pixel Stand
What’s in the BoxPixel Stand (1st Generation)

1.5 m USB C-to USB-C cable

18 W USB PD power adapter

Quick Start Guide
Pixel Stand (2nd gen)

1.5 m USB C-to USB-C cable

30 W USB PD power adapter

Quick Start Guide
DimensionsLength: 3.6 in (92 mm)

Width: 3.6 in (92 mm)

Height: 4.1 in (105 mm)
Length: 3.2 in (82 mm)

Width: 2.8 in (71.6 mm)

Height: 4.4 in (113.9 mm)
Ports1x USB-C input1x USB-C input
Compatible Charging DevicesGoogle Pixel 3

Google Pixel 3a

Google Pixel 3 XL

Google Pixel 3a XL

Google Pixel 4

Google Pixel 4a

Google Pixel 4 XL

Google Pixel 4a (5G)

Google Pixel 5

Google Pixel 5a

Google Pixel 6

Google Pixel 6 Pro

Qi compatible devices
Google Pixel 3

Google Pixel 3a

Google Pixel 3 XL

Google Pixel 3a XL

Google Pixel 4

Google Pixel 4a

Google Pixel 4 XL

Google Pixel 4a (5G)

Google Pixel 5

Google Pixel 5a

Google Pixel 6

Google Pixel 6 Pro

Qi compatible devices
Charging PowerUp to 10 W charge for Pixel phones

Up to 5 W charge for Qi-compatible devices
Up to 23 W charge for Pixel 6 Pro phone

Up to 21 W charge for Pixel 6 Pro phone

Up to 10 W charge for older Pixel phones

Up to 15 W charge for Qi-compatible devices
Supported Pixel FeaturesBedtime Experience

Google Assistant Visual Spotlight

Google Meet

Home Controls

Media Controls

Media Immersion

Photo Frame

Sunrise Alarm

Wired Next Doorbell Compatibility
Bedtime Experience

Google Assistant Visual Spotlight

Google Meet

Home Controls

Media Controls

Media Immersion

Photo Frame

Sunrise Alarm

Wired Next Doorbell Compatibility
CoolingPassiveActive
Recycled MaterialsN/AApproximately 39%
PricingCheck price on Amazon.(#CommissionsEarned)Check price on Amazon.(#CommissionsEarned)

What’s in the Box

Along with the main charging units, these products also come with an USB cable, power adapter and quick start guide.

You can check out a breakdown of the parts included inside each new retail box below:

1st Gen Google Pixel Stand:

  • Pixel Stand (1st Generation)
  • 1.5 m USB C-to USB-C cable
  • 18 W USB PD power adapter
  • Quick Start Guide

2nd Gen Google Pixel Stand:

  • Pixel Stand (2nd gen)
  • 1.5 m USB C-to USB-C cable
  • 30 W USB PD power adapter
  • Quick Start Guide

Dimensions

When it comes to size, the second-generation charger is shorter than the original in terms of length and width. However, the newer model is taller than the first-generation device.

You can find the measurements for both products below:

1st Gen Google Pixel Stand:

  • Length: 3.6 in (92 mm)
  • Width: 3.6 in (92 mm)
  • Height: 4.1 in (105 mm)

2nd Gen Google Pixel Stand:

  • Length: 3.2 in (82 mm)
  • Width: 2.8 in (71.6 mm)
  • Height: 4.4 in (113.9 mm)

Ports

The first- and second-generation Pixel Stands both use have an USB-C input that is utilized to power the wireless chargers.

Compatible Charging Devices

These stands are mainly designed to wirelessly recharge the following Pixel phones:

  • Google Pixel 3
  • Google Pixel 3a
  • Google Pixel 3 XL
  • Google Pixel 3a XL
  • Google Pixel 4
  • Google Pixel 4a
  • Google Pixel 4 XL
  • Google Pixel 4a (5G)
  • Google Pixel 5
  • Google Pixel 5a
  • Google Pixel 6
  • Google Pixel 6 Pro

Along with the aforementioned Google phones, these wireless chargers can also be used with Qi compatible devices.

Charging Power

The newer version of the Pixel Stand has a maximum charging power that is 130% more than the older model if you are recharging the Pixel 6 Pro.

If you have a Pixel 6, then the maximum charging power of the new stand is 110% more than the original.

For older Pixel phones, the charging power for both generations should be identical.

For Qi-compatible devices, the 2nd Gen Pixel Stand offers 200% more charging power than the 1st Gen Pixel Stand.

You can find the charging specs for both products below:

1st Gen Google Pixel Stand:

  • Up to 10 W charge for Pixel phones
  • Up to 5 W charge for Qi-compatible devices

2nd Gen Google Pixel Stand:

  • Up to 23 W charge for Pixel 6 Pro phone
  • Up to 21 W charge for Pixel 6 Pro phone
  • Up to 10 W charge for older Pixel phones
  • Up to 15 W charge for Qi-compatible devices

Supported Pixel Features

The 1st Gen Pixel Stand and 2nd Gen Pixel Stand provide the same features when charging a compatible Google Pixel phone.

You can find the full list of functions below:

  • Bedtime Experience
  • Google Assistant Visual Spotlight
  • Google Meet
  • Home Controls
  • Media Controls
  • Media Immersion
  • Photo Frame
  • Sunrise Alarm
  • Wired Next Doorbell Compatibility

Cooling

When it comes to keeping heat dissipation, the original model of the Pixel Stand uses passive cooling while the second-generation release provides a more powerful active cooling solution.

Recycled Materials

The newer version of the Google Pixel Stand is also made of around 39% recycled material, in terms of weight density, to help with protecting the environment.

Resource:

How to clean and disinfect the 2nd Gen Google Pixel Stand

Since the second-generation Google Pixel Stand has a white coating, it can look dirty quite easily. You can take a look at this tutorial at Seeking Tech to see how you can properly clean this wireless charger without damaging it.

Is the 2nd Gen Google Pixel Stand water proof?

The stand, as well as the included power adapter, does not offer any water resistance. Therefore, you shouldn’t submerge either of these parts underwater or expose them to any excess liquid.

If you did expose the charging stand to excess water, then it may overheat and short circuit. Unfortunately, water damage will void your warranty for this product.

What cleaning solutions should you use for 2nd Gen Google Pixel Stand?

When it comes to the cleaning solution, you should avoid using any benzene, bleach, chemical detergent, chemical powder and other chemical agents.

Instead, you can use plain water, common household soap as well as bleach free cleaning wipes.

If you want to clean and disinfect the stand, then you can also use isopropyl alcohol that has at least 70% concentration. You can also use household disinfecting wipes for the same purpose.

Overall, we recommend using isopropyl alcohol as it not only kills any surface bacteria, germs and viruses but it will also dry very fast when compared to other cleaning liquids. If you are looking for this solution, then we recommend getting the MG Chemicals – 824-1L 99.9% Isopropyl Alcohol Electronics Cleaner, which you can find on Amazon with this link. (#CommissionsEarned).

What cleaning cloth should you use for 2nd Gen Pixel Stand?

For the cleaning cloth, you should avoid using any materials that have an abrasive surface as it may end up scratching and causing damage to the charging stand.

Instead, you should be using a soft lint-free cloth to wipe the Pixel Stand clean. If you are looking for one, then we suggest picking up the MagicFiber Microfiber Cleaning Cloths, which you can find with this Amazon link. (#CommissionsEarned).

How to clean and disinfect the 2nd Gen Google Pixel Stand

In order to clean and disinfect new Pixel Stand, you can take the following steps:

1. To being, you need to remove your phone or Qi-compatible device from the 2nd Gen Google Pixel Stand if you haven’t done so already.

2. Next, you need to unplug the USB-C cable from the USB-C port of the wireless charging stand.

3. If you only have minor dust buildup, streaks and/or smudges, then you can use a dry soft lint-free cloth to wipe the device clean.

4. For harder to remove discolorations, dirt and grimes, you can pour a cleaning solution to a lint-free cloth.

Do not pour the solution directly on the 2nd Gen Pixel Stand as you could end up pouring too much and damaging it.

For the cloth, make sure you pour enough to make it lightly damp. If you make it too wet, then you can simply squeeze out any excess water buildup.

As we stated above, we prefer using the aforementioned isopropyl alcohol as it will dry quickly and disinfect the charger at the same time.

5. When wiping your wireless charging stand, start by gently wiping the device. You can apply more force and use more cleaning solution for the dirtier spots that are harder to remove.

6. After wiping the 2nd Gen Google Pixel Stand completely clean, you next need to wait for device to completely air dry. If you were using isopropyl alcohol then this will not take long at all.

When waiting, you can use a fan to speed up the drying process. You should not use any heat source, such as a hair blow dryer, as doing so may cause damage to your stand.

7. After letting the 2nd Gen Pixel Stand completely dried out from cleaning, you should be able to plug it back into the USB-C power source again and use it to wirelessly charge your Pixel phone or other Qi-compatible devices.

How to fix Quick Resume issues with Forza Horizon 5

With the Xbox Series S and Xbox Series X versions of Forza Horizon 5, you are able to suspend the game and start off exactly where you left off thanks to Quick Resume. While this is a very convenient feature, it may also cause bugs and glitches.

To see how you can potentially fix these issues with this open-world racing game, you can take a look at this troubleshooting guide at Seeking Tech.

How to close Forza Horizon 5

In order to disable Quick Resume in Forza Horizon 5, you need to completely exit out of the game.

To do so, you will need to take the following steps:

1. While you have Forza Horizon 5 opened on your Xbox Series S or Xbox Series X console, press the Xbox button on your controller. This is the button that has the Xbox logo and should be displaying a white light.

2. By pressing the Xbox button, you should bring up the system’s Guide menu. Here, scroll down to the Forza Horizon 5 icon.

3. With the Forza Horizon 5 icon highlighted, press the menu button (which has the three horizontal lines symbol) to open a pop-up menu.

4. In the pop-up menu, you need to select Quit to completely exit out of this game.

How to remove Forza Horizon 5 from Quick Resume

If you previously have Forza Horizon 5 suspended in Quick Resume, then you can remove the game from the suspension by doing the following:

1. Open the Guide menu of your Xbox Series S or Xbox Series X by pressing the Xbox button on your controller.

2. With the Guide menu opened, select the “My games & apps” option.

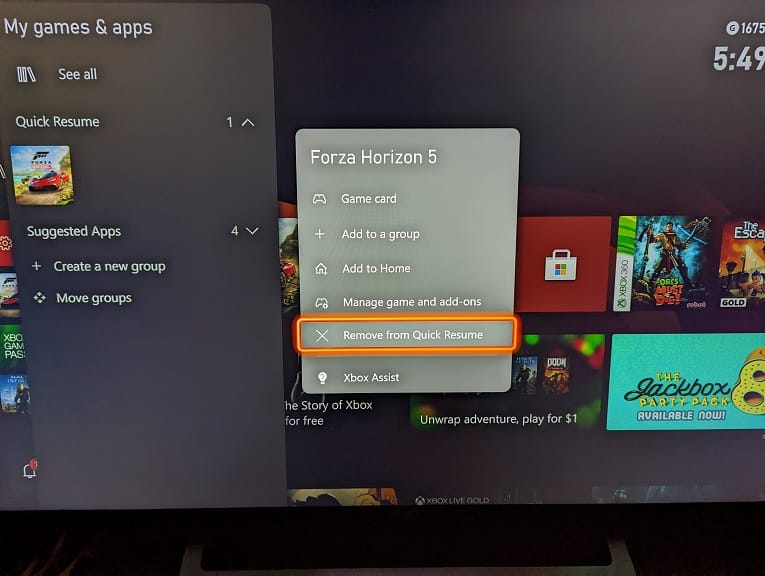
3. In the “My games & apps” menu, scroll over to the Forza Horizon 5 icon underneath the Quick Resume section.

4. With the Forza Horizon 5 icon highlighted, you then need to press the Menu button on your controller.

5. In the pop-up menu for Forza Horizon 5, you need to select the “Remove from Quick Resume” option.

By completely exiting or removing the game from being suspended and then restarting, you should be able to fix any Quick Resume issues with this open-world racing game.

How to update Forza Horizon 5 and your Xbox Series X or Xbox Series S console

We also recommend updating Forza Horizon 5 in addition to your Xbox Series S or Xbox Series X consoles as a new patch for the game and/or firmware for your system may fix the Quick Resume problems.

In order to update the racing game, you can take the following steps:

1. Press the Xbox button to gain access to the Guide menu.

2. After opening the Xbox Guide, select “My games & apps.”

3. In the “My games & apps” section of the guide menu, select “See all.”

4. In the Games section of the next screen, scroll over to the Forza Horizon 5 icon.

5. With the highlighted, open the small pop-up menu by pressing the Menu button on your controller.

6. Select “Manage game and add ons” from the pop-up menu.

7. In the “Manage – Forza Horizon 5” menu, select Updates.

8. In the “Forza Horizon 5 – Updates” menu, you will find whether or not a new patch is available for download.

To update your Xbox Series X or Xbox Series S console, you will need to do the following:

1. Open the Xbox Guide menu again by pressing the Xbox button on your gamepad.

2. In the Guide menu, head over to the “Profile & system” section. You can get there quickly by pressing the RB buttons on your gamepad several times.

3. In the “Profile & system” section, go to Settings.

4. After getting to Settings, you first need to select the System option on the left category.

5. On the right side of the same screen, you then need to select Updates.

6. In the “System – Updates” menu, you will see whether or not you can download a new firmware for your Xbox Series S or Xbox Series X.

How to delete photos, pictures, screenshots and videos on Pixel 6/Pixel 6 Pro

The Google Pixel 6 and Google Pixel 6 Pro are great for taking photos and capturing videos thanks to the new Magic Eraser feature as well as high quality cameras.

You can check out this step-by-step guide at Seeking Tech so see how you can easily delete any unwanted photos, pictures, screenshots and videos from both the cloud and local storage options of your phone.

To remove any photos, pictures, screenshots and video that are stored on the cloud of your Google Pixel 6 or Google Pixel 6 Pro, you can take the following steps:

1. To begin, open the Settings app on your smartphone.

If you can’t find the app, swipe upwards from an empty space in the home screen to bring up a list of installed applications you have on your Google Pixel 6 and Google Pixel 6 Pro.

2. Inside of the Settings app, tap the Storage option.

3. In the Storage menu, you then need to select Images for photos, pictures and/or screenshots. You can also select Videos for video clips.

4. After getting to the next screen, press and hold the image/video that you want to delete.

5. You should now see the delete option appear on the top right corner. This option is represented as the trash icon.

6. Before tapping the trash icon, you can also select other images/videos that you want deleted.

7. Once you are done with your selection, you can then select the delete option.

8. In the notification, select “Move file(s) to trash.

9. The files you initially deleted will remain in the trash for 30 days, allowing you the opportunity to restore them.

10. If you want to permanently delete the images and/or videos immediately, then you need to go back to the first page of the Settings app.

11. In the first page of the Settings app, select Storage.

12. After getting to the Storage menu, select Trash.

13. Inside of the Trash menu, select the images or videos that you want to delete.

14. After making you selection, you then need to select the delete option at the bottom right of the screen.

15. In the pop-up notification, select delete to permanently delete the selected images and/or video clips.

How to fix Halo Infinite crashing and freezing issues on Xbox Series X|S

When playing Halo Infinite on your Xbox Series X or Xbox Series S console, the videogame may end up crashing or freezing. To see how you can potentially resolve these issues, you can check out this troubleshooting guide at Seeking Tech.

Restarting Halo Infinite

The first step we recommend taking is to restart Halo Infinite.

If you are still playing the game, press the Xbox button and then go to the Halo Infinite icon. With the icon highlighted press the Menu button and then select Quit.

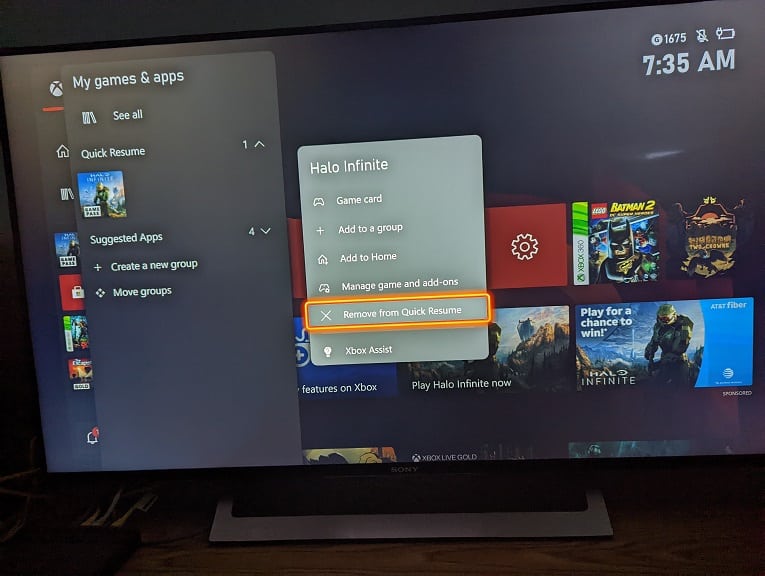
If Halo Infinite is currently suspended via Quick Resume, press the Xbox button and then select the “My games & apps” option. Next, highlight the Halo Infinite icon and then press the Menu button. Finally, select “Remove from Quick Resume” option.

Once you completely closed the game, open it again to see if you are still experiencing bugs and/or glitches that are causing it to freeze or crash.

Power cycling your Xbox Series X or Xbox Series S

If restarting Halo Infinite did not get rid of the crashing or freezing errors, then you can try power cycling your console.

In order to do so, press and hold the Xbox button on your controller to bring up the power menu. In this menu, select the “Turn off console” option.

If your system is not responding to any of your button presses, then you can also press and hold the Xbox power button on the console for 10 seconds in order to force a shut down.

Once the Xbox Series S or Xbox Series X have been turned off. We also recommend unplugging the power cable. Wait for at least 2 minutes before plugging the power cable back in. This process will help clear out the cache of your console, which could be the cause of these crashes.

After pugging the power cord back into your console, turn your Series S or Series X back on and then open Halo Infinite to see if you are still experiencing any bugs or glitches.

Updating the Xbox Series S and Xbox Series X firmware

You can also try updating your Xbox Series S or Xbox Series X to the newest firmware. In order to do so, you need to press the Xbox button first to launch the Guide menu.

In the Guide menu, scroll over to the “Profile & system” tap by pressing the RB button on your gamepad a few times. After getting there, select Settings.

Inside the Settings menu, select System on the options available on the left side. On the right side in the same menu, select Updates. The “System – Updates” menu will show whether or not a new firmware update is available for download.

Updating Halo Infinite

If none of the aforementioned solutions worked, then you can try updating the game. In order to manually check for a new patch, press the Xbox button to open the Guide menu. Afterwards, select “My games & apps” and then “See all.”

In the Games menu, scroll over to the Halo Infinite icon. With this icon highlighted, press the Menu button and then select “Manage game and add ons.”

Inside the “Manage – Halo Infinite” menu, select Updates. This “Halo Infinite – Updates” menu will show if there is any patch available for download.

You can also try playing other videogames. If the other games aren’t crashing or freezing, then you can simply wait until Halo Inifnite gets a new patch and/or your Xbox Series console gets a new firmware.

If your other games are also crashing or freezing, then your system could be the cause of these problems. If that is the case, then you may want to contact Microsoft about potentially getting your Xbox Series S or Xbox Series X console repaired.