How to fix Pixel 6a battery drain issues

The Google Pixel 6a is equipped with a 4410 mAh battery that can last more than a day. If you find that the battery life of this smartphone is a lot shorter than what you were expecting, then you can take a look at this guide to see how you can get more efficient usage.

1. To start off, we recommend closing any opened applications that you aren’t current using as these will end up draining the battery of your phone.

To close any opened or suspended apps, swipe upwards slowly from the bottom of the screen and then hold for a second. If you are using buttons-navigation, then you can tap the square icon located at the bottom of the screen.

In the App Overview menu, you can close any apps that are currently opened.

2. Restarting your Pixel 6a can also be helpful as it will close all opened apps as well as any lingering processes that may have been draining your battery.

You can follow this tutorial to see how you can restart this phone.

3. We also suggest restricting any background-running apps that you don’t plan on using in order to save on battery life by doing the following:

  • Start off by opening the Settings App.
  • Next, you need to go to Apps from the from page of Settings.
  • You then need to tap the “See all apps” option from the Apps menu.
  • In the All Apps menu, select the application that you want to restrict battery usage for.
  • Inside the App Info menu for the application, you then need to select Battery.
  • After getting to the Battery Usage menu of the mage, set the Manage Battery Usage setting to Restricted.

4. If you don’t plan on using a background running app at all, then you can try taking the following steps to force stop it:

  • Go inside the Settings App.
  • From Settings, you need to tap Apps.
  • In the Apps menu, you then need to select the “See all apps.”
  • Inside the All Apps list, select the application that you want to force stop.
  • After getting to the App info menu for the application, select the Force Stop option.

5. If you have no usage for an app running in the background, then you can delete it from the Pixel 6a’s internal storage by selecting the Uninstall option from the aforementioned App Info menu.

6. It is important to note that some apps will use more battery than others. The more intensive apps often include videogames as well as applications that requires location pinging and/or constant internet usage.

7. Keep in mind that the recommended operating temperature range of this phone model is 0°C to 35°C (or 32°F to 95°F). Outside of this range, the internal battery may end up draining faster.

To see how you can prevent the Google Pixel 6a from overheating, we recommend that you check out this post.

8. If you have any wireless connections turned on, then you phone will end up using a lot more battery. To prevent this from happening, turn off the Bluetooth, Wi-Fi and any other connections if you aren’t actively using them.

9. We also recommend setting a short screen timeout length so that the Pixel 6a’s screen will turn off after it detects that a certain amount of inactivity time has passed.

In order to do so, you need to do the following:

  • First, you need to head over to the Settings App.
  • In Settings, you then need to go to Display.
  • From the Display menu, you need to select Screen Timeout.
  • After getting to the Screen Timeout menu, make sure you set a short duration in order to extend the battery life of your Pixel phone.

8. A higher brightness level will use up more battery charge. Therefore, we recommend using a dark theme as well as lowering the screen’s brightness as much as possible without causing you any eye discomfort or visibility issues.

You may also want to enable the adaptive brightness feature. By doing so, you Pixel 6a will learn your brightness level preferences over time and then automatically adjust the screen’s brightness to your liking.

9. You can also use the Battery Save or Extreme Battery Saver Modes of your Pixel 6a by taking the following steps:

  • You first need to open the Settings App and then go to Battery.
  • In the Battery menu, you then need to head over to Battery Saver.
  • In the Battery Saver menu, make sure that the Use Battery Saver Setting is enabled.

  • Afterwards, select Set a Schedule.
  • In the Set a Schedule, you can schedule when the phone will automatically enable the Battery Saver. Mode. It can be based on when the phone expects your battery to run out or the remaining battery percentage.
  • In the aforementioned Battery Saver menu, you can also enable or disable the Turn Off When Charged Setting, which disable this mode when you have more than 90% battery life remaining.
  • To use the Extreme Battery Saver mode, tap the setting in the Battery Saver menu.
  • Inside the Extreme Battery Saver menu, you will get a description of this mode. Here, you can select the “When to Use” option. Afterwards, you can choose to activate this extreme battery saving mode automatically or manually whenever you enable the regular Battery Saver mode.
  • In the same Extreme Battery Saver menu, you can also select Essential Apps. In the next screen, you can select which applications that you don’t want paused when this mode is active.

How to INZONE H7 and INZONE H9 low audio quality issues

When connecting your INZONE H7 Wireless Gaming Headset or INZONE H9 Wireless Noise Canceling Gaming Headset, you may experience lower than expected audio quality.

To see how you can improve your listen experience with these Sony products, you can take a look at this troubleshooting article here at Seeking Tech.

1. The first step we recommend taking is to make sure that your INZONE H7 or INZONE H9 is not wet.

This is because that, if liquid gets inside your headset, then it may cause the sound output to be distorted. Of course, water can also cause the inner parts to short circuit as well as many other problems.

To find out how you can prevent liquid damage, as well as properly dry these products, you can take a look at this article.

2. You can try playing a different audio, video or video game to see if the sound output from other content sound better.

If the other content features a higher audio quality, then the issue is not related to the headset. Instead, it is most likely due to the media file.

3. Some content will sound worse at higher volumes. If you believe that this is the case, then we recommend that you lower the volume to see if the audio quality will improve.

You can try lowering the headset volume with the dial located on the left ear cup of your INZONE H7 Wireless Gaming Headset or INZONE H9 Wireless Noise Canceling Gaming Headset. Moreover, you can try lowering the volume on the connected device.

If the app or game you are using has an in-app or in-game menu, then you can also check to see if these is a setting where you can adjust the volume.

4. If you are connecting your headset to the other device by using a Bluetooth connection via the HFP or HSP Bluetooth profiles, then make sure you change the codec to A2DP.

In order to do so, look through the Bluetooth menu on the connected device to see if there is an option available where you are able to switch Bluetooth codecs.

5. You can also try changing various settings in the INZONE Hub.

You can download and install this program on your computer. You then need to connect your INZONE H7 or INZONE H9 to be able to start messing with the various settings that may help improve the sound output quality.

6. On the connected devices, you can also try looking at its system settings in order to adjust the audio output settings in order to see if you can fix the low audio quality problems.

7. Resetting or restoring your wireless gaming headset to the factory default settings may also help.

To see how you can perform both of these actions for the Sony INZONE H7 Wireless Gaming Headset or Sony INZONE H9 Wireless Noise Canceling Gaming Headset, you can follow the steps from this tutorial.

What to do if HDR10 and Dolby Vision are greyed out on Xbox Series X and S

When you try to enable HDR10 or Dolby Vision on your Xbox Series X or Xbox Series S console, then option to do so may be greyed out.

To see how you can make both HDR10 and Dolby Vision be selectable, you can take a look at this troubleshooting guide from Seeking Tech.

1. To start off, we recommend that you verify that your television set or computer monitor supports HDR10 (which may also be referred simply as HDR) and/or Dolby Vision.

2. Depending on your screen, you may also need to manually enable HDR10 or Dolby Vision. We recommend looking in the settings menu of your TV or monitor to see if this option is available.

3. When connecting your Xbox Series X or Xbox Series S to the screen, make sure you use the cable that came with the console.

Thet Series X includes a HDMI 2.1 cable in the box while the Series S includes a HDMI 2.0 cable. Both of these types will provide enough bandwidth to enable HDR10 and Dolby Vision.

4. You should also make sure that you are using the correct HDMI port on your television set. For best compatibility, make sure you plug the HDMI cable into a HDMI 2.0 or HDMI 2.1 port.

5. To see whether or not your Xbox Series console is able to detect the HDR10 or Dolby Vision capabilities of the screen, you can take the following steps:

  • Start by going to the Settings app on your Xbox Series X or Xbox Series S.
  • From the Settings menu, navigate over to the General tab in the left column and then select “TV & display options.”
  • After getting to the “General – TV & display options” menu, select “4K TV details.”
  • In the “General – 4K TV details” screen, you should see whether or not HDR10 and Dolby Vision are supported for the screen you are currently using.

6. Updating the firmware of your computer monitor or television set may help resolve its HDR issues.

To update the screen, you need to follow the instructions provided in the user manual or website from the manufacturer.

7. You should also make sure that your Xbox Series X or Xbox Series S has been updated to the latest available firmware as a new release may improve HDR compatibility.

8. If you are using 120 Hz refresh rate, then it may cause the HDR10 and/or Dolby Vision options to be greyed out. In this case, you can try lowering the refresh rate to 60 Hz.

In order to do so, you need to do the following:

  • Open the Settings app on your console and then go to “TV & display options.”
  • Inside the “General – TV & display options” menu, select “Refresh rate.”
  • In the drop-down menu, select “60 Hz.”

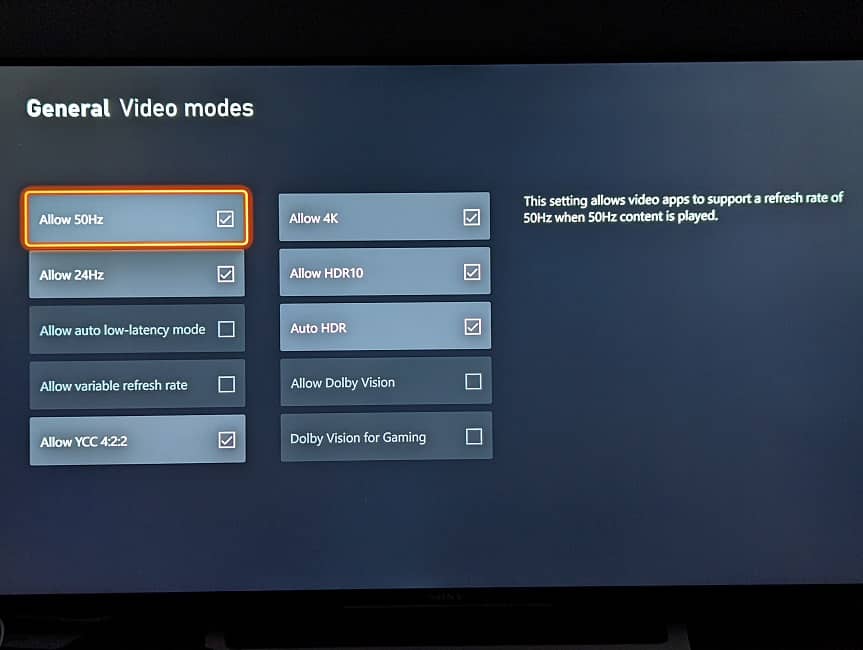
9. You can also try disabling several video modes to see if doing so will make HDR10 and/or Dolby Vision selectable.

In order to do so, we recommend taking the following steps:

  • Launch the Settings app on your Series X or Series S.
  • In Settings, go to “TV & display options.”
  • From the next screen, select “Video modes.”
  • Inside the “General – Video modes” menu, try to disable “Allow auto-low latency mode” and “Allow variable refresh rate.”
  • After disabling both aforementioned modes, see if you can enable the “Allow HDR10,” “Allow Dolby Vision” and/or “Dolby Vision for Gaming” options in the same “General – Video modes” menu.

What to do if there is no sound coming out of the Sony LinkBuds S

If you don’t hear any sound coming out of one, or both, ear phones of the Sony LinkBuds S, then you can take a look at this troubleshooting article from Seeking Tech to see what steps you can take to fix this issue.

1. To start off, make sure that the ear phones are actually powered on.

If you have having issues trying to turn on the LinkBuds S, then you can take a look at this guide.

2. You can also try disconnecting and then reconnecting the Bluetooth connection.

3. Furthermore, you can try forgetting the Bluetooth pairing and then pair the ear phones back to the same device again.

4. On the other device, make sure that you didn’t accidentally stop, pause or mute the audio or video.

5. If you are using an audio or video playing app, then you can try restarting it.

6. You can also try restarting the other device.

7. If you are using a laptop or desktop computer with multiple audio output options, then make sure that you set the sound output to the LinkBuds S.

8. Keep in mind that the audio will be paused when you set the ear phones to Speak-to-Chat mode. This mode can accidentally be turned on.

In order to disable Speak-to-Chat, you need to do so by using the official “Sony | Headphones Connect” mobile application.

9. If you are using the Service Link feature, then only the right ear bud of the LinkBuds S will be working.

You can use the “Sony | Headphones Connect” app to disable Service Link.

10. If you are using Amazon Alexa or Google Assistant, then only the right ear bud can be used by default.

You can change this setting in the Playback Control section in the “Sony | Headphones Connect” app.

11. If you are using HFP (Hands-Free Profile) or HSP (Headset Profile) when connecting to the other device, then only one of the ear phones may end up outputting sound.

In this case, try to look in the settings of the smartphone app or computer program you are using to see if you can make both ear phones output sound.

12. There is a possibility that the ear buds are clogged up.

To see how you can safely clean the Sony LinkBuds S, you can check out this guide.

13. Resetting the ear phones may be able to get them to output sound again.

If a standard reset does not work, then you can try restoring the factory default settings.

How to show Pixel 6a battery percentage

The Google Pixel 6a comes with a 4410 mAh battery that could provide more than 24 hours of battery life per every full charge. If you want to view the battery percentage of this smartphone, then you can take a look at this troubleshooting article from Seeking Tech.

How to view the battery percentage of your Pixel 6a

In order to view the battery percentage on your Google Pixel 6a, you need to take the following steps:

1. To begin turn on your smartphone if you haven’t done so already.

2. You should also make sure you unlock its screen so that you can interact with it.

3. Next, you need to open the Settings App.

If you can’t find this application in the home screen, then it should appear in the list of installed applications that you can go to by swiping upwards from an empty space on the home screen.

Alternatively, you can swipe downwards from the very top of the screen two time. By doing so, you will drag down the expanded quick settings window where you can then tap the gear icon in order to head into the Settings App.

4. From the Settings App, you then need to tap Battery.

5. At the top of the Battery menu, you will see the battery percentage as well as the estimated battery life remaining.

How to show battery percentage on the Pixel 6a

If you want to add the battery percentage to the top right side of your Google Pixel 6a, then you need to do the following:

1. Start by heading over to the Settings App of your phone.

2. In Settings, you then need to go to Battery.

3. Once you get to the Battery menu, make sure that the Battery Percentage setting is enabled.

The battery percentage should now be added at the top right corner of the screen.

How to remove the Pixel 6a battery percentage

If you decided that you no longer want your Google Pixel 6a to show its battery percentage on the top right side of the screen, then you need to take the following steps:

1. To begin, open the Settings App.

2. From the front page of Settings, you need to head over to Battery.

3. In the Battery menu, you need to make sure that the Battery Percentage setting is disabled.

If done correctly, you should no longer see a percentage number appear on the top right corner.

How to prevent Pixel 6a screen burn in issues

The Google Pixel 6a may be susceptible to screen burn in issues if you aren’t careful. To see how you can prevent afterimages from appearing on your smartphone, you can take a look at this article from Seeking Tech.

1. The first step we recommend taking is to enable screen time out. In order to do so, you need to take the following steps:

  • Start by going to the Settings App on your Google Pixel 6a.
  • After getting to Settings, you then need to head over to Display.
  • In the Display menu, you then need to select Screen Timeout.
  • After getting to the Screen Timeout menu, select the amount of time that will passed until the screen is turned off. We suggest selecting 5 minutes or less to prevent any burn in problems.
  • From the same Screen Timeout menu, you can also turn on the Screen Attention feature, which will prevent the screen from turning off as long as the front-facing camera is able to see that someone is looking at it.

2. You may also want to consider setting up a screen saver by doing the following:

  • Go to Settings App on your Pixel 6a phone.
  • From the Settings menu, you should then need to go to Display.
  • Once you get to Display, scroll down and then select Screen Saver.
  • In the Screen Saver menu, you can select Current Screen Saver and then customize what images you want to show up.
  • Return to the Screen Saver menu and then tap the gear icon.
  • In the Screen Saver Settings menu, we recommend enabling Night Mode as it will dim the screen when the screen saver is active.
  • Go back to the Screen Saver menu and then select When to Start.
  • Inside the When to Start menu, we suggest selecting While Charging or Docked.

3. Screen burn ins are more likely to occur if you make your Pixel 6a screen extra bright. Thus, we recommend lowering the brightness level to as low as you can with causing any eye discomfort.

For the uninformed, you can manually lower the screen brightness by swiping down from the top of the screen two times to open the expanded quick settings window. The brightness slider should appear at the top.

If you have adaptive brightness enabled, then your Google Pixel 6a should learn your preferences over time and then automatically adjust the brightness level to your liking.

If you are having issues trying to get adaptive brightness to work properly, then you can take a look at this troubleshooting article.

4. Whenever you aren’t using your Pixel 6a, we recommend turning off the screen. Not only will you prevent ghost images, but you will also save on battery life.

5. If your phone has been displaying a static image for a long time, and you don’t wasn’t to turn off its screen, then you can switch over to a completely different content once in a while for a few minutes in order to prevent ghosting effects.

How to enable, customize and disable the Pixel 6a night mode

The Google Pixel 6a features a night mode that makes the screen easier to read at night as well as helps you fall asleep easier. To see how you can turn on, customize and/or turn off this display mode, you can take a look at this tutorial from Seeking Tech.

How to turn on the Pixel 6a night mode

In order to enable the night mode setting of your smartphone, you need to do the following:

1. To begin, make sure you turn on your phone and then unlock its screen so that you can start interacting with it.

2. Next, you need to head into the Settings App of your Pixel device.

If you can’t find Settings on the home screen, then you can swipe up from an empty space to bring up a list of installed applications. You should be able to locate the app from there.

Alternatively, you can swipe down from the top of the screen two times. Afterwards, tap the gear icon to head into the Settings App.

3. Once you get to Settings, you first need to select Display.

4. From the Display menu, make sure that the Night Light setting is turned on.

How to customize the Pixel 6a night mode

In order to customize the night mode of the Google Pixel 6a in order to better suit your preferences, you need to do the following:

1. Go to the Settings App.

2. From the front page of Settings, you should then tap Display.

2. After getting to the Display menu, you then need to head over to Night Light.

3. In the Night Light menu, you can schedule when your Pixel 6a will automatically enable and disable night mode.

You can tap the Schedule setting and then select the “Turn on from sunset to sunrise” option so that this display mode will only be enabled from the time the sun sets until the time the sun rises in your area.

Alternatively, you can select the “Turns on at customize time” option. Afterwards, you can select a start time and end time for the night mode.

4. Also in the Night Light menu, you can adjust the tint intensity of the night mode by using the slider located at the bottom of the screen. Make sure that the Use Night Light setting is enabled first; otherwise, the slider will be greyed out and become non-interactive.

How to turn off the Pixel 6a night mode

In order to manually disable the night mode of your phone, you need to take the following steps:

1. Start by opening the Settings App for your Google Pixel 6a.

2. Inside of Settings, the first step you need to take is to go to Display.

3. In the Display menu, make sure that the Night Light setting is turned is turned off.

How to fix Alienware AW3423DW blurry, shaky and other screen problems

When using the 34” Alienware AW3423DW Curved QD-OLED, you may experience the following problems:

  • Blurriness
  • Distortion
  • Fuzziness
  • Ghosting
  • Jittery Video
  • Scrambled Video
  • Shakiness
  • Tearing

To see how you can potentially fix these issues with the gaming monitor, you can take a look at this troubleshooting article from Seeking Tech.

How to fix blurriness, fuzziness and ghosting issues

If your AW3423DW is showing a blurry/fuzzy screen or a screen with a lot of ghosting effects, then you can try doing the following:

1. The first step you can try is to change the video output resolution of the connected device to see if you can get a sharper image.

2. If you are using any HDMI or DisplayPort extension cable, then we recommend that you remove them as they may be causing the image to look less sharp.

Instead, you should move the monitor closer to device so that you will only need a single video cable for the connection.

3. You can also try factory resetting the Alienware AW3423DW by doing the following:

  • Start by moving or pressing the joystick controller on the bottom of the monitor.
  • You should now be in the on-screen display (OSD). Here, you need to select the Menu option located at the top.
  • Inside of Menu, you then need to select Others.
  • Finally, you need to select the Factory Reset option located on the right side.

How to fix shaky or jittery issues

If the display image of your Alienware AW3423DW Curved QD-OLED is shaking or jittering a lot, then you can try doing the following:

1. To start off, you can try factory resetting the monitor by following the steps laid out earlier in this article.

2. Other nearby devices could also be causing electronic interference with the screen.

In this case, you can either try moving the monitor to a different location or unplug any nearby device that you think may be causing the electronic interference.

How to fix tearing and scrambled video issues

If you are seeing tearing and/or a scrambled video when using the AW3423DW, then you can try doing the following steps:

1. You can first try doing a self-test for the monitor.

You can do so by turning off the monitor and then unplugging any HDMI and/or DisplayPort cables you have connected. Afterwards, turn the monitor back on to see if you are still seeing any tearing or scrambled effects.

2. If you the same issues still show up in the self-test, then we recommend checking the video cables and ports to see if there are any potential damage.

3. A factory reset may help in this situation as well.

4. You can also try restarting the connected device in safe mode.

If the monitor is normal with the connected device in safe mode, then the tearing or scrambled picture problems is most likely not related to the monitor.

How to fix Sony LinkBuds S battery drain issues

For every full charge, the ear phones of the Sony LinkBuds S have a battery life up to 9 hours. If the charge is draining a lot faster than what you are expecting, then you can check out this troubleshooting guide at Seeking Tech.

1. The LDAC codec uses a lot more battery charge when compared to the AAC and SBC codecs.

If you are using LDAC, the maximum battery life is expected to be only 4.5 hours. With AAC and SBC, you can get up to 9 hours before needing to recharge the ear buds.

In order to switch the codec being used by your Sony LinkBuds S, you can do so by using the “Sony | Headphones Connect” mobile application.

2. Using the noise cancellation feature will also reduce the battery life of these wireless ear buds.

If you are using noise cancellation with LDAC, then the maximum battery life drops to just 3.5 hours.

For the AAC and SBC codecs, the maximum battery life drops all the way down to 6 hours.

3. Ambient Sound Mode will also cause the battery to drain significantly.

For LDAC, the maximum battery life will only be 3.5 hours when using this mode.

For AAC and SBC, the length of usage tops out at 6 hours.

4. Using the ear phones for calls will also significantly drain the batteries of the Sony LinkBuds S.

If you are only using the ear buds for calls, then you will only get a maximum of 3.5 hours per full charge.

5. The following features, when enabled, will also take a good chunk of batter charge for the Sony LinkBuds S:

  • DSEE Extreme
  • Equalizer
  • Service Link
  • Speak-to-Chat
  • Voice Assistant (including Amazon Alexa and Google Assistant)

Thankfully, you can disable these features from the “Sony | Headphones Connect” app.

6. If you aren’t using the LinkBuds S, then make sure you turn it off immediately.

To find out how you can properly turn off these ear phones, you can take a look at this tutorial.

7. When you aren’t using the ear buds, then you should also put it back in the charging case so that both will be recharged by the next time you need to use them.

You should also make sure that you keep the top of the charging case closed so that you don’t waste any battery life.

How to fix Pixel 6a touchscreen issues

When trying to use your Google Pixel 6a, you may find that its touchscreen is inaccurate and/or unresponsive. To see how you can fix these screen interaction problems with this phone model, you can take a look at this troubleshooting article from Seeking Tech.

1. The first step we recommend taking it to restart your device as the touchscreen problems may be a result of a temporary software bug.

If you aren’t able to select the Restart option in the power menu due to an unresponsive touchscreen, then you are press and hold both the power and volume up buttons at the same time for at least 30 seconds in order to force a restart.

If that doesn’t work, then you can try pressing and holding the power button for a minimum of 30 seconds.

2. You should also make sure that your finger and the touchscreen of the Pixel 6a are both clean.

To learn more about how you can clean this device, we recommend that you take a look at this tutorial.

3. Furthermore, make sure you are pressing the touchscreen of the phone correctly. The finger needs to make direct contact with the display. Your finger nail and glove won’t be registered as an input.

4. If you press down on the screen too hard, then the Pixel 6a may not be able to detect the input.

5. The touchscreen may not function normally if your phone is wet and/or overheating.

To see how you can properly dry a wet Google Pixel 6a, you can check out this guide. To see how you can cool down your phone, you can follow the steps laid out in this post.

6. If you are using a screen protector, then you may need to put a little bit more pressure when touching the screen.

7. If possible, you can also try increasing the touchscreen sensitivity of Pixel 6a by taking the following steps:

  • To begin, you need to open the Settings App on your smartphone.
  • In the Settings App, you need to select Display.
  • From the Display menu, scroll down and then make sure that the Increase Touch Sensitivity setting is enabled.

8. If you are having problems touching the screen to navigate, then you may have the Gesture Navigation feature disabled. To turn this back on, you need to do the following:

  • Go to the Settings App of your Pixel 6a.
  • In Settings, you need to head over to System and then Gestures.
  • From the Gestures menu, select System Navigation.
  • Inside the System Navigation menu, make sure you select Gesture Navigation. Furthermore, you may want to read the description of the setting to get a refresher on how you can use the touchscreen to navigate around on your smartphone.

9. We also recommend that you keep you Google Pixel 6a updated to the latest firmware as a new release may help fix the touchscreen problems.

10. If the issues haven’t gone away, then you may want to consider doing a factory reset.

If none of the aforementioned potential solutions then we recommend that you contact Google to get additional support.