How to disable cloud saves on Xbox Series S and Xbox Series X

The Xbox Series S and Xbox Series X both feature cloud storage for save files. If you want to disable this feature, then you can check out this step-by-step guide at Seeking Tech.

The only way to disable your save data from being uploaded to the cloud is by disconnecting your Xbox Series S or Xbox Series X from the Xbox network (previously known as Xbox Live).

In order to do so, you need to take the following steps:

1. First off, you need to get to the Guide menu.

To go there, press the Xbox button on your Xbox Series controller. This is the flat button that has the Xbox button and should be lit up when your console is turned on.

2. Once you get to the Guide menu, navigate over to the “Profile & system” tab.

You can switch tabs with the right directional button, by pushing right on the left analog stick or by pressing the RB button.

3. After getting to the “Profile & system” tab, select “Settings” from the list.

4. Inside of the “Settings” menu, you first need to select “General” from the list of options on the left side.

5. On the same screen, you then need select the “Network settings” option on the right side.

6. In the “Network” menu, select the “Go offline” option to disconnect your Xbox Series S or Xbox Series X console from the Internet and, thus, the Xbox network.

With your console offline, your save files won’t be uploaded to the cloud. With that said, your console must remain offline at all times as your Xbox Series S or Xbox Series X will automatically sync the data you have on your console’s solid state drive to the cloud storage every time it is connected to the Xbox network.

How to revert to older cloud saves on Xbox Series S and Xbox Series X

If you want to revert from the save file located on your offline console to the older save file you have previously uploaded to the cloud, you need to first delete the save data you have stored on the SSD of your Xbox Series S or Xbox Series X.

Keep in mind that you will lose all the progress you made up until the saved data you have stored on the cloud.

If you are still interested in this method, then you can take the following steps:

1. As we stated above, your Xbox Series S or Xbox Series X must be disconnected from the Internet. Otherwise, the save data between the SSD and the cloud storage will be the same.

2. If you haven’t done so already, make sure you completely closed your game before starting this process.

We also recommend removing Quick Resume from the game as that feature may cause issues.

3. Press the Xbox button on the controller to bring up the “Guide” menu.

4. In the “Guide” menu, select “My games & apps.”

5. In the “My games & apps,” select “See all.”

6. In the next screen, select “Games” on the left side.

7. Next, hover over the game with the save file that you want to be reverted.

8. With the game in question highlighted, press the Menu button (this is the small button with three horizontal lines) on your controller.

9. In the pop-up menu, select “Manage game and add-ons.”

10. In the next screen, select “Saved data.”

11. You the need to select the “Delete all” option.

12. You should get a notification saying that your any un-synced save file will be permanently lost.

Here, you need to select the “DELETE All” option to continue.

13. With the save file deleted from the solid state drive of your Xbox Series S or Xbox Series X, the next step is to open the “Guide” menu again by pressing the Xbox button.

14. In the “Guide” menu, navigate over to the “Profile & system” tab.

15. From the “Profile & system” tab, head into “Settings.”

16. In “Settings,” select “General” on the left side.

17. On the right side of the same screen, select “Network settings.”

18. Finally, select the “Go online” option in the “Network” menu.

19. Now you can open the game again.

The old save file should automatically downloaded from the cloud.

How to watch YouTube videos in HDR on PS5

Thanks to a recent update, you can now watch YouTube videos in HDR on your PlayStation 5 or PlayStation 5 Digital Edition. In order to do so, you can check out this step-by-step guide from Seeking Tech.

How to download the YouTube app on PS5

To begin, make sure you have the YouTube app install on your system.

If you haven’t done so already, you can take the following steps:

1. From the home screen, which is where you select which games to play, press the R1 button on your DualSense controller to switch over to the Media tab.

2. In the Media tab, select All Apps.

3. In the All Apps section, scroll down and then select the YouTube app.

4. On the YouTube page, select Download.

How to update the YouTube app on PS5

You should also update the YouTube app if you haven’t done so already.

To update, you need to do the following:

1. From the home screen menu, switch to the Media tab.

2. After getting to the Media tab, scroll over to the YouTube app.

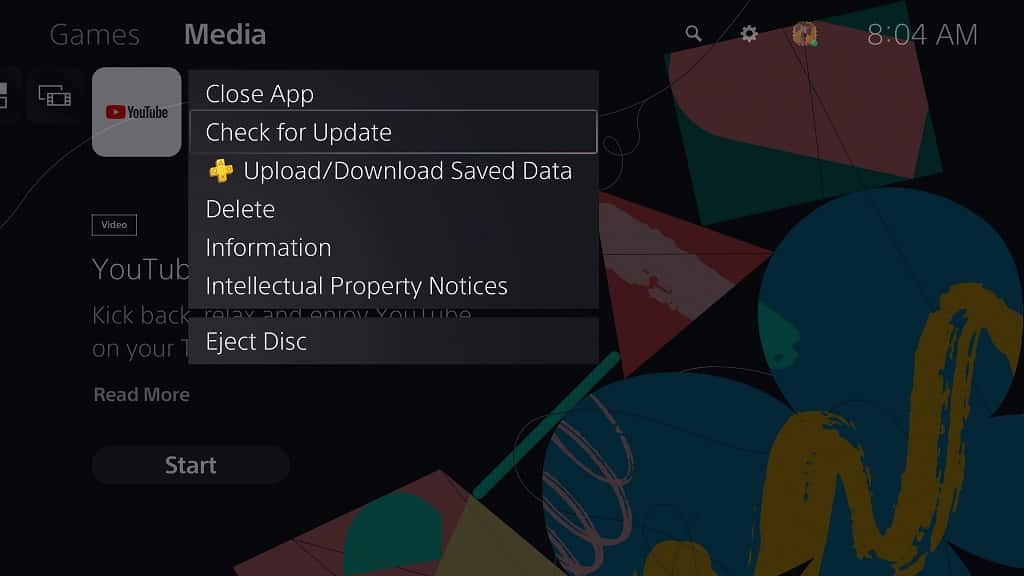
3. With the YouTube app highlighted in the Media tab, press the Options button on your DualSense controller.

4. In the pop-up window, select Check for Update.

How to set up for PS5 to stream HDR videos on YouTube

After updating the YouTube app, you should then make sure that your PlayStation 5 system is properly set up to support HDR.

In order to do so, you need to take the following steps:

1. From the home screen, select the gear wheel icon located on the top right corner of the screen to go to Settings.

2. Inside of Settings, select Screen and Video.

3. After getting to the Screen and Video menu, select Video Output on the left side of the screen.

4. On the right side of the same Screen and Video menu, you then need to select HDR.

5. In the pop-up menu, select either Always On or On When Supported.

Always On will allow your PS5 to show HDR-enabled content in addition to converting SDR content to HDR.

On When Supported will allow your PS5 to show HDR content when it is compatible. This option will also disable the SDR conversion to HDR.

How to tell if you are watching a HDR YouTube video on PS5

To tell whether or not you are a watching a YouTube video with HDR enabled on your PlayStation 5, you can try bringing up a display menu on your television screen that will show the current display information.

If your TV does not have that particular feature, then you can do the following:

1. When you are playing a video in the YouTube app, press any of the directional buttons or move the left analog stick in any direction.

2. Afterwards, select the More option, which has the three bullet points symbol.

3. The second option to the left should show that the video is displaying in HDR.

4. You can also select the “Stats for nerds” option from the aforementioned More menu.

5. In the “Stats for nerds” menu, the bt2020 color indicates that the the YouTube video is displaying HDR. If it shows bt709 instead, then it indicates that the video is showing SDR.

How to enable performance mode on Xbox Series S and Xbox Series X

Most modern videogames offer multiple graphical settings on home consoles, which most likely include a performance mode that will let you play at a high frame rate.

You can check out this guide at Seeking Tech to see how you can enable higher frame rates on the Xbox Series S and Xbox Series X consoles.

How to enable performance mode for Xbox Series S and Xbox Series X games

Unlike the PlayStation 5, there is no system-wide option to enable performance mode for all games on the Xbox Series S or Xbox Series X. Instead, you have to do so on a game-by-game basis.

You can usually find the option to enable higher frame rates from the in-game menus of a game that supports multiple graphical settings. You should be able to find the performance mode, or its equivalent, in the graphics or visual settings.

How to enable performance mode for backwards compatible games on Xbox Series S and Xbox Series X

Just like the native Xbox Series S and Xbox Series X games, you also have to turn on performance mode one at a time for backwards compatible Xbox One, Xbox 360 and Xbox games.

If there is an option for higher frame rate (most older games before the Xbox One generation most likely won’t offer this feature), then you will most likely find it in the in-game menus under the graphics or visual settings.

Some of the older games may also support FPS Boost, which will let you play them at a higher frame rate than they were originally designed for on the Xbox Series S and Xbox Series X consoles.

You can find a full list of FPS Boost supported games with this link.

While some games have FPS Boost enabled by default, others may not. In order to enable this feature, you need to take the following steps:

1. If you haven’t done so already, you should turn on your Xbox Series S or Xbox Series X console.

2. With your console powered on, press the Xbox button on your controller to open the “Guide” menu.

For the uninformed, the Xbox button has the Xbox logo and should be lit up when your controller is turned on.

3. Inside of the “Guide” menu, go down and then select “My games & apps” from the list.

4. Next, select the “See all” option.

5. In the new menu, first select “Games” from the list in the left column.

6. On the right side of the same menu, you will see the games that are currently installed on the storage of your Xbox Series S or Xbox Series X console.

Here, you need to navigate over to the game that you want to enable the FPS Boost feature for.

7. With that game highlighted, press the Menu button on your controller.

On the Xbox Series controller, the Menu button has three horizontal lines.

8. In the small pop-up menu, select “Manage game and add-ons.”

9. In the next screen, select “Compatibility options” on the left side.

10. Once you get to the “Manage – Compatibility options” menu, you will see the “FPS boost” setting.

If the box next to the “FPS boost” setting is empty, then it indicates that the FPS Boost feature is currently disabled for that specific game. To enable it, select the “FPS boost” setting to check the box next to it.

If you the setting is greyed out and can’t be selected, then it means that the game doesn’t not support the frames-boosting feature.

About 120 Frames Per Second and Variable Refresh Rate

Both the Xbox Series S and Xbox Series X support 120 frames per second.

Since the Xbox Series X comes with a HDMI 2.1 cable, you will be able to play games at 120 fps in up to 4K resolution.

As the Xbox Series S comes with a HDMI 2.0 cable, you can play games at 120 fps in up to 1440p resolution.

The Series S console also supports HDMI 2.1 cables; so, if you got a HDMI 2.1 cable available, you can also play games at 120 fps in 4K.

Both the Xbox Series S and Xbox Series X also support Variable Refresh Rate, which will prevent any stutters and screen tears.

With both consoles, you will need a television set or monitor that supports displaying games at 120 frames per second and with Variable Refresh Rate in order to use either or both of these display features.

How to fix issues with the Switch OLED screen looking dark, washed out and more

With the Switch OLED system, Nintendo replaced the LCD screen from the original system and Switch Lite system with an OLED screen.

If you are experiencing issues with the screen of your Nintendo Switch OLED looking bad, dark, off, washed out or weird, then you can check out this step-by-step tutorial at Seeking Tech.

Before we being, it should be noted that this troubleshooting guide is only intended for the handheld and tabletop modes of the Switch OLED system.

If the Switch games look back when you connect your Switch OLED system to a TV, then we recommend adjusting the TV’s display settings. You can also adjust the TV Settings on your game console in the System Settings menu.

1. The first step we recommend taking is to check to see if your OLED screen issue is related to a certain game or across multiple games.

If it only affects one game, then we recommend going to the in-game menu and then adjust the visual settings, if there are any.

You can also try updating the game to the latest available patch to see if doing so will fix the OLED screen display issues.

To update to the latest software version for a game, you need to take the following steps:

  • In the Home menu, hover over to the game with display issues.
  • With the game in question highlighted, you can then press either the + or – button on the Joy-Con.
  • In the next menu, select Software on the left column.
  • On the right side of the same menu, select Via the Internet.

2. You can also try updating the firmware of your Nintendo Switch OLED system if you haven’t done so already.

In order to do so, you can do the following:

  • In the Home menu, head into System Settings.
  • Inside System Settings menu, scroll down and then select System from the options available on the left column.
  • On the right side of the same menu, select System Update.

3. The next step you can try is to check the Change Display Colors setting.

In order to do so, you need to take the following steps:

  • From the Home menu, select System Settings.
  • In the System Settings menu, scroll down on the left column and then select System.
  • On the right side in the same menu, scroll down and then select Change Display Colors.
  • The Change Display Colors should be set to Default. If it was previously set to Invert Colors or Grayscale, then make sure to change it to Default.

4. Furthermore, you can try adjust the screen brightness by taking the following steps:

  • Go to System Settings from the Home menu.
  • Inside the System Settings menu, select Screen Brightness from the left bar.
  • On the right side of the same menu, you should see the brightness adjustment bar.

5. We also recommend checking the Console-Screen Colors setting. For the uninformed, the Console-Screen Colors is only available in the Nintendo Switch OLED model as the screen will allow you to display more vivid colors.

To check the Console-Screen Colors, you need to do the following:

  • Go to System Settings from the Home menu of your Nintendo Switch OLED.
  • Navigate downwards and then select System.
  • On the right of the same screen, select Console-Screen Colors.
  • By default, the Console-Screen Colors is set to Vivid.
  • If you are experiencing screen OLED issues when it was set to Vivid, then you can change the Console-Screen Colors to Standard.
  • If you are experiencing screen OLED issues when it was set to Standard, then you can change the Console-Screen Colors to Vivid.

How to disable the screenshot button on Xbox Series S and Xbox Series X

The Xbox Series S and Xbox Series X feature a capture button where you can take screenshots and record gameplay videos.

If you find yourself accidentally hitting this button, then it may be somewhat annoying seeing the captured screenshot and cloud upload notifications appear when you are playing a game.

You can check out this step-by-step tutorial at Seeking Tech to see how you can disable the capture button.

How to disable screenshot and video captures on Xbox Series S and Xbox Series X

If you don’t want to take screenshots or record videos, you can disable the capture feature on your Xbox Series S or Xbox Series X by doing the following:

1. First off, press the Xbox button on your Xbox Series controller. For the uninformed, this button has the Xbox symbol and should be lit up when your system Is turned on.

2. You should be in the Guide menu. Here, you can press the right directional pad, point to the right with the left analog stick or press the RB button on your controller to navigate over to the “Capture & share” tab.

3. In this tab, select the “Capture settings” option with the A button.

4. In the “Preferences – Capture & share” menu, select the “Allow game captures” drop-down menu.

5. In the “Allow game captures” drop-down menu, select the “Don’t capture” option.

How to disable automatic cloud uploads for captures on Xbox Series S and Xbox Series X

If you want to continue taking screenshots and record videos but don’t want them to be automatically uploaded to the cloud storage, you need to do the following:

1. Open the Guide menu with the Xbox button on your controller.

2. Head over to the “Capture & share” tab.

3. Select “Capture settings.”

4. Inside the “Preferences – Capture & share” menu, select the “Automatically upload” drop-down menu.

5. Finally, set the “Automatically upload” setting to “Don’t upload.”

Can you completely disable the capture/screenshot button on Xbox Series S and Xbox Series X?

Unfortunately, you can’t completely disable the capture/screenshot button on Xbox Series S and Xbox Series X.

Even if you disable the capture feature, you will get an error message every time you press the capture button.

How to disable screenshot and video capture notifications on Xbox Series S and Xbox Series X

To get rid of the error message even if you already disable the game captures (or you want to keep taking screenshots and videos without the pop-up notifications appearing), you need to take the following steps:

1. Press the Xbox button on your controller to open the Guide menu.

2. Navigate over to the “Profile & system” tab.

3. Scroll down and select “Settings.”

4. In the “Settings” menu, select the “Preferences” option on the left side.

5. On the right side in the same menu, select the “Notification” option.

6. In the “Preferences – Notifications” menu, select the “Xbox notification” option.

7. In the “Preferences – Xbox Notifications” menu, select the “Captures” option.

8. In the “Preferences – Capture Notifications” menu, make sure the box next to the “Capture notifications on” option is unchecked.

It you see a check mark, simply select this option to disable it.

How to turn off FPS Boost on Xbox Series S and Xbox Series X

FPS Boost is a new Xbox Series S and Xbox Series X feature that will increase the frame rates of older backwards compatible videogames.

While this display setting will make these games run smoother, it may come at a sacrifice of lower visual fidelity (such as a lower resolution). Not to mention that increasing the frame rate may cause bugs and glitches.

To find out how you can disable FPS Boost for a single game, you can check out this step-by-step guide from Seeking Tech.

1. To begin, turn on your Xbox Series S or Xbox Series X console if you haven’t done so already.

2. Next, you need to open the “Guide” menu, which you can do be pressing the Xbox button on your Xbox Series controller.

If you have a hard time finding it, the Xbox button is in the top-middle part of the controller. It has an Xbox logo and should be lit up.

3. Once you got to the “Guide” menu, navigate down and then select (with the A button on the controller) the “My games & apps” option.

4. In the next screen, you need to select the “See all” option.

5. Once you get to the new menu, you need to first select the “Games” option on the left column.

6. On the right side of the same menu, you should see the currently list of games you currently have installed on your Xbox Series S or Xbox Series X system.

Navigate over to the game that you want to disable FPS Boost for.

7. With the game in question highlighted, press the Menu button on your controller.

If you have a hard time finding the Menu button, it is the small button with the symbol that features three horizontal lines.

8. If done correctly, you should open a small pop-up menu.

Here, you need to select the “Manage game and add-ons” option.

9. In the next menu, you need to select “Compatibility options” from the left side.

10. In the “Manage – Compatibility options” menu, you should see the “FPS boost” setting for that specific game.

If the box next to the setting is checked, then that means that the game is currently using the frames boosting feature. If that is the case, simply select the “FPS boost” setting to clear the box and disable it for that specific game.

If you see the “FPS boost” greyed out with an unchecked box, then it indicates that the game does not support the frames boosting feature.

How to re-enable FPS Boost on Xbox Series S and Xbox Series X

If you want to re-enable FPS Boost for a game on your Xbox Series S or Xbox Series X console, you need to do the following:

1. Turn on your Xbox Series S or Xbox Series X game console.

2. Press the Xbox button on your controller to launch the “Guide” menu.

3. Select “My games & apps.”

4. Next, select “See all.”

5. In the new menu, select “Games” from the list of options available on the left column.

6. On the right side of the same screen, hover over to the game that you want to re-enable the FPS boost feature for.

7. With that game highlighted, press the Menu button on your Xbox Series controller.

8. In the pop-up menu, select “Manage game and add-ons.”

9. In the new game-specific menu, select “Compatibility options” on the left side of the screen.

10. In the next screen, you should see the “FPS boost” setting.

If the box next to this setting is unchecked, then it indicates that FPS booster is currently disabled for that individual game. You simply need to select “FPS boost” to check the box and enable that feature.

If the “FPS boost” setting is greyed out and can’t be selected, then the game doesn’t support the frames boosting feature.

How to install Acer Predator GM7000 to PS5

The Acer Predator GM7000 is a brand new PCIe Gen 4.0 x 4 solid state drive released in 2021. If you want to install this SSD on the PlayStation 5 or PlayStation 5 Digital Edition, then you can check out this step-by-step tutorial at Seeking Tech.

Is the Acer Predator GM7000 compatible with PlayStation 5?

The following capacities of the Acer Predator GM7000 should be compatible with the PS5 and PS5 Digital Edition:

  • 512 GB Acer Predator GM7000 NVMe PCIe Solid State Drive (‎BL.9BWWR.106)
  • 1 TB Acer Predator GM7000 NVMe PCIe Solid State Drive (‎BL.9BWWR.106)
  • 2 TB Acer Predator GM7000 NVMe PCIe Solid State Drive ‎(BL.9BWWR.106)

In addition to using the PCIe Gen 4.0 x 4 interface, all three capacity options have a sequential reading speed of up to 7400 MB per second. Furthermore, a customized heat spreader is also included in each product to help cool the SSD when it is running on the PS5.

The dimensions for these SSDs are 80 mm x 22 mm x 5.9 mm, which should fit into the M.2 storage docking bay of the PlayStation 5 and PlayStation 5 Digital Edition.

Moving important data off of Acer Predator GM7000

In order to use the Acer Predator GM7000, you will need to format it. Doing so will delete all of the data you have stored on the SSD. So, if you have any important files, then we recommend moving those files to another storage before you insert the GM7000 to your PS5 system.

Installing heat spreader to Acer Predator GM7000

If you haven’t done so already, you should also install the included heat spreader to the Acer Predator GM7000.

Upgrading the PS5 firmware

One last perquisite is the firmware of your PlayStation 5 or PlayStation 5 Digital Edition system as support for M.2 drives was only added recently. Therefore, make sure that your console has been updated before you begin.

How to insert Acer Predator GM7000 to PS5

Now that you have done all the prep work, you should then insert the Acer Predator GM7000 into your PlayStation 5 or PlayStation 5 Digital Edition system.

In order to do so, you need to take the following steps:

1. Turn off your PlayStation 5 console.

2. Unplug the power cable, HDMI cable and any other cable you have plugged into the system.

3. Remove the stand from the system.

4. Lay your PlayStation 5 down so that the side with the PS logo is underneath.

5. Position the system so that the backside, which has the HDMI and power ports, is facing you.

6. From your vantage point, place your right hand on the bottom right corner and your left hand on the top left corner of the outer cover.

7. Use your right hand to lift the bottom right corner of the outer cover.

8. Use your left hand to slide the outer cover off to the left.

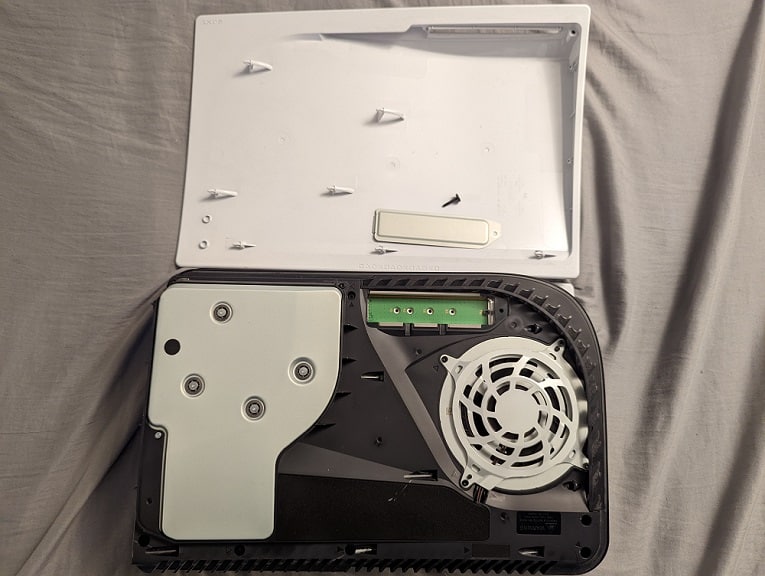
9. With the outer cover removed, you should see the long rectangular M.2 expansion bay.

10. Use a cross-head screwdriver to remove screw holding the metal cover of the expansion bay.

11. Remove the metal cover to access the expansion bay.

12. Here, you should see another screw and spacer. Remove both from the expansion bay by using a cross-head screwdriver.

13. Place the previously removed spacer into the 80 screw hole.

14. Now align the Acer Predator GM7000, which should have its heat spreader installed, with the M.2 connector of your PlayStation 5.

15. Firmly insert the solid state drive into the M.2 connector from a diagonally upwards position.

16. Hold the opposite end of the GM7000 down and then use the screw you previously removed from the expansion bay on the 80 screw hole to fasten the SSD.

17. Place the metal cover of the M.2 expansion bay back on and then use the screw you previously removed to secure the cover.

18. Slide the outer cover of the PlayStation 5 back into place from the left side.

How to format Acer Predator GM7000 for PS5

In order to format the Acer Predator GM7000 for the PlayStation 5, you need to do the following:

1. After inserting the Predator GM7000 solid state drive into the M.2 slot of your PS5 or PS5 Digital Edition, plug back in the power cable, HDMI cable as well as other cables you previously connected to the system.

2. Turn on your system.

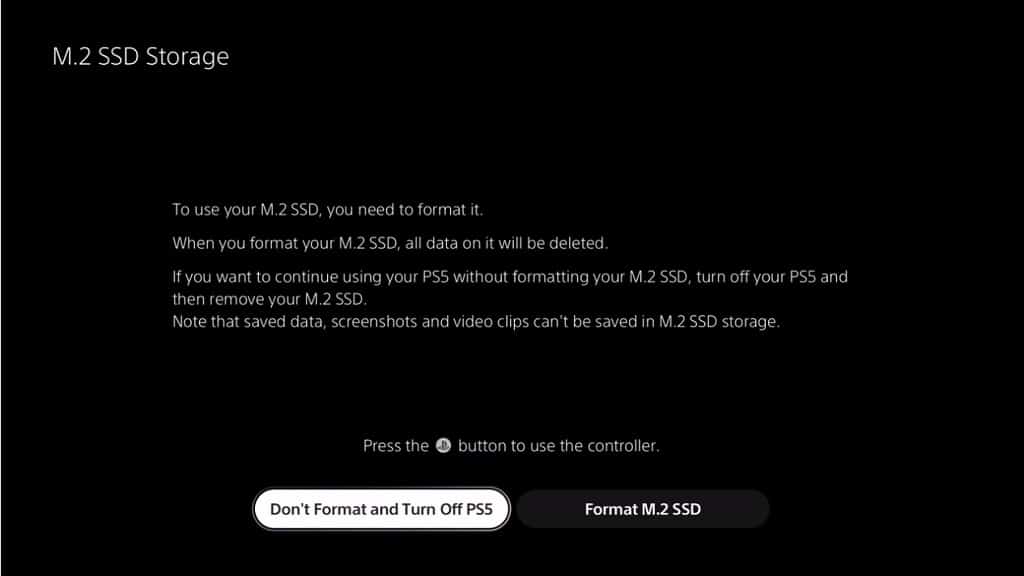
3. During the boot up process, you should get a notification that will ask you to format the Acer Predator GM7000.

4. Press the PS button on the DualSense to power it on.

5. Select the Format M.2 SSD option.

6. After the formatting is completed, you should see a screen that shows that sequential read speed of your Acer Predator GM7000 solid state drive as detected by your PlayStation 5 system.

7. Select the OK option to get to the Home Screen main menu.

Where to find Acer Predator GM7000 in the PS5 menus

If you have a hard time finding where your Acer Predator GM7000 is located in the menus of your PlayStation 5 system, you can do the following:

1. From the Home Screen, select the Settings options on the top right corner.

2. From the Settings menu, select Storage.

3. From the Storage menu, select M.2 SSD Storage on the left side.

4. On the right side of the same Storage Menu, you should see the current information on your Acer Predator GM7000.

You can also use this Storage menu to move games, delete games, reformat the GM7000 and change the default installation location.

How to change animation speed or completely disable animations on Pixel 6/Pixel 6 Pro

By default, the Google Pixel 6 and Google Pixel 6 Pro use animations when transitioning and scaling. If you want to change the animation speed, or completely turn off animations, then you can check out this step-by-step tutorial at Seeking Tech.

How to disable animations using the normal menus of Pixel 6 and Pixel 6 Pro

In order to disable animations by using the normal menus of the Google Pixel 6 and Google Pixel 6 Pro, you need to do the following:

1. First off, you must head into the Settings app.

You can get to this app by swiping downwards from the top of the menu two times in order to gain access to the gear icon. Tap this icon to enter the Settings app.

You can also get to Settings by swiping upwards from an empty area in the Home menu. This will bring up the Installed Apps menu where you should be able to select the Settings App.

2. After getting into the Settings app, select Accessibility.

3. In Accessibility, select the “Test and display” option.

4. In the “Test and display” menu, you should see the “Remove animations” option.

You need to make sure that the switch next to it is turned on. If the switch is to the left, then it indicates that animations are currently enabled. To disable it, simply select “Remove animations” to move the switch to the right side.

How to change animation speed using the developer options on Pixel 6 and Pixel 6 Pro

In order to increase or decrease the animation speed of the Google Pixel 6 and Google Pixel 6 Pro, you need to take the following steps:

1. Go to the Settings app.

2. In Settings, select the “About phone” option from the list.

3. Next, you need to quickly tap the “Build number” options 7 times. This will unlock the Developer options menu.

4. To get to the newly unlocked Developer options menu, go back to the Settings app.

5. In Settings, you now need to select System.

6. Inside the System menu, select “Developer options.”

7. After getting to the “Developer options” menu, scroll down until you get to the Drawing section. Here you will see the following settings:

  • Window animation scale
  • Transition animation scale
  • Animator duration scale

By default, all three of these settings are set to Animation scale 1x. In order to change the speed for any of these select one of them to bring up a menu showing the following options:

  • Animation off
  • Animation scale .5x
  • Animation scale 1x
  • Animation scale 1.5x
  • Animation scale 2x
  • Animation scale 5x
  • Animation scale 10x

Select your preferred option to change the speed for that particular animation type.

How to enable double tap shortcut on Pixel 6 and Pixel 6 Pro

With the Google Pixel 6 and Google Pixel 6 Pro, you can use the Quick Tap function to create a quick shortcut. To find out how to do so, you can check out this step-by-step tutorial at Seeking Tech.

1. First off, you need to enter the Settings app.

If you need help getting to it, then you can swipe downwards from the top of the screen two times. Afterwards, tap the gear icon to go to Settings.

An alternative method is to swipe upwards from an empty space on the Home menu to open a menu showing a list of installed apps. From here, tap the Settings app.

2. After getting to the Settings app, scroll down and then tap the System option.

3. Inside of the System menu, tap the Gestures option.

4. In the Gestures menu, select the “Quick tap” option.

5. By default, the Use Quick Tap setting is disabled. In order to turn it on, tap this setting to move the switch to the right side.

6. With Quick Tap enabled, you can then set what actions to tie the shortcut to.

You have the following choices:

  • Take screenshots
  • Access your digital assistant
  • Play or pause media
  • See recent apps
  • Show notifications
  • Open app

For the Open app action, tap the gear icon next to it in order to open a screen where you can select which app you want to open when you double tap the back of your Pixel 6 or Pixel 6 Pro.

7. In the same Quick Tap menu, you can also enable the “Require stronger taps” option. If you turn this on, then you will need to tap the back of your phone with more force to use the shortcut. This is helpful if you want to prevent accidentally activating the shortcut action.

Once you enable Quick Tap and set the shortcut action, you can try testing it out by quickly tapping the back of your Google Pixel 6 or Google Pixel 6 Pro.

If you have a hard time using this shortcut, try double tapping near the middle of the phone. You may also want to put in some extra force for the taps, especially if you are using a case for your smartphone.

How to change clock format and settings on Pixel 6/Pixel 6 Pro

With the Google Pixel 6 and Pixel 6 Pro, you can customize the clock format and settings. To find out how to do so, you can check out this guide at Seeking Tech.

Before we begin, you need to get to the Clock settings, which you can do by taking the following steps:

 1. On the Home screen, swipe upwards from an unoccupied space. This should bring up a list of installed apps you have on your smartphone.

2. Next, you need to tap the Clock app.

3. Inside the Clock app, tap the more icon (which has the three dots stacked on top of each other).

4. Finally, tap Settings from the small pop-up menu.

Inside the Clock settings you can do the following:

How to change the clock display style on Pixel 6 and Pixel 6 Pro

If you tap the Style option inside the Settings menu of the Clock app, you will be able to pick between an Analog or Digital clock. The analog style will show the time as a traditional clock while the digital style will show numbers.

How to display seconds on the clock of the Pixel 6 and Pixel 6 Pro

To show seconds on the clock, you need to enable the “Display time with seconds” option from the Settings menu of the Clock app.

How to show home clock on Pixel 6 and Pixel 6 Pro

When you are traveling to a different time zone, it may be convenient to know what the current time is at home.

To show the home time, you need to enable the “Automatic home clock” option in the Settings menu of the Clock app.

How to change time zones on Pixel 6 and Pixel 6 Pro

In order to change time zones on your phone, you need to select the “Home time zone” option from the Settings menu of the Clock app. In the following pop-up menu, you will be able to choose a different time zone.

In order to prevent your phone from reverting back to the original time zone, you need to do the following:

1. In the Settings menu of the Clock app, select “Change date & time.”

2. Make sure that the “Set time zone automatically” option is disabled.

3. You should also make sure that the “use location to set time zone” option is disabled.

How to change the date and time on Pixel 6/Pixel 6 Pro

If you want to change the date and time on the Google Pixel 6 and Google Pixel 6 Pro, you need to do the following:

1. From the Settings menu of the Clock app, select the “Change date & time” option.

2. In the “Date & time” menu, make sure you disable the “Set time automatically” setting.

3. With “Set time automatically” disabled, you should now be able to tap the “Date” option.

Doing so will open a calendar where you can choose the date.

4. You should also be able to tap the “Time” option in the “Change date & time” menu with the “Set time automatically” setting disabled.

Doing so will bring up an analog clock where you can change the time. You can also tap the icon to the bottom left of the pop-up menu to switch to a digital clock.

How to show 24-hour clock format on Pixel 6 and Pixel 6 Pro

If you want to use the 24-hour clock format on your Google Pixel 6 or Google Pixel 6 Pro, you need to take the following steps:

1. From the Settings menu inside the Clock app, tap the “Change date & time” option.

2. In the “Date & time” menu, make sure that the “Use locale default” option is disabled.

3. You should now be able to enable the “Use 24-hour format” option right underneath the aforementioned “Use locale default” option.