How to change the sprint settings in Call of Duty: Modern Warfare 3

By default, you need to press down on the left analog stick in order to toggle the sprint function in Call of Duty: Modern Warfare III. To perform a tactical sprint, which lets you run even faster in short bursts, you need to double tap on the left analog in the same direction.

To see how you can change the sprint settings for this first-person shooting game, you can take a look at this guide from Seeking Tech.

1. From the main menu, press the Options button on the PlayStation controller or Menu button on the Xbox controller.

In the newly opened menu, press the R1 and RB buttons a few times until you get to the tab with the gear icon. Afterwards, select Controller.

2. In the next screen, use the R1 and RB buttons again to change tabs until you get to Gameplay.

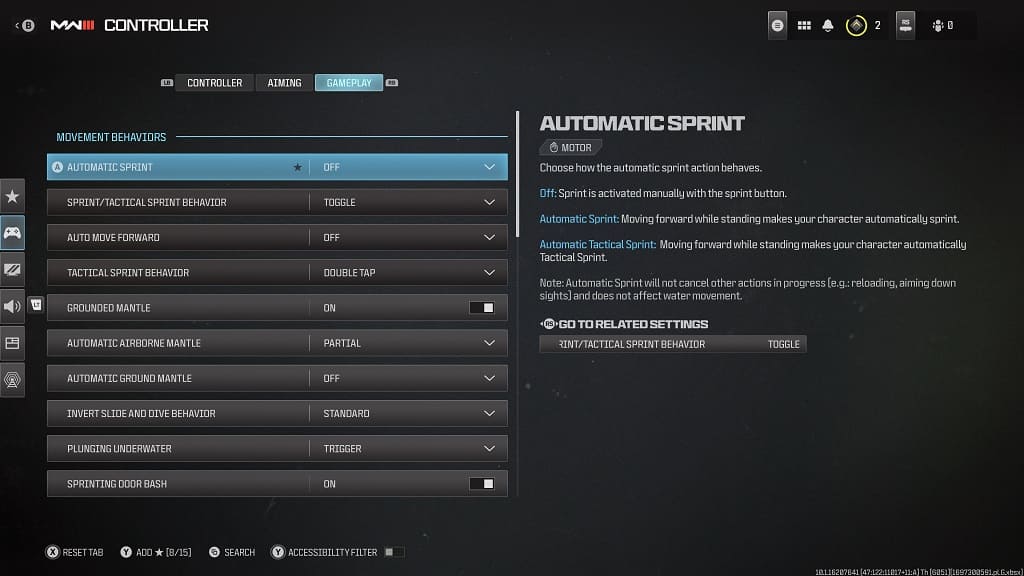
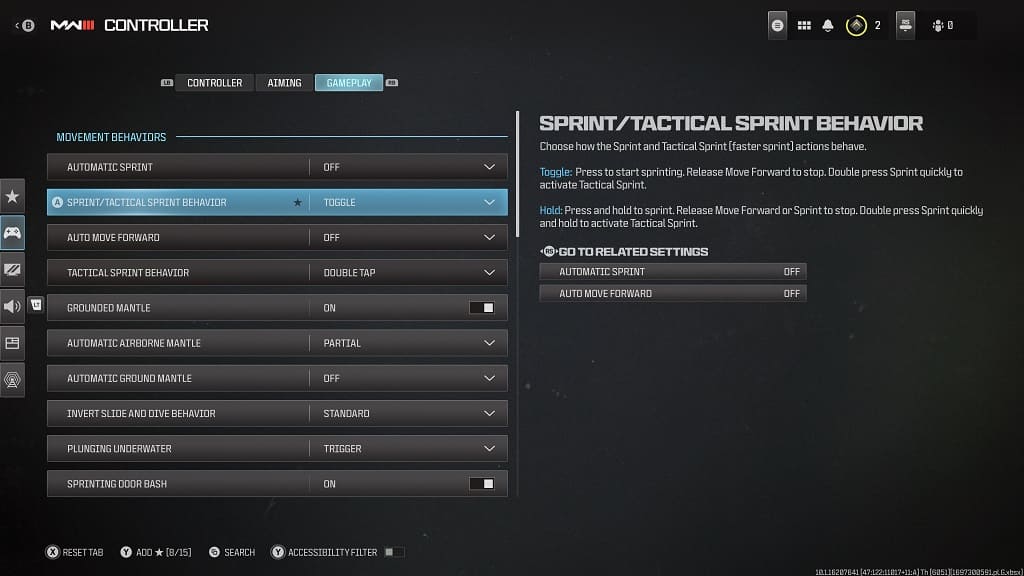
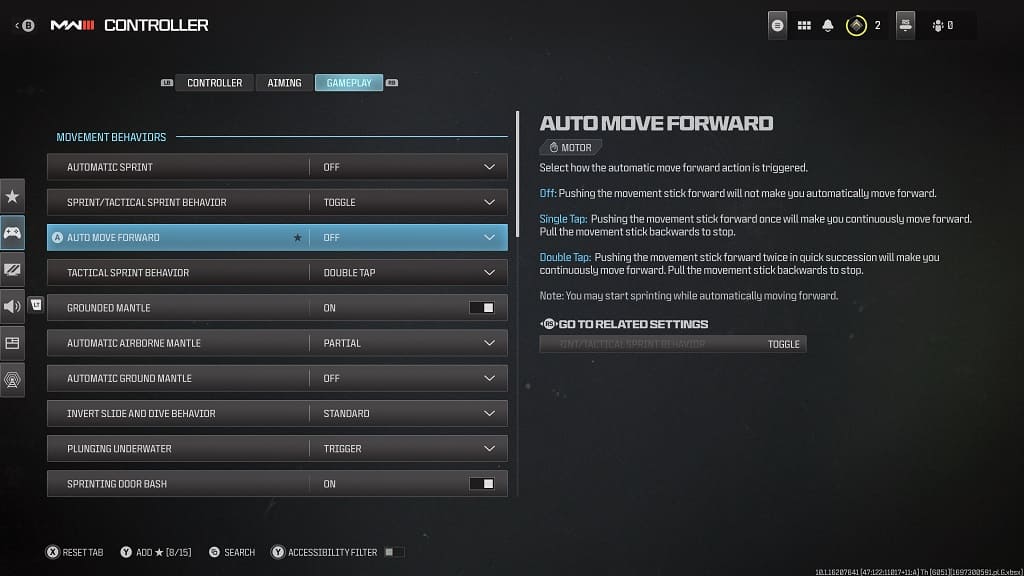
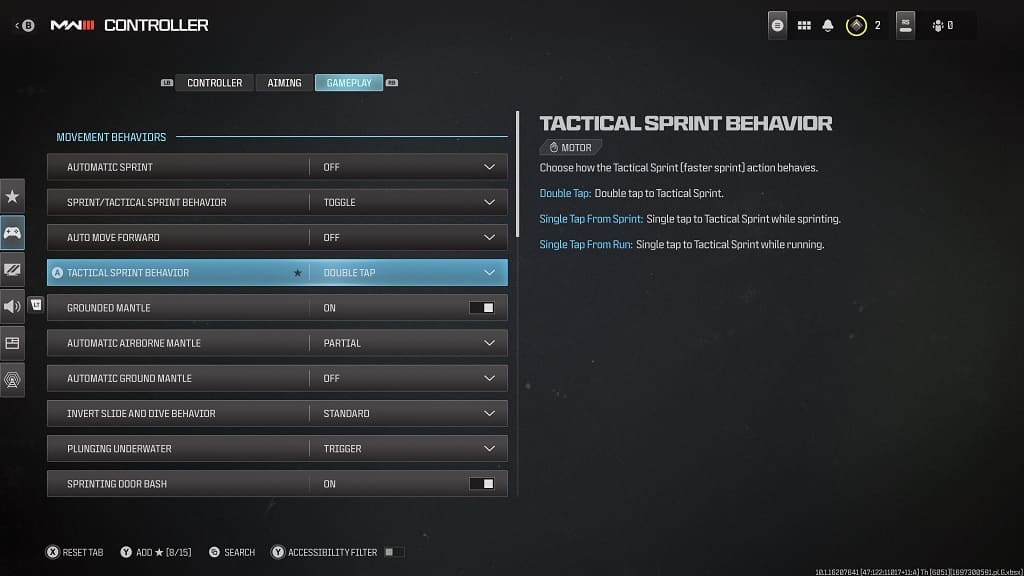
3. From the Gameplay tab, you should be able to adjust the following options:

Automatic Sprint:

  • Off
  • Automatic Sprint
  • Automatic Tactical Sprint

Sprint/Tactical Sprint Behavior:

  • Toggle
  • Hold

Auto Move Forward:

  • Off
  • Single Tap
  • Double Tap

Tactical Sprint Behavior:

  • Double Tap
  • Single Tap from Sprint
  • Single Tap from Run

4. We recommend that you play around with settings until you find the right combination that fits your play style.

How to adjust the aim assist setting in Call of Duty: Modern Warfare 3

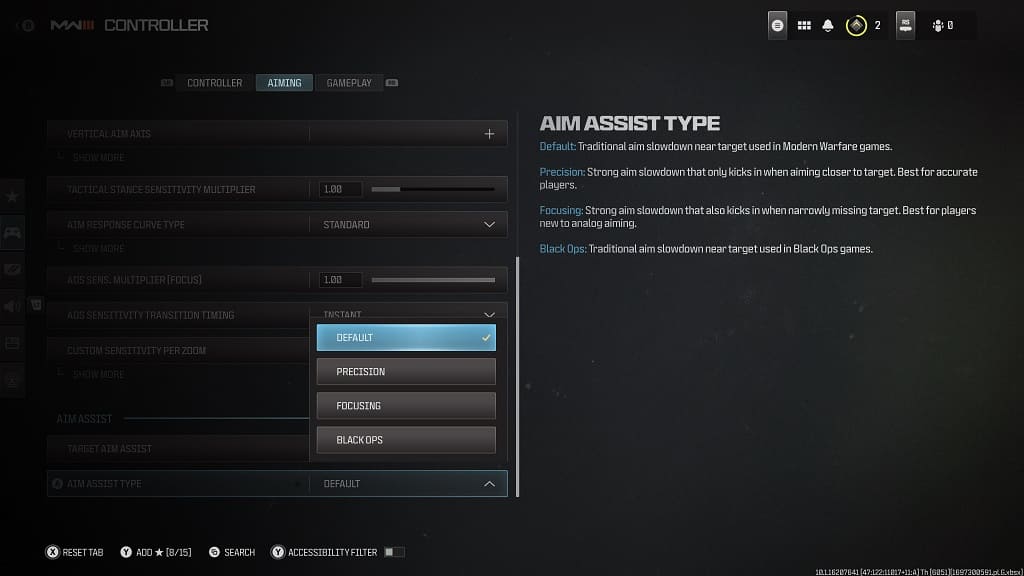
You may find the aim assist to feel off when playing Call of Duty: Modern Warfare III with a controller. To see how you can change this setting for the latest CoD installment, you can check out this guide from Seeking Tech.

1. If you haven’t done so already, make your way to the Settings menu in the game.

2. From there, press the L2 button on PlayStation or LT button on Xbox to bring up the menu on the left side. You then need to select Controller.

3. In the Controller section, press the L1 or LB button in order to switch over to the Aiming tab.

4. You should then scroll down until you get to the Aim Assist section.

5. Next, you should make sure that Target Aim Assist is set to On.

6. Afterwards, you need to select Aim Assist Type.

7. You will be able to change the aiming type to any of the following options:

Default: Traditional aim slowdown near target used in Modern Warfare games.

Precision: Strong aim slowdown that only kicks in when aiming closer to target. Best for accurate players.

Focusing: Strong aim slowdown that also kicks in when narrowly missing target. Best for players new to analog aiming.

Black Ops: Traditional aim slowdown near target used in Black Ops games.

We suggest that you test out all four options to see which type is best suited for your playstyle.

How to disable vibration in Call of Duty: Modern Warfare III

When playing with a compatible controller, haptic feedback will automatically be enabled in Call of Duty: Modern Warfare III. To see how you can tune down the rumble intensity, or turn this feature off completely, you can check out this guide at Seeking Tech.

1. From the main menu screen in Modern Warfare 3, navigate over towards the Settings menu.

If you are playing the game with a console controller, then you have to press the Menu button on the Xbox controller or Options button on the PlayStation controller. Afterwards, press the RB or R1 buttons a few times to view the Settings tab.

2. From the Settings tab, select Controller.

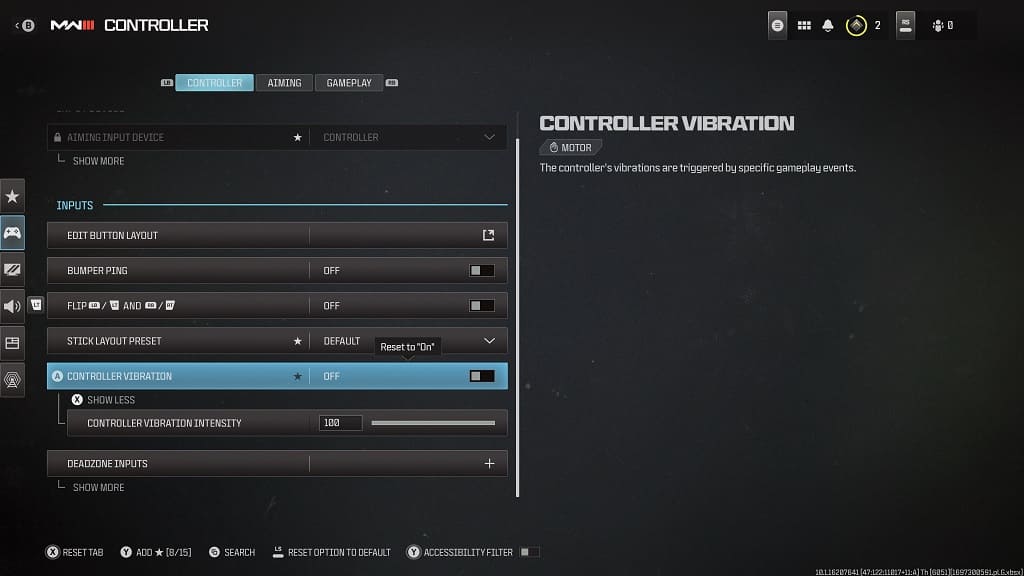
3. In the Controller section of Settings, move the cursor down to Controller Vibration. It should show the following description:

The controller’s vibrations are triggered by specific gameplay events.

To fully disable rumble, make sure that Controller Vibration is set to Off.

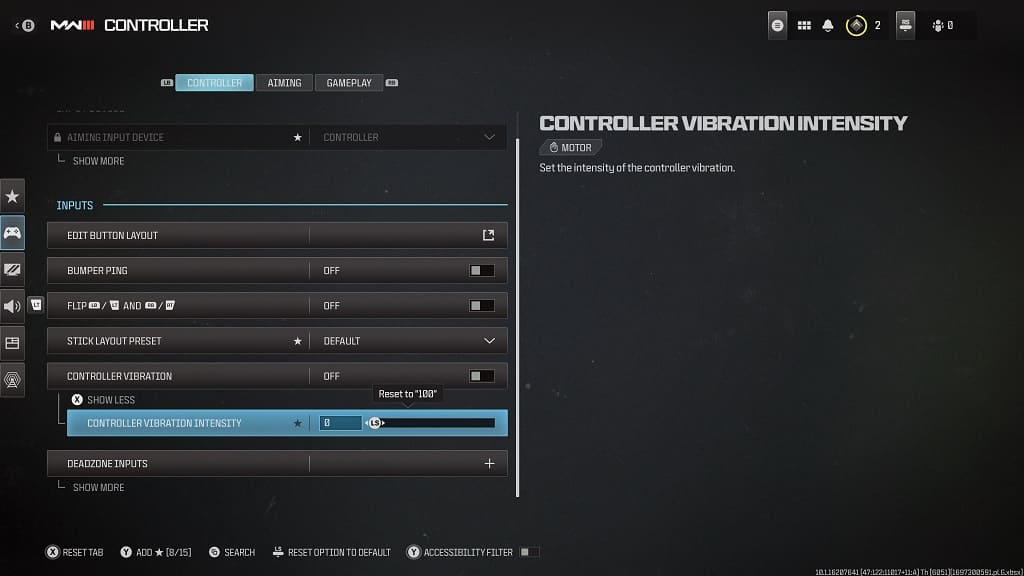
4. If you want to keep haptic feedback but reduce its intensity, make sure that Controller Vibration is set to On.

You then need to press X on Xbox or Square on PlayStation to show the Controller Vibration Intensity slider. This is used to reduce the strength of the rumble.

5. Once you are done, exit the Settings menu. You should notice the new vibration changes implemented into the game when you start playing it again.

How to disable Call of Duty: Modern Warfare 3 crossplay on consoles

By default, crossplay is enabled in the PlayStation 4, PlayStation 5, Xbox One, Xbox Series S and Xbox Series X versions of Call of Duty: Modern Warfare III. If you want to have a level playing field, then you can check out this guide at Seeking Tech to see how you can disable cross network matchmaking.

PS4 and PS5

If you are playing on PlayStation consoles, then you need to take the following steps:

1. Go to Settings from the main menu in Modern Warfare 3.

To do so, press the Options button while in the menus. You then need to press R1 to switch tab until you get to the gear cog icon. From there, select Account & network.

2. If you aren’t in the Account & Network section in Settings already, press the L2 button and then select it from the left menu.

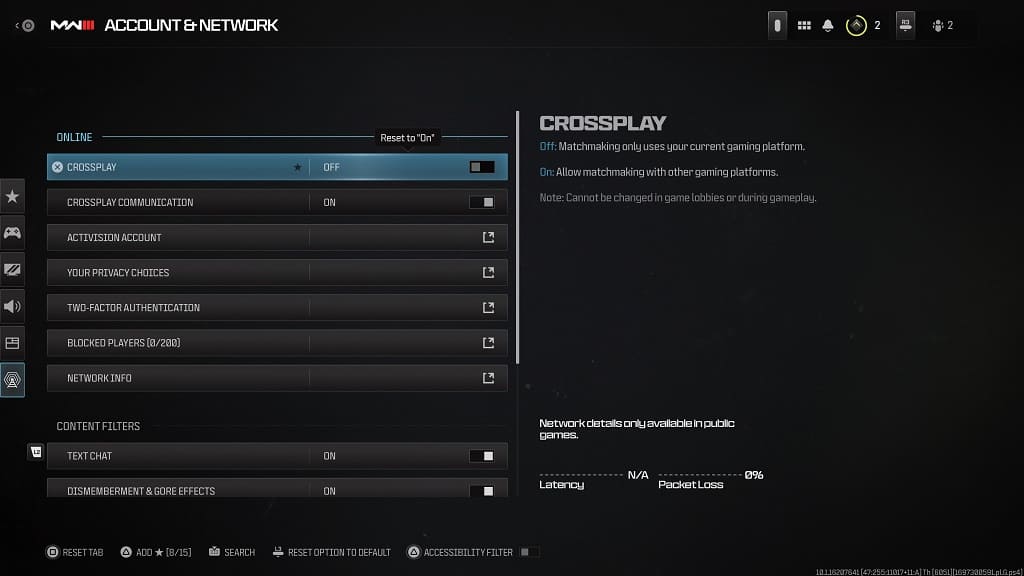
3. You should see the Crossplay option located at the top. It should show the following information:

Off: Matchmaking only uses your current gaming platforms.

On: Allow matchmaking with other gaming platforms.

4. Make sure that Crossplay is set to Off.

5. Exit the Settings menu.

You should no longer be matched up with players on non-PlayStation platforms when playing the online multiplayer.

Xbox One, Xbox Series S and Xbox Series X

The Crossplay option in the Settings menu of Call of Duty: Modern Warfare III is hidden in the Xbox One, Xbox Series S and Xbox Series X versions of the game. So, in order to disable cross network play for these consoles, you need to do the following instead:

Press the Xbox button to open the Guide menu.

Press the RB button a few times until you are viewing the “Profile & system” tab.

Select Settings.

In Settings, go to Account > Privacy & only safety > Xbox privacy > View details & customize > Communication & multiplayer.

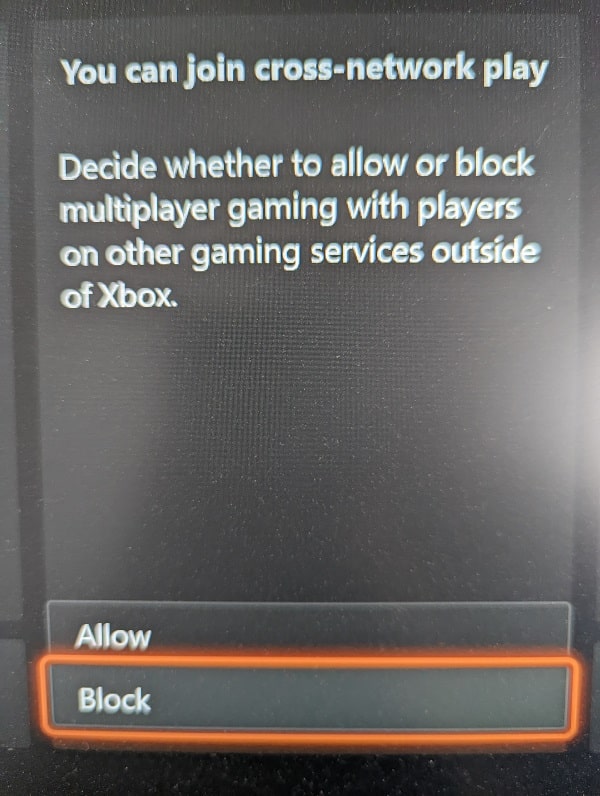
On the next screen, select the drop-down menu in the “You can join cross-network play” column.

Select the Block option.

You should now only be matched up with other players on the Xbox Live network.

How to enable keyboard and mouse support for Forza Motorsport on Xbox Series X and S

You can play the Xbox Series X and Xbox Series S versions of Forza Motorsport with a keyboard and mouse. To see how you can set up this control method for the racing simulator, you can take a look at this tutorial from Seeking Tech.

1. For the first step, you need to connect a keyboard and mouse to your Series X or Series S. Keep in mind that these consoles do not support Bluetooth.

You may still be able to use a wireless keyboard and/or mouse if you have a wireless or Bluetooth USB dongle that you can connect to one of the USB ports of the Xbox. Otherwise, we recommend using USB wired for the connection.

2. The game should automatically detect the keyboard and mouse inputs. As a result, you should be able to use them right away to navigate the menus and control your car.

With that said, the Xbox controller needs to stay connected to the console. If it disconnects, then you will see a message asking you to re-connect. We recommend connecting the gamepad via a USB cable to one of the available USB ports of the console so that you don’t waste the battery life of the wireless controller.

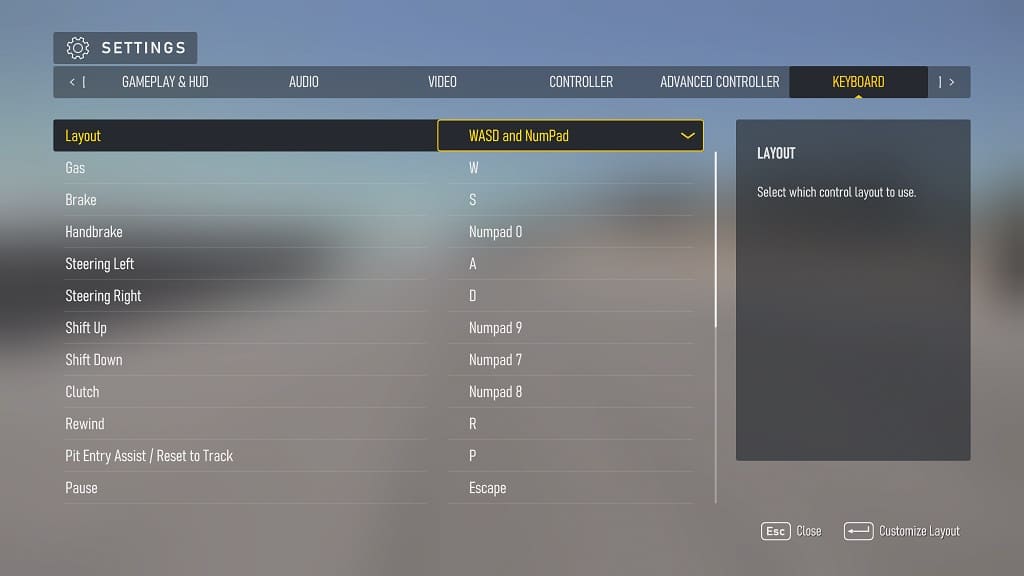
3. To find the key binds for Forza Motorsport, head into the Settings menu.

4. From Settings, use the “[“ and “]” keys to change tabs until you get to Keyboard. You can also use the LB and RB buttons of the connected Xbox controller.

You need to scroll to the right to find the Keyboard section.

5. In the Keyboard menu, you will be able to view the current key bindings and make any adjustments.

Keep in mind that the mouse input can’t be used outside of the menus.

6. If you decide to change some of the key bindings, exit the Settings menu and then select Save when asked if you want to keep your changes.

How to change the default camera view in Forza Motorsport

If you don’t like the default cockpit perspective in Forza Motorsport and find yourself constantly changing the camera angle at the start of every race, then you can check out this guide to see how you can switch the default camera view.

1. For the first step, open up the Settings menu in Forza Motorsport. You can do so from the home screen or pause screen.

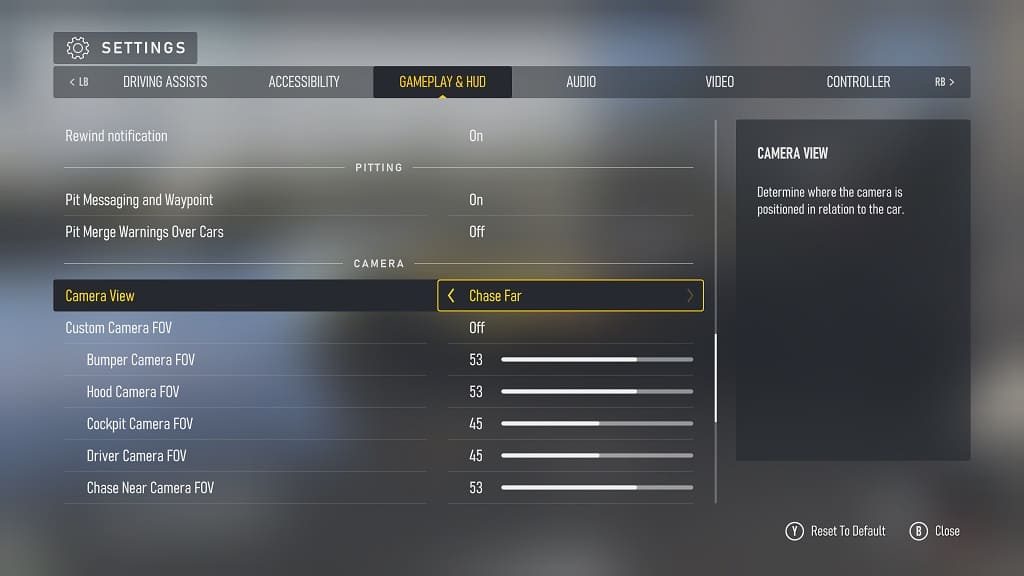
2. In Settings, you need to be viewing the Gameplay & HUD tab.

If you are playing with an Xbox controller or race wheel, you need to use the LB and RB buttons to switch tabs in this menu.

3. Once you get to the right tab, scroll down to the Camera section. You should see the Camera View option from there, which has the following description:

Determine where the camera is positioned in relation to the car.

4. Use the left analog stick or directional pad to change the Camera View. You should be able to switch between the following perspectives:

  • Bumper
  • Hood
  • Cockpit
  • Driver
  • Chase Near
  • Chase Far

5. After changing the default camera angle, exit out of Settings.

6. Select to save the change you just made when you get the “Confirm Save” pop-up notification.

The next time you start a race, the perspective should start with the one you select for the Camera View setting.

How to fix Honkai: Star Rail PS5 account linking issues

If you are having issues trying to link your existing Hoyoverse account to the PlayStation 5 version of Honkai: Star Rail, then you can check out this troubleshooting article from Seeking Tech.

1. Before we begin, make sure you have a secondary email account as you will need it during this process. You will also need a smartphone, computer or another device that has a web browser.

2. Once you are ready, you open Honkai: Star Rail and then start the game.

3. Play through the beginning until you gain access to the Phone menu.

4. Open the Phone menu by pressing the Options button.

5. Next, select Account Settings.

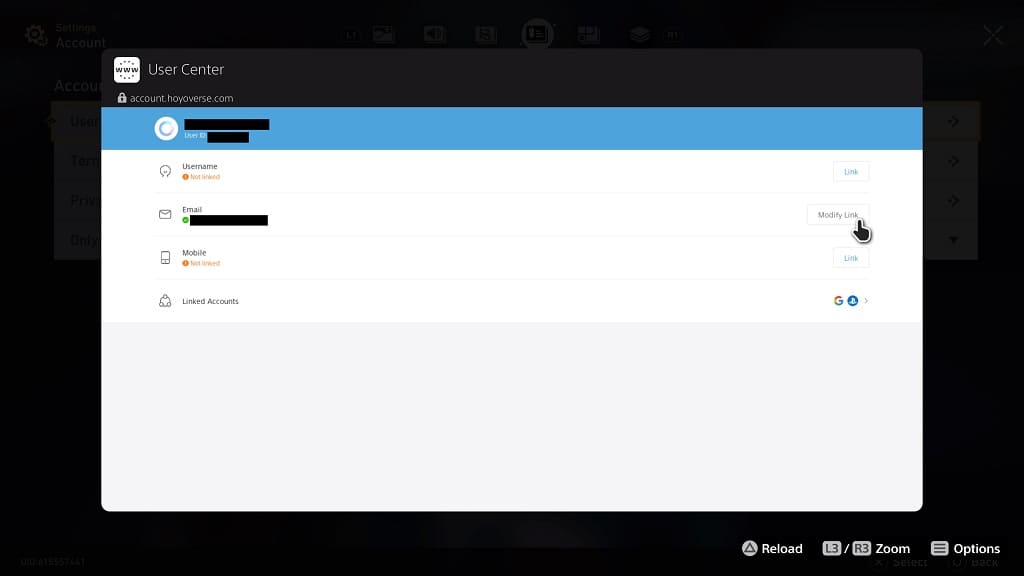
6. You then need to select User Center.

7. The game will then load the Account page from the Hoyoverse website by using the internal web browser of the PS5.

If the page fails to load, press the Triangle button to load it again. You can also try backing out and then selecting User Center from the Account Settings screen. It may take several tries to get it to load properly.

8. Once the webpage has loaded on the PS5, select Modify Link on the Email section.

9. Change your email to a different address. During this process, you may need to go through several verification steps.

10. Close Honkai: Star Rail on your PS5.

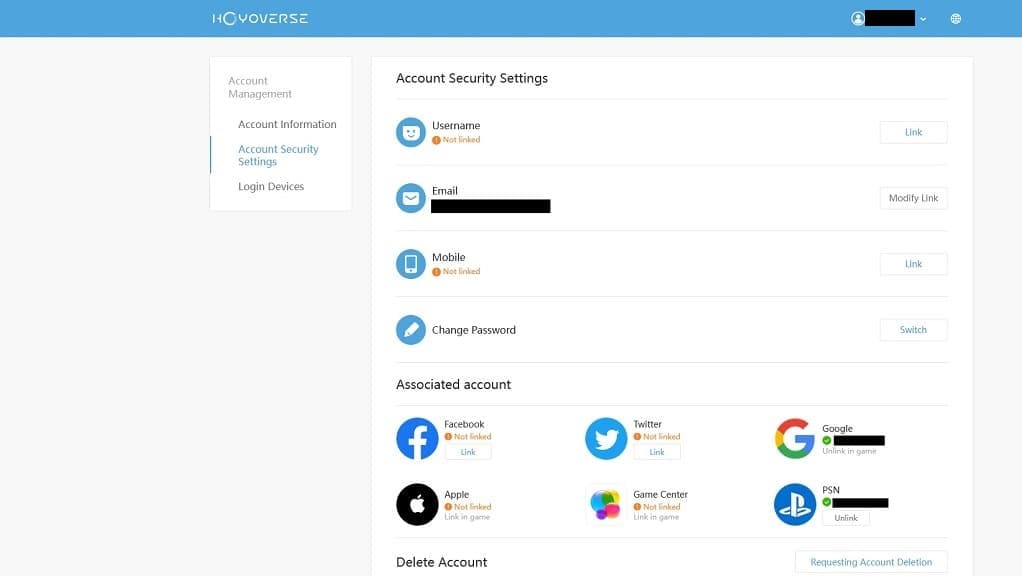
11. On a web browser on another device, go to the Account page on the Hoyoverse website.

12. Log into your Hoyoverse account using the new email you used from Step #6.

13. Select the Unlink option next to the PSN account.


14. Start up Honkai: Star Rail. When asked to log in, make sure you select the “Already have an account, log in directly” option.

15. Enter the email address you used for your original Hoyoverse account.

How to turn off crossplay in the PS5 version of Honkai: Star Rail

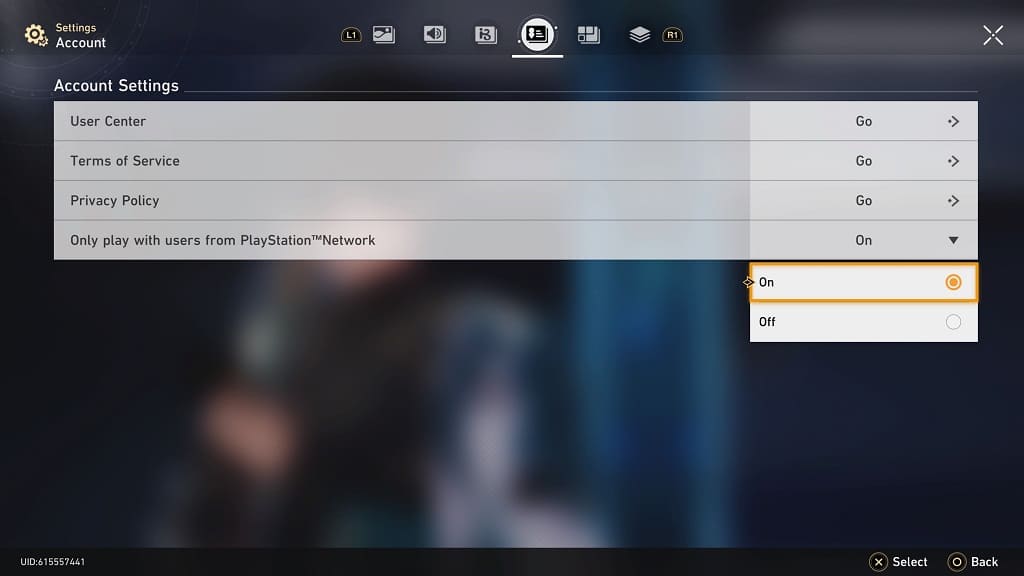
Cross platform is enabled by default in the PlayStation 5 version of Honkai: Star Rail. If you would rather disable this feature so that the game will only connect with other PS5 users, then you can check out this tutorial from Seeking Tech to see how you can properly do so.

1. To start off, you need to make your way to the Settings menu in Honkai: Star Rail.

You can do so from the title screen, by pressing L3 and then selecting the gear icon. You can also select the same gear icon from the phone menu.

2. In Settings, use the L1 and R1 buttons of the DualSense to change tabs until you get to the Account Settings tab.

3. From there, select the “Only play with users from PlayStation Network” setting.

4. By default, this setting is set to Off, which means that you are able to connect with other users that are playing on the PC, Android or iOS platforms.

To disable cross platform connections, make sure you set the “Only play with users from PlayStation Network” setting to On.

5. You can then exit the Settings menu.

When using the multiplayer features in Honkai: Star Rail, your connection will now be limited to other PS5 users.

How to change voice language in PS5 version of Honkai: Star Rail

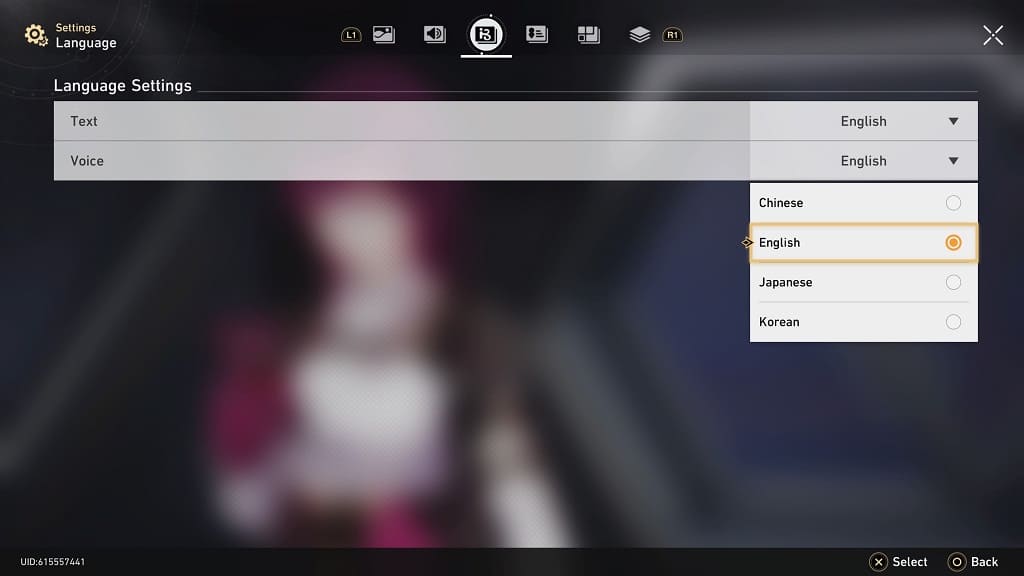
If you are playing the PlayStation 5 version of Honkai: Star Rail in an English-speaking region, then the default voice language will be set to English. If you would like to switch over to a different language, then you can check out this tutorial from Seeking Tech to see how you can properly do so.

1. To start off, you need to open the Settings menu.

If you haven’t logged into the game yet, then you can press L3 in the title screen and then select the gear cog icon.

If you have already loaded into your save file, then you need to press the Options button on the DualSense to open the phone menu. From there, you can either select Account Settings or the gear cog icon.

2. Once you get to Settings, use the L1 and R1 buttons to change tabs until you get to Language Settings.

3. Select Voice from the Language Settings menu.

4. In the drop-down menu, you will be able to choose between any of the following options:

  • Chinese
  • English
  • Japanese
  • Korean

5. After changing the voice language, you can back out of the Settings menu.

When you resume playing Honkai: Star Rail, the voice acting will now be in the language that you switched over to.

How to link Hoyoverse account to PS5 version of Honkai: Star Rail

In order to play Honkai: Star Rail on the PlayStation 5, you need to log into your Hoyoverse account.

If you already have an existing account, then you can check out this Seeking Tech guide to see how you can link it to this role-playing game.

1. If you haven’t done so already, open Honkai: Star Rail on your PS5.

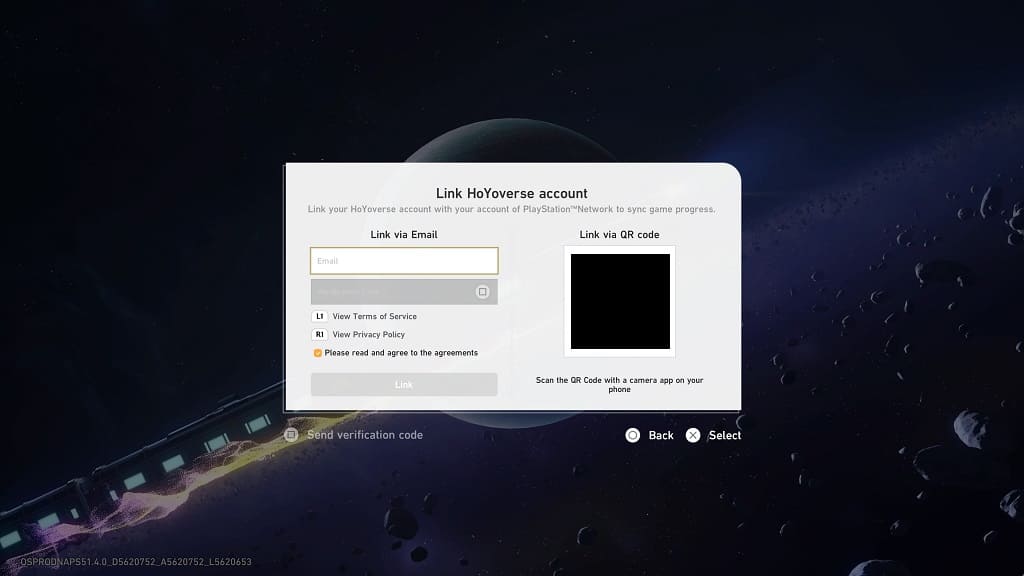
2. When trying to play the game, you should see a screen instructing you to link to your Hoyoverse account.

You will be able to link through email or by scanning the QR code on your phone. We ended up going with the latter.

3. After scanning the code, you may be asked to log into your Hoyoverse. You can also log in with a Google, Apple, Facebook or Twitter account.

If you used a third-party log-in, then you have to set up a password for your Hoyoverse account as well if you haven’t done so already. You may also get a verification code sent to your email that you must enter in the Hoyoverse in order to continue.

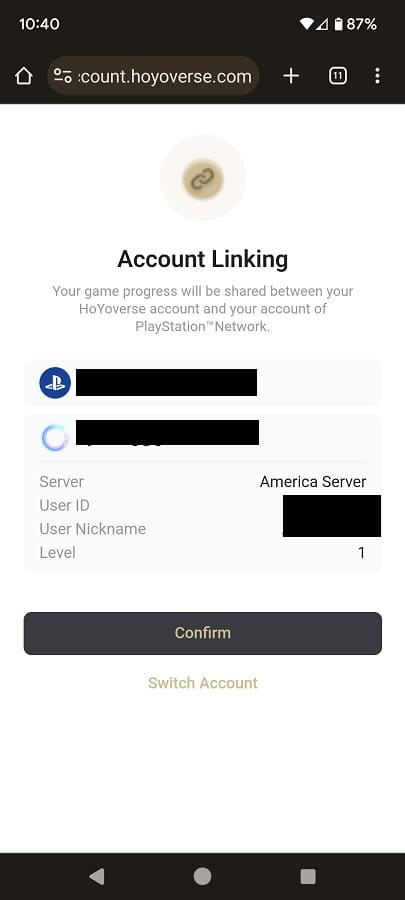
4. After successfully logging into the Hoyoverse website, you should see the Account Linking page. It should show your PlayStation Network username, email address as well as other details.

Here, you need to select Confirm to start the linking process.

Both the webpage and the game running on the PS5 will let you know when the account linking has been completed. Now that you are logged into your Hoyoverse account in the game, you should be able to start playing Honkai: Star Rail on your PS5.