How to prevent Xbox Series S and Xbox Series X from overheating

When you are playing your Xbox Series S or Xbox Series X, you may get a message stating that your console will automatically shut down due to the lack of sufficient ventilation.

If you are getting these overheating warnings multiple times, then you can check out this troubleshooting guide at Seeking Tech to see how you can resolve issues with your console getting too hot.

Xbox Series S and Xbox Series X: Vertical or Horizontal Positioning?

With the Xbox Series S and Xbox Series X, you can either stand your console up vertically or lie it down horizontally.

We recommend the vertical position as this placement means that you will expose more of the outer surface area of the console to the air. As a result, you should get better heat dissipation.

Where to put your Xbox Series S or Xbox Series X

When it comes to where you should place your Xbox Series S or Xbox Series X console, Microsoft recommends that you leave at least 4 inches to six inches of clearance on all sides. So, if possible, we recommend placing your game system on top of a desk, entertainment center, shelf or table.

You should not be placing your Xbox Series S or Xbox Series X or a confined or enclosed space that may trap the heat being dissipated from the console.

You should also avoid placing your console on a soft surface area (such as on a bed or sofa) as doing so will block the ventilation of your console.

Furthermore, you should not put your Xbox Series system near a heat source such as an amplifier, heater, stove or radiator.

Finally, you should avoid placing any objects that may block the vents of the Xbox Series S or Xbox Series X console.

What is the operating temperature of Xbox Series S and Xbox Series X?

The recommended operating temperature range of the Xbox Series S and Xbox Series X ie 5°C to 35°C (or 41°F to 95°F). So, before turning on your console, make sure your room temperature is within the aforementioned range.

If you are moving your Series S or Series X console from one location to another with a temperature difference of 11°C (20°F) or more, then Microsoft recommends letting your console adjust to the current room temperature before turning it on.

Lastly, you need to avoid placing your console in direct sunlight as doing so will heat it up.

Protecting the power cord of the Xbox Series S and Xbox Series X

To prevent your Xbox Series S or Xbox Series X from overheating, you should also protect the power cord of your console.

First off, you should only be using the official cord that comes with your console. This cord must not be cracked, frayed and/or damaged in any way.

As we stated above with the console placement, you should also avoid exposing the power cord nearby any heat sources.

When planning the Xbox Series S and Xbox Series X into a power outlet, Microsoft advises against using any generators or inverters. Moreover, it is recommended that you unplug your console during lightning storms to prevent electrical surges that may damage your console.

Keeping the Xbox Series S and Xbox Series X vents clean

One last precaution you can take to prevent your Xbox Series S or Xbox Series X console from overheating is by keeping the vents, especially those that are near the fans, cleaned from dust, dirt and smudges that may hinder the system’s airflow.

To clean you Xbox Series S or Xbox Series X console, first turn it off and then remove all the plugs.

You can use a dry microfiber cloth or a Q-tip cotton swap. You might also want to use an isopropyl alcohol electronics cleaner (if you are looking for one, then we recommend getting the MG Chemicals 824-1L 99.9% Isopropyl Alcohol Electronics Cleaner, which you can find on Amazon with this link). (#CommissionsEarned).

For the uninformed, isopropyl alcohol dries extremely quickly and is also very effective at removing dust, dirt and more.

After cleaning, make sure that your Xbox Series S or Xbox Series X console is dry before plugging it back in and turning it back on again.

Microsoft does not recommend using compressed air to clean out your Xbox Series S or Xbox Series X system.

How to see bandwidth usage on Xbox Series S and Xbox Series X

The Xbox Series S and Xbox Series X consoles come with a feature that lets you track bandwidth usage. If you want to see how much of the Internet your game system is using over a period of time, then you can check out this step-by-step tutorial at Seeking Tech.

Where to find Xbox Series S and Xbox Series X bandwidth usage data

To find the bandwidth usage stats for your Xbox Series S or Xbox Series X console, you need to take the following steps:

1. First off, if you haven’t done so already, turn on your console in addition to your console’s controller.

2. Next, you need to press the Xbox button on your controller to bring up the Guide quick menu.

For the uninformed, the Xbox button should be lit up on your Xbox Series S or Xbox Series X controller.

3. After getting to the Guide menu, you need to navigate over to the Profile & system tab.

You can switch tabs by using the LB/RB buttons, left/right directional buttons on the D-Pad or by moving the left analog stick to the left or right.

4. After getting to the Profile & system tab in the Guide menu, scroll downwards and then select Settings.

To select, you need to press the A button on your controller.

5. Now that you are in the Settings menu, you first need to select General from the left column.

6. In the same menu, you then need to select Network settings on the right side.

7. Inside of the Network menu, select Bandwidth usage.

In the Bandwidth usage menu, you will see the following categories:

The “Current usage” category shows how much bandwidth your Xbox Series S or Xbox Series X data is currently using at this moment.

The “Total usage this period” category shows much data is being used over the length of the time period.

The “Time period” category shows the date range of the current time period that is being tracked.

The “Reset on this day” option lets you set when you would like the time period to end. You can choose anywhere from the first day of the month to all the way to the last day of the month. This option is really helpful if you want to align the bandwidth tracking of your Xbox Series S or Xbox Series X console to the bandwidth tracking cycle from your internet service provider.

The usage over the last 12 hours category shows the amount of Internet bandwidth used over the last 12 hours on an hourly basis.

Finally, the Historical bandwidth usage category shows the amount of bandwidth used by your console over the previous time periods.

How accurate is the bandwidth usage data on Xbox Series S and Xbox Series X?

According to Microsoft, the bandwidth usage data shown on the Xbox Series S or Xbox Series X is an estimation for the console only.

The bandwidth usage data from your internet service provider will most likely be different, especially if you have other devices connected to the Internet.

How to clean and disinfect the Xbox Series X and Xbox Series S controllers

Occasional cleaning is recommended if you want to keep you Xbox Series X, Xbox Series S and other compatible controllers in tip-top condition. You can check out this guide at Seeking Tech to see how you can properly clean these Microsoft products.

What cleaning solution can you use for Xbox Series X, Xbox Series S and Xbox controllers?

In order to simply clean your Xbox Series X, Xbox Series S and other Xbox controllers without disinfecting it, Microsoft recommends using either plain water or water mixed with mild soap.

What disinfecting solution can you use for Xbox Series X and Xbox Series S consoles?

To clean and disinfect your Xbox Series X or Xbox Series S systems at the same time, Microsoft recommends using an isopropyl alcohol (also known as IPA) solution that has 70% concentration at most.

If you looking for this type of solution, then we suggest getting the Chem Corp Isopropyl Alcohol, which you can find on Amazon with this link. (#CommissionsEarned).

What disinfecting solution can you use for Xbox Adaptive, Xbox One and Xbox Series controllers?

The following products have been tested by Microsoft to be safe for use when it comes to disinfecting the Xbox Adaptive, Xbox One and Xbox Series controllers:

  • CaviWipes
  • Clorox Healthcare Bleach Germicidal Wipes
  • Covidien Alcohol Prep pads
  • Dawn with water mix
  • Formula 409 All-Purpose Cleaner
  • PDI Sani-Cloth Plus
  • Total Solutions Disinfectant Wipes
  • Windex Glass Cleaner
  • Isopropyl alcohol solution (70% concentration or less)
  • Other mild dish soap with water mix

What disinfecting solution can you use for Xbox Elite controller?

The following disinfectants have been tested by Microsoft to be safe for use with the Xbox Elite controller:

  • Dawn with water mix
  • Formula 409 All-Purpose Cleaner
  • Windex Glass Cleaner
  • Isopropyl alcohol solution (70% concentration or less)
  • Other mild dish soap with water mix

What can you use to wipe Xbox Series X, Xbox Series S and Xbox controllers?

To wipe your console and controller, Microsoft suggests using a soft, lint-free cloth.

If you are looking for a product, then we recommend checking out the MagicFiber Microfiber Cleaning Cloths, which you can find on Amazon with this link. (#CommissionsEarned).

How to clean and disinfect Xbox Series X, Xbox Series S and Xbox controllers

In order to clean, as well as disinfect, your Xbox Series X console, Xbox Series S console, as well as the compatible controllers, you can take the following steps:

1. Turn off your console and controller.

2. Remove any cables or accessories you have connected to the console and controller.

If you are using a controller with a removeable battery, you might want to consider removing the battery (or batteries) so that you won’t accidentally turn on the controller when wiping it clean.

3. Wet your cloth with the cleaning solution.

Make sure you don’t get the cloth too damp. If you do, you can squeeze out any excess liquid before wiping your console or controller.

4. You can now wipe your console and controller with the cloth.

When wiping make sure you avoid getting any excess water inside any of the open ports and/or vents of your console and controller.

5. Once you are done wiping your console and controller clean, wait until both are completely dried out.

We don’t recommend using a hair dryer or any other heating tools to speed up the drying process as you could end up damaging these Microsoft electronics.

6. Once the console and controller have been completely dried, you can reconnect all the cables and accessories you previously connected.

7. You can then turn on and use your console and controller.

Resource:

How to fix Xbox Series S and Xbox Series X controller connection issues

When playing on your Xbox Series S or Xbox Series X, you may have a hard time trying to connect the official controller with the console. You may also experience random disconnects.

To resolve these connection issues with your Xbox Series S and Xbox Series X controller, you can check out this troubleshooting guide at Seeking Tech.

1. Before anything else, we recommend inspecting the battery compartment of your Xbox Series controller.

You can find the compartment by sliding the back cover off of gamepad.

Inside, you need to check to see if the AA batteries are correctly and securely inserted. If you are using a battery pack, then you need to make sure that it is compatible with the new Xbox Series S and Xbox Series X controller.

You can also try replacing the older batteries with new ones. If you are using rechargeable batteries or a battery pack, you can try recharging before using them again with the controller.

2. You should also check your surroundings.

First off, you need to make sure that you don’t have any solid objects blocking the line of sight between your wireless controller and your Xbox Series S or Xbox Series X console.

You also need to make sure you have no wireless interferences as Wi-Fi and other Bluetooth devices could hinder with the controller’s Bluetooth connection if they are close enough.

You may also want to move the controller closer to your console. The Xbox Series S and Xbox Series X gamepad has a Bluetooth range of 19 feet to 28 feet. However, that distance could become shorter due to the blockages and interferences.

3. If you are still experiencing connection issues, then you can try power cycling your Xbox Series controller, which you can do by taking the following steps:

With your controller turned on, press and hold the Xbox button until it turns off. This should take around 5 to 10 seconds.

Afterwards, press and hold the Xbox button on the same controller in order to turn it back on.

4. You should also power cycle your Xbox Series S or Xbox Series X console. In order to do so, you need to do the following:

With your console turned on, press and hold the power button on the console until it shuts off. This should take around 10 seconds.

Next, press the same power button again to turn the console back on.

5. The next step you can take is to connect your Xbox Series S and Xbox Series X controller directly to the console by using a wired USB connection.

To do so, you will need an USB-C to USB-A cable, which isn’t included with the Xbox Series S or Xbox Series X console box. If you don’t have an extra one lying around, then we recommend picking up the Anker USB-C to USB-A cable, which can be found on Amazon with this link. (#CommissionsEarned).

Once you acquire the necessary cable, connect the USB-C end to the USB-C port of the controller and the USB-A end to one of the USB-A ports on your game console.

Next, simply press the Xbox button on your controller to enable the wired connection.

6. While your Xbox Series S and Xbox Series X controller is connected to your console, we also recommend updating the gamepad’s firmware if there is one available.

To do so, you need to take the following steps:

  • With your Xbox Series S or Xbox Series X console turned on, press the Xbox button on your controller to open the Guide menu.
  • On the Guide menu, you can use the RB button to switch tabs until you get to Profile & system tab.
  • Once you get to the Profile & system tab, select Settings.
  • In the Settings menu, select Device & connections from the options available on the left side.
  • You then need to select Accessories on the right side of the same screen.
  • Look for the Xbox Series controller that is having issues. Underneath the controller graphic, you need to select the “…” option.
  • In the Xbox Wireless Controller menu, the top-most option will show whether or not the gamepad has the latest available firmware. If it indicates that you need to update your controller, make sure you select it to start the update process.
  • After updating the controller, you can remove the USB cable from it.
  • You can then try testing the wireless connection to see if the gamepad continues to suffer from connection issues.

If the aforementioned potential solutions do not fix your connection problems, then you may have to contact Microsoft about getting your gamepad and/or console repaired.

How to fix issues with Xbox Series S and Xbox Series X controller buttons not working

When playing on the Xbox Series S or Xbox Series X, you may notice that the buttons on the controller aren’t working as intended.

To fix this issue, you can follow this troubleshooting guide at Seeking Tech.

1. The first step we recommend doing is to check the button mapping of your Xbox Series S and Xbox Series X controller.

In order to do so, you need to take the following steps:

  • Turn on your Xbox Series console.
  • Press the Xbox button on your controller to open the Guide.
  • In the Guide, press the RB button (or the right directional pad button) to switch to the Profile & system tab.
  • Once you get to the Profile & system tab, you need to select Settings.
  • Inside Settings, select Devices & connections on the left column.
  • On the right side of the same screen, select Accessories.
  • Under the image of your problematic controller, select CONFIGURE.
  • In the Profiles screen, select the pencil icon on the right side of the screen.
  • In the next screen, you will see all of the remapped buttons on your controller. Here, we recommend selecting the Restore to default option on the right side.

Afterwards, try testing your buttons to see if they are working normally again.

2. You can also try updating the Xbox Series S and Xbox Series X controller by doing the following:

  • Open the Guide and then select Settings from the Profile & system tab.
  • In Settings, select Devices & connections on the left side and then Accessories on the right side.
  • Next, select the “…” option of under the image of the controller.
  • In the next screen, select the top-most option to update the Xbox Series S and Xbox Series X controller.

3. If you have more than one controller connected when you are experiencing the button input issues, then you can also disable Copilot, which you can do by taking the following steps:

  • Go to Settings from the Profile & system tab in the Guide menu.
  • After getting to the Settings menu, select Devices & connections from the left column and then Accessories from the right side of the same screen.
  • Afterwards, select the “…” option located underneath the image of the problematic controller.
  • In the Xbox Wireless Controller menu, you should see the Turn Off Copilot option at the bottom of the left side.

4. If you are only experiencing this incorrect button input problem when playing one specific game or using one specific app, then you should check out the in-game or in-app menus to reconfigure and/or re-calibrate your controller settings.

5. One last potential solution is to make sure that you don’t have any Bluetooth interference when using wireless connection of the Xbox Series S and Xbox Series X controller.

There should be a direct line of sight between the gamepad and your Xbox Series console. So, make sure there aren’t any physical objects in between your controller and game system.

Furthermore, you should also make sure that there aren’t any wireless connections, such as Wi-Fi and other devices, close to your console or controller.

Finally, you can try moving your controller closer to the game console to get a better Bluetooth connection.

If none of the suggested solutions help fix the incorrect button input issues, and your controller is still covered under warranty, then you can contact Microsoft about potentially getting your gamepad repaired.

How to adjust and change the screen size for Xbox Series S and Xbox Series X

When playing the Xbox Series S or Xbox Series X, you may notice that not all of the screen is shown. You may also see a black border, which indicates that the picture is not filling up your television or monitor display.

You can check out this guide at Seeking Tech to see how you can adjust and change the screen size.

Before we begin, it is important to note that you can’t directly adjust the aspect ratio or screen size on your Xbox Series S or Xbox Series X. Instead, the game console will provide a reference point that you can use.

1. To start out, make sure that your game system in turned on.

2. Next, press the Xbox button on the controller (this button has the Xbox logo and should be lit up) in order to launch the Guide menu.

3. Inside of the Guide menu, press the RB button on the controller a few times to switch over to the “Profile & system” tab.

4. In the “Profile & system” tab, select Settings.

5. After getting to the Settings menu, select General on the left side.

6. On the right side of the same menu, select “TV & display options.”

7. Inside the “General – TV & display options” menu, select Calibrate TV.

8. In the Calibrate TV menu, select Next.

9. In the “Recommended settings” screen, select Next.

10. In the “Aspect ratio & sharpness” screen, you should get your reference point.

11. With the screen from the previous step showing on your TV, use your television remote to open settings. If you are using a monitor, then you should open your monitor settings.

12. In the settings of your TV set or monitor, look for the option that will let you adjust the screen size or change the aspect ratio.

13. Your main objective is to make sure that the “Aspect ratio & sharpness” screen has a green line that stretches out to the entirety of your display.

14. You should also make sure that the square and circle shapes are perfect as these shouldn’t be stretched or squeezed.

15. If you can’t get the green lines to appear on your television, then you should aim to have the blue lines stretched to the entirety of your televisions screen or monitor.

16. Once you are done, you can press the Xbox button and then select Home to get back to the Home menu of your Xbox Series S or Xbox Series X.

How to fix Xbox Series X|S HDR issues with being too bright, too dark or washed out

When playing a HDR videogame on your Xbox Series X or Xbox Series S console, you may notice that the graphics will look slightly off. The picture can be too bright, too dark or appear to be washed out.

You can check out this troubleshooting guide at Seeking Tech to see how you can fix HDR display issues with the Xbox Series X and S.

1. The first step you can take is to look at the settings for your television set.

If your TV has Dynamic Tone Mapping enabled, then we recommend turning it off as this feature will convert non-HDR games (also known as SDR games) into HDR. While some games may look better, other may end up looking off.

We also recommend enabling HGiG if your TV has that feature. HGiG is designed to provide an industry standard for game developers, console manufactures and television manufactures. As a result, you should get a more accurate HDR picture.

2. On your Xbox Series X or Xbox Series S console, you can also calibrate the HDR display. In order to do so, you can take the following steps:

  • Press the Xbox button on your Xbox Series controller. If you can’t find it, then the button should have the Xbox logo and be lit up.
  • In the pop-up Guide menu, press the RB button several times until you switch over to the “Profile & system” tab.
  • On the “Profile & system” tab, select Settings.
  • Over at the Settings menu, you first need to select General from the categories on the left column.
  • On the right side in the same menu, you then need to select “TV & display options.”
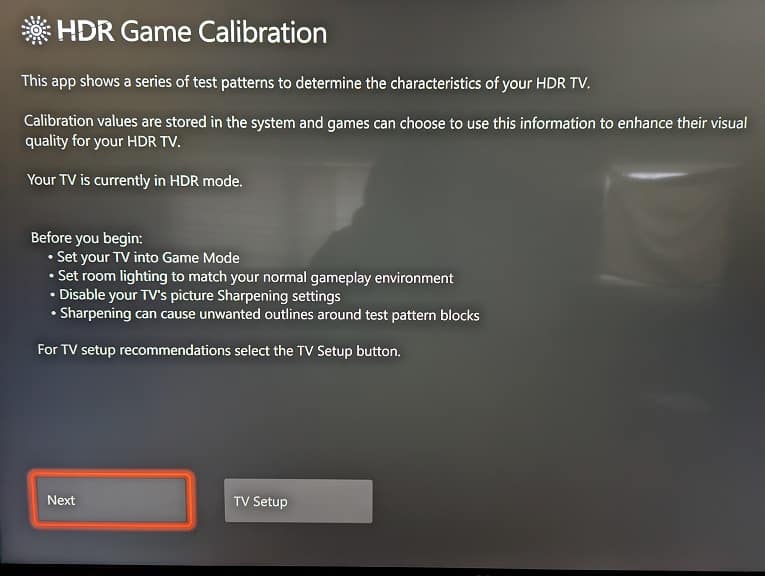
  • In the “General – TV & display options” menu, select “Calibrate HDR for games.”
  • In the first page of the HDR Game Calibration menu, follow the on-screen instructions to set your TV in game mode and disable any sharpening settings. You should also set your room lighting to the one you normally use for gaming. Once you are done with the preparations, select Next to continue.
  • In the Minimum Luminance page, adjust the image until you can barely see the checkerboard pattern. Select Next to move on once you are done.
  • In the first Maximum Luminance page, adjust the image until all the squares in the image have the same brightness. You can then select Next to move on.
  • In the second Maximum Luminance page, you again need to change the brightness level of the image until all the squares are the same. Select Next and then Done to finished to calibration.

3. If you are using Dolby Vision, then we recommend disabling this feature unless you are playing a game that fully supports it. This is because Dolby Vision will convert non-HDR and HDR10 games, which could result in these titles looking too bright, too dark or washed out.

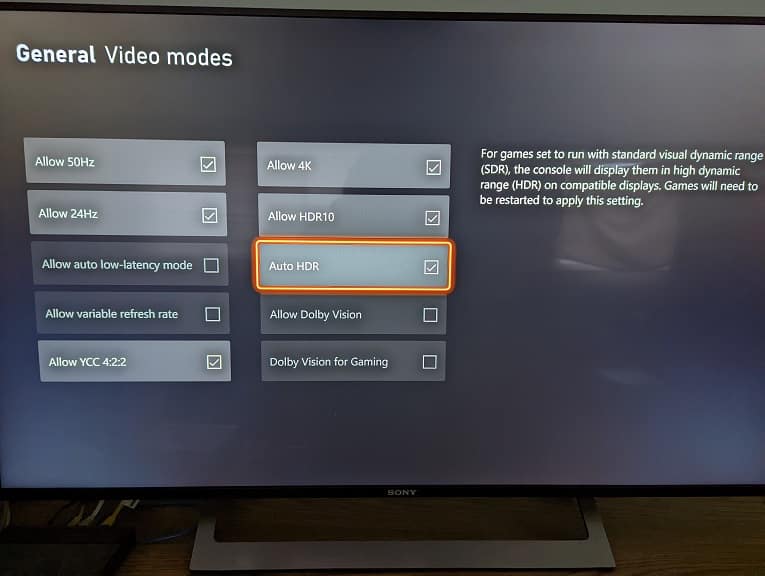
We also recommend turning off Auto HDR. This feature will convert any non-HDR games to SDR, which may make some games look worse.

In order to disable these HDR features, you can take the following steps:

  • Press the Xbox button on your gamepad to open the Guide menu and then press the RB button several times until you get to the “Profile & system” tab.
  • Next, you need to select Settings.
  • After getting to Settings, select General from the left column and then “TV & display options” on the right side in the same screen.
  • Inside the “General – TV & display options” menu, select “Video modes.”
  • From the “General – Video modes” menu, make sure that the box next to “Dolby Vision for Gaming” is unchecked if you want to disable Dolby Vision.
  • If you are disabling Auto HDR, then you need to make sure that the box next to it is unchecked.

4. In most modern games, you can also adjust the visual settings from within the game.

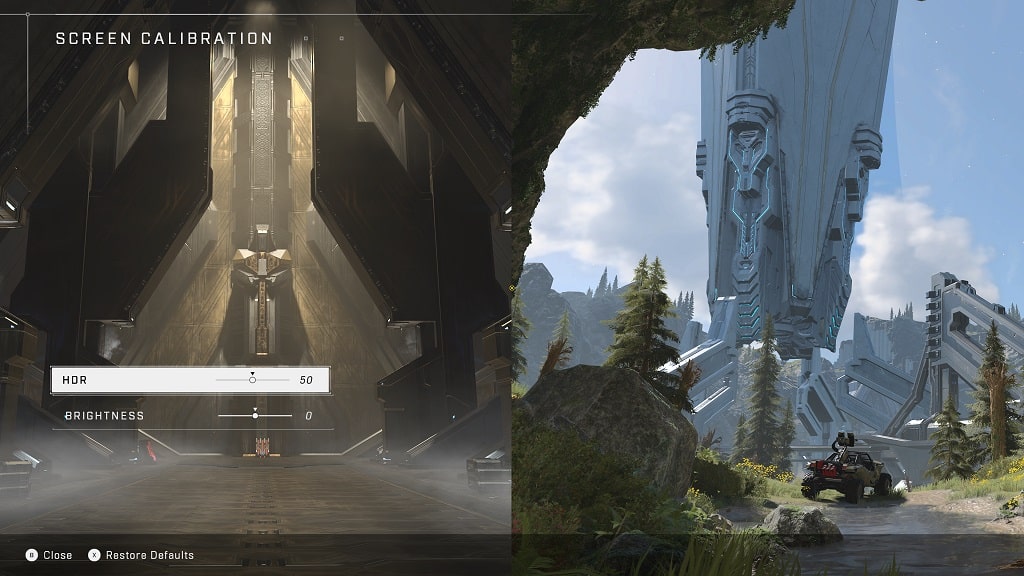
For example, you can do the following in Halo Infinite:

  • Press the menu option to bring up the pause menu and then select Settings.
  • Inside Settings, tap RB several times until you get to Video.
  • On the Video tab, press the Y button to go to Screen Calibration.
  • In the Screen Calibration screen, you will be able to adjust the HDR and brightness levels.

5. If your game still doesn’t look quite right in HDR after try the aforementioned solutions, then your television set may not be good enough to properly display HDR.

If you are looking for a great HDR TV, then the most recommended products are the LG C1 and LG G1, which you can find on Amazon with the following links: C1 and G1. (#CommissionsEarned).

6. There is also a possibility that a game you are playing may not be properly calibrated for HDR display. If that is the case, then you are at the mercy of the game developer as all you can do is to wait for a potential patch to fix the HDR issues.

How to reduce input lag and add BLE to Xbox One Wireless, Xbox Elite 2 and Xbox Adaptive Controllers

Microsoft recently reduce the input lag as well as added Bluetooth Low Energy support for the Xbox One Wireless Controller (with Bluetooth support), Xbox Elite Series 2 Wireless Controller and Xbox Adaptive Controller.

In order to take advantages of these improvements, you need to update your gamepad to its latest firmware, which you can do by taking the following steps in this tutorial at Seeking Tech.

1. First off, press the Xbox button to turn on your Xbox One Wireless Controller (with Bluetooth support), Xbox Elite Series 2 Wireless Controller or Xbox Adaptive Controller.

If your gamepad is already paired with your Xbox One, Xbox One S, Xbox One X, Xbox Series S or Xbox Series X console, then pressing the Xbox button on the controller should also turn on the game system.

If your controller is not paired with the console, then you need to turn on the console and controller individually. Afterwards, press the pair buttons on the controller and console.

2. With both the console and controller turned on and paired together, press the Xbox button on the controller to open the Guide menu.

3. In the Guide menu, press the RB button several times until you arrive at the “Profile & system” tab.

4. On the “Profile & system” tab, go to Settings.

5. In Settings, select System from the left side of the screen.

6. On the right side of the same screen, you then need select to Updates.

7. After heading into the “System – Updates” menu, you should see the “Select Update” option appear if your console detects that a new firmware available for download.

Select “Select Update” to continue.

8. In the “Let’s update” notification that should pop up, you then need to select START UPDATE to download and install the new firmware.

9. After your console has been updated to the latest firmware, press the Xbox button to go to the Guide menu.

10. In the Guide menu, select Settings from the “Profile & system” tab.

11. Inside Settings, select the “Devices & connections” option on the left column.

12. On the right side of the same screen, select Accessories.

13. In the Xbox Accessories menu, select the “…” option underneath the image of your Xbox One Wireless Controller (with Bluetooth support), Xbox Elite Series 2 Wireless Controller or Xbox Adaptive Controller.

14. In the controller menu, you should see the “Update now” option if there is a new firmware available.

Select “Update now” to continue.

15. A notification should pop up, warning you to keep the controller near your console. You should also make sure that any devices and/or cables stay attached to the gamepad during this update process.

Here, you need to select CONTINUE to start the firmware update.

16. In the Updated screen, select NEXT to complete the installation.

17. After the update, you will be able to store one Bluetooth host and one Wireless host on your Xbox One Wireless Controller (with Bluetooth support), Xbox Elite Series 2 Wireless Controller and/or Xbox Adaptive Controller.

You can switch between the Bluetooth and Wireless hosts by pressing the pair button on your gamepad two times in quick succession.

How to disable cloud saves on Xbox Series S and Xbox Series X

The Xbox Series S and Xbox Series X both feature cloud storage for save files. If you want to disable this feature, then you can check out this step-by-step guide at Seeking Tech.

The only way to disable your save data from being uploaded to the cloud is by disconnecting your Xbox Series S or Xbox Series X from the Xbox network (previously known as Xbox Live).

In order to do so, you need to take the following steps:

1. First off, you need to get to the Guide menu.

To go there, press the Xbox button on your Xbox Series controller. This is the flat button that has the Xbox button and should be lit up when your console is turned on.

2. Once you get to the Guide menu, navigate over to the “Profile & system” tab.

You can switch tabs with the right directional button, by pushing right on the left analog stick or by pressing the RB button.

3. After getting to the “Profile & system” tab, select “Settings” from the list.

4. Inside of the “Settings” menu, you first need to select “General” from the list of options on the left side.

5. On the same screen, you then need select the “Network settings” option on the right side.

6. In the “Network” menu, select the “Go offline” option to disconnect your Xbox Series S or Xbox Series X console from the Internet and, thus, the Xbox network.

With your console offline, your save files won’t be uploaded to the cloud. With that said, your console must remain offline at all times as your Xbox Series S or Xbox Series X will automatically sync the data you have on your console’s solid state drive to the cloud storage every time it is connected to the Xbox network.

How to revert to older cloud saves on Xbox Series S and Xbox Series X

If you want to revert from the save file located on your offline console to the older save file you have previously uploaded to the cloud, you need to first delete the save data you have stored on the SSD of your Xbox Series S or Xbox Series X.

Keep in mind that you will lose all the progress you made up until the saved data you have stored on the cloud.

If you are still interested in this method, then you can take the following steps:

1. As we stated above, your Xbox Series S or Xbox Series X must be disconnected from the Internet. Otherwise, the save data between the SSD and the cloud storage will be the same.

2. If you haven’t done so already, make sure you completely closed your game before starting this process.

We also recommend removing Quick Resume from the game as that feature may cause issues.

3. Press the Xbox button on the controller to bring up the “Guide” menu.

4. In the “Guide” menu, select “My games & apps.”

5. In the “My games & apps,” select “See all.”

6. In the next screen, select “Games” on the left side.

7. Next, hover over the game with the save file that you want to be reverted.

8. With the game in question highlighted, press the Menu button (this is the small button with three horizontal lines) on your controller.

9. In the pop-up menu, select “Manage game and add-ons.”

10. In the next screen, select “Saved data.”

11. You the need to select the “Delete all” option.

12. You should get a notification saying that your any un-synced save file will be permanently lost.

Here, you need to select the “DELETE All” option to continue.

13. With the save file deleted from the solid state drive of your Xbox Series S or Xbox Series X, the next step is to open the “Guide” menu again by pressing the Xbox button.

14. In the “Guide” menu, navigate over to the “Profile & system” tab.

15. From the “Profile & system” tab, head into “Settings.”

16. In “Settings,” select “General” on the left side.

17. On the right side of the same screen, select “Network settings.”

18. Finally, select the “Go online” option in the “Network” menu.

19. Now you can open the game again.

The old save file should automatically downloaded from the cloud.

How to enable performance mode on Xbox Series S and Xbox Series X

Most modern videogames offer multiple graphical settings on home consoles, which most likely include a performance mode that will let you play at a high frame rate.

You can check out this guide at Seeking Tech to see how you can enable higher frame rates on the Xbox Series S and Xbox Series X consoles.

How to enable performance mode for Xbox Series S and Xbox Series X games

Unlike the PlayStation 5, there is no system-wide option to enable performance mode for all games on the Xbox Series S or Xbox Series X. Instead, you have to do so on a game-by-game basis.

You can usually find the option to enable higher frame rates from the in-game menus of a game that supports multiple graphical settings. You should be able to find the performance mode, or its equivalent, in the graphics or visual settings.

How to enable performance mode for backwards compatible games on Xbox Series S and Xbox Series X

Just like the native Xbox Series S and Xbox Series X games, you also have to turn on performance mode one at a time for backwards compatible Xbox One, Xbox 360 and Xbox games.

If there is an option for higher frame rate (most older games before the Xbox One generation most likely won’t offer this feature), then you will most likely find it in the in-game menus under the graphics or visual settings.

Some of the older games may also support FPS Boost, which will let you play them at a higher frame rate than they were originally designed for on the Xbox Series S and Xbox Series X consoles.

You can find a full list of FPS Boost supported games with this link.

While some games have FPS Boost enabled by default, others may not. In order to enable this feature, you need to take the following steps:

1. If you haven’t done so already, you should turn on your Xbox Series S or Xbox Series X console.

2. With your console powered on, press the Xbox button on your controller to open the “Guide” menu.

For the uninformed, the Xbox button has the Xbox logo and should be lit up when your controller is turned on.

3. Inside of the “Guide” menu, go down and then select “My games & apps” from the list.

4. Next, select the “See all” option.

5. In the new menu, first select “Games” from the list in the left column.

6. On the right side of the same menu, you will see the games that are currently installed on the storage of your Xbox Series S or Xbox Series X console.

Here, you need to navigate over to the game that you want to enable the FPS Boost feature for.

7. With that game highlighted, press the Menu button on your controller.

On the Xbox Series controller, the Menu button has three horizontal lines.

8. In the small pop-up menu, select “Manage game and add-ons.”

9. In the next screen, select “Compatibility options” on the left side.

10. Once you get to the “Manage – Compatibility options” menu, you will see the “FPS boost” setting.

If the box next to the “FPS boost” setting is empty, then it indicates that the FPS Boost feature is currently disabled for that specific game. To enable it, select the “FPS boost” setting to check the box next to it.

If you the setting is greyed out and can’t be selected, then it means that the game doesn’t not support the frames-boosting feature.

About 120 Frames Per Second and Variable Refresh Rate

Both the Xbox Series S and Xbox Series X support 120 frames per second.

Since the Xbox Series X comes with a HDMI 2.1 cable, you will be able to play games at 120 fps in up to 4K resolution.

As the Xbox Series S comes with a HDMI 2.0 cable, you can play games at 120 fps in up to 1440p resolution.

The Series S console also supports HDMI 2.1 cables; so, if you got a HDMI 2.1 cable available, you can also play games at 120 fps in 4K.

Both the Xbox Series S and Xbox Series X also support Variable Refresh Rate, which will prevent any stutters and screen tears.

With both consoles, you will need a television set or monitor that supports displaying games at 120 frames per second and with Variable Refresh Rate in order to use either or both of these display features.