The Crucial P5 Plus, Sabrent Rocket 4 Plus and Samsung 980 Pro meet the PCIe Gen4 x4 M.2 NVMe interface and 5,500 MB per second (or faster) sequential read speed requirements of the PlayStation 5.
If you want to mount any of these supported solid state drives to the PS5 or PS5 Digital Edition, then you can follow this step-by-step tutorial at Seeking Tech.
Before we begin, we would like to note that this guide will be covering the following PS5-compatible capacities:
- 250 GB Samsung 980 Pro (MZ-V8P250B)
- 500 GB Samsung 980 Pro (MZ-V8P500B)
- 1 TB Samsung 980 Pro (MZ-V8P1T0B)
- 2 TB Samsung 980 Pro (MZ-V8P2T0B)
- 500 GB Crucial P5 Plus (CT500P5PSSD8)
- 1 TB Crucial P5 Plus (CT1000P5PSSD8)
- 2 TB Crucial P5 Plus (CT2000P5PSSD8)
- 1 TB Sabrent Rocket 4 Plus (SB-RKT4P-1TB)
- 2 TB Sabrent Rocket 4 Plus (SB-RKT4P-2TB)
- 4 TB Sabrent Rocket 4 Plus (SB-RKT4P-4TB)
About PS5 Formatting
Before we start the installation process, you need to make sure that you don’t have any important files stored on the Crucial P5 Plus, Sabrent Rocket 4 Plus or Samsung 980 Pro SSD you are planning to use.
This is because the formatting these storage drives for the PlayStation 5 will erase all existing data. So, if you have important files stored on the SSD, make sure you copy it to another location before installing the solid state drive to the PS5.
Heat Sink Recommendation
Sony also recommends using a heat sink. The Crucial P5 Plus, Sabrent Rocket 4 Plus and Samsung 980 Pro do not come with a built-in heat sink.
While you can use these SSDs on the PS5 without something to dissipate heat, you may run into performance and/or hardware issues if the storage drive get too hot. So, it is best to just put your drive in a heat sink before installing it on to a PlayStation 5.
When combined with a heat sink, your Crucial P5 Plus, Sabrent Rocket 4 Plus or Samsung 980 Pro should be no longer than 4.33 inches (110 mm) and no wider 0.984 inch (or 25 mm).
The total height of the solid state drive, with a heat sink, should also be less than 0.442 inch (or 11.25 mm). Furthermore, there must be less than 0.096 inch (2.45 or mm) of space underneath the SSD as well as less than 0.314 inch (or 8 mm) of space above the SSD.
If you are looking for a heat sink, then you recommend getting the be quiet! MC1 M.2 SSD Cooler, which you can find on Amazon with this link. (#CommissionsEarned).
You can check out this video guide to see how you can install the be quiet! MC1 M.2 SSD Cooler.
If you are looking for a PS5 compatible M.2 SSD that already comes with a built-in heat sink, then you should check out the FireCuda 530, WD_BLACK SN850 or AORUS 7000S.
Firmware Requirement
One last requirement is that your PlayStation 5 needs to be updated to the latest firmware as M.2 SSD support was only added recently.
If you enable automatic login to the PlayStation Network, you should get a notification to update to the latest firmware, if there is a new version available, when you turn on your PS5 system.
You can also manually update by doing the following:
1. Turn on the PlayStation 5 and go to the Home Screen, which is the main system menu where you can select which game to play and perform other tasks.
If you are inside of a game or app, you can get to the Home Screen by pressing and holding the PS button on the DualSense controller.
2. From the Home Screen, head into Settings.
You will find Settings, which has the gear icon, on the upper right corner of the Home Screen.
3. Inside the Settings menu, select System.
4. In the System menu, select System Software from the options available on the left side.
5. In the same System menu, select System Software Update and Settings on the right side.
6. In the System Software Update and Settings menu, select the Update System Software option.
You can then choose to update over the internet or through the USB drive.
How to install P5 Plus, Rocket 4 Plus and 980 Pro to PS5
Once you are done preparing your solid state drive and PS5, you can now begin to install your P5 Plus, Rocket 4 Plus or 980 Pro to the game console.
To do so, need to take the following steps:
1. If you haven’t done so already, turn off the console.
2. When the PS5 console is no longer displaying any lights, unplug any cables you have attached to it.
3. You should also remove the stand if you have it attached to the console.
4. Next up, you need to lay the console down so that the side with the PS logo in underneath. The bottom part of the system, which has logos and the screw hole to attach the stand to, should be facing you.
5. From your view point, grab the upper right corner of the white outer cover. Lift it up and then pull it towards your direction to detach the outer cover.
6. You should now be able to locate the rectangular M.2 slot cover. Use a cross-head screwdriver to remove the screw holding the slot cover in place and then remove the cover to expose the M.2 slot.
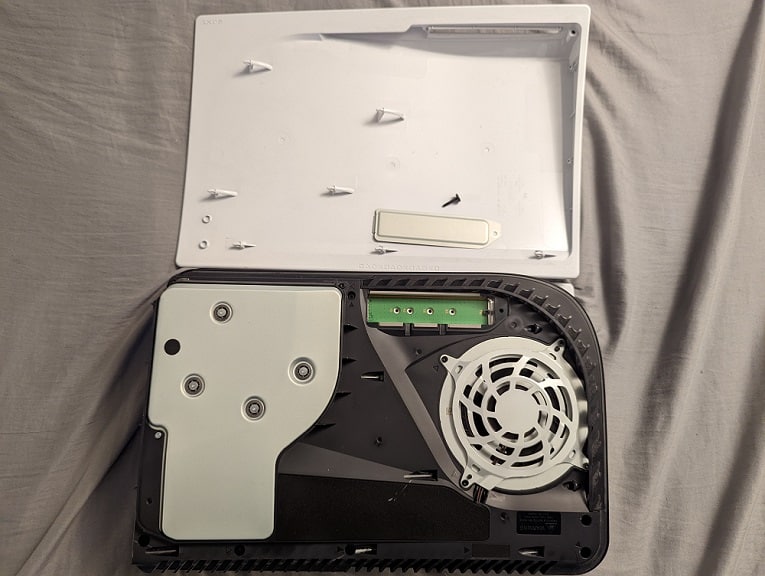
7. Inside the M.2 slot, unscrew the screw and spacer.
8. Place the same aforementioned spacer into the 80 screw hole of the M.2 slot.
8. You are now able to insert your P5 Plus, Rocket 4 Plus or 980 Pro with the heat sink attached.
Make sure that the connectors of your SSD and the M.2 slot are aligned correctly and then insert the drive. You should insert the drive diagonally with the opposite end of the SSD pointing upwards.
9. Once you are done inserting the drive, hold the opposite end of your P5 Plus, Rocket 4 Plus or 980 Pro down and then screw it into the screw hole to keep the storage drive from popping up again. You can use the same screw that you remove before in the M.2 slot.
10. With your solid state drive firmly connected and attached to the PS5, you can then put the cover of the M.2 slot back on and screw the cover tight.
11. Afterwards, slide the white outer cover of your PS5 system back into place.
How to format P5 Plus, Rocket 4 Plus and 980 Pro for PS5
Now that you connected your P5 Plus, Rocket 4 Plus or 980 Pro to the M.2 slot of your PlayStation 5 console, you can then move on to formatting the solid state drive.
To do so, you need to do the following:
1. If you haven’t done so already, plug in the cables you previously removed.
2. Turn on your PlayStation 5 console.
3. You should get a M.2 SSD Storage message.
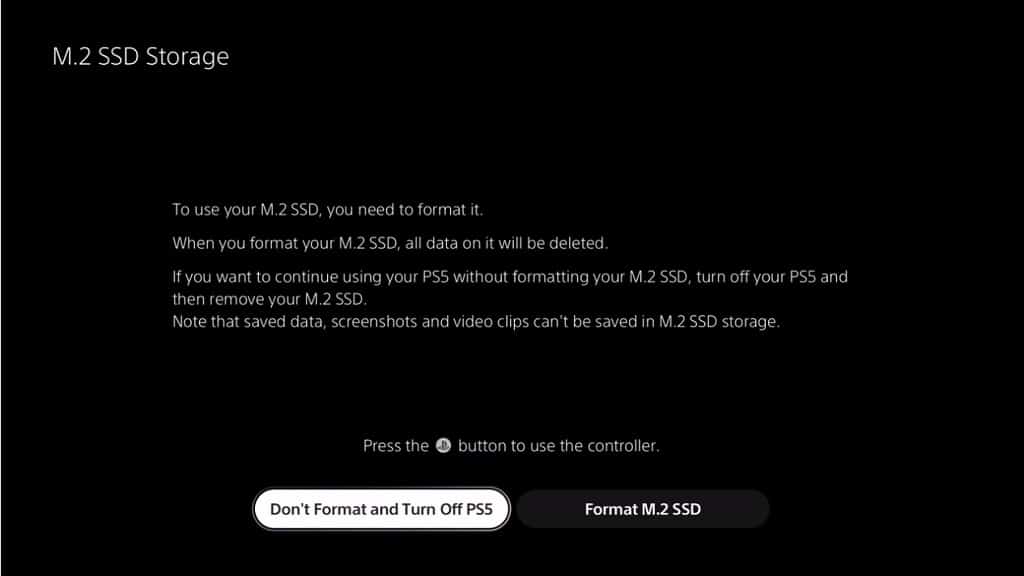
Here, you need to press the PS button on your DualSense to use the controller. You then need to select the Format M.2 SSD option.
4. After the formatting process is completed, you will see the sequential read speed of your P5 Plus, Rocket 4 Plus or 980 Pro SSD running on the PlayStation 5.
Here, you need select the OK option to go to the Home Screen main menu.
Where to find P5 Plus, Rocket 4 Plus and 980 Pro in the PS5 menu
To find the location of your newly installed P5 Plus, Rocket 4 Plus or 980 Pro solid state drive in the menu of the PS5, you need to take the following steps:
1. Go to Settings from the Home Screen.
2. In Settings, go to Storage.
3. In Storage, select M.2 SSD Storage from the list of available options on the left side.
4. On the right side in the same Storage menu, you will find your P5 Plus, Rocket 4 Plus or 980 Pro.
You will also be able to see how much free space you have left in addition to having the option to reformat your M.2 SSD.