The MSI SPATIUM M480 is a new solid state drive that meets the requirements to be compatible with the PlayStation 5 system as you will be able to play PS5 games directly off of this M.2 SSD.
You can check out this tutorial from Seeking Tech to see how you can install the SPATIUM M480 to the PS5.
Before we start, it should be noted that this guide will cover the following capacities:
- 500 GB SPATIUM M480 PCIe 4.0 NVMe M.2 Solid State Drive
- 1 TB SPATIUM M480 PCIe 4.0 NVMe M.2 Solid State Drive
- 2 TB SPATIUM M480 PCIe 4.0 NVMe M.2 Solid State Drive
Heat Sink Recommendation
Although there is a heatsink version of this SSD available (the SPATIUM M480 PCIe 4.0 NVMe M.2 HS), it is too tall to fit into the docking bay of the PlayStation 5.
Therefore, we recommend getting the non-heatsink version of the SPATIUM M480 and then acquire a heatsink that will fit with the game console.
If you are looking for a PS5-compatible heatsink, then we recommend taking a look at the be quiet! MC1 M.2 SSD Cooler with this link. (#CommissionsEarned).
To see how to install the MSI SPATIUM M480 with the MC1 M.2 SSD Cooler, you can check out this video guide.
Moving important data off of MSI SPATIUM M480
You will need to format your MSI SPATIUM M480 in order to use it with the PlayStation 5.
Reformatting the drive will erase all data you previously stored on it.
Therefore, we recommend backing up any important data, if there is any, you have on the SPATIUM M480 before installing it on the PS5.
Upgrading to latest PlayStation 5 firmware
M.2 support for the PlayStation 5 was added through a firmware update on the system. Thus, you need to install the latest available firmware if you haven’t done so already.
In order to manually update the PS5 firmware, you need to do the following:
1. Go to the Home Screen, which is the main menu where you can pick which game to play.
If you are playing a game or using an app, you can get to the Home Screen by pressing and holding the PS button on your DualSense controller.
2. In the Home Screen, go to Settings, which you can find on the upper right corner of the main menu with the gear icon.
3. Inside Settings, go to System.
4. Inside the System menu, select the System Software option on the left side of the menu.
5. In the same System menu, select System Software Update and Settings on the right side.
6. Inside the System Software Update and Settings menu, go to Update System Software.
7. In the next screen, you can pick to update the firmware of the PlayStation 5 over the Internet or via a USB storage device.
How to insert MSI SPATIUM M480 to PS5
Once you are done with the aforementioned preparations, you can now insert the SPATIUM M480 to the M.2 docking bay of the PlayStation 5.
To do so, you need to take the following steps:
1. Turn off the PS5 console.
2. After making sure that the console has completely powered down, which you will know when it isn’t displaying any lights, unplug any cables that are attached to the PlayStation 5.
3. Detach the stand from the console as well.
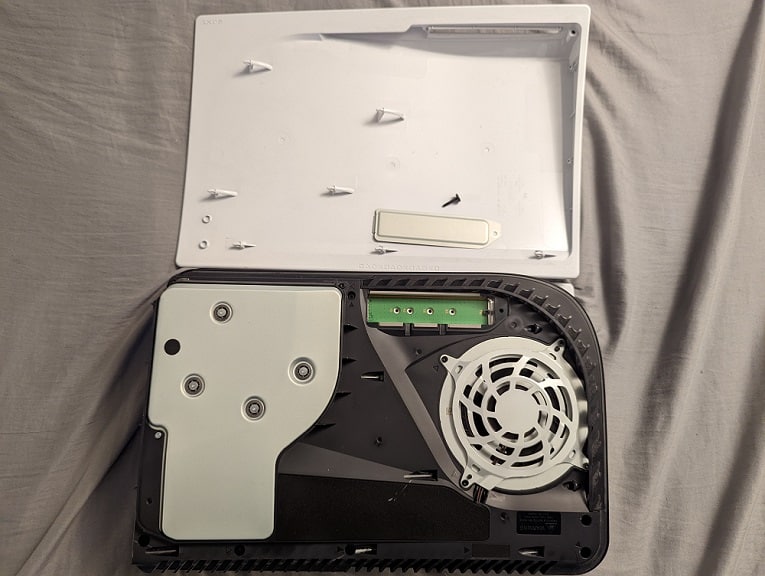
4. Now, you need to place the console so that the outer cover side that contains PS logo side is facing downwards.
Furthermore, the bottom of the system, which shows various logos and contains the screw hole for the stand, should be facing you.
5. From your vantage point, grab the upper right corner of the outer cover.
6. Lift the cover up and then pull it towards you to remove the outer cover.
7. With the cover off, you should see a rectangle metal cover over the M.2 docking bay of the PlayStation 5.
Here, you need to use a cross-head screwdriver to remove the screw holding the M.2 dock cover in place and then remove the metal cover for the M.2 docking bay.

8. Once you are inside the docking bay, you should see another screw along with a spacer. Use a cross-head screwdriver to remove both of these.
9. Placed the previously removed spacer into the 80 screw hole of the bay.
10. You can then be able to insert the MSI SPATIUM M480, with a compatible heatsink attached, to the M.2 slot.
To do so, you need to align the connectors of your SSD with the M.2 slot of the PS5. You can then insert the SPATIUM M480 from a diagonally upwards position.
11. Once the solid state drive has been inserted into the M.2 slot of the PlayStation 5, hold the other end of the SSD, which should be floating up, down.
Use the screw you previously removed from the M.2 docking bay to screw the SPATIUM M480 down and keep it secure.
12. Put the previously removed metal cover of the M.2 dock back on and screw it in place again.
13. Slide the outer cover of the PlayStation 5 back into place.
How to format MSI SPATIUM M480 for PS5
After inserting the MSI SPATIUM M480 to your PlayStation 5 system, you then need to format the solid state drive before you can use it.
In order to do so, you need to do the following:
1. Plug the power cable and HDMI cable back into the PlayStation 5 console.
2. Turn on the PS5.
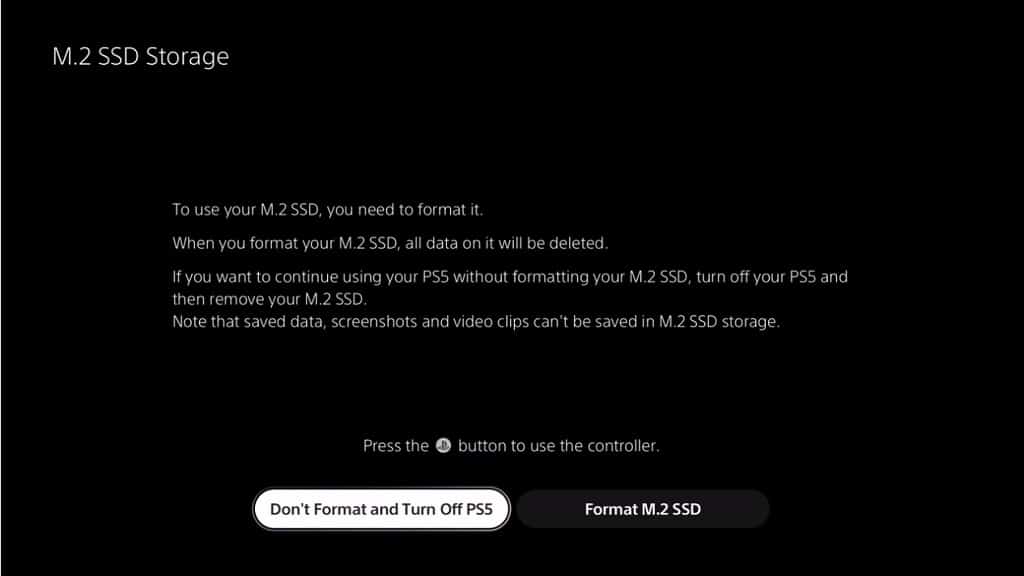
3. You should get a message talking about the M.2 SSD Storage.

4. Press the PS button on your DualSense to use your controller.
5. Select the Format M.2 SSD option to start the formatting process.
6. After the formatting procedure is completed, you should see the sequential read speed of the MSI SPATIUM M480 when it is being used by the PS5 system.
Here, you need to select the OK option to go to the Home Screen.
Where to find MSI SPATIUM M480 in the PS5 menu
Now that you have formatted the SPATIUM M480 on the PlayStation 5, you can begin using it.
To find this MSI solid state drive in the menus, you need to take the following steps:
1. In the Home Screen, go to Settings.
2. From the Settings menu, select Storage.
3. From the Storage menu, select M.2 SSD Storage on the left side.
4. On the right side of the same Storage menu, you should find your SPATIUM M480.
5. You can use the Storage menu to delete and move games from one storage to another. You can also reformat the SPATIUM M480.
