How to fix Final Fantasy VII Ever Crisis network errors

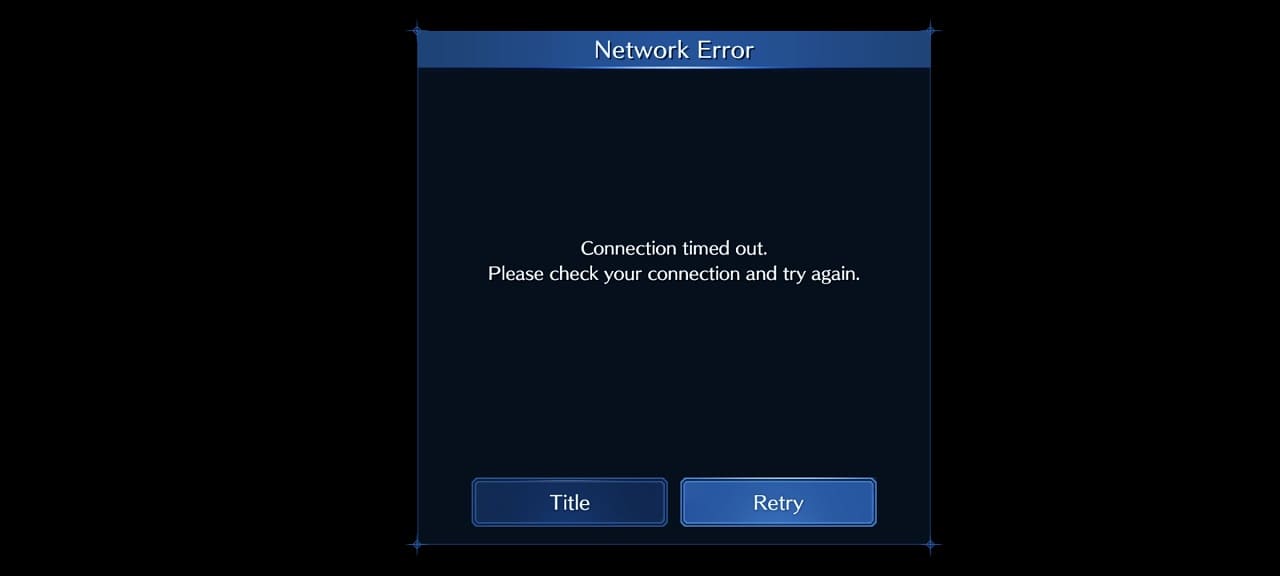
When trying to play Final Fantasy VII Ever Crisis, you may encounter the following Network Error message:

Connection timed out. Please check your connection and try again.

As a result, you won’t be able to play the game until you can connect to the server again. To see how you can fix these network errors, you can take a look at this troubleshooting article from Seeking Tech.
1. For the first step, we recommend checking the official Final Fantasy VII Ever Crisis Twitter page to find any announcements regarding sever maintenance and/or downtime.

If there are server issues, then you won’t be able to log in and play the game until the development team fixes them.

2. If the servers appear to be fine but you are still getting network errors, then you should make sure that the internet connection on your mobile device is stable.

If possible, try to use a Wi-Fi connection over a mobile network. You can also try moving the device around to see if you can get a stronger signal.

3. If you are using a Wi-Fi connection, then you should check to see if you have any concurrent streams or downloads that may be congesting your bandwidth. If there are, then you can try pausing or cancelling them.

4. You should also make sure that you aren’t downloading on the same device you are using to play Final Fantasy VII Ever Crisis. We recommend that you close any other open applications as well.

How to change character appearance in Final Fantasy VII Ever Crisis

In Final Fantasy VII Ever Crisis, you can change the appearances of your party members. To see how you can swap the skins for this mobile RPG, you can take a look at this article from Seeking Tech.

1. To start off, head to the main menu in the game if you aren’t there already.

2. From the main menu, select Party from the left side of the screen.

3. You can then select either Solo Party or Co-op.

4. In the next screen, select the character that you want to swap costumes for.

Note: If you don’t see the character you wanted, then select any character in the party and then tap the “Characters” option located at the button left of the screen. This should open up the Characters menu where you can switch to your preferred party member.

5. After selecting your character, look at the “Main Equip” menu on the right side of the screen.

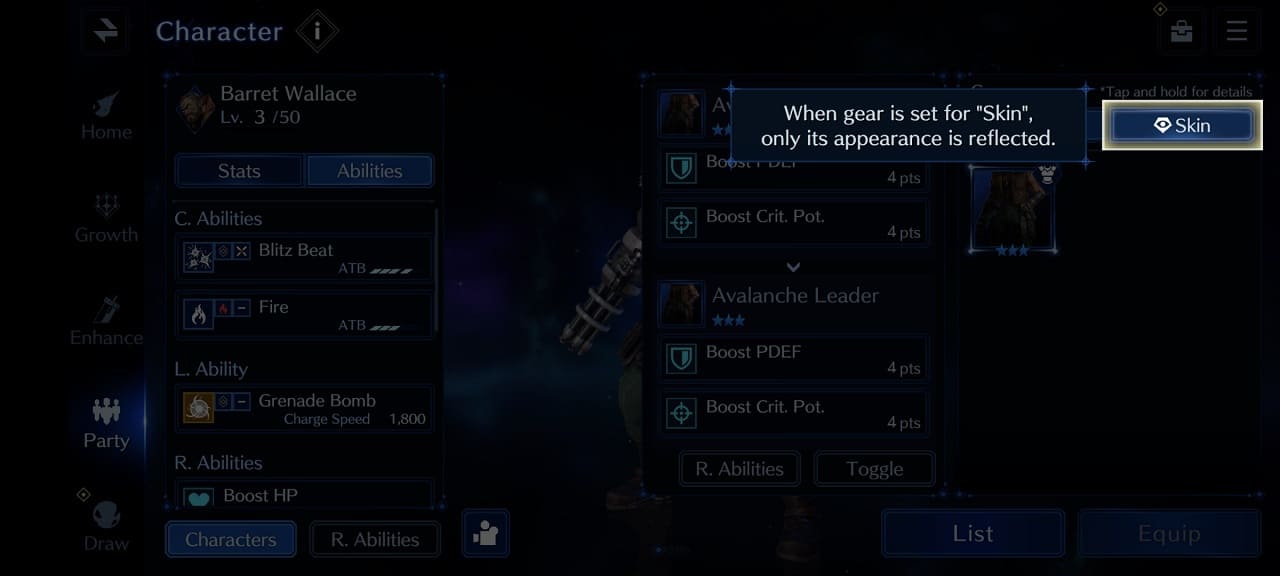
6. From there, select the current skin, which should be the top left box of the Main Equip menu.

7. Afterwards, select the Skin tab.

8. You should then be able to change your character’s appearance with the costumes you have earned playing through Final Fantasy VII Ever Crisis.

How to automatically convert weapons into parts in Final Fantasy VII Ever Crisis

You end up getting a lot of weapons in Final Fantasy VII Ever Crisis. To see how you can automatically convert duplicate weapons that you don’t want into weapon parts for this mobile game, you can take a look at this tutorial from Seeking Tech.

1. For the first step, you need to head over to the main menu.

If you are playing through a mission, you can either finish it or retire from the quest to go back.

2. In the main menu, tap the icon with the three horizontal lines. It should be located on the top right corner.

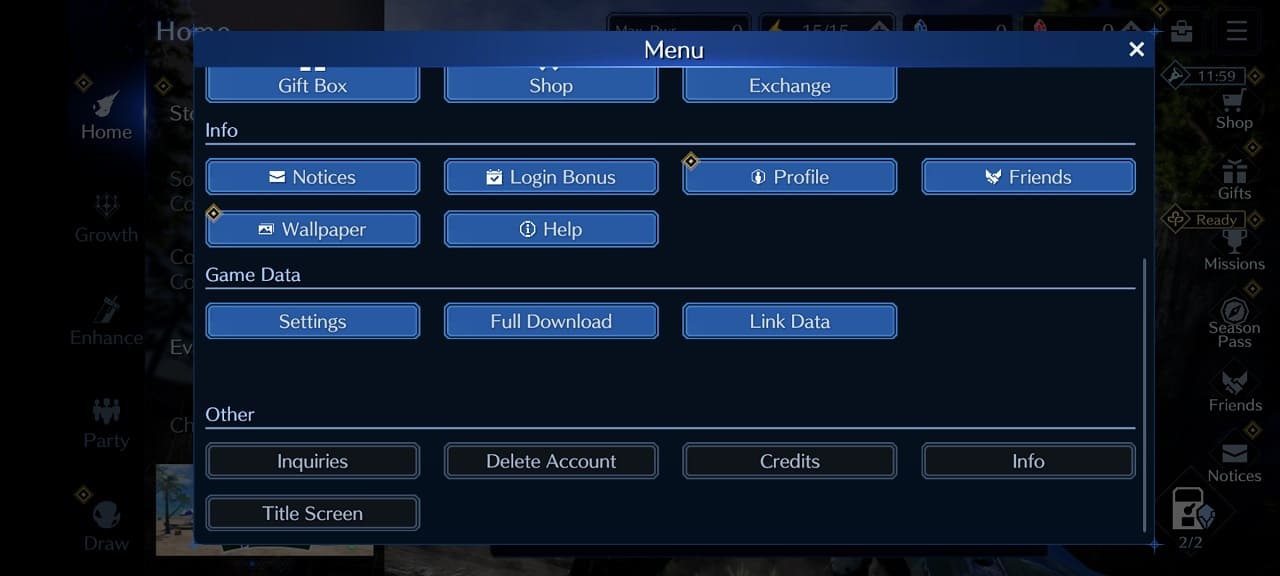
3. After opening the Menu screen, scroll down and then select Settings from the Game Data section.

4. From the Settings menu, select the Game tab on the left side if you aren’t viewing it already.

5. You should see the Auto-Convert option with the following description:

If obtaining a duplicate weapon, weapons of the same or lower rarity will automatically be exchanged for Weapon Parts.

6. Tap the switch located to the right of the option to turn this feature On.

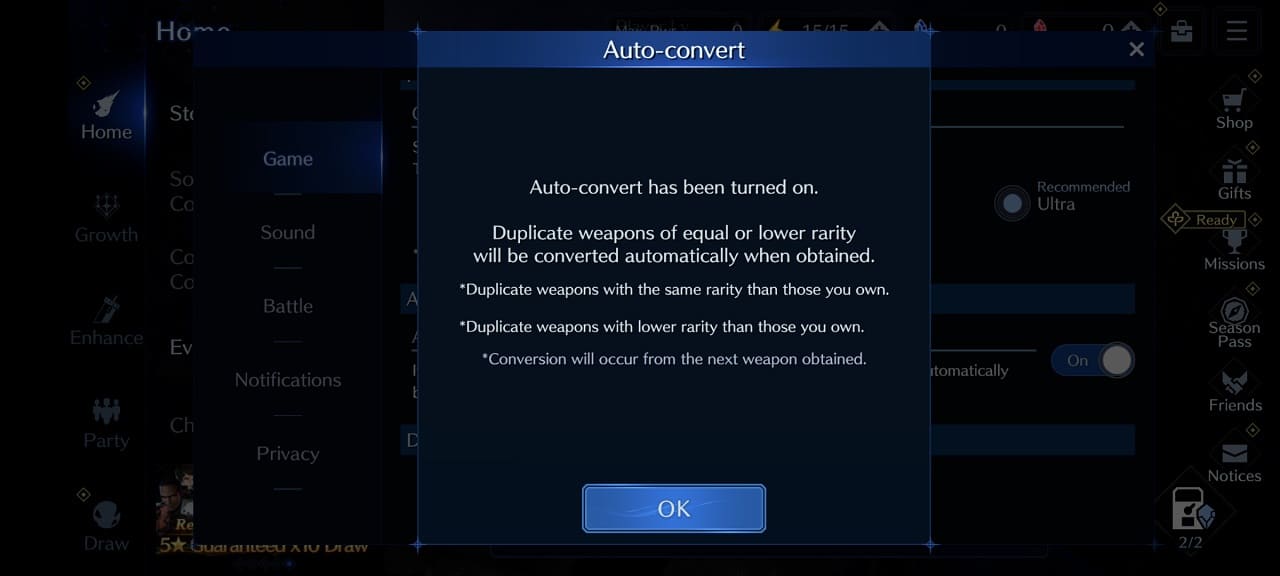
7. You should then see a notification saying that any duplicate weapons you obtained that are of equal or lower rarity will be automatically converted over to weapon parts.

Here, you need to select OK to confirm the change.

How to fully download Final Fantasy VII Ever Crisis

When you download Final Fantasy VII Ever Crisis from the Apple App Store or Google Play Store, you will only be downloading a portion of the game. To see how you can download the full mobile game in advance, you can take a look at this tutorial from Seeking Tech.

1. If you haven’t done so already, make sure you open the game, connect to its server and then head over to the home screen.

2. In the home menu, tap the hamburger icon on the top right side in order to open the Menu.

3. From there, scroll down to the Game Data section.

4. Tap the Full Download option.

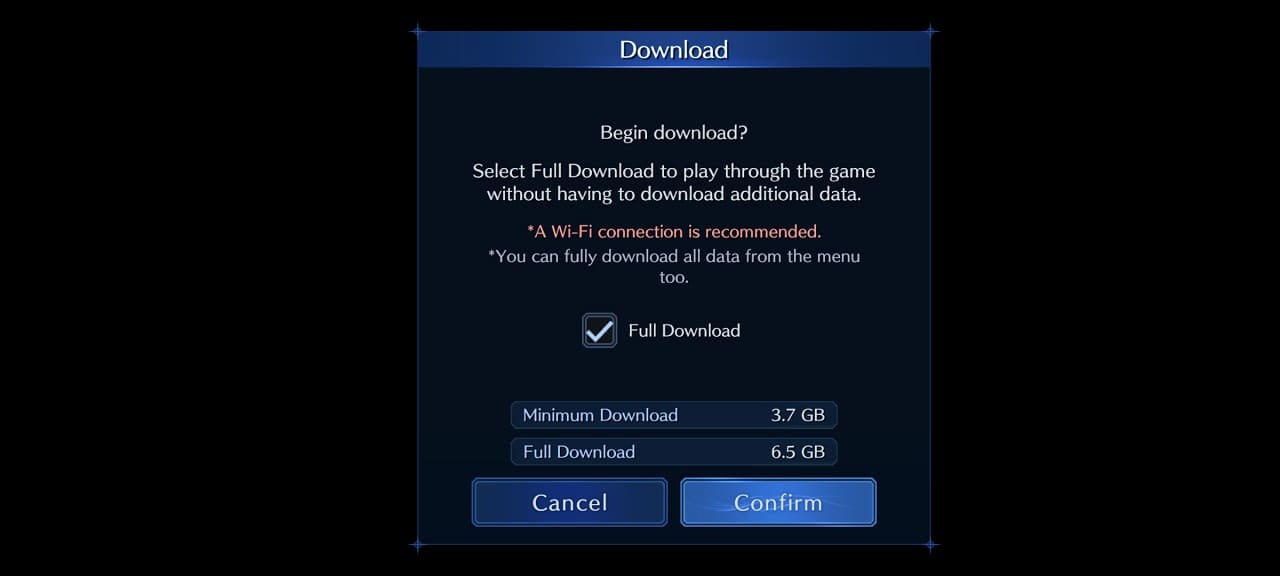
5. If there is a new update available, then you will see a Download notification with the following message:

Begin download? Select Full Download to play through the game without having to download additional data.

You should also see a red text that says, “A Wi-Fi connection is recommended.” So, if possible, try to switch over to Wi-Fi instead of using mobile data.

6. From the Download notification, make sure that the box next to Full Download is checked and then tap Confirm.

7. Wait for the download to complete.

How to fix Payday 3 HDR issues on console

Payday 3 may look a little off in HDR when you are playing the game on a PlayStation 5, Xbox Series X or Xbox Series S. To see how you can potentially fix this display issue, you can check out this troubleshooting article from Seeking Tech.

Before we start, it is important to note that Payday 3 does not officially support HDR on consoles at launch. So, if the game looks off to you, then you can either play it in SDR or convert the SDR image to HDR.

How to play in SDR

To play Payday 3 in SDR, you need to disable any Auto HDR features on your console.

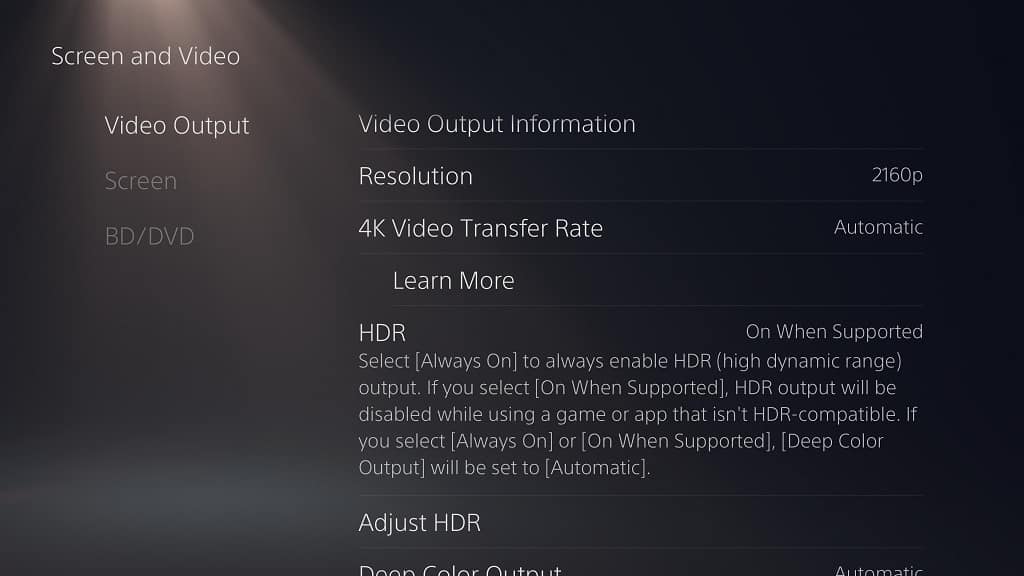
On your PS5, go to Settings > Screen and Video > Video Output > HDR and then make sure that HDR is set to “On When Supported.”

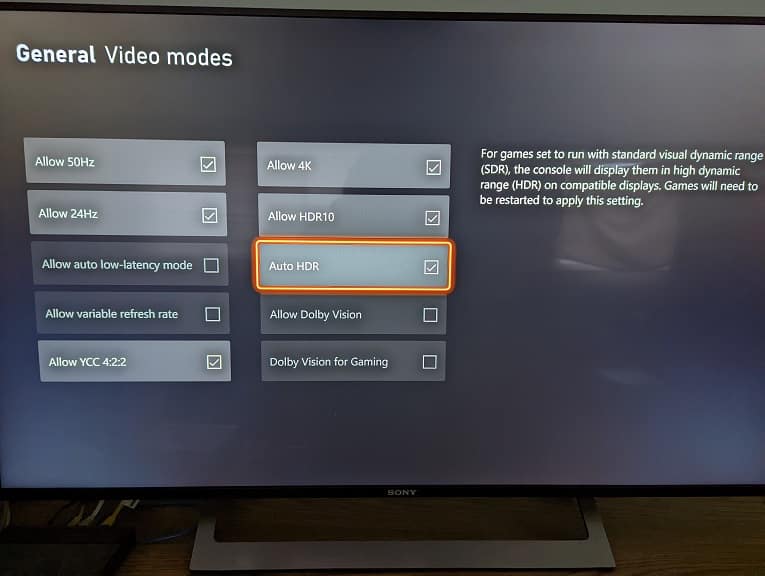
For the Series X or Series S, go to Settings > General > TV & display options > Video modes and then make sure that Auto HDR is not selected.

You should also check the settings of your television screen or monitor to make sure you disable any features that will convert SDR into HDR.

How to play with Auto HDR

If you want to try playing Payday 3 with the SDR image converted over to SDR, then you need to do the following:

For the PS5, go to Settings > Screen and Video > Video Output > HDR and then make sure that HDR is set to “Always On.”

On the Xbox Series X or Xbox Series S, head over to Settings > General > TV & display options > Video modes and then make sure that Auto HDR is selected.

How to adjust the brightness settings

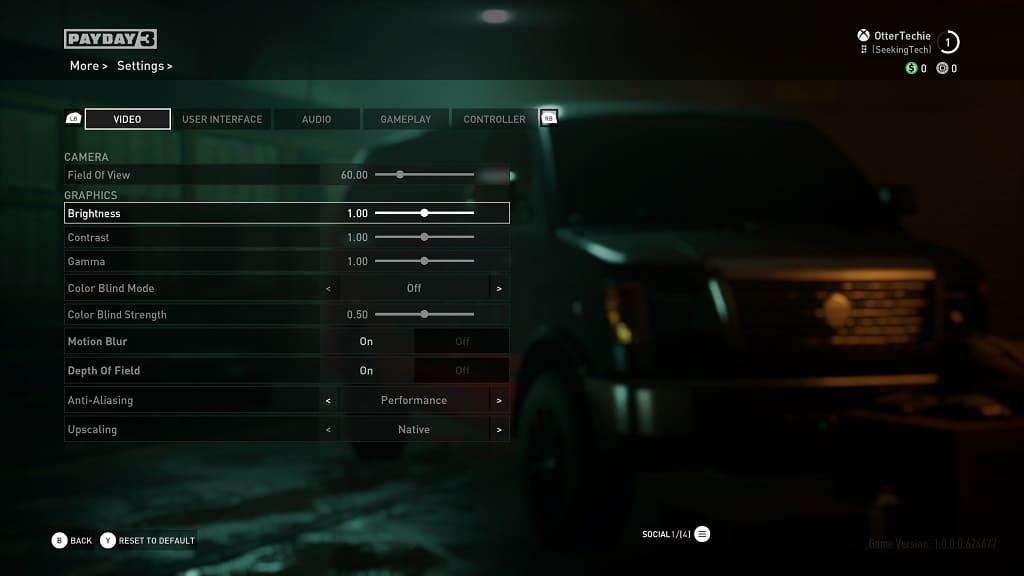
You can also use the in-game menus of Payday 3 to adjust the brightness settings. In order to do so, head over to Settings > Video.

From there, you will be able to adjust the Brightness, Contrast and Gamma levels.

How to prevent motion sickness while playing Payday 3

You may start to feel a little nauseated when playing Payday 3. To see how you can potentially prevent your motion sickness from triggering in this multiplayer heist game, you can take a look at this article from Seeking Tech.

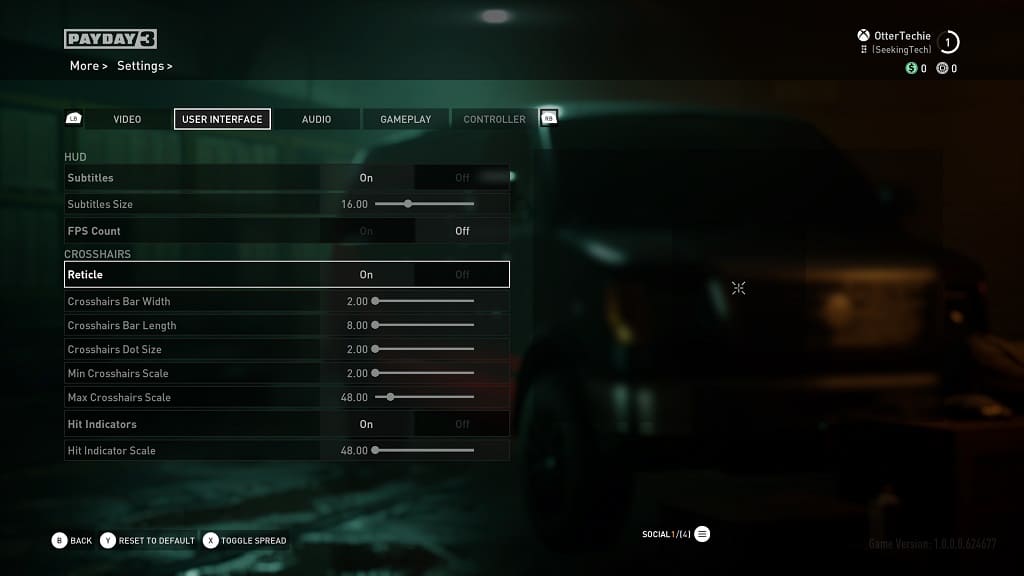
1. If you haven’t done so already, make sure you enable the reticle. This will add a white dot to the middle of screen when you aren’t aiming with a weapon. If you focus on the dot, then it should help alleviate some of your nausea.

To check if you have the reticle enabled, open the Settings menu in the game and then go to the User Interface tab. From there, make sure that the Reticle option is turned on.

2. In the same User Interface tab, you will also be able to adjust the size of the crosshair. You will be able to change the following:

  • Crosshairs Bar Width
  • Crosshairs Bar Length
  • Crosshairs Dot Size
  • Min Crosshairs Scale
  • Max Crosshairs Scale

By making the crosshair more apparent, you should be able to more easily focus your eye on the middle of the screen.

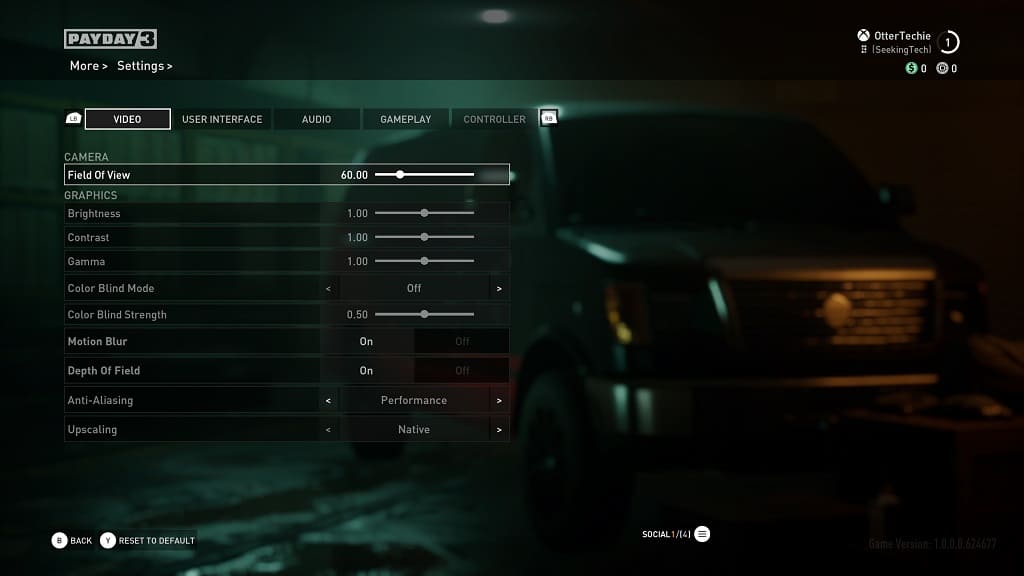
3. You can also try adjusting the field of view. In order to do so, open the Settings menu in Payday 3 and then head over to the Video tab. From there, you will find the field of view slider, which is set to 60 by default.

Try to play around with a different field of view to see if you feel more comfortable. You can change this setting anywhere from 50 to 90.

How to change the resolution and frame rate in Final Fantasy VII Ever Crisis

You are able to change the resolution and frame rate when playing Final Fantasy VII Ever Crisis on your Android or iOS device. To find out how you can do so for this mobile RPG, you can check out this tutorial from Seeking Tech.

1. For the first step, you need to tap the hamburger icon from the main menu. If you are currently playing a mission, then you can either complete it first or retire back to the main menu.

2. From the Menu screen, you need to select Settings from the Game Data section.

3. In Settings, make sure you are viewing the Game tab. If not, tab the “Game” option from the left column.

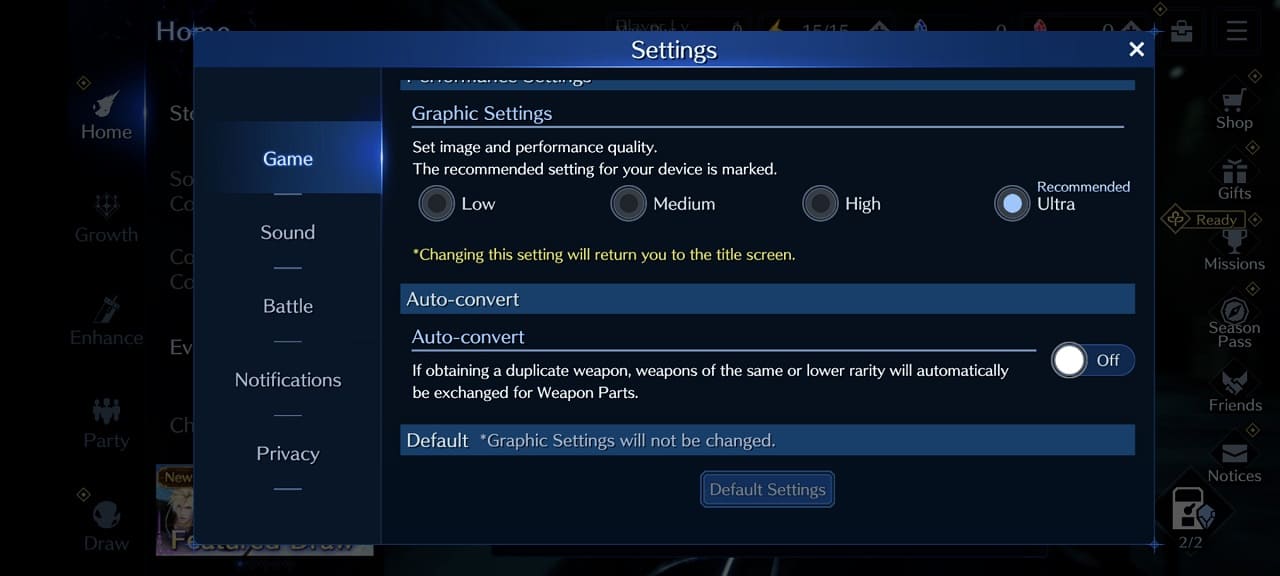
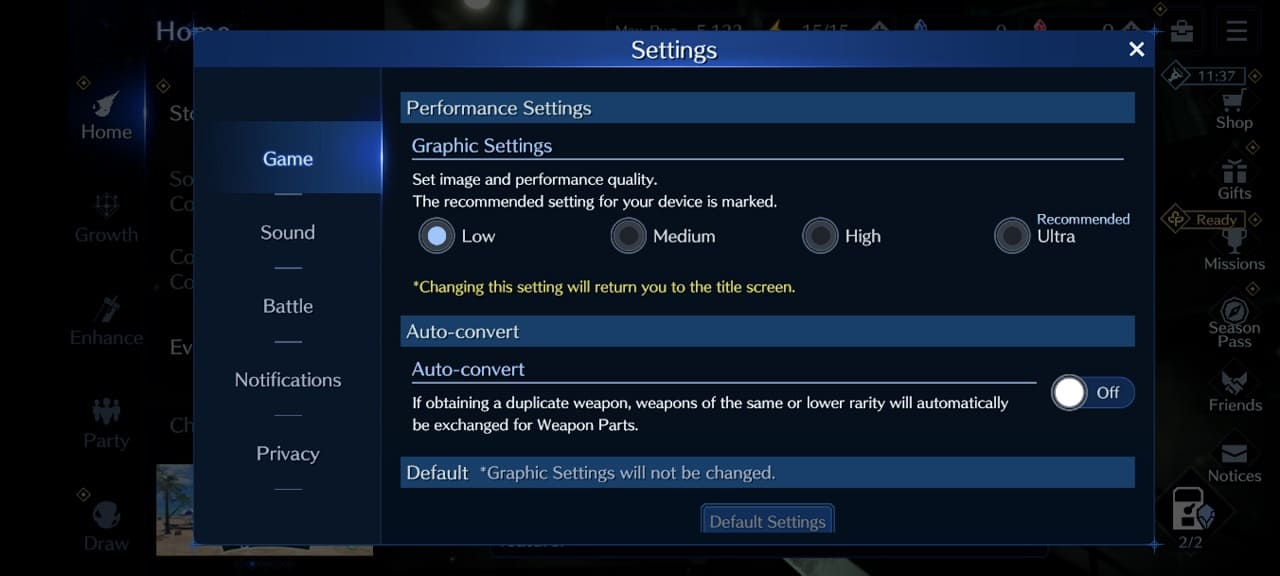
4. From the Game tab, you should be able to see Graphic Settings, which should show the following description:

Set image and performance quality. The recommended setting for your device is marked.

5. You will be able to select between the following options:

  • Low
  • Medium
  • High
  • Ultra

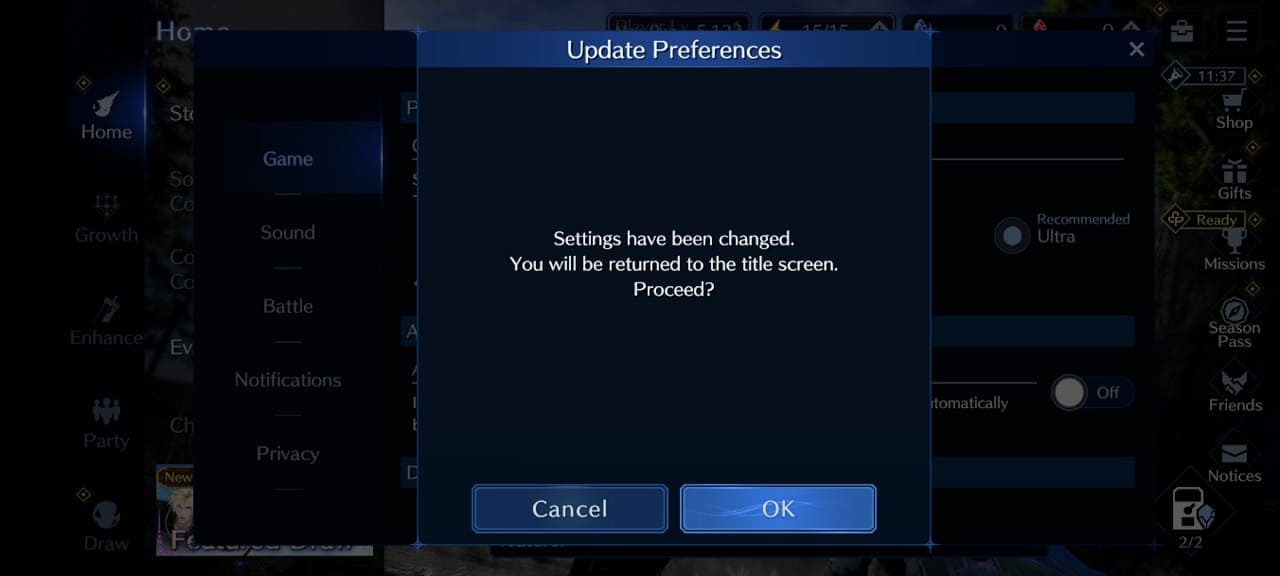
6. After making a selection, you should see an Update Preference pop-up saying the following:

Settings have been changed. You will be returned to the title screen. Proceed?

Tap the OK option to continue.

7. Once the game has been rebooted and reconnected to the online servers, the new graphical settings should be applied.

How to fix Payday 3 aiming issues on consoles

You may find that the aiming controls feels a little bit off when playing Payday 3 on a PlayStation 5, Xbox Series X or Xbox Series S. To see how you can potentially fix these issues in the multiplayer heist game, you can check out this article from Seeking Tech.

1. If you haven’t done so already, you can try lowering the input lag by doing the following:

Enable “Game Mode” on your TV or monitor settings.

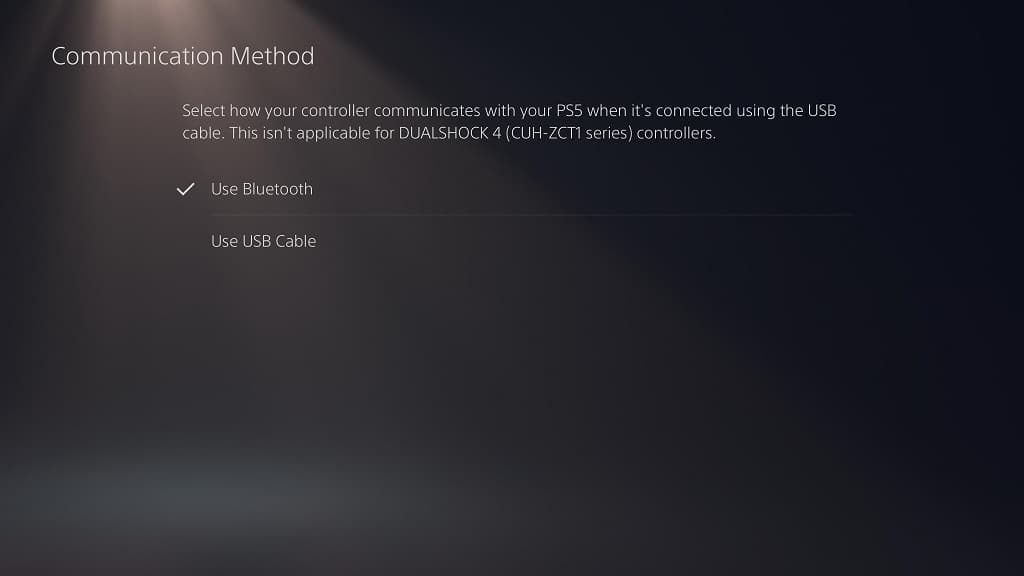
Plug the controller directly into your console. On the PS5, you also need to make sure that you have wired communication enabled by going to Settings > Accessories > Controller (General) > Communication Method > Use USB Cable.

2. You can also adjust the aiming sensitivity settings by using the in-game menus.

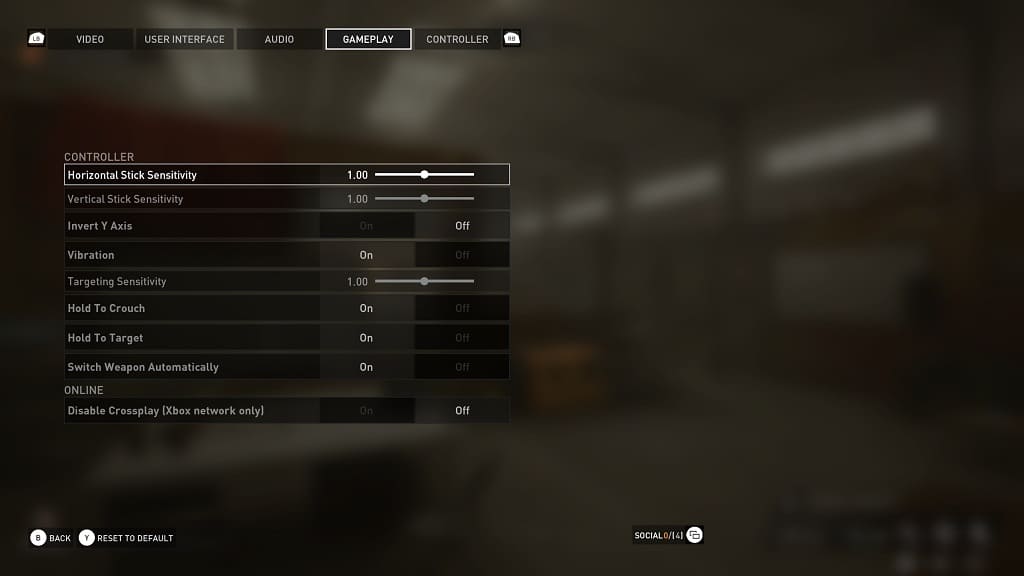
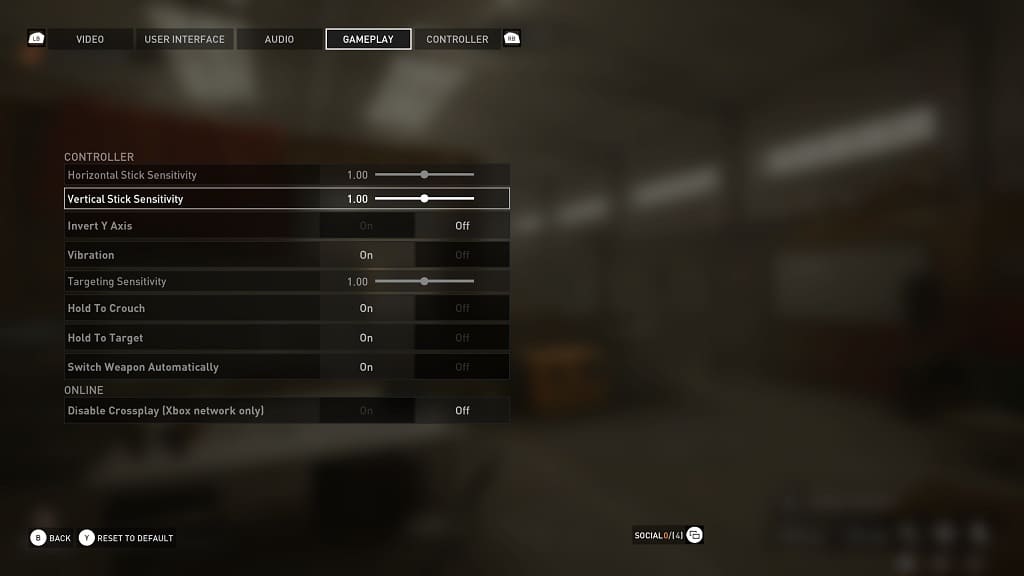
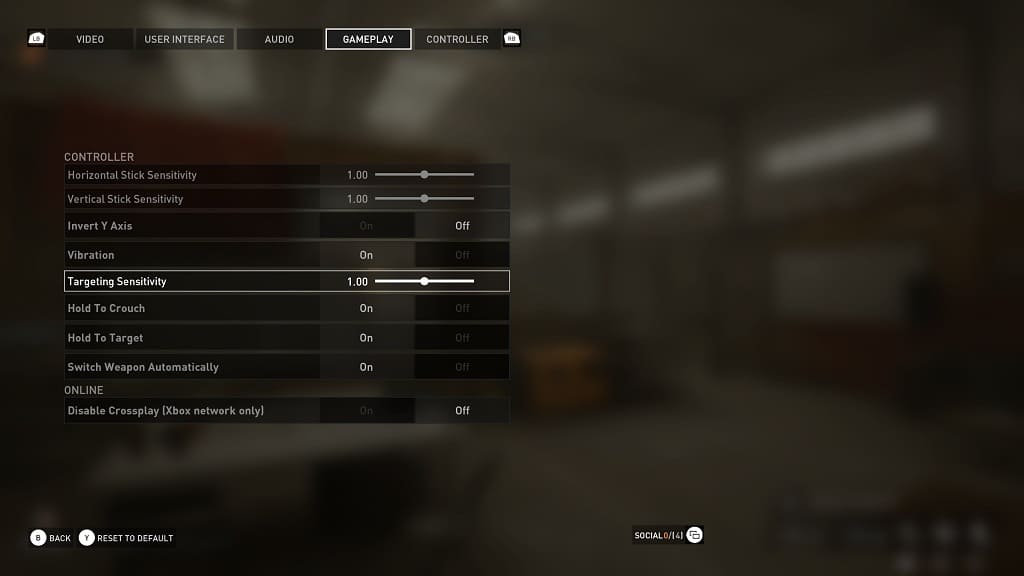
In order to do so, open the Settings menu in Payday 3 and then go to the Gameplay tab. You can then adjust the following:

Horizontal Stick Sensitivity

Vertical Stick Sensitivity

Targeting Sensitivity

You may need to play around with these settings in the game until aiming feels natural.

3. If you have a DualSense Edge or Xbox Elite gamepad, then you can adjust the dead zones for the right analog sticks from the menus of these controllers.

4 Of course, you should make sure you have the latest patch downloaded as well as the new update make improve aiming with the analog stick and/or add new settings such as the ability to adjust the analog acceleration and dead zone.

How to change the subtitle size in Payday 3

You may find that the subtitles in Payday 3 to be either too small or too big. Fortunately, you can adjust the text size. To see how you can properly do so, you can take a look at this tutorial from Seeking Tech.

1. For the first step, you need to head into the Settings menu in the multiplayer heist game. This can be done from either the main menu or pause menu.

2. After getting to Settings, switch over to the User Interface tab.

You can change tabs in Payday 3 by using the L1 and R1 buttons of a PlayStation controller or LB or RB buttons on an Xbox gamepad.

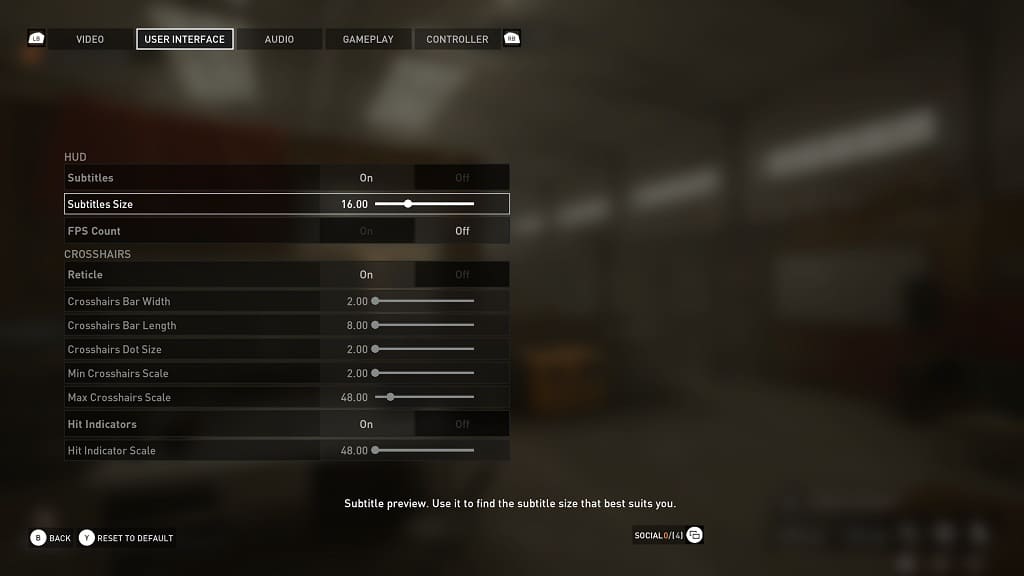
3. From the User Interface tab, move the menu cursor down to Subtitle Size.

4. By default, this setting is set to 16.00. You are able to adjust the value, in increments of 1.00, from 8.00 to 32.00.

At the bottom of the screen, you should see a preview of the new subtitle size with the following wording:

Subtitle preview. Use it to find the subtitle size that best suits you.

5. After changing the text size, you can exit the Settings menu and then return to playing the latest Payday videogame.

How to fix Payday 3 invite issues on Xbox Series X and S

You may not be able to invite friends to your match if you are playing the Xbox Series X or Xbox Series S versions of Payday 3. To see how you can fix this inviting issue, you can take a look at this troubleshooting article from Seeking Tech.

According to a notification from the official Payday the Game website, you currently can’t invite your friends to play the game through the Xbox menus. Instead, the invitation needs to be sent by using the in-game menus in Payday 3.

The development team at Starbreeze Studios intends to fix this issue in a future update. For now, they advised using the in-game options for invites. You can find the full statement regarding this matter below:

There’s currently an issue where Xbox heisters can’t invite their friends via the Xbox shell. Invites to your friends in-game still function as expected, so use this feature until the problem is resolved.

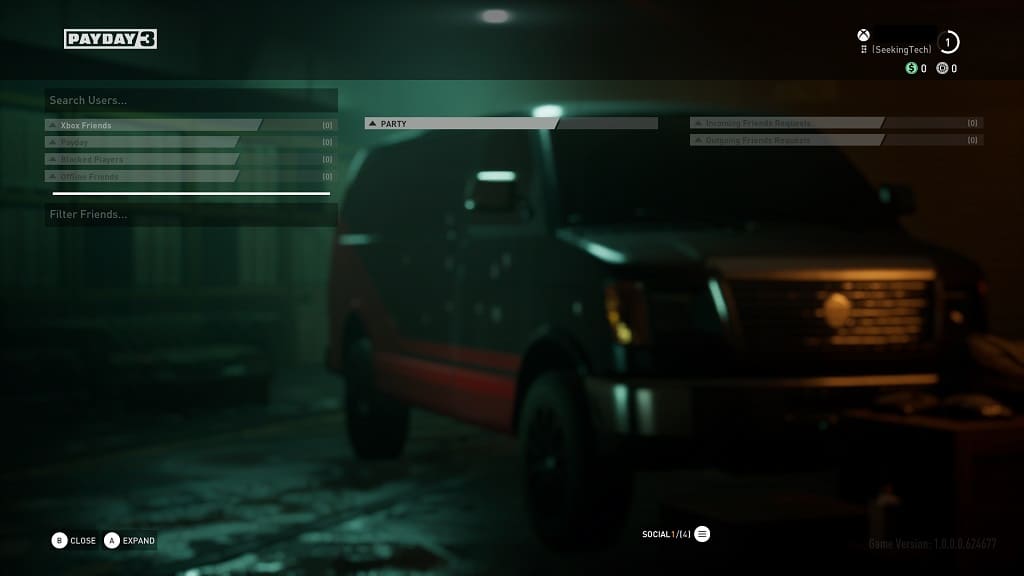
To invite other players by using the in-game menus of Payday 3, you need to open the Social menu.

This can be done by pressing the Menu button on the Xbox controller from the main menu. If you are viewing the Settings menu from the pause screen, then you need to press the View button instead to open the Social screen.