The X90K is a full array 4K LED that came out in 2022. You can check out this guide at Seeking Tech to see what recommend settings for this Sony television set you should be using when it comes to playing games on your PlayStation 5, PlayStation 5 Digital Edition, Xbox Series X and/or Xbox Series S.
This article should cover all currently available screen size options of the X90K, which includes the following models:
- 55″ Sony 4K Ultra HD TV X90K Series BRAVIA XR Full Array LED Smart Google TV (XR-55X90K)
- 65″ Sony 4K Ultra HD TV X90K Series BRAVIA XR Full Array LED Smart Google TV (XR-65X90K)
- 75″ Sony 4K Ultra HD TV X90K Series BRAVIA XR Full Array LED Smart Google TV (XR-75X90K)
- 85″ Sony 4K Ultra HD TV X90K Series BRAVIA XR Full Array LED Smart Google TV (XR-85X90K)
1. To start off, we recommend checking to see if there is a new firmware update available for your television set. This is because a recent software helped improved the peak HDR brightness output when Variable Refresh Rate was enabled. There may be other improvements available as well as may optimize the display of PS5, Xbox Series X and Xbox Series S games.
If you don’t know how to update the firmware of your X90K, then you can follow the steps in this tutorial.
2. You should also check to see if there is a new firmware update on your console as well as it may come with enhancements and or improvements.
3. Once you are sure that both your TV and gaming system has been updated, make sure that you are using a HDMI 2.1 cable to connect your console to either the HDMI #3 or HDMI #4 ports of your X90K.
Keep in mind that the HDMI #1 and HDMI #2 ports are only HDMI 2.0. Therefore, you need to use the third and fourth numbered ports instead in order to take advantage of the extra video signal bandwidth.
4. Using the remote of your Sony LED television set, you need to head over to the Settings menu and then select Display & Sound > Picture > Video Signal. Afterwards, select the HDMI port that is currently connected to the gaming system.
Once you get to the HDMI Signal Format menu, make sure you select the Enhanced Format (VRR) option if you have a PlayStation 5 or PlayStation 5 Digital Edition console.
For the Xbox Series X or Xbox Series S, you can select Enhanced Format (Dolby Vision) if you are planning to play games that are compatible with the Dolby Vision format. If you don’t plan on using this feature, then you can choose Enhanced Format (VRR) instead.
5. Go back to the first page of Settings on your X90K and then go to Display & Sound > Picture. Afterwards, you need to enable Auto Picture Mode so that you can activate the Auto Low Latency Mode.
With this mode, the TV will automatically switch over to the game mode when you are playing your PS5, Xbox Series X or Xbox Series S.
6. From the same Picture menu, you need to disable the Ambient Light Sensor, Light Sensor, CineMotion and Motionflow features.
Ambient Light Sensor and Light Sensor may cause your X90K to look dimmer. CineMotion and Motionflow could add various visual artifacts and add input lag.
7. Also in the Picture menu, go to Video Signal and then select HDR Mode. Afterwards, you need to select Auto.
You should now be done with optimizing your X90K for the new consoles.
8. On the console side, you need to make sure that you are using the right settings as well.
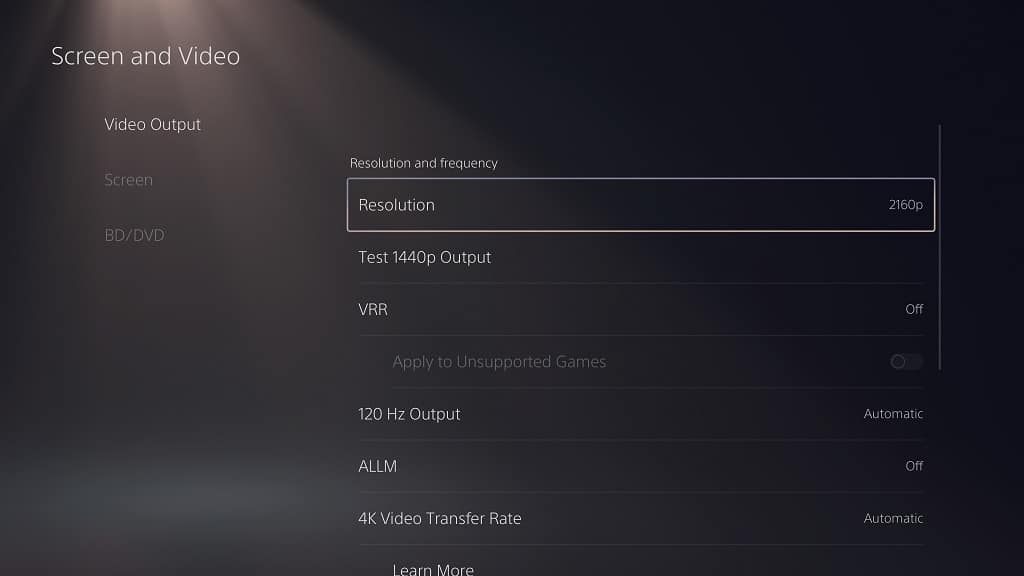
On the PS5 or PS5 Digital Edition system, you need to open the Settings menu and then head over to Screen and Video > Video Output.

From there, you need to set Resolution to 2160p and then HDR to On When Supported. You also need to make sure that the VRR, 120 Hz Output, ALLM, 4K Transfer Rate, Deep Color Output and RGB Range settings are all set to Automatic.
Finally, select Adjust HDR from the Video Output menu. Afterwards, follow the instructions that appear on screen to match the HDR brightness output of your PlayStation 5 to your X90K.
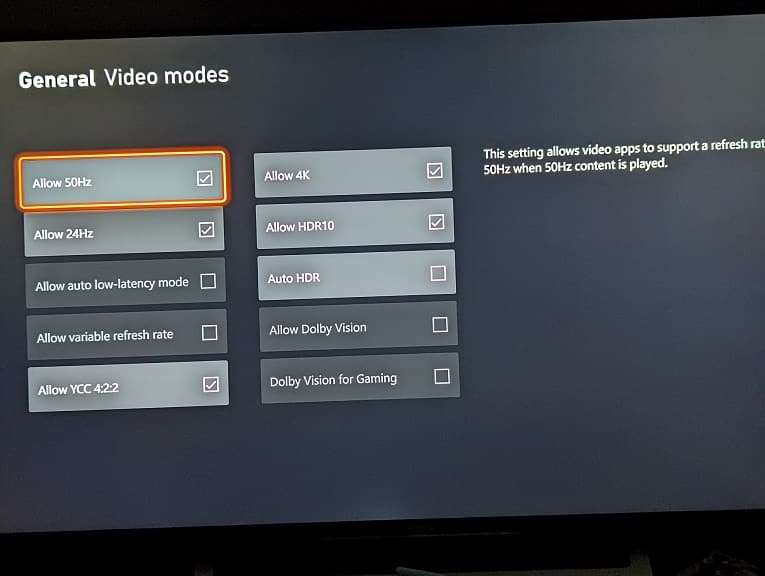
On the Xbox Series X and Xbox Series S, go to the Settings menu. From there, head over to General > TV & display options > Video modes.

Inside the Video modes menu, you need to make sure that the following boxes are checked:
- Allow auto-low latency mode
- Allow variable refresh rate
- Allow 4K
- Allow HDR10
- Allow Dolby Vision
- Dolby Vision for Gaming (if you are planning to use this HDR format)
You should also make sure that Auto HDR is unchecked; otherwise, non-HDR games may end up looking a little off in some cases.
You then need to back out to the TV & display options menu. From there, make sure that Resolution is set to 4K. Furthermore, you need to select the Calibrate HDR option and then follow the on-screen instructions to optimize the HDR brightness output.
