The Patriot Viper VP4300 is a M.2 2280 solid state drive that uses a PCIe Gen4 x4 NVMe and has a maximum sequential reading speed of up to 7,400 MB per second. These specifications mean that the VP4300 is compatible with the PlayStation 5 and PlayStation 5 Digital Edition.
If you want to install this SSD to the PS5, then you can take a look at this step-by-step tutorial from Seeking Tech.
This guide will cover the following capacities:
- 1 TB Viper VP4300 M.2 2280 Solid State Drive (VP4300-1TBM28H)
- 2 TB Viper VP4300 M.2 2280 Solid State Drive (VP4300-2TBM28H)
Installing the graphene and aluminum heatshields to VP4300
If you haven’t done so already, you need to install the included graphene and aluminum heatshields to VP4300. You can find the instructions, with images, for installing the two heatshields in the quick start guide of the SSD.
Sony recommend you use a heatsink with a M.2 solid state drive as excessive heat could cause issues with the SSD and the PlayStation 5 system.
So, while you can still use the VP4300 with the PS5, with one or even none of its heatshield add-ons, we highly recommend using both to optimize the heat dissipation.
Moving important data off of VP4300
The Patriot Viper VP4300 will need to be formatted for use with the PlayStation 5. Formatting the SSD will remove all of the previous data off of the drive.
So, if you have important files stored on the VP4300 that you can’t afford to lose, then you should connect the SSD to a computer first and then moved over the files to another drive before installing it to the PlayStation 5.
Upgrading to latest PlayStation 5 firmware
The Viper VP4300, as well as other compatible M.2 solid state drives, does not work with the PlayStation 5 without the latest firmware update.
Therefore, we recommend you update to the newest firmware available of your PS5 system. You can trigger a prompt for an update, if there is a new version available, when you turn on your PlayStation 5 while it is connected to the internet.
You can also manually update the firmware by doing the following:
1. Go to the Home Screen menu on the PlayStation 5. This is the main system menu where you can select a game to launch as well as perform other tasks.
If you are currently playing or game or using an app on the PS5, you can get to the Home Screen quickly by pressing and holding the PS button on the DualSense controller.
2. In the Home Screen, you need to go to Settings, which you can find in the upper right corner of the menu in between the Search option and your profile picture.
3. Inside the Settings menu, you need to go to System.
4. Once you are in the System menu, select the System Software option from the list of the left side.
5. On the right portion of the same System menu, you then need to select the System Software Update and Settings option.
6. Inside the System Software Update and Settings menu, select Update System Software.
7. In the Update System Software, you can choose to update over the internet or with an USB drive.
How to install VP4300 to PS5
The next step is to physically install the Patriot Viper VP4300 into the PlayStation 5.
In order to do so, you need to take the following steps:
1. Turn off your PlayStation 5 and make sure it is not displaying any lights.
2. Unplug any cables that are currently attached to the PS5 system.
3. If you have the stand installed, make sure you remove it as well.
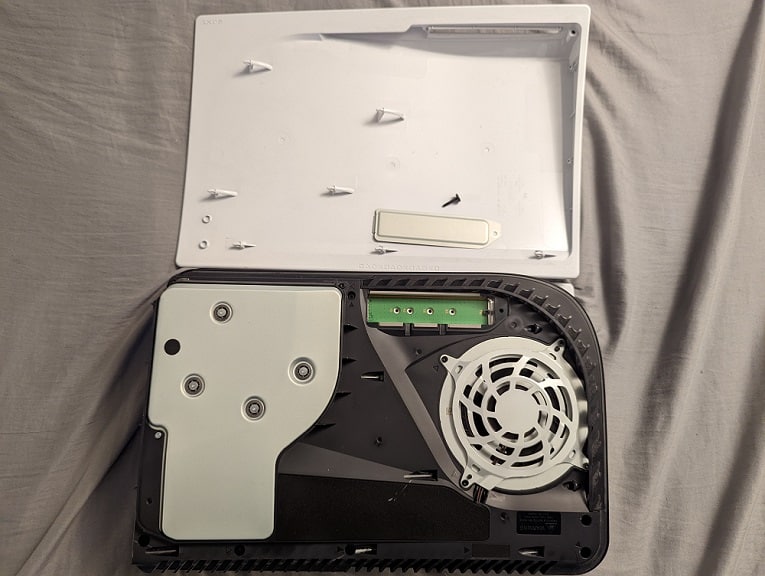
4. Next up, you need to lay your system down on a flat surface with the side with the PS logo being the bottom. The base of the system, which has all the trademark logos as well as the screw hole for the stand, should be facing you.
5. From your point of view, grab the upper right corner of the outer cover. Gently pull the outer cover upwards and the pull it towards you.
If done correctly, you should be able to remove the outer cover, which will give you access to the M.2 slot of the PlayStation 5.
6. Locate the metal M.2 slot cover, which is a long rectangle. Use a cross-head screwdriver to remove the screw keeping the cover locked in and then remove the cover.

7. Inside the M.2 slot, use your screwdriver again to remove the screw and spacer you find inside.
8. Place the removed spacer into the 80 screw hole of the M.2 slot.
8. Now it is time to insert your Viper VP4300.
Make sure that the connector of your solid state drive is correctly aligned with the M.2 connector of the PlayStation 5.
You can then insert the Viper VP4300 into the M.2 connector of the PS5 from a diagonally upwards position.
9. Afterwards, push down on the other end of the VP4300 and then use a screw on the screw hole to hold the SSD down.
10. After installing the VP4300, you need to put the metal M.2 slot cover back on and secure it with the same screw you previously removed.
11. Slide the outer cover of the PlayStation 5 system right back into place.
How to format VP4300 for PS5
Fortunately, formatting the VP4300 for the PlayStation 5 is a lot less complicated.
To format, you need to do the following:
1. With the Patriot Viper VP4300 installed inside, reconnect the power and HDMI cables you previously unplugged to the PS5.
2. Turn on your PlayStation 5 system.
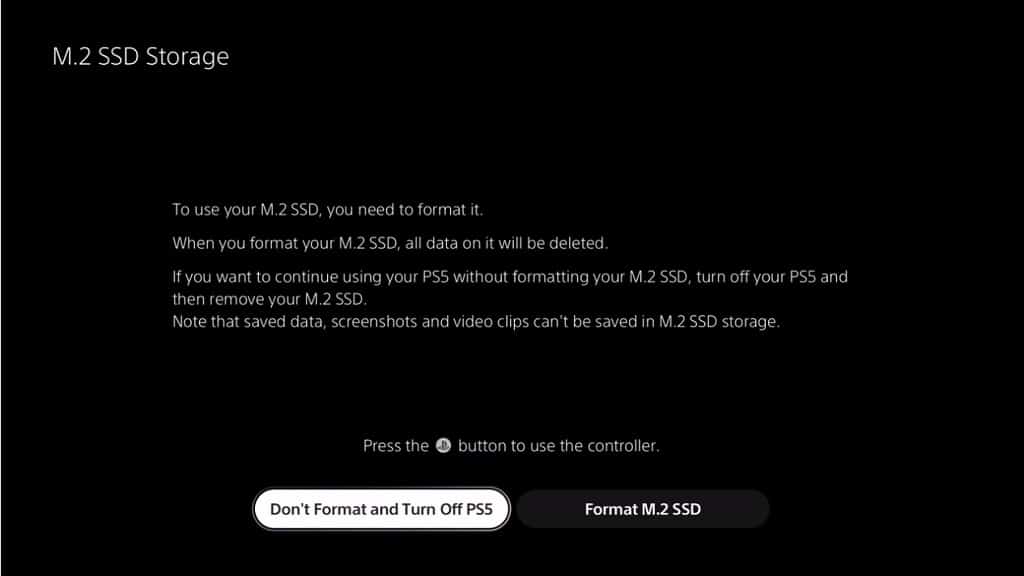
3. You should get a message about the M.2 SSD Storage.

In this message, you first need to press the PS button on your DualSense to use the controller.
You then need to select the Format M.2 SSD option to start the formatting.
4. After your VP4300 have been formatted, you will see another message that will show off the sequential read speed of your storage drive on the PlayStation 5.
Select the OK option here to continue to the Home Screen.
Where to find VP4300 in the PS5 menu
If you want to find where your newly installed VP4300 is located in the menu of the PlayStation 5, you need to take the following steps:
1. From the Home Screen, you need to go into Settings.
2. Once you are in the Settings menu, select the Storage option.
3. From the Storage menu, select the M.2 SSD Storage from the left side.
4. On the right side from the same Storage menu, you will find information about your VP4300.
In the same Storage menu, you can also reformat your M.2 solid state drive as well as move content between the different storage types available.
