With the PlayStation 5, as well as PlayStation 5 Digital Edition, you can reassign buttons on your DualSense and DualShock 4 controllers. If you are interested in doing so, then you can follow this tutorial at Seeking Tech.
How to remap DualSense and DualShock 4 buttons on PS5
To remap the buttons on your controller, you need to take the following steps:
1. Turn on your PS5 and select your user profile. This will bring you to the home screen menu. If you are already playing a game or using an app, you can press and hold the PS button on your controller until the home screen shows up.
2. The remapped buttons will be tied to your user profile. To switch user profiles, you need to select your profile picture from the home screen menu (it is located on the upper right corner of the screen). Afterwards, select the “Switch User” option in the new pop-up menu.
3. After making sure you are on the right profile, go to “Settings” from the home screen (this is also located on the upper right corner of the screen, right next to your profile picture).
4. In the new “Settings” menu, select the “Accessibility” option.
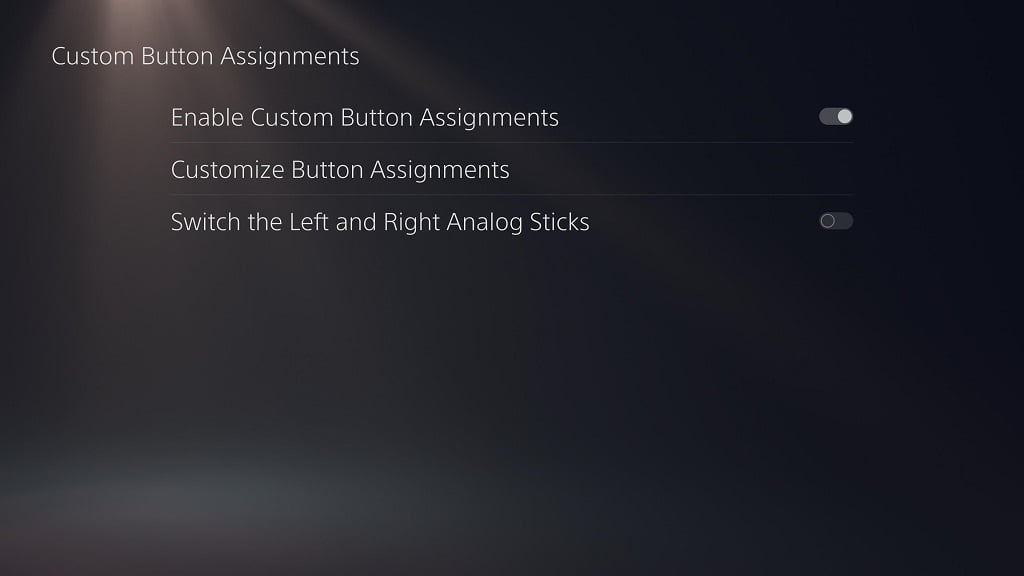
5. In the “Accessibility” menu, select the “Controllers” option on the left side of the screen and then the “Custom Buttons Assignments” option on the right side of the screen.
6. In the “Custom Buttons Assignments” menu, select the “Enable Custom Button Assignments” option if it is disabled. You can tell that this feature is enabled by looking at the switch to the right of the wording. The feature is turned on when the switch is white. The other options below will also become selectable.
7. After enabling the “Custom Button Assignments” option, select “Customize Button Assignments” from the same menu screen.
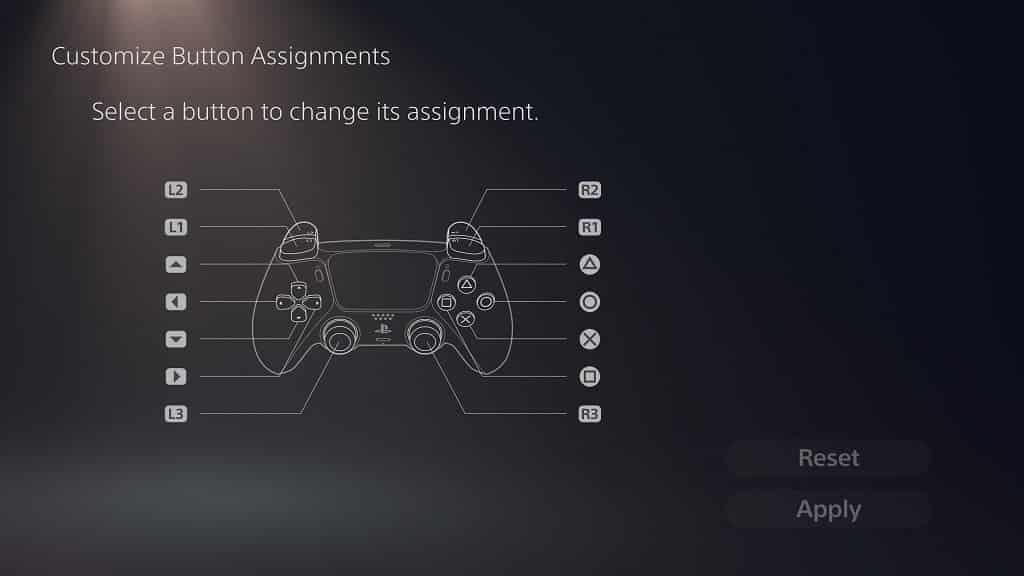
In the “Custom Button Assignments” menu, you will be able to remap the following buttons:
- L1
- L2
- L3
- R1
- R2
- R3
- Triangle
- Circle
- Cross (X)
- Square
- Up Directional Button
- Left Directional Button
- Down Directional Button
- Right Directional Button
You can switch between any of the aforementioned buttons. For example, if you change the default functionality of the Triangle button to the X button, the default functionality of the X button will automatically change to the Triangle button as well. Keep remapping the buttons until you achieved your desired results.
8. Once you are satisfied with the changes, you can select the “Apply” option to save your remapped button layout.
Common Button Changes
Some of the more common button remaps are L1 to L2 and R1 to R2. Before the PlayStation 4, a lot of games, especially those from the first-person and third-person shooting genres, use the L1 and R1 buttons for aiming and shooting.
The other common change is from X to O. Before the PlayStation 5, a lot of videogames originating from Japan will use the O button as confirmation and the X button as cancel. This button assignment would either stay the same or be switched when a Japanese game is localized for other regions such as North America.
Some gamers may also like to change the functionally of the L3 and R3 as pushing down on the left and right analog sticks of the DualSense or DualShock 4 may not feel all that great, especially if you are using these buttons to run or perform a melee attack.
Can you remap PS, share and options button on PS5?
You can’t remap any of the PS, share or options button on your DualSense/DualShock 4 controller when using the PlayStation 5.
How to disable DualSense and DualShock 4 remapped buttons on PS5
If you want to disable using the remapped buttons on the PlayStation 5, you must take the following steps:
1. From the home screen, go to the aforesaid “Settings” menu.
2. In “Settings,” go to “Accessibility.”
3. In the new screen, select “Controllers” on the left side and then “Custom Button Assignments” on the right side.
4. Select the “Enable Custom Button Assignments” option. You can tell that this setting is disabled if you look at the switch to the right of the wording. If the switch is black (and the other two options below it become non-selectable), then the custom button assignments are disabled.
4. To use the remapped buttons again, you have to re-enable the “Enable Custom Button Assignments.” Doing so will bring back your previous customized buttons layout.
How to reset DualSense and DualShock 4 remapped buttons on PS5
If you would like to reset the remapped controller buttons on the PlayStation 5, you can take the following steps:
1. Return to the aforementioned “Custom Button Assignments” menu. You can do so by going from the home menu to “Setting,” then ““Accessibility,” then “Controller” and, finally “Custom Button Assignments.” Make sure “Enable Custom Button Assignments” is turned on and then select “Custom Button Assignments.”
2. In the menu, select the “Reset” option on the bottom right corner.
How to switch the DualSense/DualShock 4 left and right analog sticks on PS5
To switch the functions of the left and right analogs on the PlayStation 5, you need to do the following:
1. Return to the “Custom” Button Assignments” menu by heading to home screen and then selecting the following options in subsequent order: “Settings,” “Accessibility,” “Controllers” and “Custom Button Assignments.”
2. Make sure that the “Enable Custom Button Assignments” is turned on and then select the “Switch the Left and Right Analog Sticks” option.
How to invert DualSense and DualShock 4 controls on PS5
If you want to invert controls systemwide on your PlayStation 5 for your DualSense and DualShock 4, you can take the following steps:
From the home screen menu, head to “Setting.”
1. In the “Settings” menu, select the “Saved Data and Game/App Settings” from the available options.
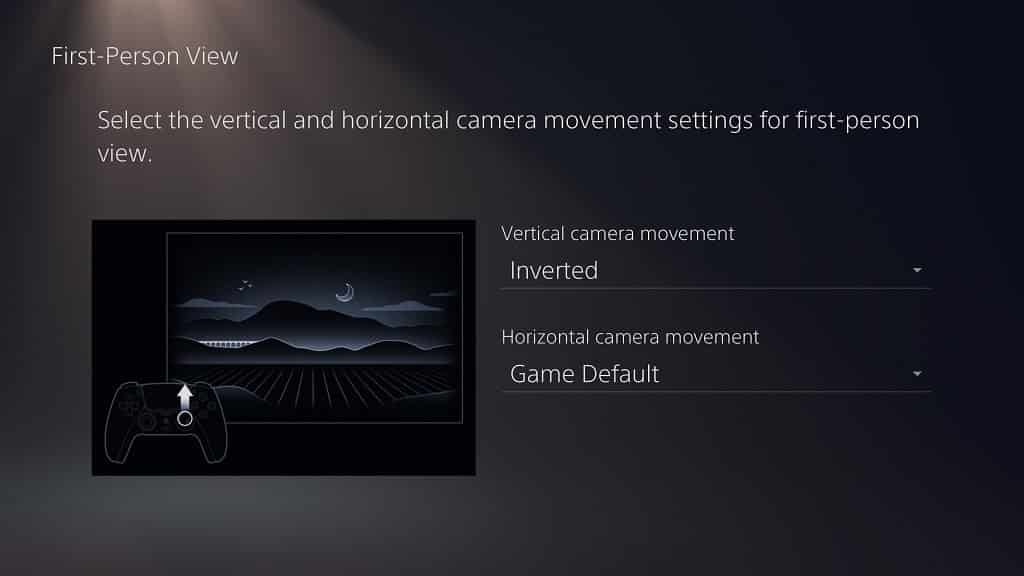
2. In the new “Saved Data and Game/App Settings” menu, select “Game Presets on the left side of the screen and then either “First-Person View” or “Third-Person View” on the right side of the screen.
3. In the new menu, you will be able to change two settings: “Vertical Camera Movement” and “Horizontal Camera Movement.” For both, you have three options “Game Default,” “Normal” or “Inverted.” If you select “Normal” or “Inverted” you will see a short video demonstrating the effect of the new setting.
4. Once you are satisfied with the changes, you can back out, which is the O button on your controller be default, to confirm the changes.