Thanks to a recent firmware update, you can now automatically switch between SDR and HDR on the PlayStation 5 and PlayStation 5 Digital Edition.
If you are interested in this new feature, then you can take a look at this step-by-step guide at Seeking Tech to see how you can enable it.
Upgrade to the latest PS5 firmware
Without the latest firmware for your PlayStation 5, you would have to manually enable and disable HDR. So, if you haven’t done so already, you need to update to the latest software versions of your system.
To manually download the newest firmware, you can take the following steps:
1. Make sure that you are in the home screen. This is the main menu where you select which game to play.
2. From the home screen, head into “Settings.” You can find the “Settings” option on the upper right corner of the screen with the gear cog icon.
3. Inside the “Settings” menu, head to “System.”
4. Inside the “System” menu, select to “System Software” option from the left side and then the “System Software and Update Settings” option on the right side of the same screen.
5. Inside the “System Software and Update Settings” menu, select the “Update System Software” option.
6. In the “Update System Software” menu, select “Update Using Internet.”
You can also select “Update from USB Drive” if you have the latest firmware update on a USB drive that is connected to your system. Thie update file must be in the PS5 > UPDATE folder in order for the system to recognize it and initiate the firmware update.
How to enable auto switching for SDR and HDR on PS5
In order to enable the auto-switching for SDR and HDR on the PlayStation 5, you need to take the following steps:
1. As we stated above, make sure you have the latest firmware for your PlayStation 5.
2. Go to the home screen, which is the main menu where you can select games to play.
3. In the home screen, select the “Settings” option, which has a gear cog icon located on the top right corner of the screen.
4. In the “Settings” menu, select “Screen and Video.”
5. In the “Screen and Video” menu, select the “Video Output” option on the left side and then the “HDR” option.
6. In the pop-up menu, you will have three choices.
The “Off” option will disable HDR for all game and video content, including those that support HDR.
The “Always On” option will enable HDR for all games and other content, including those that can only display in SDR.
The “On When Supported” option will enable HDR when it is supported and disable the SDR to HDR conversion when only SDR is supported. This option is helpful since you don’t have to manually enable or disable HDR depending on the content.
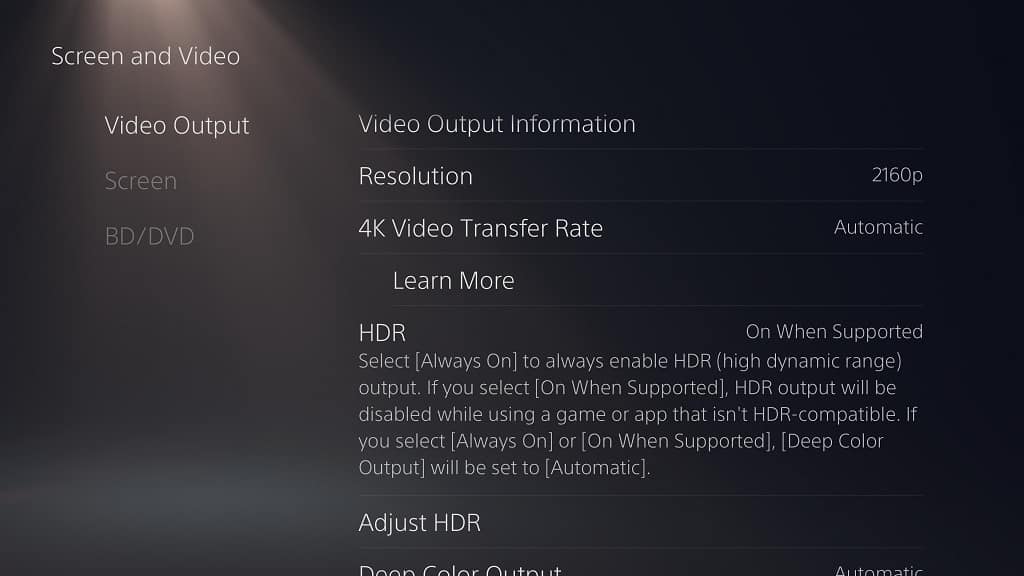
Keep in mind that using the “Always On” option or the “On When Supported” option will set “Deep Color Output” to the “Automatic” setting. The “Deep Color Output” setting is required to be enabled for HDR. If you set “Deep Color Output” to “Off,” then HDR will automatically be disabled as well.
It should also be noted that converting SDR to HDR will change how a game will look for better or worse. We recommend testing out both the “Off” and “Always On” options to see which you prefer. If you want to use the developer’s intent, then we suggest using the “On When Supported” option.